はじめに
先日、とある調査の中でdumpsysが便利であることに改めて気づいたため、覚えておくと役に立つ(かもしれない)dumpsysの使い方をまとめました。
検証環境
- Android Studio4.1.1
- Android 10
- ターミナル上でadbにPATHが通っている前提
dumpsysの基本
実機やエミュレーターが接続されている状態で、ターミナル上で以下のコマンドを叩くと端末からあらゆる情報がdumpされて標準出力に表示されます。
adb shell dumpsys
このようにdumpがひたすら出力されます。この中から必要なところだけを絞り込んで使っていくのが基本的な使い方です。
また、以下のようにパラメーターを渡すことで特定のサービスに絞って情報を出力することが出来ます。
(実行中のサービス一覧はadb shell dumpsys -lで確認できる)
adb shell dumpsys activity # activityに関連する情報だけ
(標準出力)
ACTIVITY MANAGER SETTINGS (dumpsys activity settings) activity_manager_constants:
  max_cached_processes=32
  background_settle_time=60000
  fgservice_min_shown_time=2000
  fgservice_min_report_time=3000
  fgservice_screen_on_before_time=1000
  fgservice_screen_on_after_time=5000
  content_provider_retain_time=20000
  gc_timeout=5000
  gc_min_interval=60000
なお、dumpsysの出力の中に
ACTIVITY MANAGER SETTINGS (dumpsys activity settings) activity_manager_constants
や
ACTIVITY MANAGER RECENT TASKS (dumpsys activity recents)
のように、(dumpsys foo bar)みたいなセクションがあります。
括弧内の通りdumpsysコマンドを叩くと、そのセクションだけ出力することが出来ます。
adb shell dumpsys activity recents
(標準出力)
ACTIVITY MANAGER RECENT TASKS (dumpsys activity recents) # ←このセクション配下だけ出力される
mRecentsUid=10090
mRecentsComponent=ComponentInfo{com.google.android.apps.nexuslauncher/com.android.quickstep.RecentsActivity}
mFreezeTaskListReordering=false
mFreezeTaskListReorderingPendingTimeout=false
  Recent tasks:
  * Recent #0: TaskRecord{4adb8ab #8 A=net.fdash.adventcalendar2020 U=0 StackId=3 sz=3}
    userId=0 effectiveUid=u0a134 mCallingUid=2000 mUserSetupComplete=true mCallingPackage=null
    affinity=net.fdash.adventcalendar2020
    intent={act=android.intent.action.MAIN cat=[android.intent.category.LAUNCHER] flg=0x10000000 cmp=net.fdash.adventcalendar2020/.Activity1}
    mActivityComponent=net.fdash.adventcalendar2020/.Activity1
    autoRemoveRecents=false isPersistable=true numFullscreen=3 activityType=1
    rootWasReset=false mNeverRelinquishIdentity=true mReuseTask=false mLockTaskAuth=LOCK_TASK_AUTH_PINNABLE
    Activities=[ActivityRecord{cdc0f28 u0 net.fdash.adventcalendar2020/.Activity1 t8}, ActivityRecord{7217a91 u0 net.fdash.adventcalendar2020/.Activity2 t8}, ActivityRecord{160eae7 u0 net.fdash.adventcalendar2020/.Activity3 t8}]
    askedCompatMode=false inRecents=true isAvailable=true
    mRootProcess=ProcessRecord{b7deb08 11683:net.fdash.adventcalendar2020/u0a134}
    stackId=3
    hasBeenVisible=true mResizeMode=RESIZE_MODE_RESIZEABLE_VIA_SDK_VERSION mSupportsPictureInPicture=false isResizeable=true lastActiveTime=8206625 (inactive for 1007s)
  * Recent #1: TaskRecord{f01673 #5 I=com.google.android.apps.nexuslauncher/.NexusLauncherActivity U=0 StackId=0 sz=1}
    userId=0 effectiveUid=u0a90 mCallingUid=0 mUserSetupComplete=true mCallingPackage=null
    intent={act=android.intent.action.MAIN cat=[android.intent.category.HOME] flg=0x10000100
//(後略)
ちなみに、以下のように-hオプションを付けることでも、各サービスが取れるパラメーターを確認することが出来ます。
adb shell dumpsys activity -h
(標準出力)
Activity manager dump options:
  [-a] [-c] [-p PACKAGE] [-h] [WHAT] ...
  WHAT may be one of:
    a[ctivities]: activity stack state
    r[recents]: recent activities state
    b[roadcasts] [PACKAGE_NAME] [history [-s]]: broadcast state
    broadcast-stats [PACKAGE_NAME]: aggregated broadcast statistics
    i[ntents] [PACKAGE_NAME]: pending intent state
    p[rocesses] [PACKAGE_NAME]: process state
    o[om]: out of memory management
    perm[issions]: URI permission grant state
    prov[iders] [COMP_SPEC ...]: content provider state
    provider [COMP_SPEC]: provider client-side state
    s[ervices] [COMP_SPEC ...]: service state
    allowed-associations: current package association restrictions
    as[sociations]: tracked app associations
    lmk: stats on low memory killer
    lru: raw LRU process list
    binder-proxies: stats on binder objects and IPCs
    settings: currently applied config settings
    service [COMP_SPEC]: service client-side state
    package [PACKAGE_NAME]: all state related to given package
    all: dump all activities
    top: dump the top activity
  WHAT may also be a COMP_SPEC to dump activities.
  COMP_SPEC may be a component name (com.foo/.myApp),
    a partial substring in a component name, a
    hex object identifier.
  -a: include all available server state.
  -c: include client state.
  -p: limit output to given package.
  --checkin: output checkin format, resetting data.
  --C: output checkin format, not resetting data.
  --proto: output dump in protocol buffer format.
  --autofill: dump just the autofill-related state of an activity
これさえ押さえておけば、あとは各自がお好みのshell芸を披露するだけです
adb shell dumpsys activity top | perl -nle 'BEGIN{$s=999} /^(\s*)View Hierarchy|^(\s*)/; $1 ? (print and $s=length($1)) : length($2)>$s ? print : ($s=999)'
Activityのスタックを調べる
以下のコマンドで、Activityのスタックを調べることが出来ます。
adb shell dumpsys activity activities
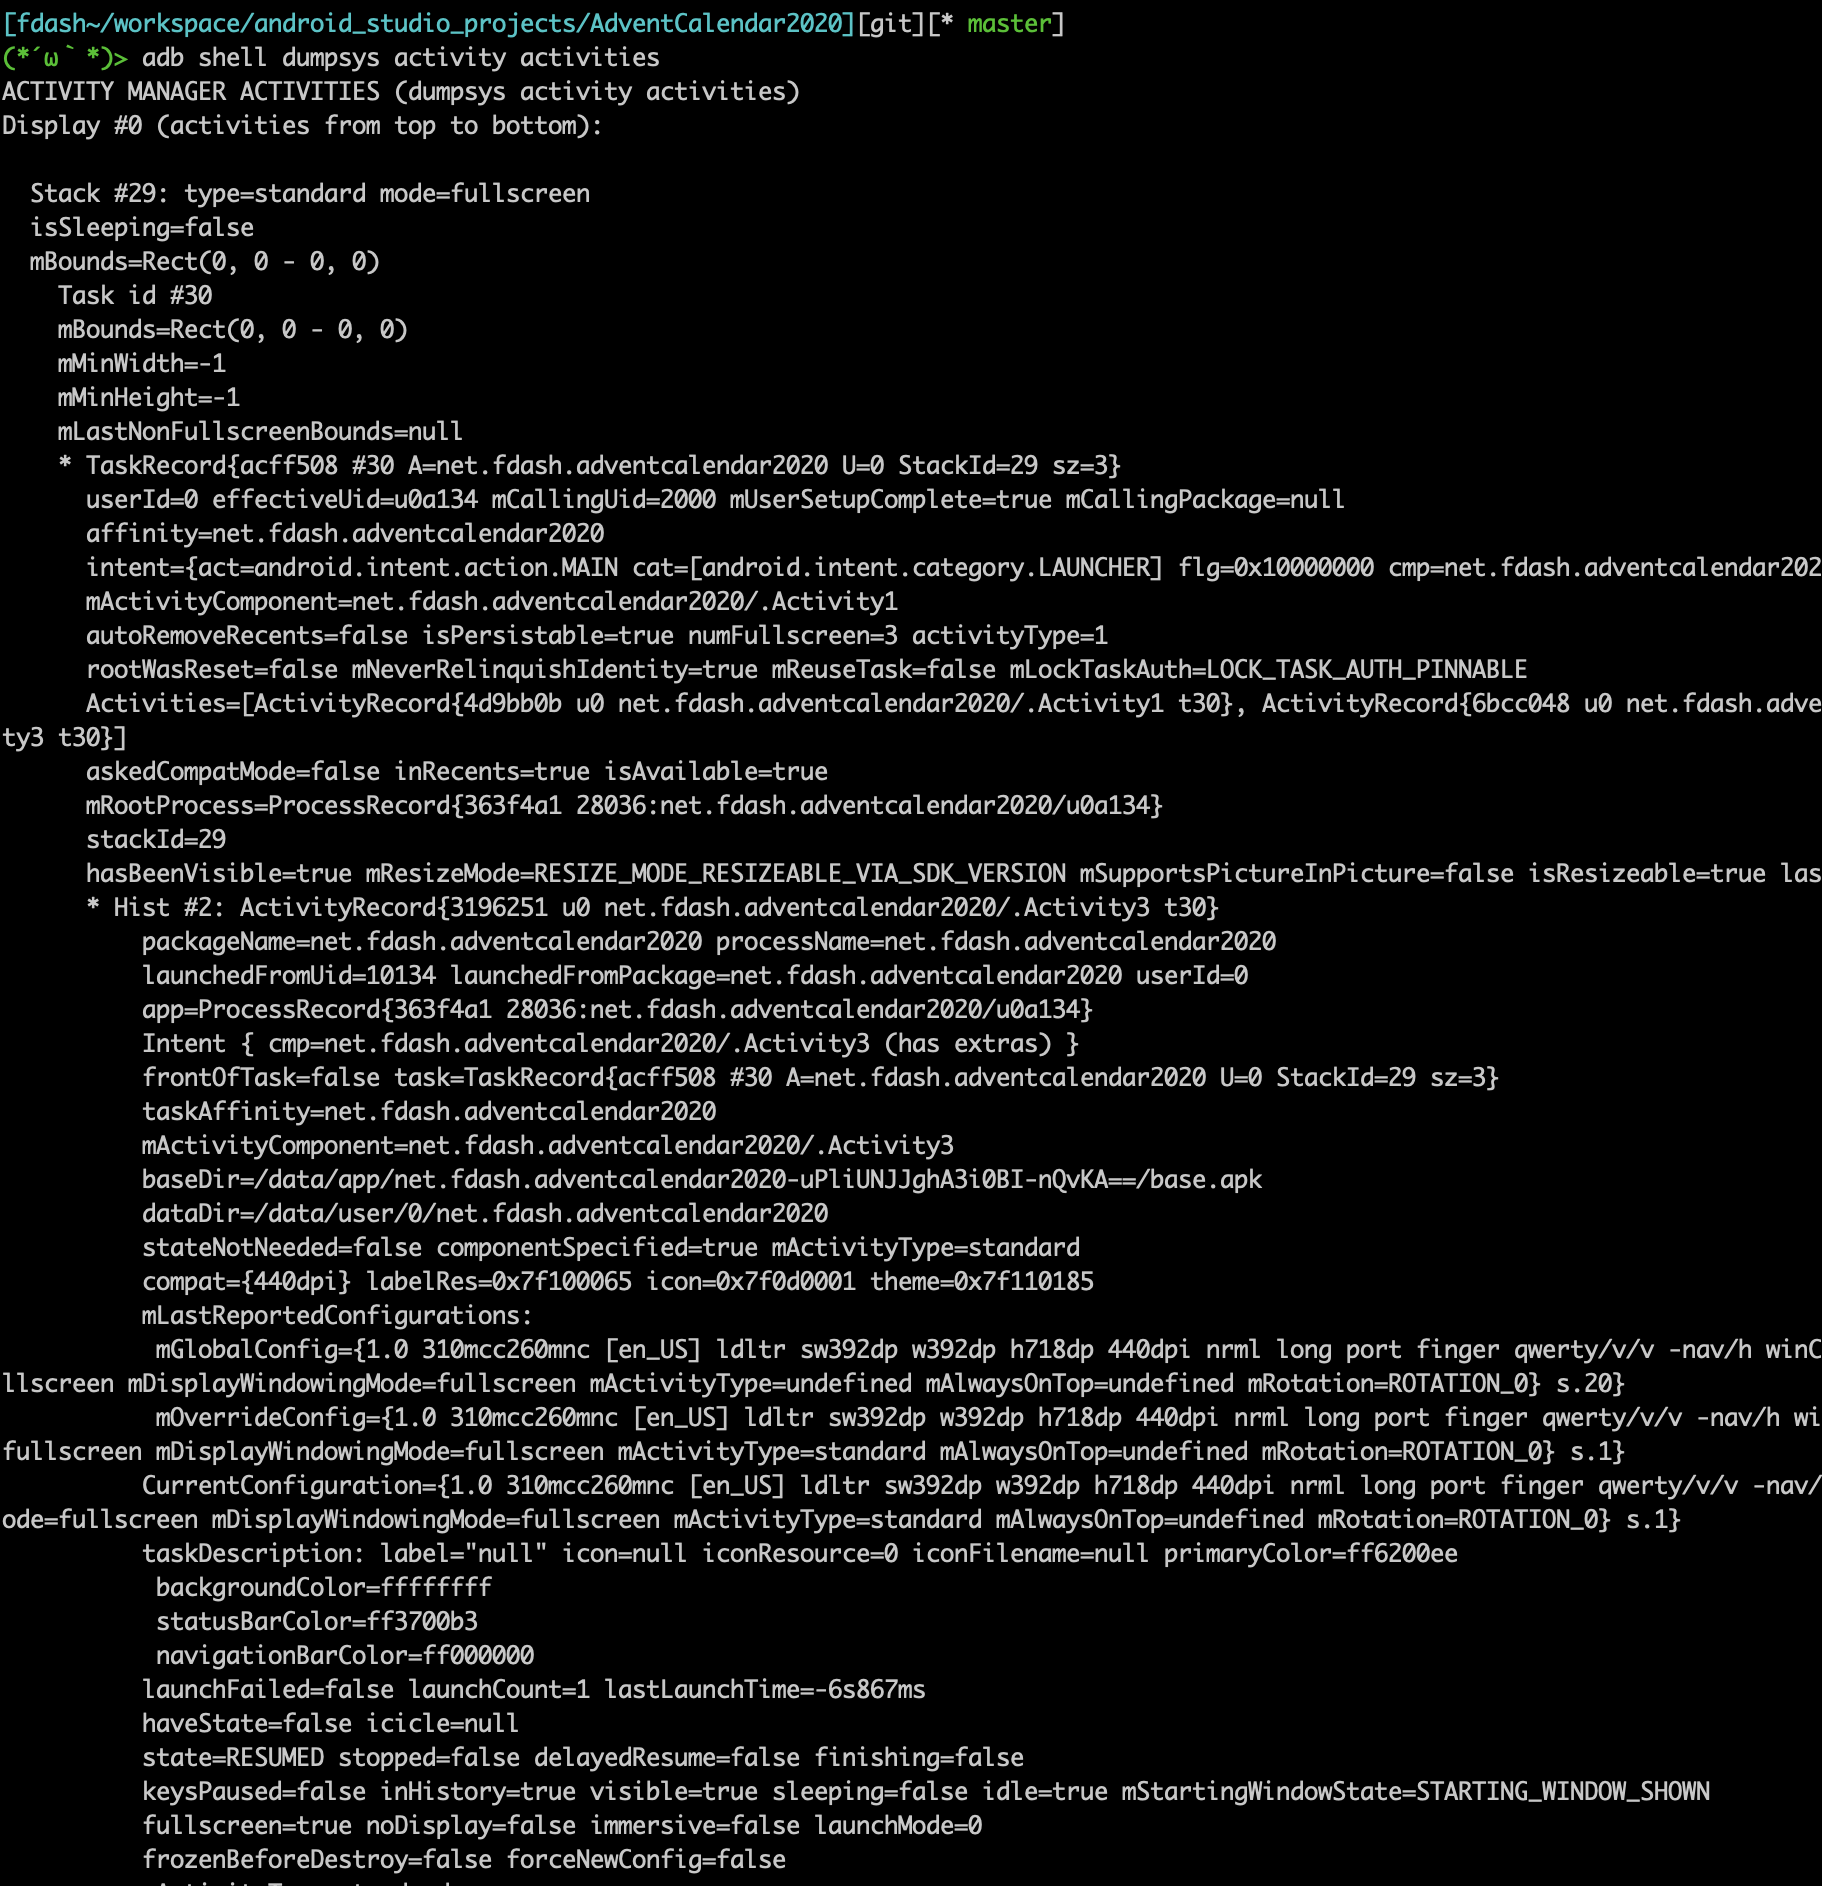
スタックごとに上(前面)から下(背面)の順でActivityの状態や起動時のIntentが詳細に出力されます。この中から自分のアプリを見つけそのブロックを上から下に見ていくことで、自分のアプリのスタック状態を遡ることができます。
「このActivityって今STOPPEDなんだっけ?それともDESTROYEDになっちゃってる?」といったことも確認できます。
また、Running activities (most recent first):という部分を見れば、生きているActivityのスタックが一目で確認できます。
    Running activities (most recent first):
      TaskRecord{28b4600 #15 A=net.fdash.adventcalendar2020 U=0 StackId=10 sz=3}
        Run #2: ActivityRecord{980e13b u0 net.fdash.adventcalendar2020/.Activity3 t15}
        Run #1: ActivityRecord{b3a081a u0 net.fdash.adventcalendar2020/.Activity2 t15}
        Run #0: ActivityRecord{c9622b9 u0 net.fdash.adventcalendar2020/.Activity1 t15
※ただし、メモリ不足などでActivityが開放されちゃっている場合は、Runnning activitiesのところに出てこないため注意が必要です。その場合は、前述のStack #~を一つずつ確認する必要があります。
お手軽に一覧を出すならこれでも良いでしょう
adb shell dumpsys activity activities | grep "Run #"
(標準出力)
        Run #2: ActivityRecord{980e13b u0 net.fdash.adventcalendar2020/.Activity3 t15}
        Run #1: ActivityRecord{b3a081a u0 net.fdash.adventcalendar2020/.Activity2 t15}
        Run #0: ActivityRecord{c9622b9 u0 net.fdash.adventcalendar2020/.Activity1 t15
Fragmentの一覧を見る
各タスクのトップにあるActivityのdumpから、それぞれのActivityが管理しているFragmentを確認することも出来ます。
adb shell dumpsys activity top
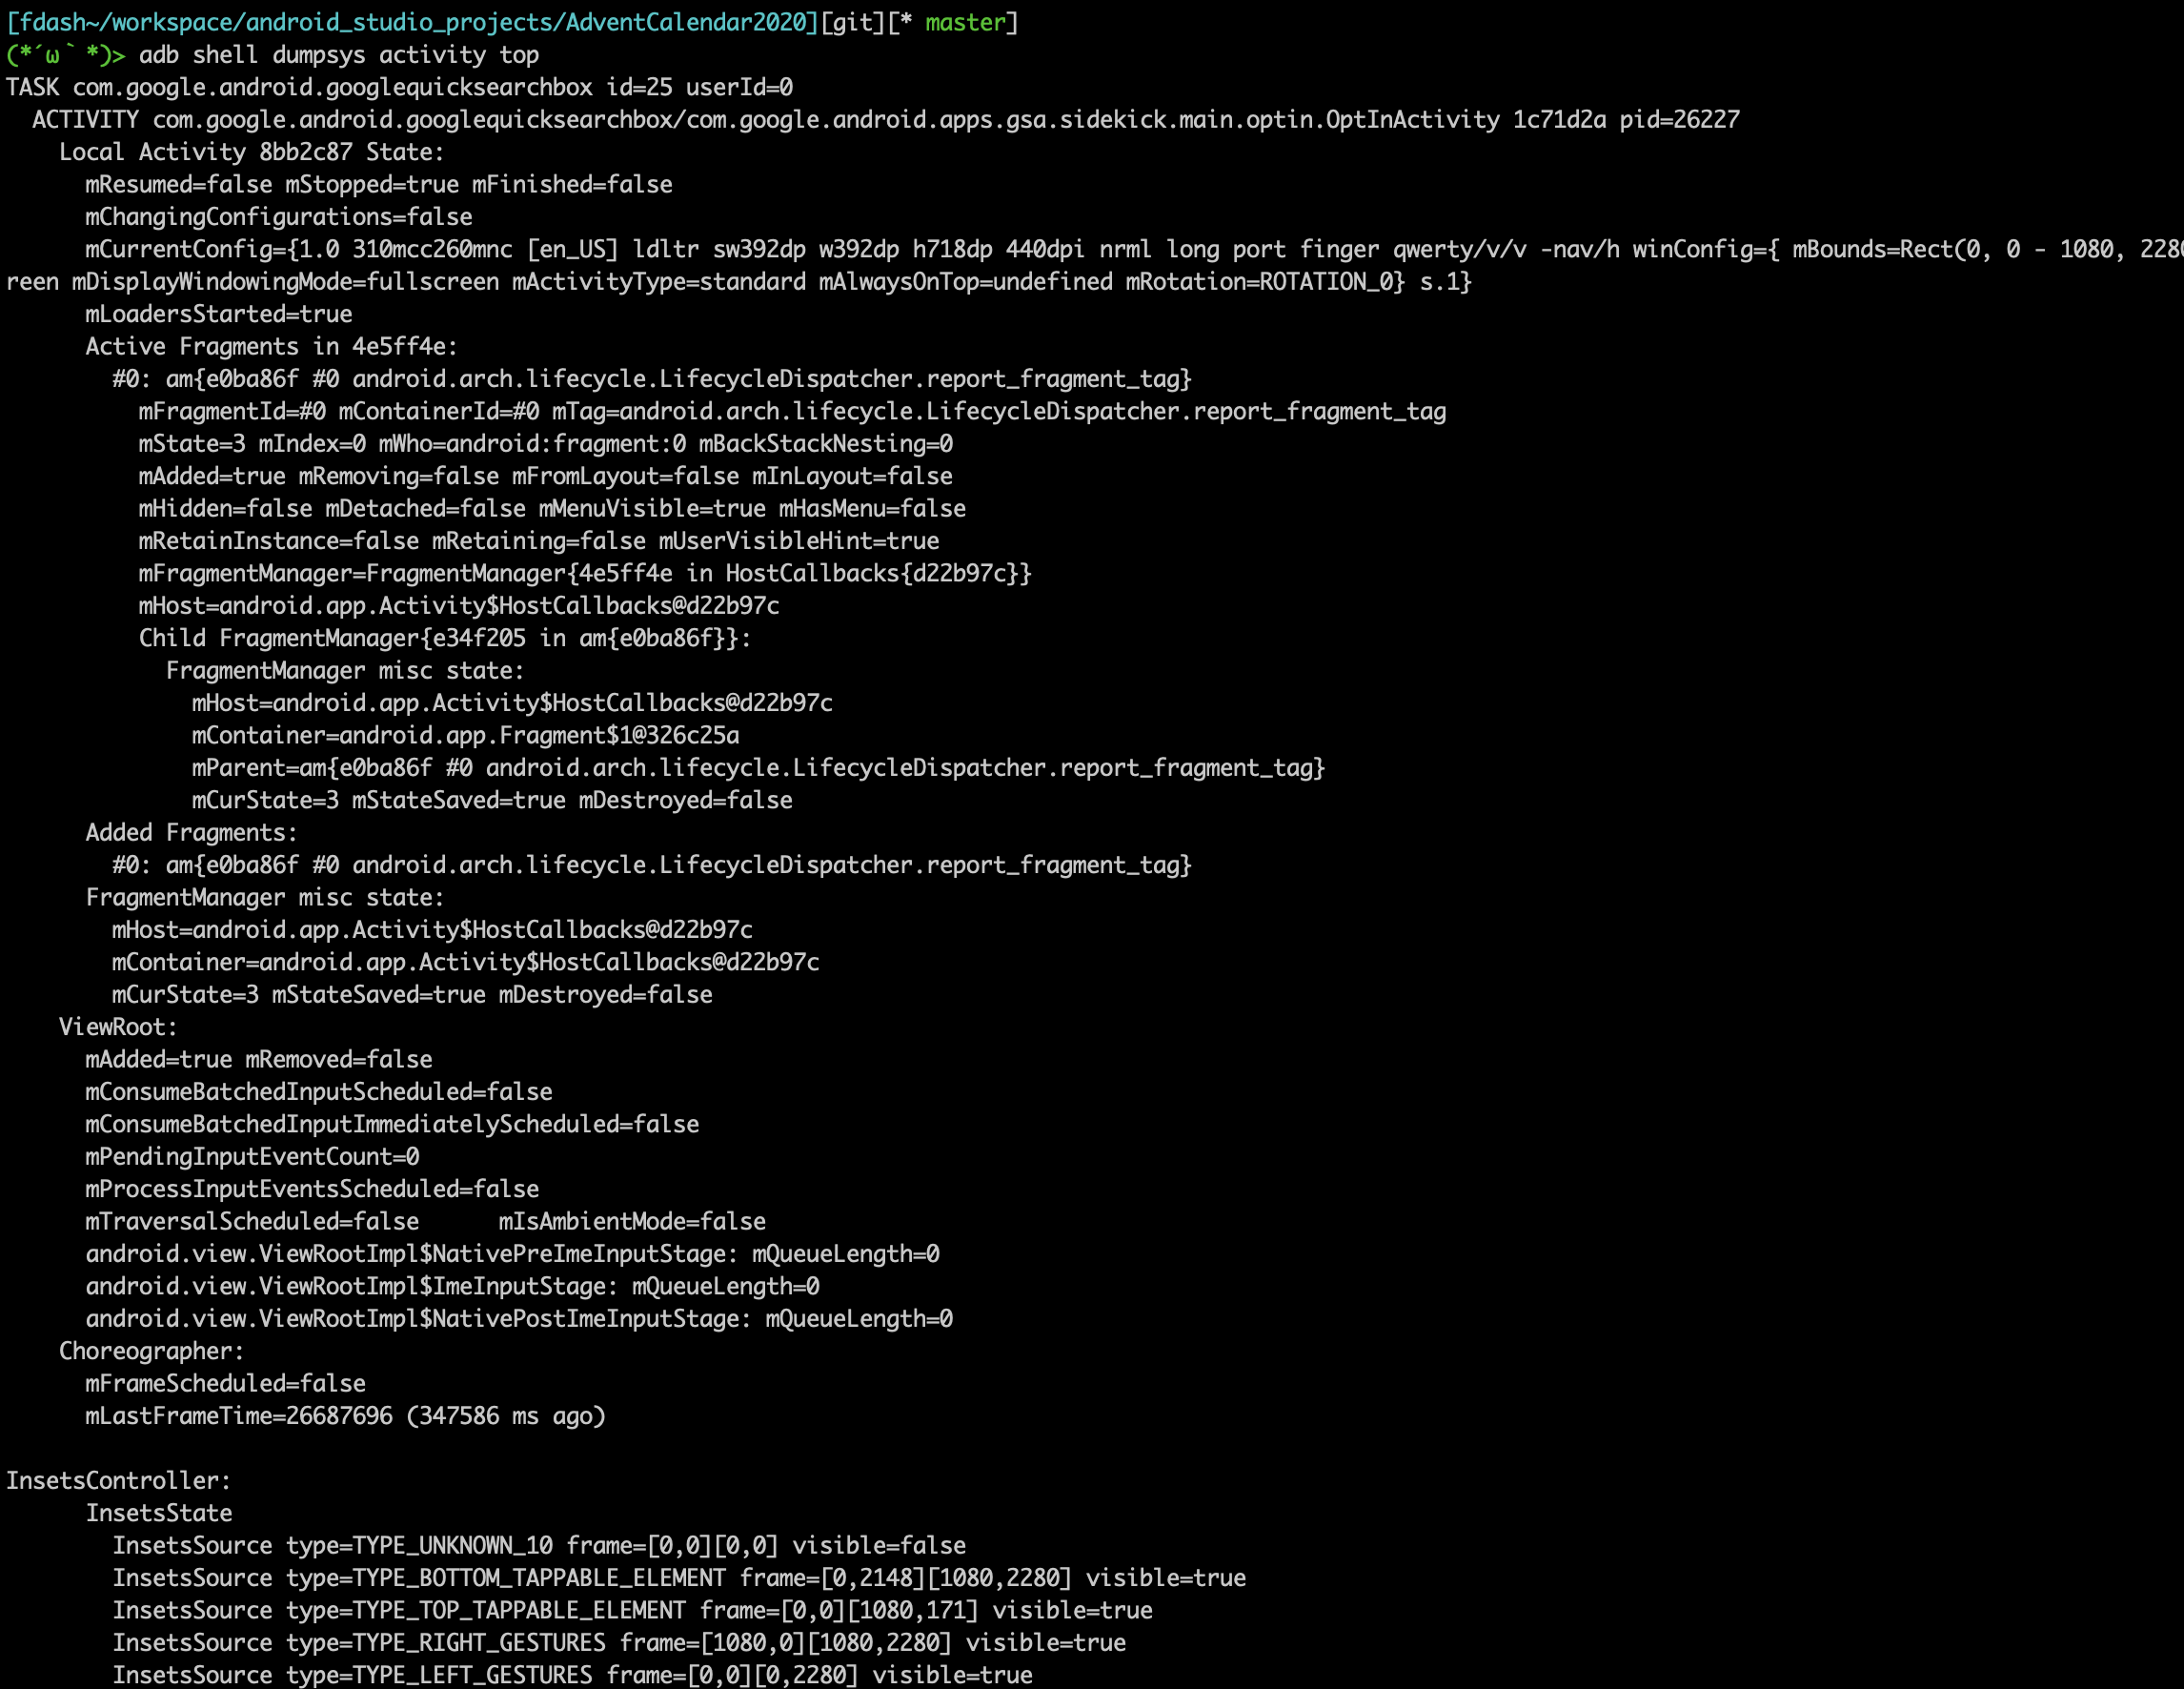
Fragmentのスタックを確認する際はAdded Fragments:の部分を確認すれば一目で分かります。(長すぎて上のスクショからは見切れています)
    Added Fragments:
      #0: NavHostFragment{4f9705c} (73f6462a-a38e-4da8-bbf7-f1a214a16698) id=0x7f0800f2}
      #1: TestFragment1{6df4cc4} (34825848-e506-48b1-a4f3-111b239439c9) id=0x7f0800f2}
      #2: TestFragment2{1bb01a9} (7dbfcc78-5d82-4e85-aba3-d1ffa2a97ee3) id=0x7f0800f2}
      #3: TestFragment2{2903ce1} (07b12688-8098-4198-bbf6-358682ccd2c6) id=0x7f0800f2}
↑のケースだと、TestFragment2が予期せず2つ張り付いているかも?ということに気付くことができます。(FragmentTransaction#replaceすべきところでFragmentTransaction#addしてしまった時にありがち)
もちろんActivityと同じように、それぞれのFragmentのstateやdetach済みかどうかを個別に確認することもできます。
Viewの状態を調べる
Fragmentの時と同じく、現在のActivityのdumpからviewの状態を調べることもできます
adb shell dumpsys activity top
上記コマンドを叩いた時に、View Hierarchy:という部分でVIewの階層構造や、それぞれのVIewの状態を取得することができます。
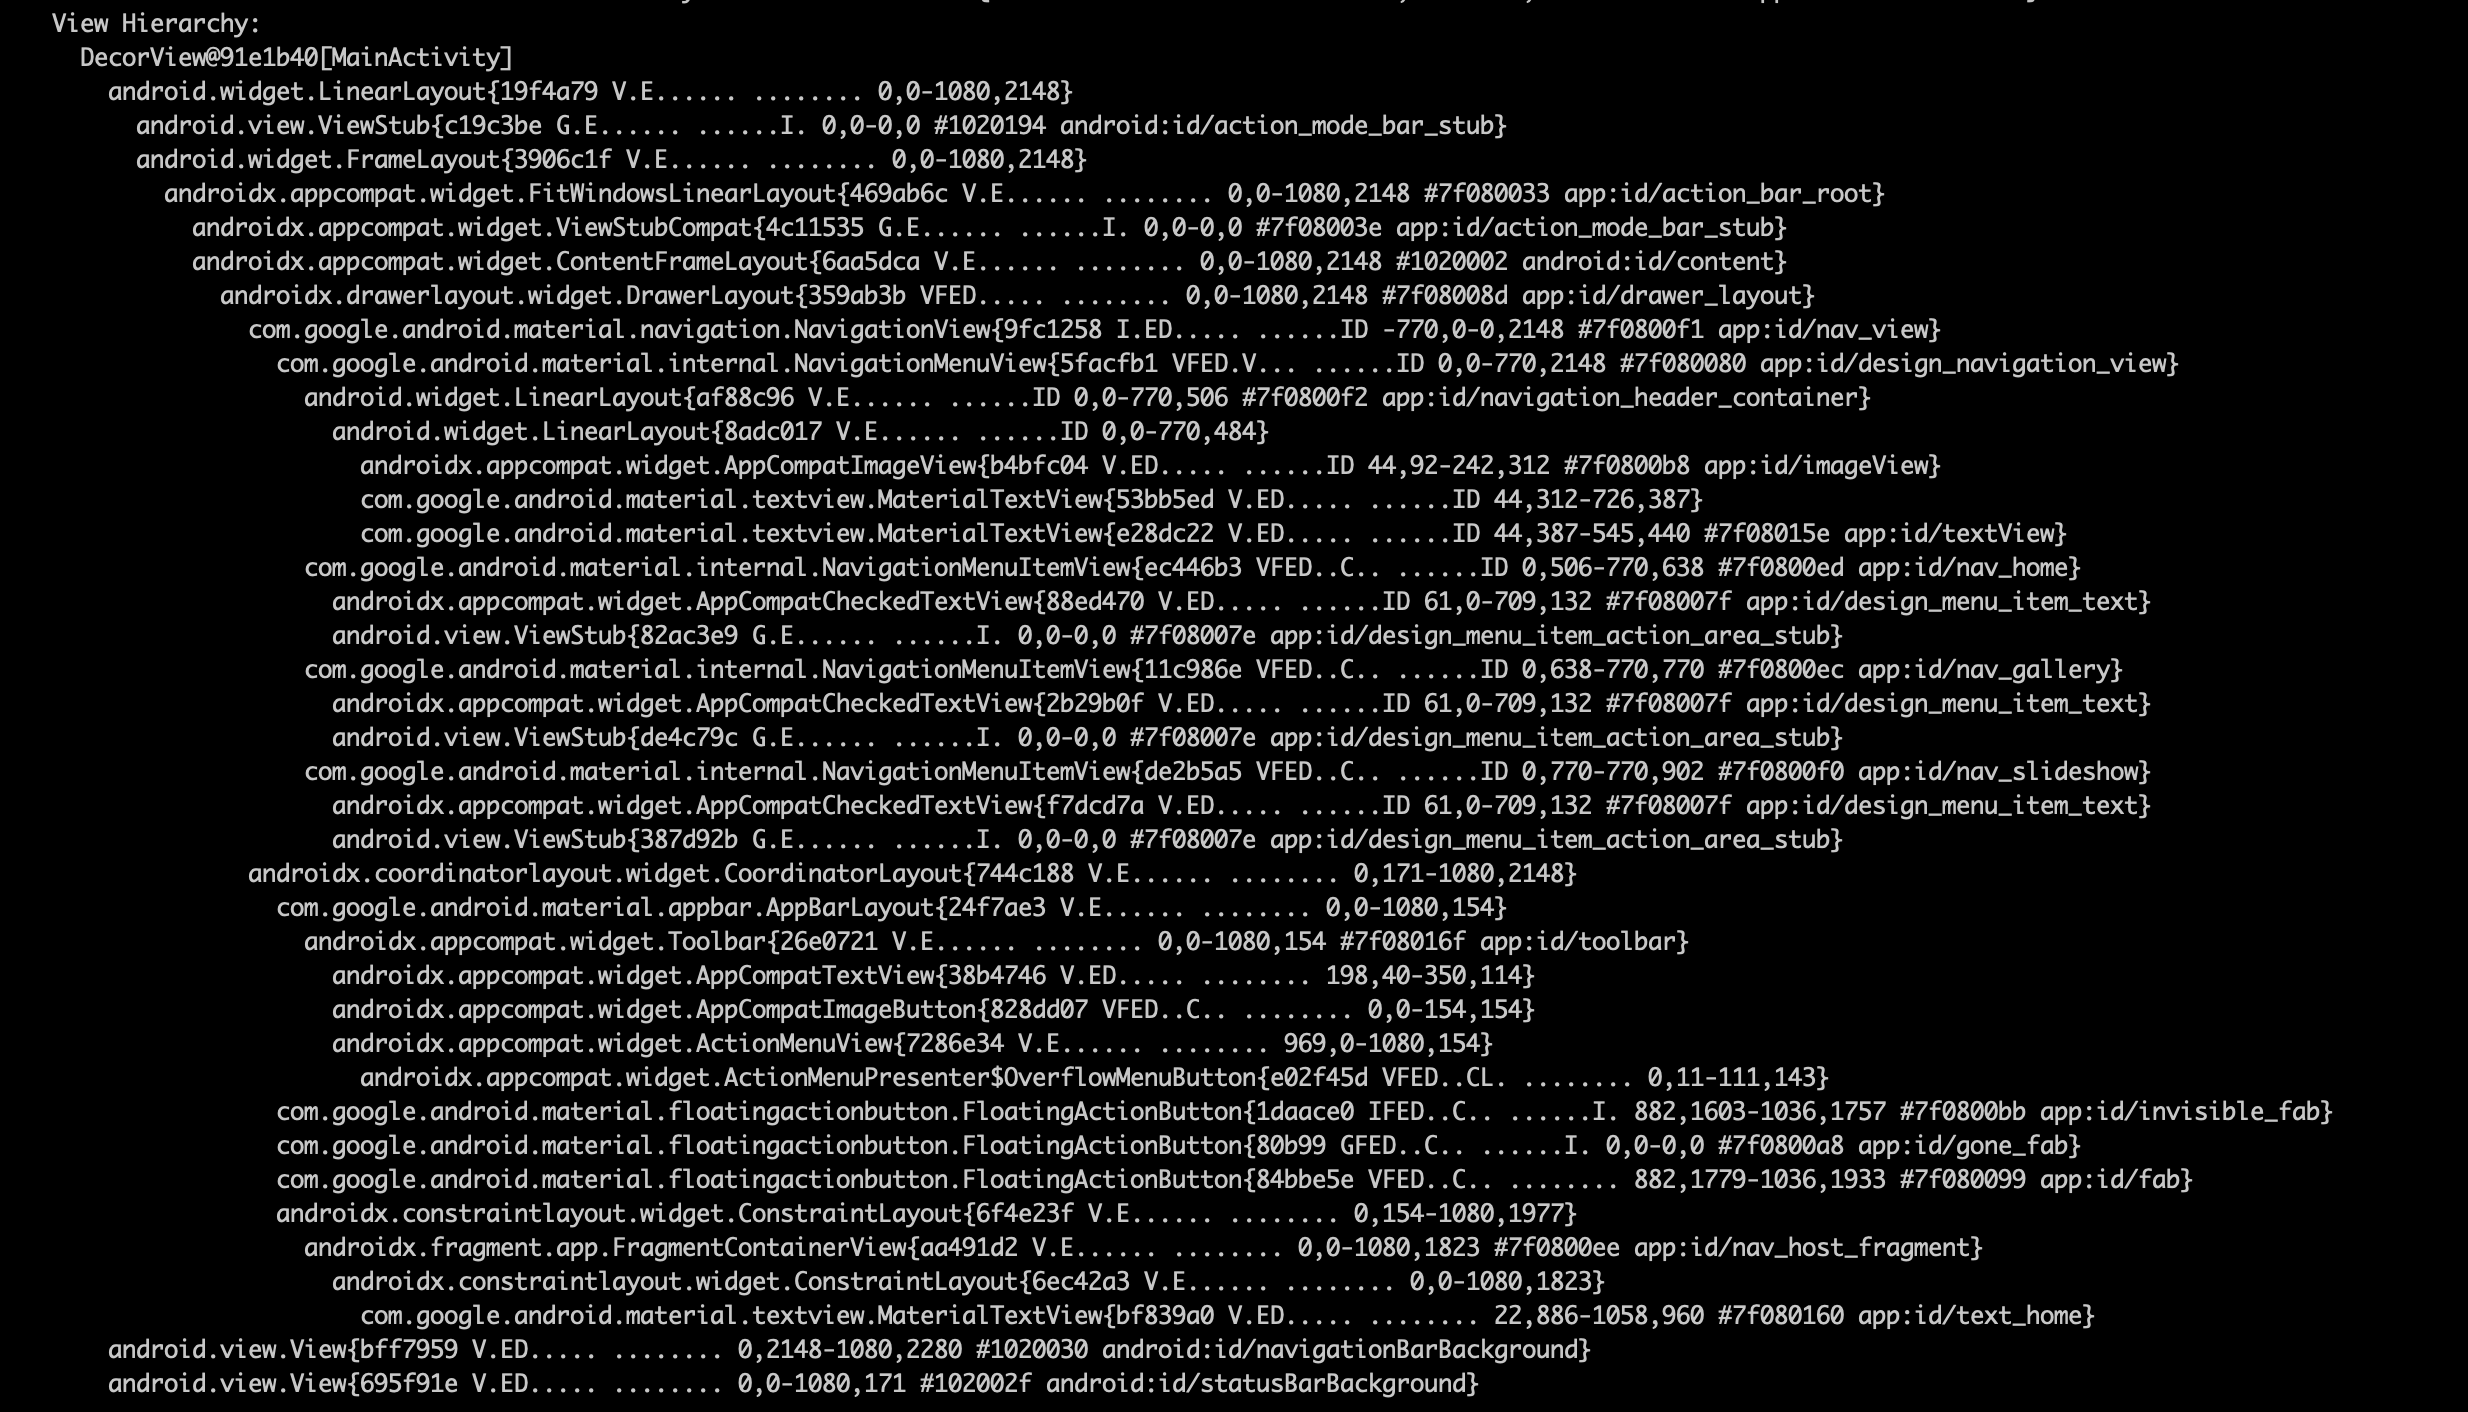
Viewの階層はuiautomatorviewerでも検証できますが、uiautomatorviewerで見つけられないView.GONEやView.INVISIBLEなViewが見れたり、viewのidで検索が出来たりするところがdumpsysの良いところです。
ちなみに

この部分のフラグが何を意味しているかは、String#toStringの実装1 を見ると確認出来ます。
↑の場合だと@1daace0のFAB(viewのidはid/invisible_fab)がVisibilityがINVISIBLEだけどフォーカスが当たる状態になっていて、ViewがEnabled、DrawMaskにはなっていなくて...といった具合です。
(余談)
前述のshell芸を使うと、このView Hierarchyブロックだけフィルタリングして出力することが出来ます
# (再掲)
adb shell dumpsys activity top | perl -nle 'BEGIN{$s=999} /^(\s*)View Hierarchy|^(\s*)/; $1 ? (print and $s=length($1)) : length($2)>$s ? print : ($s=999)'
まとめ
これ以外にも数えきれないほど沢山の情報を取得することができるので、改めてもう一度adb shell dumpsysと叩いて情報量の多さを体感してみてください。
普段はAndroidStudio付属のデバッグツールを使ってデバッグすることの方が多いと思いますが、検証で行き詰まってどうしようもなくなった時には、このdumpsysの存在を思い出して頂ければと思います。
また、dumpsysはコマンドラインベースならではの取り回しの良さもあるので、黒い画面厨の方は是非他のツールと組み合わせて便利な使い方を探してみると新たな発見があると思います。(例えば、dumpsysの出力をpeco に食わせると、対象のviewの状態を瞬時に確認することが出来たりします)
dumpsysの出力をpecoに渡して、viewのidで対象のview(id/invisible_fab)を絞り込む様子
現場からは以上です。
明日は、@k-sekido さんの「エンジニア提案をしよう」です。お楽しみに!!
参考