はじめに
この記事は東京高専プロコンゼミAdventCalendar② 8日目 の記事です.
①https://adventar.org/calendars/4321/
②https://adventar.org/calendars/4322/
@ryu4carさんの記事を見て今日のカレンダーが埋まっていないことを知ったので急遽,記事を書くことにしました.
書くことにしたのは良いのですが特にアイデアがなかったので,@_sotaatosの過去ツイートから着想を得て「Twitterのブロック欄でブロックした理由の設定機能」を作ることにしました.
何で作るか
最近遊んだのもあって,Tampermonkeyを使って実装しようと思います.
Tampermonkeyとは
Tampermonkeyは,いい感じにJavaScriptを書くとWebページを色々いじれるようになるChrome拡張です(適当でごめんなさい).
できたもの

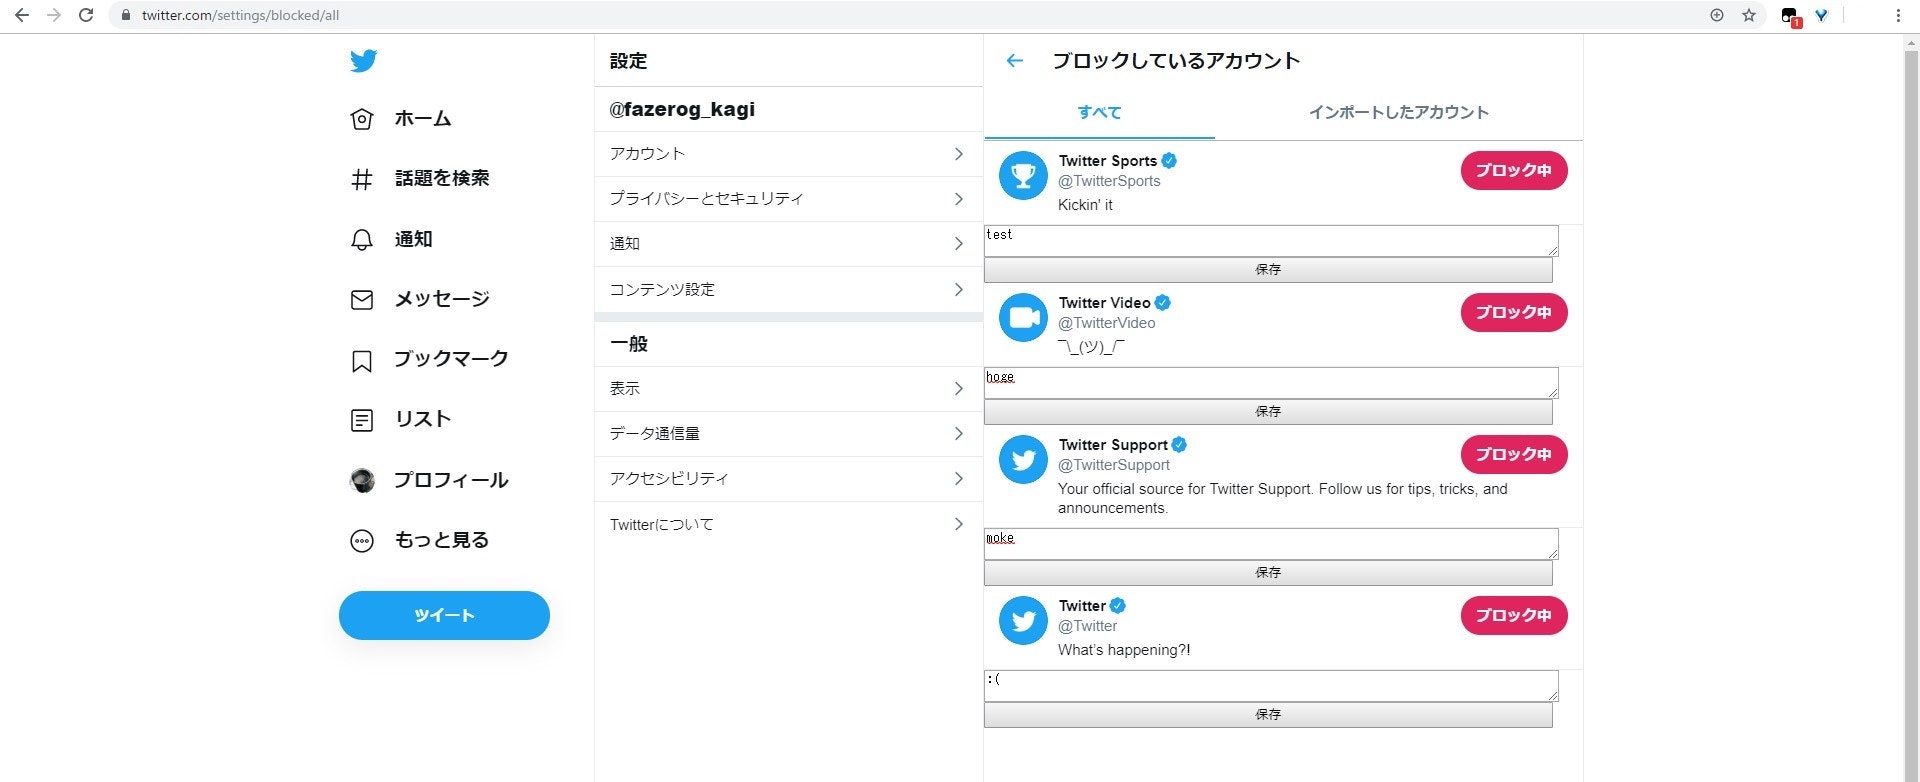
こんな感じで理由をメモしておけます.
急いで作ったのでデザインとか色々適当ですが,許してください...
書いたコード
コードも適当です,ごめんなさい.
// ==UserScript==
// @name         TwitterBlockReasonReminder
// @namespace    https://fazerog02.github.io
// @version      1.0.0
// @description  twitterでブロックした理由を書き残せる何か
// @author       fazerog02
// @match        https://twitter.com/settings/blocked/all
// @grant        GM_setValue
// @grant        GM_getValue
// ==/UserScript==

function init(){
    // ブロックされたユーザーのアカウント情報の要素を取得
    let blocked_user_panels = document.querySelector("div[aria-label='タイムライン: ブロックしているアカウント']").children[0].children[0].children;

    // なぜか最後に空のパネルがあるので一回少なく回す
    for(let i = 0; i < blocked_user_panels.length-1; i++){
        // ブロックされたユーザーのtwitter idを取得
        let blocked_user_id = blocked_user_panels[i].getElementsByClassName("css-901oao css-bfa6kz r-1re7ezh r-18u37iz r-1qd0xha r-a023e6 r-16dba41 r-ad9z0x r-bcqeeo r-qvutc0")[0].children[0].innerText;
        // ブロックされたユーザーのブロックされた理由を取得
        let blocked_reason = GM_getValue(blocked_user_id, "");

        // 囲いのdiv,理由の入力欄,保存ボタンを生成
        let wrapper_div = document.createElement("div");
        let reason_textarea = document.createElement("textarea");
        let change_button = document.createElement("button");
        // 囲いのdiv,理由の入力欄,保存ボタンを反映
        wrapper_div.appendChild(reason_textarea);
        wrapper_div.appendChild(change_button);
        blocked_user_panels[i].appendChild(wrapper_div);

        // 入力欄に理由を表示させる
        reason_textarea.value = blocked_reason;
        // 入力欄とボタンを大きくする
        reason_textarea.style.width = "95%";
        change_button.style.width = "95%";
        // 入力欄の後は改行されるようにする
        reason_textarea.style.display = "block";
        // ボタンの文字を'保存にする'
        change_button.innerText = "保存";
        // ボタンを押したら理由をtwitter idに紐づけて保存する
        change_button.onclick = function(){
            GM_setValue(blocked_user_id, reason_textarea.value);
        };
    }
}

window.onload = function(){
    // ブロックされたユーザーは遅延読み込みされるので1500ms待ってから実行する
    let timeout = setTimeout(init, 1500);
};
これだけだとアレなので,少しコードについて説明していきます.
// ==UserScript==
// @name         TwitterBlockReasonReminder
// @namespace    https://fazerog02.github.io
// @version      1.0.0
// @description  twitterでブロックした理由を書き残せる何か
// @author       fazerog02
// @match        https://twitter.com/settings/blocked/all
// @grant        GM_setValue
// @grant        GM_getValue
// ==/UserScript==
まず上の部分ですが,これはJavaScriptではなくTampermonkeyの設定です.
軽く説明すると,
- name = スクリプトの名前
- namespace = ホームページなど自分を示すもの
- version = スクリプトのバージョン
- description = スクリプトの説明
- author = スクリプトの作者
- match = スクリプトが実行されるurl(:///*とするとすべてのページで実行される)
- grant = 危険な関数(ローカルデータを保存,取得するGM_getValue, GM_setValueなど)を実行できるようにする
こんな感じです.
詳しい説明は公式ドキュメントにのっています.
https://www.tampermonkey.net/documentation.php?ext=dhdg#_name
// ブロックされたユーザーのアカウント情報の要素を取得
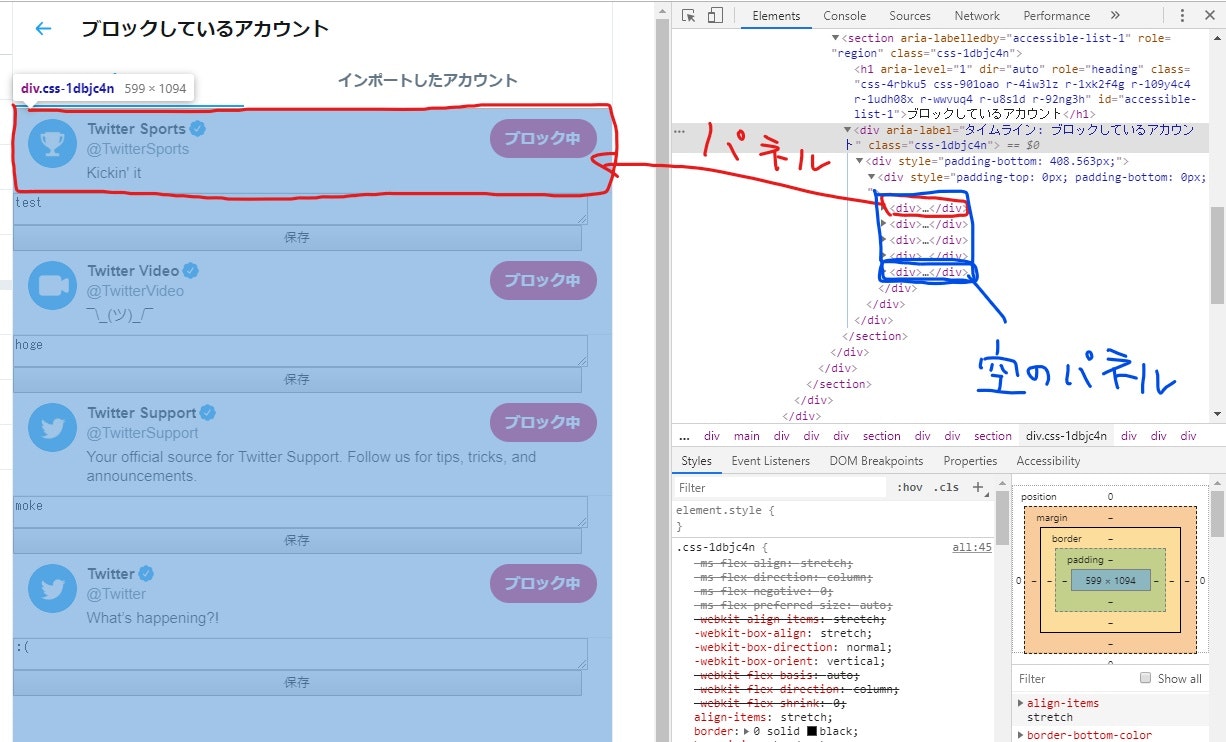
let blocked_user_panels = document.querySelector("div[aria-label='タイムライン: ブロックしているアカウント']").children[0].children[0].children;
この部分は,直接ユーザー情報が書いてあるdiv要素に特定できる属性がなかったので,3階層上にあるaria-labelを持つdiv要素を取得しています.(上の画像を参考にしてください)
aria-labelなど,idやclass以外の属性もquerySelectorを使うことで値を指定して取得できます.
また,上の画像の通り空のパネルが1つ生成されているので,
// なぜか最後に空のパネルがあるので一回少なく回す
    for(let i = 0; i < blocked_user_panels.length-1; i++){
の部分で1回少なくループを回しています.
let blocked_reason = GM_getValue(blocked_user_id, "");
と
GM_setValue(blocked_user_id, reason_textarea.value);
の部分ですが,GM_setValueとGM_getValueはローカルデータを扱うための関数です.
GM_setValueでデータを保存,GM_getValueでデータの読み取りができます.
window.onload = function(){
    // ブロックされたユーザーは遅延読み込みされるので1500ms待ってから実行する
    let timeout = setTimeout(init, 1500);
};
ここのは,Twitterがコンテンツを遅延読み込みして表示するのでwindow.onloadだけではブロックされたユーザーのアカウント情報が取得できないため,setTimeoutでデータの取得に1.5秒の遅延を入れてます.
良くない実装だと思うので,いい方法があったら是非教えてください.
配布
一応,配布をします.
https://greasyfork.org/ja/scripts/393450-twitterblockreasonreminder
まとめ
全体的に適当なので,直してもうちょっとマシなものにします(予定)
Tampermonkey,便利で楽しいので,みんな使おう!!!!!!!!!
拙い文章ですが最後まで読んでいただき,ありがとうございました.
