概要
先日Bitbucketからaws cliを実行したい状況になったので、その方法を紹介します。
手順は以下の通りです。
- AWSでIAMユーザーを作成し、アクセスキー・シークレットキーを発行
- Bitbucket Pipelinesを有効にする
- Bitbucketにアクセスキー・シークレットキーを登録
- bitbucket-pipelines.ymlを作成
- BitbucketでPipelinesを実行
1. AWSでIAMユーザーを作成し、アクセスキー・シークレットキーを発行
IAM > ユーザー > ユーザーを追加
から、プログラムによるアクセスにチェックをいれて作成します。
アタッチする権限は、Bitbucketからどのような権限でAWSにアクセスしたいかで決めてください。
作成後に発行されるアクセスキー・シークレットキーを控えておきます。
2. Bitbucket Pipelinesを有効にする
Pipelinesを有効にしたいリポジトリの画面にいき、
Settings > PIPELINES/Settings
ここでEnable PipelinesをONにします。
3. Bitbucketにアクセスキー・シークレットキーを登録
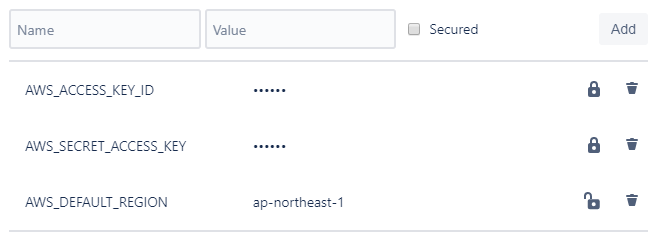
Settings > PIPELINES/Repository variables
ここで、Pipelinesの環境変数を以下のように登録します。

4. bitbucket-pipelines.ymlを作成
pipelines:
  default:
    - step:
        image: atlassian/pipelines-awscli
        script:
          - aws iam get-user
AWS CLIを使うのでDockerイメージにAtlassianが提供するこちらのイメージを使います。
https://hub.docker.com/r/atlassian/pipelines-awscli
お好きなブランチで、このファイルをリポジトリ直下で commit -> push し、再度Bitbucketのリポジトリの画面に戻っておきます。
5. BitbucketでPipelinesを実行
Pipelines > Run pipeline
ここで、先ほどのブランチと、Pipelineにdefaultを指定してRunをクリックすれば、aws iam get-userが実行できます。
以上になります。