SublimeTextのSyntaxを自作する
SublimeTextでメモを取る際に基本的にはMarkdownで書いているのですが
わざわざPreview表示する必要も感じなかったので、
普通のtxtファイルでも色とりどり表示するようにしてみた際の自分用メモです。
# Atomと違ってSublimeTextだとMarkdownのPreviewに一癖ありますしね。

Windowsも似たような手順で可能ですが、以下はMacで実施した内容です。
雛形を作成
各カラースキーマはyamlファイルで定義されており、ファイルを以下に追加するだけでカラースキーマが使えるようになります。
# Mac
    ~/Library/Application Support/Sublime Text 3/Packages/User/
# Windows
    C:\Users\User名\AppData\Roaming\Sublime Text 3\Packages\User\
ファイルの雛形自体は自動生成可能でSublimeTextのメニューバーから以下を選択でOKです。
Tools->Developer->New Syntax...
%YAML 1.2
---
# See http://www.sublimetext.com/docs/3/syntax.html
file_extensions:
  - ec
scope: source.example-c
contexts:
  main:
    # Strings begin and end with quotes, and use backslashes as an escape
    # character
    - match: '"'
      scope: punctuation.definition.string.begin.example-c
      push: double_quoted_string
〜〜〜〜〜〜〜〜〜略〜〜〜〜〜〜〜〜〜〜〜
ひとまず上部を以下のように編集(今回はtxtに対してカラースキーマを追加します)。
%YAML 1.2
---
# スキーマを作成したい対象の拡張子。今回はtxt。
# 箇条書きで複数指定可能。file_extensions: [txt, txt2]という書き方でもOK。
file_extensions:
  - txt
  - txt2

# スキーマ名。お好きな名前で。
name: NormalText

# 詳しくは分からないが今回はtext.txt。
# カラースキーマを適用する範囲が指定できるようで、
# keyword.control.cだとC言語のifなどの条件分岐式にのみ適用などが出来るようです。
# https://www.sublimetext.com/docs/3/scope_naming.html
scope: text.txt
色つけのルールを記載する
上の設定でtxtに対するカラースキーマだと定義したので、実際に色つけのルールを書いていきます。
ルールは**contexts:**以降に記載していきます。
contexts:
  main:
    - match: '^# .*' # 色つけしたい文字列を正規表現で。
      scope: markup.bold # どのように表示させたいか。スペース区切りで重複指定可。
scopeの設定次第で色が変化していくのですが、どのscopeが何の色なのかは適用しているテーマによります。
例えばmarkup.boldはbase16-ocean.dark.tmThemeだと以下のように指定されています。
		<dict>
			<key>name</key>
			<string>Bold</string>
			<key>scope</key>
			<string>markup.bold, punctuation.definition.bold</string>
			<key>settings</key>
			<dict>
				<key>fontStyle</key>
				<string>bold</string>
				<key>foreground</key>
				<string>#ebcb8b</string>
			</dict>
		</dict>
ですがこれをいちいち調べるのはめんどくさいため、既存のカラースキーマからScopeを取ってくる事も可能です。
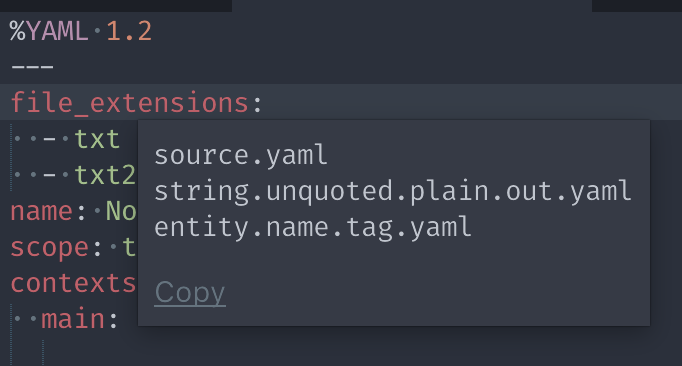
例えば今編集中のYAMLファイルのfile_extensionsという文字列にカーソルを持ってきた状態で、
Tools->Developer->Show Scope Name
を選択することで、その文字列のscopeが表示されます。

これをCopyしてそのままscopeに貼り付けるだけでOKです。
# 複数scope名がある場合でも空白区切り1行で追加して下さい。
# 上の例だとscope: source.yaml string.unquoted.plain.out.yaml entity.name.tag.yamlになります。
適用する
編集したファイルをNormalText.sublime-syntaxという名前で以下に保存します。
# Mac
    ~/Library/Application Support/Sublime Text 3/Packages/User/
# Windows
    C:\Users\User名\AppData\Roaming\Sublime Text 3\Packages\User\
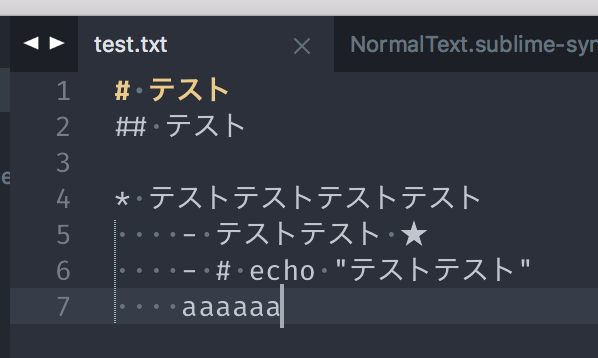
そしてtxtファイルに反映させると、以下のように色つけルールが適用されていると思います。

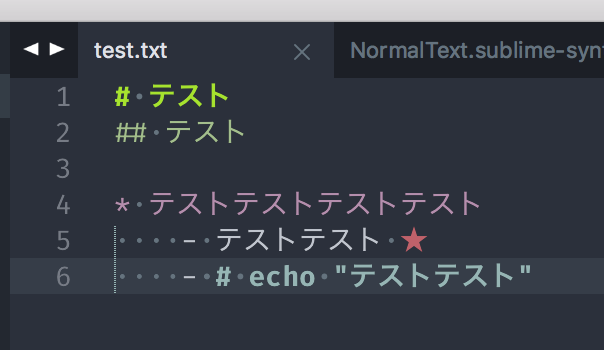
ちなみにトップに表示した画像のカラースキーマは以下のようになっています。
contexts:
  main:
    - match: '^# .*'
      scope: markup.bold markup.inserted.git_gutter
    - match: '^## .*'
      scope: markup.raw.inline
    - match: '^\* .*'
      scope: markup.changed
    - match: '^\* .*'
      scope: markup.changed
    - match: '★'
      scope: text.xml meta.tag.xml entity.name.tag.localname.xml
    - match: ' # .*'
      scope: markup.bold support.function
    - match: ' /\* .* */'
      scope: markup.bold support.function
ちょっと高度な指定方法
最初に作成した雛形にはmatch,scope以外にもpushなどの記載もあることに気付くと思います。
私も深くは理解していないですが、こちらを使うと複数行に渡った指定やスキーマの組み合わせなどが指定できます。
# 上に示したサンプルは全て1行に対する1色の指定です。
例として雛形にある以下の記載を説明すると、
contexts:
  main:
    - match: '"' # ここは同じです。
      scope: punctuation.definition.string.begin.example-c # ここも同じです。
      push: double_quoted_string # 「"」以降はdouble_quoted_stringに記載されたルールを反映すると指定しています。

  double_quoted_string:
    - meta_scope: string.quoted.double.example-c # 「"」以降はstring.quoted.double.example-cの色。
    - match: '\\.'                               # 「"」以降に「\.」の文字列があったら
      scope: constant.character.escape.example-c # constant.character.escape.example-cの色。
    - match: '"'                                 # 「"」以降に「"」の文字列があったら
      scope: punctuation.definition.string.end.example-c # punctuation.definition~略の色。
      pop: true                                  # かつdouble_quoted_stringの適用を終了する。
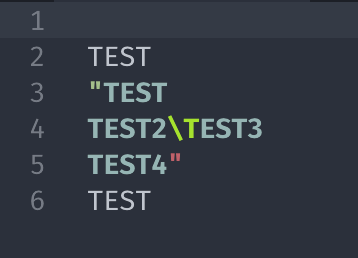
といった感じになります。実際の色は以下のようなイメージです。
scope名は変えていますが、"をトリガーに複数行に渡って色が指定できているのが分かると思います。

最後に
カラースキーマ職人はスゴイ。
参考
Sublime Text - Plain Text(.txt)で自分独自記法のハイライト表示
Syntax Definitions — Sublime Text Unofficial Documentation