目的
- React アプリを Typescript で作りたい。
- 作ったコンポーネントは Storybook で管理したい。
- できるだけサクっと。
と思い立ちましたが、知らない事が多々あって試行錯誤したので、最終的な手順を残しました。
(そのレベルなので、内容に誤りあったらごめんなさい。ご指摘歓迎、誹謗中傷スルー。)
開発環境
- Windows 10 (64bit)
先にインストールしておくもの
括弧内は使用していたバージョンです。本投稿2019年1月6日時点の最新版を使用しているはずです。
- Node.js (10.15.0 LTS 推奨版)
- Visual Studio Code (1.30.1 system setup)
App のテンプレートの作成
モジュールのインストール
React と Storybook のテンプレートを作成するモジュールを、グローバルインストールします。
npm install -g create-react-app
npm install -g @storybook/cli
Typescript 版 React アプリと Storybook のテンプレートを作成する
- プロジェクト名は
inoapp - ドキュメントフォルダの
inoapp配下に作成
として進めます。
コマンドプロンプトから次のコマンドを実行します。
mkdir C:\Users\%USERNAME%\Documents\inoapp
cd /d C:\Users\%USERNAME%\Documents\inoapp

create-react-app inoapp --typescript

cd /d C:\Users\%USERNAME%\Documents\inoapp\inoapp

getstorybook init --use-npm
npm install -D @types/storybook__react
Visual Studio Code で開く
Visual Studio Code を開き、メニューから「ファイル」-「フォルダを開く」で、C:\Users\User\Documents\inoapp\inoapp フォルダを選びます。
開いたら、メニューから「ファイル」-「名前を付けてワークスペースを保存」して C:\Users\User\Documents\inoapp\ino.code-workspace ファイルで保存します。
{
  "folders": [
    {
      "path": "inoapp"
    }
  ],
  "settings": {}
}
カスタマイズ
次の方針でカスタマイズします。
- 自作コンポーネントは
src/componentsディレクトリに追加していく。 - 自作コンポーネントは
[コンポート名].stories.tsxファイルを作成して Storybook に載せる。
不要なディレクトリとファイルを削除
Storybook のテンプレートで作成された inoapp\inoapp\src\stories は、不要なのでフォルダごと削除します。
config.js を書き換える
src/components 配下にある *.stories.tsx が Storybook に載るように書き換えます。
  import { configure } from '@storybook/react';

+ const req = require.context("../src/components", true, /.stories.tsx$/);
  function loadStories() {
-   require('../src/stories');
+   req.keys().forEach(req);
  }

  configure(loadStories, module);
自作コンポーネントの追加
自作のコンポーネントを追加します。
試しに文字列を表示する Label コンポーネントを追加します。
src/components/Label フォルダを作成し、次のファイルを追加します。
import * as React from "react";
import './Label.css';

export const Label: React.FunctionComponent<React.Props<{}>> = ({ children }) => {
  return <span className="label">{children}</span>;
};

export default Label;
.label {
  color: #007;
}
自作コンポーネントを既存のページに表示する
トップページに自作コンポーネントを追加します。
  import React, { Component } from 'react';
  import logo from './logo.svg';
  import './App.css';
+ import Label from './components/Label/Label';

  class App extends Component {
    render() {
      return (
        <div className="App">
          <header className="App-header">
            <img src={logo} className="App-logo" alt="logo" />
            <p>
              Edit <code>src/App.tsx</code> and save to reload.
            </p>
            <a
              className="App-link"
              href="https://reactjs.org"
              target="_blank"
              rel="noopener noreferrer"
            >
              Learn React
            </a>
+           <Label>お試しラベル</Label>
          </header>
        </div>
      );
    }
  }

  export default App;
追加できたか npm start を実行して確認します。
と、ここでエラーが出たのでメッセージに従って解消しました。
「npm start」で発生したエラーを解消する。
1.~4. の手順までで解消しましたので、5.以降は省略します。
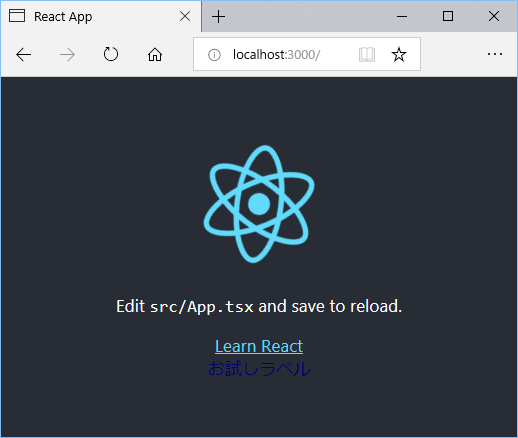
表示できて、スタイルシートが効いているのも(分かりづらいですが)文字色から分かります。
自作コンポーネントを Storybook で確認する
自作コンポーネントが Storybook に載るように、src/components/Label フォルダに次のファイルを追加します。
import * as React from "react";
import { storiesOf } from "@storybook/react";
import { Label } from "./Label";

storiesOf("Components", module)
  .add("Label", () => (<Label>test</Label>));
Storybook に載るか npm storybook を実行して確認します。

表示されました。
今後、新しいコンポーネントを作成した時も、この調子で確認できるはずです。
構成
ここまでで作成されたディレクトリとファイル、package.json は次の通りです。
テンプレート作成スクリプトのお陰で、かなり楽に到達できました。
inoapp
│  ino.code-workspace
│
└─inoapp
    │  .gitignore
    │  package-lock.json
    │  package.json
    │  README.md
    │  tsconfig.json
    │
    ├─.storybook
    │      addons.js
    │      config.js
    │
    ├─.vscode
    │      tasks.json
    │
    ├─node_modules
    │
    ├─public
    │      favicon.ico
    │      index.html
    │      manifest.json
    │
    └─src
        │  App.css
        │  App.test.tsx
        │  App.tsx
        │  index.css
        │  index.tsx
        │  logo.svg
        │  react-app-env.d.ts
        │  serviceWorker.ts
        │
        └─components
            └─Label
                    Label.css
                    Label.stories.tsx
                    Label.tsx
{
{
  "name": "inoapp",
  "version": "0.1.0",
  "private": true,
  "dependencies": {
    "@types/jest": "23.3.11",
    "@types/node": "10.12.18",
    "@types/react": "16.7.18",
    "@types/react-dom": "16.0.11",
    "react": "^16.7.0",
    "react-dom": "^16.7.0",
    "react-scripts": "2.1.3",
    "typescript": "3.2.2"
  },
  "scripts": {
    "start": "react-scripts start",
    "build": "react-scripts build",
    "test": "react-scripts test",
    "eject": "react-scripts eject",
    "storybook": "start-storybook -p 9009 -s public",
    "build-storybook": "build-storybook -s public"
  },
  "eslintConfig": {
    "extends": "react-app"
  },
  "browserslist": [
    ">0.2%",
    "not dead",
    "not ie <= 11",
    "not op_mini all"
  ],
  "devDependencies": {
    "@babel/core": "^7.2.2",
    "@storybook/addon-actions": "^4.1.4",
    "@storybook/addon-links": "^4.1.4",
    "@storybook/addons": "^4.1.4",
    "@storybook/react": "^4.1.4",
    "@types/storybook__react": "^4.0.0"
  }
}
おわりに
この投稿になるまでに試行錯誤したのですが、最終的には簡単にできるものだったんだな、とちょっと切ない心境です。。
後は、
- TSLint の設定。
-
componentsフォルダは import 時の相対パス指定を回避したい。 - スタイルシートは改善しないと汚染が。
といった所に対応したい感じでしょうか。
参考
-
React (https://reactjs.org/)
- Using TypeScript with Create React App (https://reactjs.org/docs/static-type-checking.html#using-typescript-with-create-react-app)
- TypeScript-React-Starter (https://github.com/Microsoft/TypeScript-React-Starter)
-
Storybook (https://storybook.js.org/)
- Storybook for React (https://storybook.js.org/basics/guide-react/)
- TypeScript Config (https://storybook.js.org/configurations/typescript-config/)
- react-docgen-typescript-loader (https://github.com/strothj/react-docgen-typescript-loader)
-
Typescript
- TypeScript & Stateless Component でchildrenプロパティを扱う (https://qiita.com/r-tamura/items/1bf0e72433f96a5a2f14)