Postfixからの送信を全てSES経由に変更する
はじめに
▼メリット
- EC2からメールを送信するとき、AWSの送信制限(ポートチェック)を気にせずにメールの送信が出来ます。
-
mb_send_mailなどの関数を使用したメール送信部分のソースコードを変更せずにメールの送信が可能です。 - シェルスクリプトなどでメールを送信するとき、送信制限を気にしなくていいので楽です。
▼デメリット
- お金がかかります。(すごい安いけど)
構築
▼AWSでの準備
Amazon SES SMTP 認証情報を取得
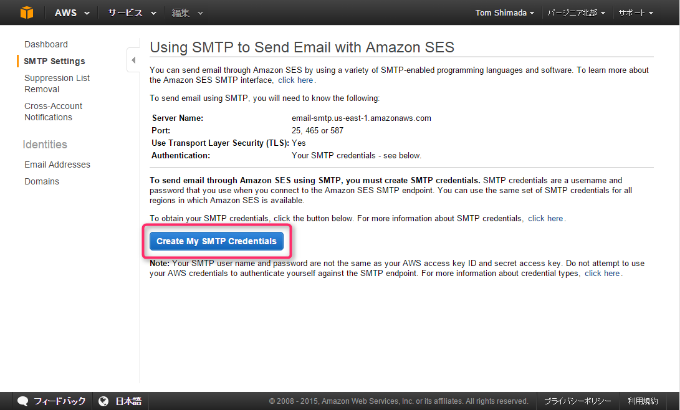
SES > SMTP Settings から [Create My SMTP Credentials] をクリック。
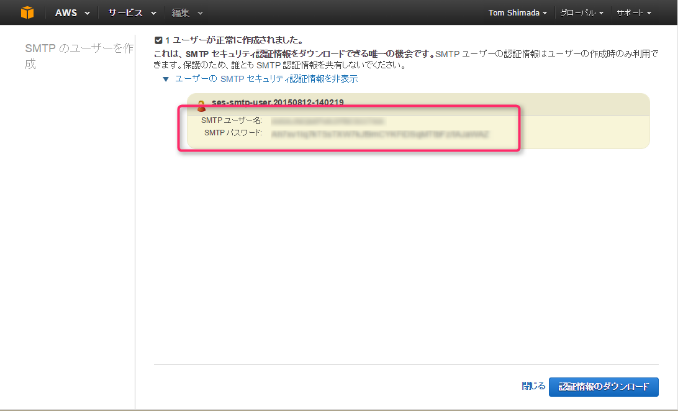
IAMユーザー名を決めて作成ボタンをクリック。
[ユーザーの SMTP セキュリティ認証情報を表示]をクリックすると
SMTP ユーザー名SMTP パスワード
が表示されるので、保存しておく。
送信元メールアドレスの認証する
「Eメールアドレス認証」か「ドメイン認証」をして、SESからメールを送信できるようにして下さい。
▼サーバ側の設定
# Postfix周りインストール
[root@ip-172-31-20-41 ~]# yum install postfix mailx cyrus-sasl-plain cyrus-sasl-md5
# Sendmail 停止
[root@ip-172-31-20-41 ~]# service sendmail stop
[root@ip-172-31-20-41 ~]# chkconfig sendmail off
# mta を Postfix に変更
[root@ip-172-31-20-41 ~]# alternatives --config mta
     There is 1 program that provides 'mta'.

       Selection    Command
     -----------------------------------------------
     *+ 1           /usr/sbin/sendmail.sendmail
     + 2           /usr/sbin/sendmail.postfix
     Enter to keep the current selection[+], or type selection number: 2
[root@ip-172-31-20-41 ~]# alternatives --display mta
	mta - status is manual.
	 link currently points to /usr/sbin/sendmail.postfix
	/usr/sbin/sendmail.postfix - priority 30
	 slave mta-pam: /etc/pam.d/smtp.postfix
	 slave mta-mailq: /usr/bin/mailq.postfix
	 slave mta-newaliases: /usr/bin/newaliases.postfix
	 slave mta-rmail: /usr/bin/rmail.postfix
	 slave mta-sendmail: /usr/lib/sendmail.postfix
	 slave mta-mailqman: /usr/share/man/man1/mailq.postfix.1.gz
	 slave mta-newaliasesman: /usr/share/man/man1/newaliases.postfix.1.gz
	 slave mta-aliasesman: /usr/share/man/man5/aliases.postfix.5.gz
	 slave mta-sendmailman: /usr/share/man/man1/sendmail.postfix.1.gz
	Current `best' version is /usr/sbin/sendmail.postfix.
# Sendmail をアンインストール(一緒に必要なのをアンインストールしそうだったらコレは飛ばす)
[root@ip-172-31-20-41 ~]# yum remove sendmail
# Postfix 設定
[root@ip-172-31-20-41 ~]# cp /etc/postfix/main.cf /etc/postfix/main.cf.bak20150812
# ※email-smtp.us-east-1.amazonaws.com の部分は使用しているリージョンによって変わります。
[root@ip-172-31-20-41 ~]# vim /etc/postfix/main.cf
     relayhost = [email-smtp.us-east-1.amazonaws.com]:25
     smtp_sasl_auth_enable = yes
     smtp_sasl_security_options = noanonymous
     smtp_sasl_password_maps = hash:/etc/postfix/sasl_passwd
     smtp_use_tls = yes
     smtp_tls_security_level = encrypt
     smtp_tls_note_starttls_offer = yes
[root@ip-172-31-20-41 ~]# diff /etc/postfix/main.cf /etc/postfix/main.cf.bak20150812
     684,692d683
     <
     < relayhost = [email-smtp.us-east-1.amazonaws.com]:25
     < smtp_sasl_auth_enable = yes
     < smtp_sasl_security_options = noanonymous
     < smtp_sasl_password_maps = hash:/etc/postfix/sasl_passwd
     < smtp_use_tls = yes
     < smtp_tls_security_level = encrypt
     < smtp_tls_note_starttls_offer = yes
     <
[root@ip-172-31-20-41 ~]# cp /etc/postfix/master.cf /etc/postfix/master.cf.bak20150812
[root@ip-172-31-20-41 ~]# vim /etc/postfix/master.cf
     #       -o smtp_fallback_relay=
[root@ip-172-31-20-41 ~]# diff /etc/postfix/master.cf /etc/postfix/master.cf.bak20150812
     39c39
     < #     -o smtp_fallback_relay=
     ---
     >       -o smtp_fallback_relay=
[root@ip-172-31-20-41 ~]# touch /etc/postfix/sasl_passwd
# ※先程作成したSMTP ユーザー名,SMTP パスワードを設定します
[root@ip-172-31-20-41 ~]# vim /etc/postfix/sasl_passwd
     [email-smtp.us-east-1.amazonaws.com]:25 SMTP ユーザー名:SMTP パスワード
# hashmap データベースファイル作成
[root@ip-172-31-20-41 ~]# postmap hash:/etc/postfix/sasl_passwd
[root@ip-172-31-20-41 ~]# rm -f /etc/postfix/sasl_passwd
[root@ip-172-31-20-41 ~]# chmod 600 /etc/postfix/sasl_passwd.db
# Postfix が正しくSSL証明書を使えるように変更(Amazon Linuxじゃない場合はCAfileの場所が違うかも)
[root@ip-172-31-20-41 ~]# postconf -e 'smtp_tls_CAfile = /etc/ssl/certs/ca-bundle.crt'
# Postfix 再起動
[root@ip-172-31-20-41 ~]# service postfix restart
# テスト送信
[root@ip-172-31-20-41 ~]# echo "mail-body" | mail -r from@hoge.com -s "mail-subject" to@hoge.com
# 送信成功時のmaillog
[root@ip-172-31-20-41 ~]# less /var/log/maillog
     Aug 12 01:36:00 ip-172-31-20-41 postfix/smtp[15323]: C6FE9A2C64: to=<to@hoge.com>, relay=email-smtp.us-east-1.amazonaws.com[107.21.234.214]:25, delay=2.4, delays=0.08/0.11/1.4/0.82, dsn=2.0.0, status=sent (250 Ok 0000014f1f8cb78a-9bcb7fca-4e28-4eb3-84a0-9b784732fab9-000000)
まとめ
mailコマンド、もしくは mb_send_mail とかでメールを送りたいときなど意外と便利ですよ。


