下準備
containerに登録するクラスを作ります。
package com.springLearning;

public class Triangle {

    public void draw(){
        System.out.println("Triangle is here!");
    }

}
Application Context(Spring container)のXml fileを作ります。
<?xml version="1.0" encoding="UTF-8"?>
<beans xmlns="http://www.springframework.org/schema/beans"
       xmlns:xsi="http://www.w3.org/2001/XMLSchema-instance"
       xmlns:context="http://www.springframework.org/schema/context"
       xsi:schemaLocation="http://www.springframework.org/schema/beans
    http://www.springframework.org/schema/beans/spring-beans.xsd
    http://www.springframework.org/schema/context
    http://www.springframework.org/schema/context/spring-context.xsd">

    <bean id="Triangle" class="com.springLearning.Triangle">

    </bean>

</beans>
main classでcontainerの物件を作り、Xml fileと連結します。
さらに、containerからTriangle Classのbean(物件)をもらいます。
public static void main(String[] args) {
		//instantiate Spring container and load the xml config
		//Spring container path for Marven:src\main\resources
		ClassPathXmlApplicationContext mContext=
                   new ClassPathXmlApplicationContext("ApplicationContext.xml");

		//get object from Spring container(Application Context)
		//also Triangle mTriangle=(Triangle)mContext.getBean("Triangle");
		Triangle mTriangle=mContext.getBean("Triangle",Triangle.class);
		mTriangle.draw();
	}
結果として、Triangle is hereが印刷されます。
injection with setter
例えば、String typeという変数をcontainerからTriangle Classに注入したい場合、
まず、setterを作ります。
public class Triangle {
    private String type;

    public void setType(String type) {
        this.type = type;
    }

    public void draw(){
        System.out.println(type+":Triangle is here!");
    }

}
注入したい値をcontainerに登録します
 <bean id="Triangle" class="com.springLearning.Triangle">
        <property name="type" value="三角形"/>
 </bean>
Mainを執行すれば、”三角形:Triangle is here!”がプリントアウトされます。
inject with constructor
**Only 1 parameter
Triangle classにまずconstructorを作ります。同じく簡単にString typeだけのパラメーターを引き受けます。
private String type;

public Triangle(String type) {
    this.type = type;
}

public void draw(){
        System.out.println(type+":Triangle is here!");
    }
containerに登録します。constructorを経由する場合、propertyではなく、constructor argを使います。一個しかパラメーターがない場合、Valueだけを書けば認識されます。
 <bean id="Triangle" class="com.springLearning.Triangle">
        <constructor-arg value="三角形"/>
 </bean>
Mainを執行すれば、”三角形:Triangle is here!”がプリントアウトされます。
**multiple parameter
constructorに一個以上のパラメーターがある場合、Springはただ順番で値を投げるだけ、認識できていないので、判別できるような何かを与えなければ、二つの選択肢があります。一つはType="xxx"(データタイプ情報を付け加えます)、もう一つはName="xxx"(変数名をつけます)。ここはint変数二つある場合を書きたいので、Nameを選びました。
まずはconstructorです。
private String type;
private int height;
private int base;

 public Triangle(String type, int height, int base) {
     this.type = type;
     this.height = height;
     this.base=base;
 }

public void draw(){
    System.out.println(type+height+"x"+base+":Triangle is here!");
}
containerへの登録。
<bean id="Triangle" class="com.springLearning.Triangle">
       <constructor-arg name="type" value="三角形"/>
        <constructor-arg name="height" value="20"/>
        <constructor-arg name="base" value="100"/>
    </bean>
結果としては”三角形20x100:Triangle is here”がプリントアウトされます。
object injection
setterでbean(物件)を他のクラスにinjectします。
まずはinjectする予定のクラスを作り、containerに登録します。containerで値を設定したいので、同じくsetterを作ります。また、後で別クラスでプリントアウトするために、getterも作っておきました。
package com.springLearning;

public class Point {
    private int x;
    private int y;
    private int z;

    public int getX() {
        return x;
    }

    public void setX(int x) {
        this.x = x;
    }

    public int getY() {
        return y;
    }

    public void setY(int y) {
        this.y = y;
    }

    public int getZ() {
        return z;
    }

    public void setZ(int z) {
        this.z = z;
    }
}
containerに登録+値を設定。3セットの値を設定したいので、それぞれ違うIdをつけて、同じクラスにリファレンスします。
 <bean id="Point0" class="com.springLearning.Point">
        <property name="x" value="0"/>
        <property name="y" value="0"/>
        <property name="z" value="0"/>
 </bean>

 <bean id="Point2" class="com.springLearning.Point">
        <property name="x" value="0"/>
        <property name="y" value="14"/>
        <property name="z" value="18"/>
</bean>

<bean id="Point3" class="com.springLearning.Point">
        <property name="x" value="0"/>
        <property name="y" value="24"/>
        <property name="z" value="28"/>
</bean>
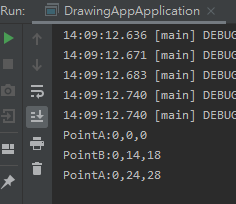
次はTriangle Classに三つのbean Objを受け入れる変数を作ります。Containerからbeanを受け入れるためにsetterも作ります。最終的にbeanの値をプリントアウトするためのコードはdraw()で作りました。
public class Triangle {
    private Point pointA;
    private Point pointB;
    private Point pointC;

    public void setPointA(Point pointA) {
        this.pointA = pointA;
    }

    public void setPointB(Point pointB) {
        this.pointB = pointB;
    }

    public void setPointC(Point pointC) {
        this.pointC = pointC;
    }

    public void draw(){
        System.out.printf("PointA:%d,%d,%d%n",pointA.getX(),pointA.getY(),pointA.getZ());
        System.out.printf("PointB:%d,%d,%d%n",pointB.getX(),pointB.getY(),pointB.getZ());
        System.out.printf("PointA:%d,%d,%d%n",pointC.getX(),pointC.getY(),pointC.getZ());

    }

}
containerに登録します。nameは変数名でrefはbean Idです。そしたら、bean objはTriangle Classの変数に注入しました。
<bean id="Triangle" class="com.springLearning.Triangle">
        <property name="PointA" ref="Point1"/>
        <property name="PointB" ref="Point2"/>
        <property name="PointC" ref="Point3"/>
    </bean>
*番外編
もしこのbeanは特定のクラスしか使わない場合、inner beanとして、直接設定をpropertyタグの中に書いても可です。例えばbeanのpoint2はTriangleしか使わない場合、直接PointBのpropertyタグに内容をつ込みます。bean Idなどを新しく付けずに済むのです。もちろん、そういう場合、別のクラスからこのbeanをリクエストすることは不可となります。
<bean id="Triangle" class="com.springLearning.Triangle">
        <property name="PointA" ref="Point0"/>
        <property name="PointB" >
            <bean  class="com.springLearning.Point">
                <property name="x" value="0"/>
                <property name="y" value="14"/>
                <property name="z" value="18"/>
            </bean>
        </property>
        <property name="PointC" ref="Point3"/>
</bean>
以上は覚書です。
