Spring MVCで作成したコントローラをMockMVCを使ってJUnitからテストします。
MockMVCとは
アプリケーションサーバにデプロイすることなく、Spring MVCの動作を再現することができます。MockMVCを使うことでコントローラのテストを簡単に作成できます。
Spring BootでMockMVCを使うためにはbuild.gradleに以下の記述を追加します。
testCompile('org.springframework.boot:spring-boot-starter-test')
SPRING INITIALIZR https://start.spring.io/ でプロジェクトを作成するとbuild.gradleにはデフォルトで記述されています。
環境
今回MockMVCを試すために、SPRING INITIALIZR https://start.spring.io/ でプロジェクトを作成しました。
プロジェクトの設定は以下のようにしました。Spring MVC, Thymeleafを使うのでdependencyにWeb, Thymeleafを追加する以外は好きに選んで下さい。
- Spring Bootバージョン: 2.0M7
- ビルドツール:Gradle
- 言語:Kotlin
- dependency: Web, Thymeleaf
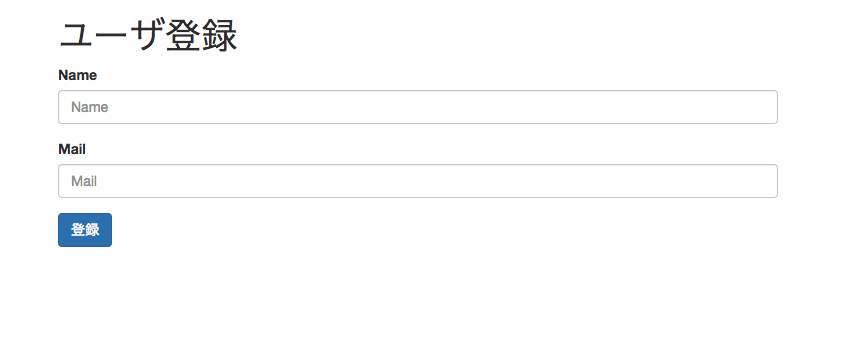
この環境で以下のようにユーザ名、メールアドレスを入力するための2つのテキストボックスと登録ボタンを持つページを作成します。
ブラウザからルートURLへアクセスすると入力ページが表示されるという動作をMockMVCでテストします。
MockMVCを試すことが目的なのでページ表示以外の処理は省略します。
コントローラの作成
ルートURLへのGETリクエストに対してindex.htmlを表示するコントローラを作成します。
@Controller
class UserController {

    @RequestMapping(value = "/", method = [(RequestMethod.GET)])
    fun index(model: Model): String {
        model.addAttribute("userForm", UserForm())
        return "index"
    }
}
フォームクラスの作成
入力フォーム用クラスを作成します。Kotlinではdata classを使うことができるので簡潔に記述できます。
data class UserForm(val name: String = "", val mail: String = "")
ビューの作成
BootStrapを使うために以下をbuild.gradleへ追加しました。
compile group: 'org.webjars', name: 'bootstrap', version: '3.3.7-1'
Thymeleafで以下のようにテキストボックスとボタンをもつページを作成します。
<!DOCTYPE html>
<html xmlns:th="http://www.thymeleaf.org">
<head>
    <meta http-equiv="Content-Type" content="text/html; charset=UTF-8" />
    <link rel="stylesheet" th:href="@{/webjars/bootstrap/3.3.7-1/css/bootstrap.min.css}" />
    <meta name="viewport" content="width=device-width, initial-scale=1" />
    <title>ユーザ登録</title>
</head>
<body>
    <div class="container">
        <h1>ユーザ登録</h1>
        <form id="userForm" method="post" th:action="@{/user}" th:object="${userForm}" action="/user">
            <div class="form-group">
                <label for="name">Name</label>
                <input class="form-control" id="name" type="text" th:feild="*{name}" name="name" placeholder="Name"/>
            </div>
            <div class="form-group">
                <label for="mail">Mail</label>
                <input class="form-control" id="mail" type="text" th:feild="*{mail}" name="mail" placeholder="Mail"/>
            </div>
            <button type="submit" class="btn btn-primary">登録</button>
        </form>
    </div>
</body>
</html>
テストの作成
ルートURLに対してGETリクエストを送信し得られたレスポンスに対し以下の内容をテストします。
- ビューとしてindex.htmlが表示される
- ステータスコードが200
- テキストボックスのname属性、placeholder属性、value属性の値が正しい
以下のようにテストクラスを作成します。
@RunWith(SpringRunner::class) // ①
@WebMvcTest // ②
class UserControllerTest {

    @Autowired
    private lateinit var mockMvc: MockMvc  // ③

    @Test
    fun test1() {
        this.mockMvc.perform(get("/"))               // ④
                .andExpect(status().isOk)            // ⑤
                .andExpect(view().name("index"))     // ⑥
                .andExpect(xpath("/html/head/title").string("Title"))    // ⑦
                .andExpect(xpath("""//*[@id="name"]/@name""").string("name"))
                .andExpect(xpath("""//*[@id="name"]/@placeholder""").string("Name"))
                .andExpect(xpath("""//*[@id="name"]/@value""").string(""))
                .andExpect(xpath("""//*[@id="mail"]/@name""").string("mail"))
                .andExpect(xpath("""//*[@id="mail"]/@placeholder""").string("Mail"))
                .andExpect(xpath("""//*[@id="mail"]/@value""").string(""))
    }

}
- ① JUnitでSpringのテストをするために使用します。
- ② MockMVCを使用してビュー、コントローラをテストする場合は@WebMvcTestを使用します。
- ③ MockMvcのインスタンスをDIします
- ④ GETリクエストを送信します
- ⑤ HTTPステータスをチェックします。
- ⑥ ビューとしてindex.htmlが表示されていることをチェックします。
- ⑦ テキストボックスの各属性が正しいことをチェックします。XPathによってテキストボックスの属性値を取得できます
テストの実行
IDE上からJUnitテストとして実行できます。
gradlewからテストクラスを指定する場合は以下のように指定します。
./gradlew test --tests "package.ControllerTest"
