概要
最近ChatGPTで話題のOpenAIですが、プログラミングに関しては「code-davinci-002」というコーディング用にファインチューニングされたモデルをAPI経由で利用することができます。
これはPlaygroundやAPIから「JavaScriptでフィボナッチ数列を計算する関数作って」のように依頼すると、そのソースコードを考えて答えてくれますが、聞いた内容は1回で完結してしまい、ChatGPTのように続けて質問することができません。
そこで、StackOverflowの以下の投稿を参考に、「それまで入力した内容に続けて依頼」ができるプログラムをPythonで実装してみましたので、その内容を紹介したいと思います。
尚、promptが簡易的なもののため、実用性はまだよくわかりません。依頼内容によってはテストケースが大量に出てくるので、もうちょっと改善したいところ。
※※2023/02/28 ここから追記※※
本記事の内容を実装後、いろいろ試してみたのですが、どうも応答がイマイチな場合が多いです。
サンプルで書いた仕様はそれっぽい動きになっているなと思ったのですが、他の入力だと全く期待する結果になりません。
利用する場合は、あくまでお試しということでお願いします。
尚、今回紹介する方法では、モデルはむしろ"text-davinci-003"を利用したほうが期待する回答が得られました。
※※2023/02/28 ここまで追記※※
注意事項
OpenAIのAPIを利用するには、API KEY(有料)を発行する必要があります。
また、APIの利用の都度で課金が必要です。今回の記事で紹介しているプログラムを利用する場合も有料となりますので、利用は自己責任でお願いします。高い料金を取られても責任持てません。
API KEYの発行は以下のサイトが参考になりそうです。
code-davinci-002を含む有料のAPIの利用は、クレジットカードの登録が必要です。私はうっかり使い過ぎないように、一時的なカード番号を発行できるVプリカを利用しました。(とは言え限度額は超えないように注意)
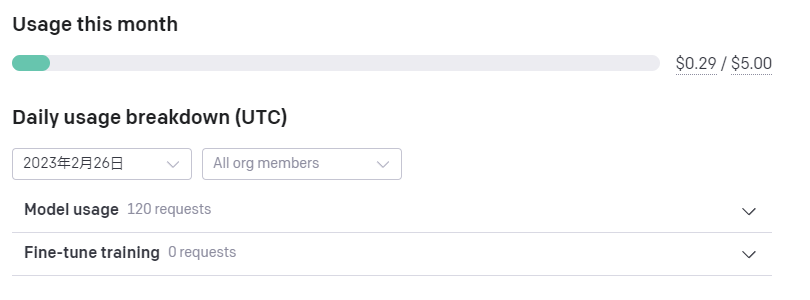
ただ、今回の検証のために短い文章を120回くらいリクエストしましたが、0.3ドルに満たない程度の金額です。
OpenAIのマイページから、月当たりの課金の上限を設定することもできるようです。
機能
以下のことが可能です。
- 仕様を入力すると、その内容をOpenAIの"code-davinci-002"に投げる。応答を標準出力する。
- 回答が途中になっても、「continue」と入力すると続きの回答をリクエストする。
- 終了する場合は「exit」と入力。
- 起動時に払い出されるキーを覚えておけば、次回起動したときに続けて質問も可能。
- 日本語での入力も可能。googletransで日本語から英語に翻訳してからAPIに投げる。
実装
順番に説明します。
1.事前準備
まずはopenai、googletransのインストール。
また、環境変数にOpenAIのAPI KEYをsetします。
$ pip install openai
$ pip install googletrans==3.1.0a0

$ export OPENAI_API_KEY="..."
googletransは、バージョン指定なしでインストールするとバグのため実行時エラーになるようです。(2023年2月時点)
2.APIに依頼するプロンプトについて
以下のように「context:」にこれまでの経緯、「prompt:」に新たに依頼したい内容が設定されるようにして、APIに渡す必要があります。
context:~~~~~~(※これまでAPIとやり取りした内容。改行してもよい)

prompt:Specification:~~~~~~(※依頼したい質問や仕様。改行してもよい)
Description and code: Let's think step by step.
contextとpromptの間に空行を入れるのがポイントらしいです。
定型的ですが、「step by step」で考えるように依頼します。ここを変えると出力が結構変わります。
3.モデル、最大トークン数を設定
ここからPythonの実装です。
以下のように、コーディング用のモデル(code-davinci-002)や最大トークン数などを設定します。
最大トークン数は、検証のためにあえて「100」とかなり小さくしています。実際に長めのプログラムを答えてほしかったら、2000以上は必要になるようです。
import openai

# 設定
model="code-davinci-002" # model="text-davinci-003" でも可能
max_tokens=100
4.入力(依頼内容)を受け取りつつ翻訳
promptは、先頭を「Specitifation:」にして、input()で順次受け取って連結してきます。
また、入力内容をgoogletransで翻訳しておきます。
from googletrans import Translator

# 最初のプロンプト
PROMPT_FISRTS = "Specitifation:"

# プロンプト全体を初期化
prompt_all = PROMPT_FISRTS

# 入力内容を翻訳する
prompt = input()
trans = translator.translate(text=prompt, src="ja", dest="en").text
prompt_all += trans
5.OpenAI APIに依頼する
モデル、プロンプトを指定して、OpenAIのAPIに依頼します。
# OpenAIに依頼
response = openai.Completion.create(
    model=model,
    prompt="context:" + context + "\n\n" + "prompt:" + prompt_all,
    temperature=0,
    max_tokens=max_tokens,
    top_p=1,
    frequency_penalty=0,
    presence_penalty=0
)

# 結果を標準出力
print(response["choices"][0]["text"]+ "\n")
6.入力内容をファイルに保存したりなど、残りの実装を追加
途中の経緯をcontextに連結していき、追加の依頼ができるようにします。また、ファイルに保存しておき、次回起動した際にも途中から続けられるようにします。
以下、ここまでの説明内容も含め、全体の実装です。
import random, string
import openai
import os
from googletrans import Translator

# 設定
model="code-davinci-002" # ex. model="text-davinci-003"
max_tokens=100

# 最初のプロンプト
PROMPT_FISRTS = "Specitifation:"

# プロンプト全体を初期化
prompt_all = PROMPT_FISRTS

# プロンプト(1回分の入力)
prompt = ""

# コンテキスト
context = ""

# 制御用
isFirst = True
counter = 1

# 翻訳
translator = Translator()

# print 入力してください。
print(">> input previous key")
key=input()

if key == "":
    key = ''.join(random.choices(string.ascii_letters + string.digits, k=10))
    print("your new key:" + key)

# ログファイル
logfile_nm = 'coding-' + key + ".log"
logfile = open(logfile_nm, "a")

# 過去のコンテキストを取得
context_file = 'coding-' + key + ".txt"
is_file = os.path.isfile(context_file)
if is_file:
    context_before = open(context_file, "r")
    if context_before != "":
        context = context_before.read()
        prompt_all = ""
        isFirst = False

    context_before.close()


file = open(context_file, "a")

# print 入力してください。
print(">> input your request(" + str(counter) + "):")

while True:
    prompt = input()

    # exitの場合は終了
    if prompt == "exit":
        break

    # これまでの全ての入力内容を削除する。
    if prompt == "init":
        prompt_all = PROMPT_FISRTS
        context = ""
        isFirst = True
        continue

    # 1回分のリクエスト内容をクリアする。(過去の依頼は継続)
    if prompt == "clear":
        prompt_all = ""
        continue

    # 入力無しは無視
    if prompt == "":
        continue

    # continueの場合は継続
    if prompt == "continue" or prompt == "c":
        prompt_all = "contiue"

    # 入力内容を翻訳する。
    if prompt != "go" and prompt != "continue" and prompt != "c" and prompt != "":
        trans = translator.translate(text=prompt, src="ja", dest="en").text
        prompt_all += trans
        continue

    # goが入力された場合、翻訳結果を確認する。
    if prompt == "go" :
        print("\033[32m{}\033[0m ".format(prompt_all))
        print("Is this OK?(y/N)")
        ans = input()

        # yesが入力されたら、OpenAIに依頼
        if ans[0] != "y":
            continue

    # 最初は、step by stepで考えることを依頼する。
    if isFirst :
        prompt_all += "\nDescription and code: Let's think step by step."
        isFirst = False

    # プロンプト出力(標準出力、ファイル)
    print("\033[32m{}\033[0m ".format(">>>>>> prompt   " + str(counter) + " <<<<<<"))
    print("\033[32m{}\033[0m ".format("prompt:" + prompt_all + "\n"))
    logfile.write("\n>>>>>> prompt   " + str(counter) + " <<<<<<")
    logfile.write("\nprompt:" + prompt_all)

    # OpenAIに依頼
    response = openai.Completion.create(
        model=model,
        prompt="context:" + context + "\n\n" + "prompt:" + prompt_all,
        temperature=0,
        max_tokens=max_tokens,
        top_p=1,
        frequency_penalty=0,
        presence_penalty=0
    )

    # レスポンスを出力
    logfile.write(">>>>>> response " + str(counter) + " <<<<<<")
    logfile.write(response["choices"][0]["text"] + "\n\n")
    logfile.flush()
    print("\033[31m{}\033[0m ".format(">>>>>> response " + str(counter) + " <<<<<<"))
    print(response["choices"][0]["text"]+ "\n")

    # contextを連結して次回以降に利用
    add_context = "\n".join([context, prompt_all, response["choices"][0]["text"]])
    context += add_context
    file.write(add_context)
    file.flush()

    # 変数を再設定
    counter += 1
    prompt_all = ""
    print(">>input your request(" + str(counter) + "):")


# ファイルをClose
logfile.close()
file.close()
動作を確認
動作を確認します。
起動すると、前回のキーを聞かれます。初回はキーがないため、何も入力せずにEnterを押下します。
>> input previous key
(※何も入力せずにEnter)

your new key:wqVxlSvtwy
仕様を日本語で書いていきます。
改行があってもOKです。
入力し終わったら、最後に「go」を入力します。
>> input your request(1):
ログインを実現するREST APIをGo言語で作成します。
IDとパスワードはSQLiteのDBのテーブルで管理します。
go
すると、以下のようにgoogletransで翻訳後の英語が聞かれます。
問題なければ「y」を入力します。
>> Specitifation:Create a REST API for login in Go language.IDs and passwords are managed in SQLite DB tables.
>> Is this OK?(y/N)
y
APIからの応答を確認します。
>>>>>> response 1 <<<<<<


1. Create a table in SQLite DB.

CREATE TABLE users (
    id INTEGER PRIMARY KEY AUTOINCREMENT,
    name TEXT NOT NULL,
    password TEXT NOT NULL
);

2. Create a Go file.

package main

import (
    "database/sql"
    "fmt"
    "log"
    "net/

>>input your request(2):
最大トークン数が100なので、途中で止まってしまいました。
「continue」と入力すると、続きを書いてくれます。
continue
>>>>>> prompt   2 <<<<<<
prompt:contiue

>>>>>> response 2 <<<<<<


3. Create a Go file.

package main

import (
    "database/sql"
    "fmt"
    "log"
    "net/http"

    _ "github.com/mattn/go-sqlite3"
)

func main() {
    db, err := sql.Open("sqlite3", "./test.db")
    if err !=
続きを出力してくれました。
ただし、最大トークン数が100だと、さすがに中途半端すぎて続きが書ききれない様子。
実際に動作させる場合はもうちょっと増やしましょう。
まとめ
今回は、Pythonを利用してChatGPT風にOpenAIのcode-davinciを叩く実装例を紹介しました。
そこそこ動くのはよいのですが、要するにプロンプトとして過去のやり取りのテキストを全部貼り付けているので、依頼を繰り返すたびにrequest側のトークンが増えてしまいます。
過去の経緯すべてではなく、要約したものを上手く渡せるとよさそうです。上手い方法が見つかったら、今後紹介したいと思います。
この記事を公開後に他のパターンも試しましたが、どうも応答がイマイチでした。もうちょっと改善できたらまた追記などしたいと思います。

