システム構成
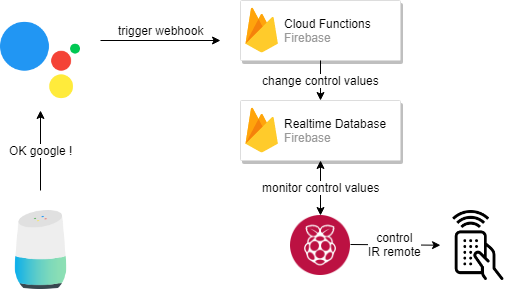
Google Homeに「部屋の明かりをつけて」と話しかけると赤外線リモコン対応シーリングライトを点灯させるシステムを実装してみます。
必要なもの
- Google Home - Alexaでもいいですが、サービス側もGoogleで構成してみようと思いますのでGoogle Homeを使います。
- Dialogflow - 対話は Dialogflow を使用します。
- Firebase - Dialogflowから起動されるwebhookの処理はCloud Functionsに、制御のトリガーにはRealtime Databaseを使ってみます。
- Raspberry Pi - Realtime Databaseのトリガーを監視して赤外線リモコンを制御するのに使います。Realtime Databaseと同期できればAndroid Thingsとかでもよいです。
- RM mini3とかeRemote mini - 赤外線リモコンの制御可能なら他も可。
サービス側の実装
Google Home に話しかけるとRealtime Databaseの値を変更してトリガーを発動させるまで。
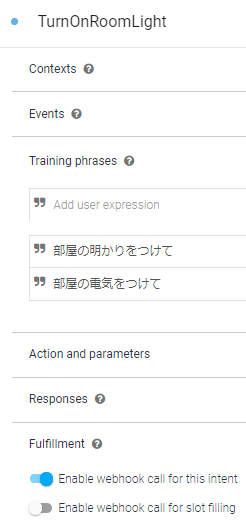
Dialogflow で対話を作成
適当な名前でAgentとProjectを作って、点灯用Intent (TurnOnRoomLight)、消灯用Intent (TurnOffRoomLight)を追加します。複雑なことはしないのでTraining Phrase, Webhookを設定しておくだけで。
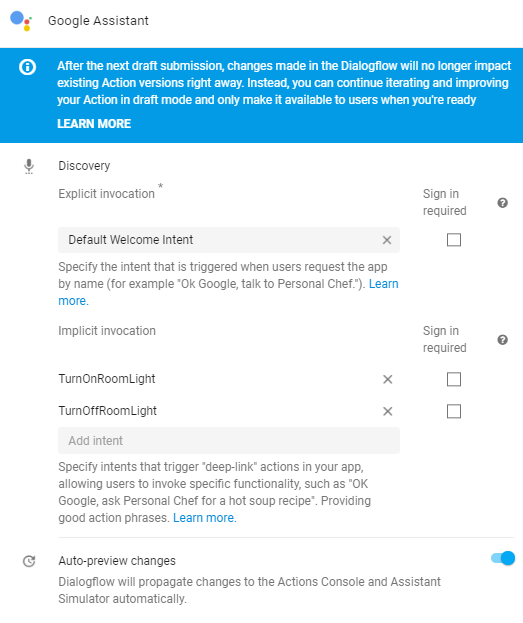
IntentをGoogle Assistantにintegrationしておきます。
Webhookを実装
WebhookはCloud Functionsを使うことにします。
Realtime Databaseの準備
Firebase realtime database を作成して、シーリングライト制御のトリガーとなるデータを room-light の名前で追加します。
firebase CLIのインストール
Firebase CLIをインストールしてloginしておきます。
$ npm install -g firebase-tools
$ firebase login
Clound functionの実装
cloud functionを実装するディレクトリを作って環境を初期化します。
$ mkdir firebase; cd ./firebase
$ firebase init functions
...
$ ls .
firebase.json functions/
$ ls ./functions
index.js package.json
functions/index.js にwebhook を実装します。Dialogflow consoleのFulfillment > Inline Editorに表示されているコードをベースにして、Realtime databaseの room-light に値を書き込むコードを追加します。トリガーとして使うだけなので書き込む値は適当に時刻でも書き込んでおきます。
'use strict';

const functions = require('firebase-functions');
const admin = require('firebase-admin');
const {WebhookClient} = require('dialogflow-fulfillment');

process.env.DEBUG = 'dialogflow:debug'; // enables lib debugging statements

admin.initializeApp()

exports.dialogflowFirebaseFulfillment = functions.https.onRequest((request, response) => {
  const agent = new WebhookClient({ request, response });
  console.log('Dialogflow Request headers: ' + JSON.stringify(request.headers));
  console.log('Dialogflow Request body: ' + JSON.stringify(request.body));

  function welcome(agent) {
    agent.add(`Welcome to my agent!`);
  }

  function fallback(agent) {
    agent.add(`I didn't understand`);
    agent.add(`I'm sorry, can you try again?`);
  }

  const lightPath = "/room-light"

  function turnOnLight(agent) {
    var date = new Date();
    admin.database().ref(lightPath).set({
      trigger: date.getTime(),
      op: 'on'
    });
    agent.add('明かりをつけました')
  }

  function turnOffLight(agent) {
    var date = new Date();
    admin.database().ref(lightPath).set({
      trigger: date.getTime(),
      op: 'off'
    });
    agent.add('明かりを消しました')
  }

  // Run the proper function handler based on the matched Dialogflow intent name
  let intentMap = new Map();
  intentMap.set('Default Welcome Intent', welcome);
  intentMap.set('Default Fallback Intent', fallback);
  intentMap.set('TurnOnRoomLight', turnOnLight);
  intentMap.set('TurnOffRoomLight', turnOffLight);
  agent.handleRequest(intentMap);
});
必要なライブラリをpackage.jsonに追加します。
{
  "name": "functions",
  "description": "Cloud Functions for Firebase",
  "scripts": {
    "serve": "firebase serve --only functions",
    "shell": "firebase functions:shell",
    "start": "npm run shell",
    "deploy": "firebase deploy --only functions",
    "logs": "firebase functions:log"
  },
  "dependencies": {
    "firebase-admin": "~6.0.0",
    "firebase-functions": "^2.0.3",
    "actions-on-google": "^2.1.3",
    "dialogflow-fulfillment": "^0.5.0"
  },
  "private": true
}
実装が終わったらcloud functionsにdeployします。deploy後に表示されるURLをDialogflow > Fulfillment > Webhook のURLに入力してDialogflowとwebhookをつなぎます。
$ firebase deploy --only functions
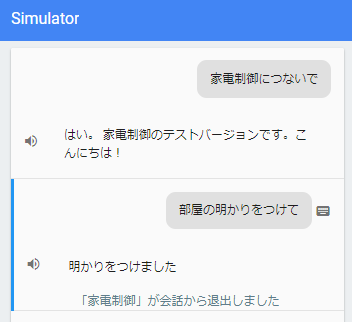
テスト
Actions on Googleのsimulatorでテストしてみます。この時、Realtime databaseのコンソールでroom-lightの値も更新されていることを確認します。
クライアント側の実装
python-broadlink
Python control for Broadlink RM2 IR controllersをインストールします。ライトのon/offのIRコードを学習してCLIツールのbroadlink_cliでon/offできるようにしておきます。
$ ./python-broadlink/cli/broadlink_cli --device @ir_code/RM.device --send @ir_code/on
$ ./python-broadlink/cli/broadlink_cli --device @ir_code/RM.device --send @ir_code/off
Realtime databaseの監視
実装用ディレクトリをfirebaseを使うように初期化します。
$ npm init
$ npm install firebase --save
$ firebase init database
index.jsを実装します。Realtime databaseの /room-light の変更を監視します。変更があったら先ほどのbroadlink_cliを使ってon/offします。
const firebase = require('firebase');
const config = require('./config')
const exec = require('child_process').exec;

firebase.initializeApp(config);
const db = firebase.database();
const irCommand = './python-broadlink/cli/broadlink_cli --device @ir_code/RM.device --send @ir_code/'

// room light
const lightPath = '/room-light';
var attached = false;
db.ref(lightPath).on("value", function(snapshot) {
    if (!attached) {
        attached = true;
        return;
    }

    var operation = snapshot.val().op;
    switch(operation) {
        case 'on':
            exec(irCommand + 'room_light/on', (err, stdout, stderr) => {});
            break;
        case 'off':
            exec(irCommand + 'room_light/off', (err, stdout, stderr) => {});
            break;
    }
});
Realtime databaseへアクセスするためのAPI KeyやURLなどの設定はFirebase consoleのAuthenticationのWeb設定からコピーしてconfig.jsに格納してindex.jsから参照します。
var config = {
    apiKey: "XXXXXXXXXXXXXXXXXXXXX",
    authDomain: "<domain>",
    databaseURL: "https://xxx.com",
    projectId: "<project id>",
    storageBucket: "<storage>",
    messagingSenderId: "0000000000"
};
module.exports = config
監視・IR制御サーバの起動
index.js を実行してrealtime databaseの監視をはじめます。Google Homeから明かりをつけるとfirebase realtime database が更新され、更新をトリガーとしてIRコマンドが送信されます。
$ node index.js