本記事は ZOZO Advent Calendar 2023 シリーズ 7 の 18 日目の記事です。
はじめに
この記事は「Slack 次世代プラットフォーム機能を使用して以下の記事と同じことをやる」というものです。
上記の記事では定常業務の担当者を決めるBOTアプリケーションを Google Apps Script を使って作っていますが、Slack 用のアプリケーションなのでデータベースも実行基盤も Slack の中で完結するアプリにしたいな…という思いから今回のアプリを作ることにしてみました。
Slack platform については Slack の中の人が解説してくれている入門記事があるので、そちらをご覧ください。
システム構成
GAS を使ったもの
冒頭で引用した記事で作っているアプリケーションの簡単なシステム構成図です。担当者を管理するデータベースとして Google Spreadsheet を使っており、そのスプシを参照して GAS のアプリケーションが動いています。
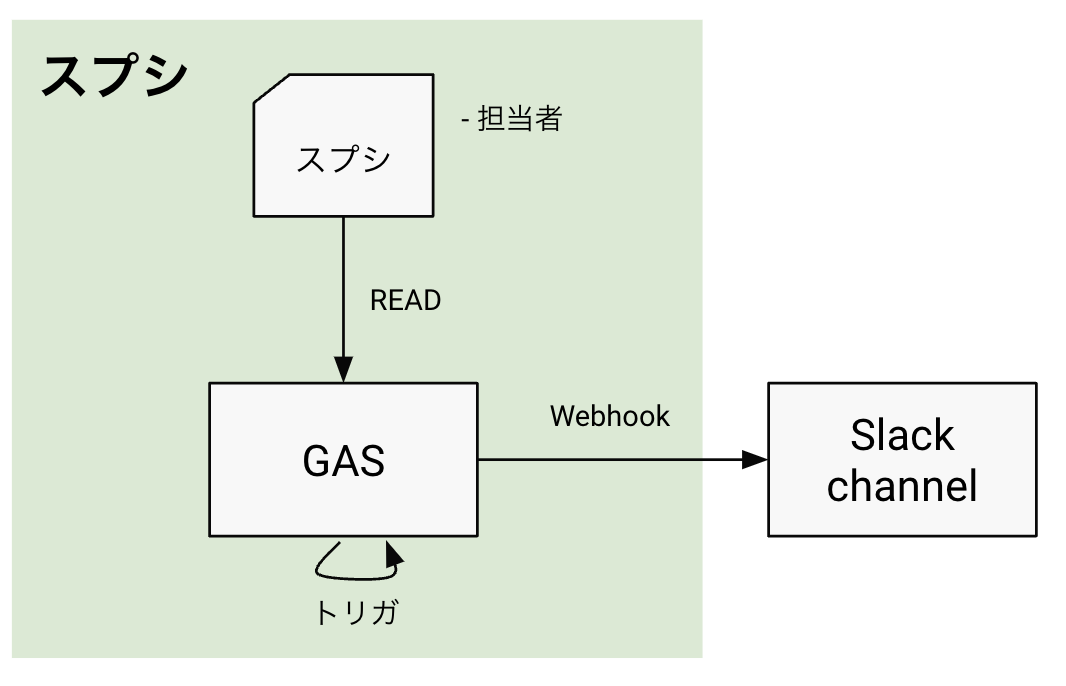
GAS では定期実行のトリガを設定できるため、実行トリガを GAS に任せる形になっています。
Slack platform を使ったもの
本記事で作成するアプリケーションの構成です。全てが Slack にまとめられる形になっています。
データベースは Dynamo DB をバックエンドとする Datastore を使用し、実行トリガは Scheduled triggers を使っています。
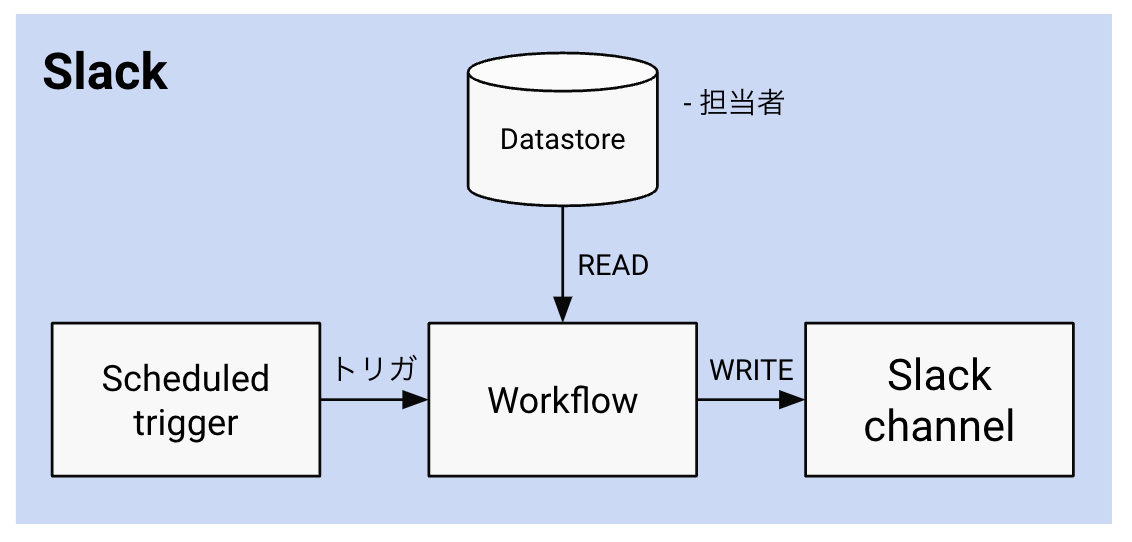
GAS を使ったものよりも構成要素が多い気がしますが、細かいことは気にしないで進みましょう。
マニフェストの定義
Slack platform ではアプリケーション全体を manifest.ts というファイルで管理します。今回は NotificationWorkflow という名称のワークフローを開発していきます。Datastore には未通知ユーザーを管理するための NotNotified データベースを用意しています。
import { Manifest } from "deno-slack-sdk/mod.ts";
import { workflow as NotificationWorkflow } from "./workflows/scheduled_notify.ts";
import NotNotified from "./datastores/not_notified.ts";

export default Manifest({
  name: "scheduled-notification-app",
  description: "You are on duty this week!",
  icon: "",
  workflows: [NotificationWorkflow],
  datastores: [NotNotified],
  outgoingDomains: [],
  botScopes: [
    "commands",
    "chat:write",
    "chat:write.public",
    "datastore:read",
    "datastore:write",
    "app_mentions:read",
  ],
});
Datastore の定義
Datastore はスキーマを定義するだけです。スキーマを定義してマニフェストファイルに定義を追加するだけでデータベースが使える優れものです。
import { DefineDatastore, Schema } from "deno-slack-sdk/mod.ts";

export default DefineDatastore({
  name: "not_notified",
  primary_key: "id",
  attributes: {
    id: {
      type: Schema.types.string,
    },
    user_id: {
      type: Schema.types.string,
    },
    username: {
      type: Schema.types.string,
    },
    updated_at: {
      type: Schema.types.string,
    },
  },
});
Function の定義
初期化用 Function
Slack platform では Function と呼ばれるコンポーネントを組み合わせて Workflow を構成します。まず今回のアプリケーションで使用するデータを入れ込むための初期化処理を行う Function を作ります。
import { DefineFunction, Schema, SlackFunction } from "deno-slack-sdk/mod.ts";

const users = [
  // 当番に入れたいユーザーの member_id を入れる
  // name は人間が管理しやすくするためのもので、制御には使用していない
  { id: "XXX", name: "user_A" },
  { id: "XXX", name: "user_B" },
  { id: "XXX", name: "user_C" },
];

export const def = DefineFunction({
  callback_id: "fill-not-notified-function",
  title: "Fill datastore with not notified users",
  source_file: "./functions/fill_not_notified.ts",
  input_parameters: {
    properties: {
      forceClear: {
        type: Schema.types.boolean,
        default: false,
      },
    },
    required: [],
  },
  output_parameters: {
    properties: {},
    required: [],
  },
});

export default SlackFunction(def, async ({ inputs, client }) => {
  const queryAll = await client.apps.datastore.query({
    datastore: "not_notified",
  });
  console.log(`query result: ${JSON.stringify(queryAll, null, 2)}`);
  if (queryAll.error) {
    return { error: queryAll.error };
  }
  // 初期化したい場合としない場合があるので条件分岐している
  if (!inputs.forceClear && queryAll.items.length > 0) {
    return {
      outputs: {},
    };
  }
  for (const item of queryAll.items) {
    const deletion = await client.apps.datastore.delete({
      datastore: "not_notified",
      id: item.id,
    });
    if (deletion.error) {
      return { error: deletion.error };
    }
  }
  // 初期化時は全ての要素を put する
  for (const user of users) {
    const creation = await client.apps.datastore.put({
      datastore: "not_notified",
      item: {
        id: crypto.randomUUID(),
        user_id: user.id,
        username: user.name,
        updated_at: new Date().toISOString(),
      },
    });
    if (creation.error) {
      return { error: creation.error };
    }
  }

  console.log(
    `Finished initialization with users: ${JSON.stringify(users, null, 2)}`,
  );
  return {
    outputs: {},
  };
});
通知対象者選定用 Function
続いてその日の担当となるユーザーを選定するための Function を作ります。今回は以下のような仕様となるように実装しています。
- 全てのユーザーが担当者になるまで重複なしで選定される
- 全てのユーザーが担当者になったあとは再度全てのユーザーが担当者候補となる
- 担当者はランダムに選ばれる
import { DefineFunction, Schema, SlackFunction } from "deno-slack-sdk/mod.ts";

export const def = DefineFunction({
  callback_id: "pickup-target-function",
  title: "Pickup notification target from not_notified datastore",
  source_file: "./functions/pickup_target.ts",
  input_parameters: {
    properties: {},
    required: [],
  },
  output_parameters: {
    properties: {
      user_id: {
        type: Schema.types.string,
      },
      username: {
        type: Schema.types.string,
      },
    },
    required: ["user_id", "username"],
  },
});

export default SlackFunction(def, async ({ client }) => {
  // 通知対象のユーザーは定数で持っているため、datastoreから全数取得してそこからランダムに選択する
  const queryAll = await client.apps.datastore.query({
    datastore: "not_notified",
  });
  if (queryAll.error) {
    return { error: queryAll.error };
  }

  const allItems = queryAll.items;
  const randomIndex = Math.floor(Math.random() * allItems.length);
  const item = allItems[randomIndex];
  const targetUserId = item.user_id;
  const targetUsername = item.username;
  console.log(`target user: ${targetUserId} ${targetUsername}`);
  // 選択されたユーザーは datastore から削除して通知済みとして扱う
  const deletion = await client.apps.datastore.delete({
    datastore: "not_notified",
    id: item.id,
  });
  if (deletion.error) {
    return { error: deletion.error };
  }

  return {
    outputs: {
      user_id: targetUserId,
      username: targetUsername,
    },
  };
});
Workflow の定義
最後に Function を組み合わせて Workflow を作ります。workflow.addStep という部分で Function を繋ぎ合わせています。
またここで作成した Workflow に対してトリガーの設定もしており、今回は冒頭で紹介した通り Scheduled trigger を使っています。
import { DefineWorkflow, Schema } from "deno-slack-sdk/mod.ts";
import { def as PickupTarget } from "../functions/pickup_target.ts";
import { def as FillNotNotified } from "../functions/fill_not_notified.ts";
import { SingleParameterVariable } from "deno-slack-sdk/parameters/types.ts";

const message = (user_id: SingleParameterVariable) => {
  return `今週の担当者は、<@${user_id}> です!\n` +
    `参考資料はこちら: <https://XXXXXXX>\n` +
    `今週も一週間よろしくお願いします!!`;
};

export const workflow = DefineWorkflow({
  callback_id: "notification-workflow",
  title: "Notification Workflow",
  input_parameters: {
    properties: {
      channel_id: { type: Schema.slack.types.channel_id },
    },
    required: ["channel_id"],
  },
});

const notificationTarget = workflow.addStep(PickupTarget, {});
workflow.addStep(Schema.slack.functions.SendMessage, {
  channel_id: workflow.inputs.channel_id,
  message: message(notificationTarget.outputs.user_id),
});
workflow.addStep(FillNotNotified, { forceClear: false });

import { Trigger } from "deno-slack-api/types.ts";

// FYI: スケジュール実行のトリガを翌日の AM 10:00 からに設定している
const today = new Date();
const tomorrow = new Date(
  today.getFullYear(),
  today.getMonth(),
  today.getDate() + 1,
);
tomorrow.setHours(10, 0, 0, 0);

const trigger: Trigger<typeof workflow.definition> = {
  type: "scheduled",
  name: "Trigger the notification workflow",
  workflow: `#/workflows/${workflow.definition.callback_id}`,
  schedule: {
    start_time: tomorrow.toISOString(),
    end_time: "2037-12-31T23:59:59Z",
    frequency: { type: "daily", repeats_every: 1 },
    timezone: "JST",
  },
  inputs: {
    channel_id: { value: "{{data.channel_id}}" },
  },
};

export default trigger;
動作確認
今回はローカルでアプリケーションを起動して動作確認を行います。まずは作成したトリガーの登録を行います。
$ slack triggers create --trigger-def ./workflows/scheduled_notify.ts
続いてアプリケーションをデバッグモードで起動します。
$ slack run
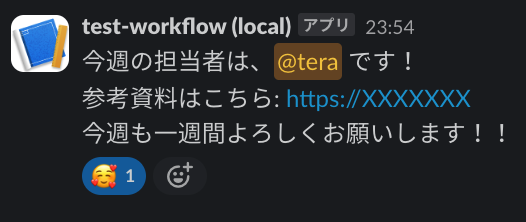
後はスケジュール実行のタイミングが来ると以下のようなメンションが飛んできます。ちなみにデバッグ時はスケジュール実行タイミングを待っていられないので、トリガーを app_mentioned に変えたワークフローを用意してデバッグしていました。
Slack platform を使うメリット
今回作成したアプリケーションの場合は、なんと言ってもシステムを運用する上での関心の対象を一箇所に集約できることでしょう。実行基盤もデータベースもトリガーも全て Slack 上であり、更にコードベースで管理できるのが最大のメリットではないでしょうか。
開発の物量という観点では正直 GAS を使った方がシュッと書けて楽だというのは否めません。
ただし、Slack platform は作って終わりではなく、これまでに作成した Function を別なワークフローの構成要素として流用できるのも大きなメリットの一つです。
今回は初めて作るワークフローだったので開発の物量は多くなってしまいましたが、Function の作り方を工夫するとある程度複雑なワークフローも Function を繋ぎ合わせるだけの作業で作れてしまうと思います。
また全てがコードで管理されているため GitHub Actions などの CI/CD ツールとの相性も良く、エンジニアの開発体験がよく考えられたサービスになっているのもメリットの一つでしょう。
まとめ
Slack platform でワークフロー作りの進化を感じました。ちなみに Slack platform は 2023 年 12 月時点では有料プランでしか使えない機能のようなので、悪しからず。