はじめに
こんにちは。今回は、カスタムレイアウトを使用してListViewを作成する際にハマった点を中心に、ListViewをスクロールできることを確認しつつ、ListViewのアイテムをタップして値を取得するところまで解説します。
カスタムレイアウトを使ったListViewの作成では、Androidでデフォルトで用意されているレイアウトを使う際には発生しない、スクロールできないといったエラーが発生することがあります。また、ListViewを画面全体に配置しない場合(画面の先頭ではなく途中から配置する場合)、ListViewを画面全体に配置する時には発生しないエラーが発生することがあります。これらのエラーにハマった際の解決方法を明確にしておきます。以下は解決方法として間違っています。
- ScrollViewでListViewを囲うことにより、スクロールできるようにする
- Java側のコードで何とかしようとする
前提
*Android Studio 4.0.1
*targetSdkVersion 29
*Google Pixel 3a XL
完成イメージ
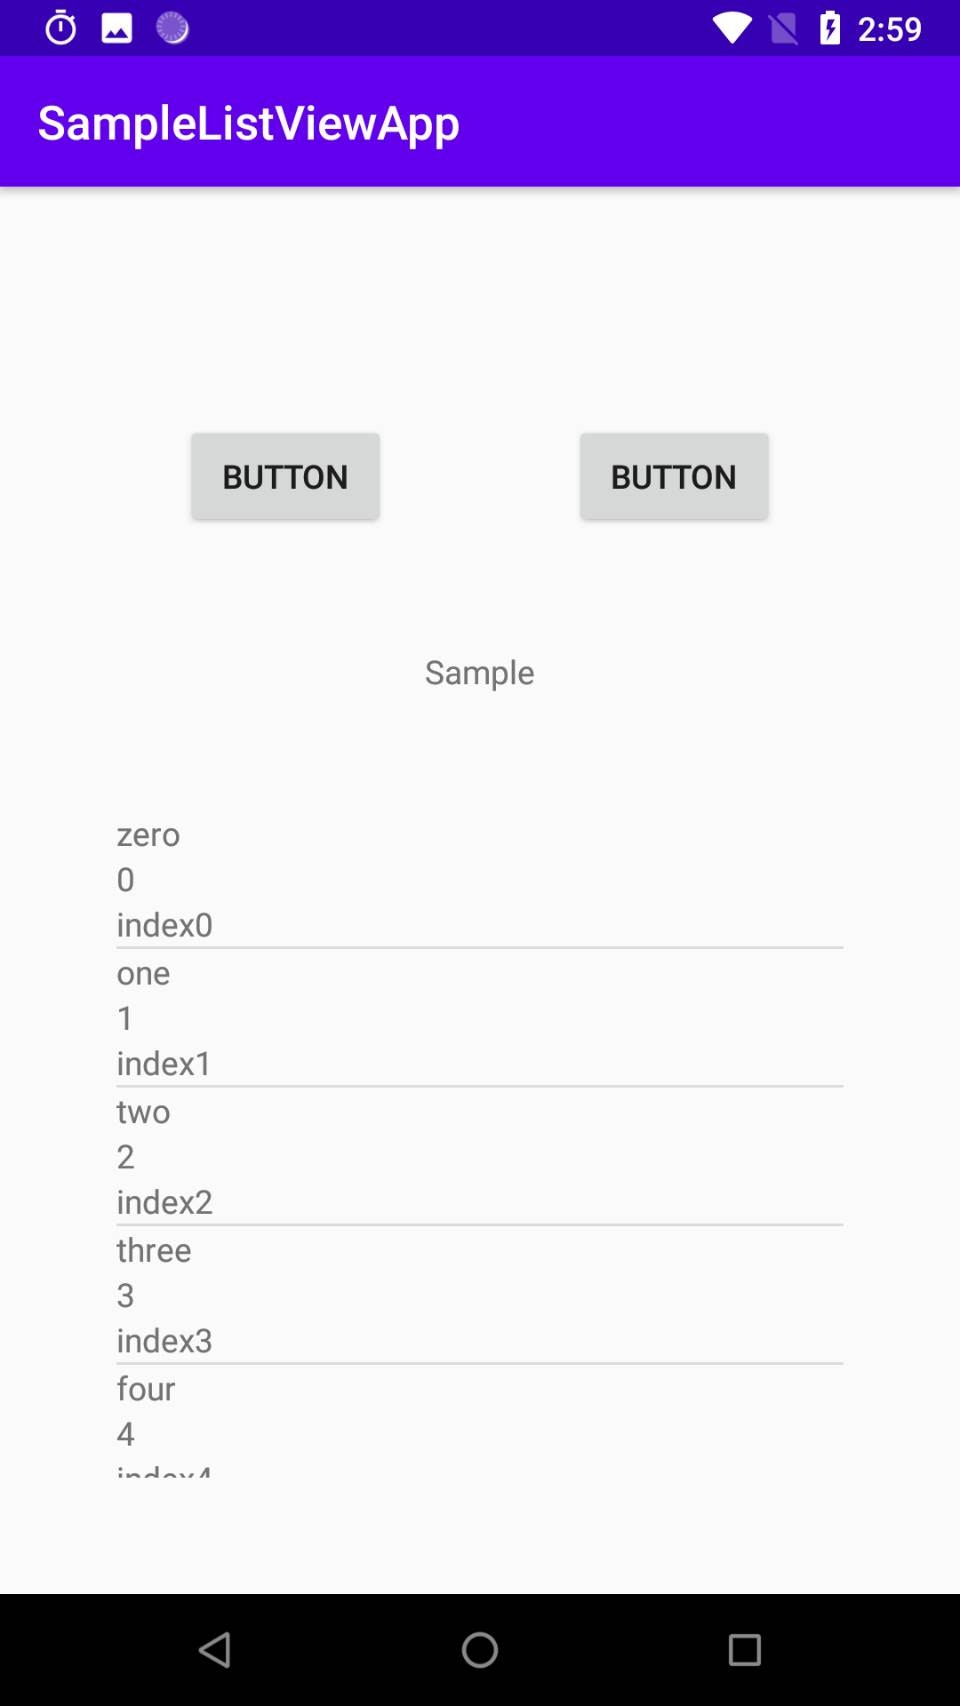
以下のような画面を作ります。リストビューのアイテムをタッチすると、ログにListViewのアイテムの値を出力するようにします。リストビューの各行は、3行のテキストビューからなります。リストビューはスクロールすることができます。
画面レイアウトの作成
まずは、完成イメージの通りになるように画面を作成してみます。レイアウトは以下の通りです。ここで配置の仕方を間違えると、想定通りにViewが配置されない、スクロールできないといった予想外の挙動が発生します。ListViewをスクロールできない場合やListViewが1行しか表示されない、ListViewが指定している大きさと異なる大きさで配置されるといった問題がある場合は、画面レイアウトが間違っていることを疑うようにしてください。間違っても、ScrollViewを配置したり、Java側にレイアウトを修正するためのコードを記述しないようにしてください。
<androidx.constraintlayout.widget.ConstraintLayout
    xmlns:android="http://schemas.android.com/apk/res/android"
    xmlns:app="http://schemas.android.com/apk/res-auto"
    xmlns:tools="http://schemas.android.com/tools"
    android:layout_width="match_parent"
    android:layout_height="match_parent"
    tools:context=".MainActivity">

    <androidx.constraintlayout.widget.ConstraintLayout
        android:id="@+id/constraintLayout"
        android:layout_width="match_parent"
        android:layout_height="wrap_content"
        android:layout_marginTop="100dp"
        app:layout_constraintStart_toStartOf="parent"
        app:layout_constraintTop_toTopOf="parent"
        tools:context=".ResultSongArtistActivity">

        <Button
            android:id="@+id/button"
            android:layout_width="wrap_content"
            android:layout_height="wrap_content"
            android:text="Button"
            app:layout_constraintEnd_toStartOf="@+id/button2"
            app:layout_constraintHorizontal_bias="0.5"
            app:layout_constraintHorizontal_chainStyle="spread"
            app:layout_constraintStart_toStartOf="parent"
            app:layout_constraintTop_toTopOf="parent" />

        <Button
            android:id="@+id/button2"
            android:layout_width="wrap_content"
            android:layout_height="wrap_content"
            android:text="Button"
            app:layout_constraintEnd_toEndOf="parent"
            app:layout_constraintHorizontal_bias="0.5"
            app:layout_constraintStart_toEndOf="@+id/button"
            app:layout_constraintTop_toTopOf="parent" />

    </androidx.constraintlayout.widget.ConstraintLayout>

    <androidx.constraintlayout.widget.ConstraintLayout
        android:id="@+id/constraintLayout2"
        android:layout_width="match_parent"
        android:layout_height="wrap_content"
        android:layout_marginTop="50dp"
        app:layout_constraintEnd_toEndOf="parent"
        app:layout_constraintStart_toStartOf="parent"
        app:layout_constraintTop_toBottomOf="@+id/constraintLayout">

        <TextView
            android:id="@+id/textView"
            android:text="Sample"
            android:layout_width="wrap_content"
            android:layout_height="wrap_content"
            app:layout_constraintEnd_toEndOf="parent"
            app:layout_constraintStart_toStartOf="parent"
            app:layout_constraintTop_toTopOf="parent" />

    </androidx.constraintlayout.widget.ConstraintLayout>

    <ListView
        android:id="@+id/listView"
        android:layout_width="match_parent"
        android:layout_height="match_parent"
        android:layout_marginBottom="50dp"
        android:layout_marginEnd="50dp"
        android:layout_marginStart="50dp"
        android:layout_marginTop="250dp"
        app:layout_constraintBottom_toBottomOf="parent"
        app:layout_constraintEnd_toEndOf="parent"
        app:layout_constraintStart_toStartOf="parent"
        app:layout_constraintTop_toBottomOf="@+id/constraintLayout2" />

</androidx.constraintlayout.widget.ConstraintLayout>
ここで問題なのが、listviewの制約をconstraintLayout2に対してつけているにもかかわらず、layout_marginTopの値にはlistviewと画面上端の間隔である250dpを指定しているということです。これで見た目のレイアウトとしては問題ないですが、本来ならlayout_marginTopの値はlistviewとconstraintLayout2の間隔である50dpを設定するべきです。layout_marginTopの値を50dpにしつつ,見た目のレイアウトを完成イメージと同じにするためには、layout_widthに0dpを指定する必要があります。match_parentは親ViewいっぱいにViewを広げて配置するのに対し、0dpはレイアウトの中で埋まっていない領域いっぱいにViewを広げて配置します。そのため、match_parentの代わりに0dpを設定することで、完成イメージと同じレイアウトを実現できます。修正後のListViewは以下のようになります。
<ListView
    android:id="@+id/listView"
    android:layout_width="match_parent"
    android:layout_height="0dp"
    android:layout_marginBottom="50dp"
    android:layout_marginEnd="50dp"
    android:layout_marginStart="50dp"
    android:layout_marginTop="50dp"
    app:layout_constraintBottom_toBottomOf="parent"
    app:layout_constraintEnd_toEndOf="parent"
    app:layout_constraintStart_toStartOf="parent"
    app:layout_constraintTop_toBottomOf="@+id/constraintLayout2" />
カスタムレイアウトの記述
ここまでで画面レイアウトを作り終えたので、ListViewの各行に表示するカスタムレイアウト、Java側の処理を記述していきます。まずはカスタムレイアウトを記述します。ListViewの各行にテキストを1行、2行配置できるレイアウトはカスタムする必要がなくデフォルトで存在するため、ここではテキストを3行配置するためのカスタムレイアウトを作成します。res/layoutフォルダを右クリックし,[New]→[Layout resource file]を選択します。list_custom.xmlを作成してください。
ListViewの各行に3行のテキストを表示するために、以下のようにTextViewを3つ配置してIDで区別します。
<?xml version="1.0" encoding="utf-8"?>
<LinearLayout
    xmlns:android="http://schemas.android.com/apk/res/android"
    android:layout_width="match_parent"
    android:layout_height="match_parent"
    android:orientation="vertical">

    <TextView
        android:id="@+id/textList1"
        android:layout_width="match_parent"
        android:layout_height="wrap_content"
        android:textSize="14sp"/>

    <TextView
        android:id="@+id/textList2"
        android:layout_width="match_parent"
        android:layout_height="wrap_content"
        android:textSize="14sp"/>

    <TextView
        android:id="@+id/textList3"
        android:layout_width="match_parent"
        android:layout_height="wrap_content"
        android:textSize="14sp"/>

</LinearLayout>
Java側の処理
最後にJava側の処理を記述します。ListView、ListViewに表示するデータを格納するリストを作成し、値を格納します。ListViewの各行のレイアウトに2つ以上の値を表示する(例えば2行あるいは横に2つのテキストを表示する)場合、データを格納するリストはList<Map<String, String>>型で記述します。ListViewの1行に1つのMap型のデータを適用します。最後に、ListViewの各行と、表示するデータを紐づけるためにadapterを使用します。コードは以下の通りです。
public class MainActivity extends AppCompatActivity {
    private ListView listView;
    private List<Map<String, String>> numList;
    private Map<String, String> numMap;

    @Override
    protected void onCreate(Bundle savedInstanceState) {
        super.onCreate(savedInstanceState);
        setContentView(R.layout.activity_main);
        this.listView = findViewById(R.id.listView);
        this.numList = new ArrayList<>();
        this.numMap = new HashMap<>();
        this.numMap.put("word", "zero");
        this.numMap.put("num", "0");
        this.numMap.put("index", "index0");
        this.numList.add(this.numMap);
        this.numMap = new HashMap<>();
        this.numMap.put("word", "one");
        this.numMap.put("num", "1");
        this.numMap.put("index", "index1");
        this.numList.add(this.numMap);
        this.numMap = new HashMap<>();
        this.numMap.put("word", "two");
        this.numMap.put("num", "2");
        this.numMap.put("index", "index2");
        this.numList.add(this.numMap);
        this.numMap = new HashMap<>();
        this.numMap.put("word", "three");
        this.numMap.put("num", "3");
        this.numMap.put("index", "index3");
        this.numList.add(this.numMap);
        this.numMap = new HashMap<>();
        this.numMap.put("word", "four");
        this.numMap.put("num", "4");
        this.numMap.put("index", "index4");
        this.numList.add(this.numMap);
        this.numMap = new HashMap<>();
        this.numMap.put("word", "five");
        this.numMap.put("num", "5");
        this.numMap.put("index", "index5");
        this.numList.add(this.numMap);
        this.numMap = new HashMap<>();
        this.numMap.put("word", "six");
        this.numMap.put("num", "6");
        this.numMap.put("index", "index6");
        this.numList.add(this.numMap);
        this.numMap = new HashMap<>();
        this.numMap.put("word", "seven");
        this.numMap.put("num", "7");
        this.numMap.put("index", "index7");
        this.numList.add(this.numMap);
        this.numMap = new HashMap<>();
        this.numMap.put("word", "eight");
        this.numMap.put("num", "8");
        this.numMap.put("index", "index8");
        this.numList.add(this.numMap);
        this.numMap = new HashMap<>();
        this.numMap.put("word", "nine");
        this.numMap.put("num", "9");
        this.numMap.put("index", "index9");
        this.numList.add(this.numMap);
        this.numMap = new HashMap<>();
        this.numMap.put("word", "ten");
        this.numMap.put("num", "10");
        this.numMap.put("index", "index10");
        this.numList.add(this.numMap);
        this.numMap = new HashMap<>();
        this.numMap.put("word", "eleven");
        this.numMap.put("num", "11");
        this.numMap.put("index", "index11");
        this.numList.add(this.numMap);

        String[] from = {"word", "num", "index"};
        int[] to = {R.id.textList1, R.id.textList2, R.id.textList3};
        // 第2引数はリストデータそのもの
        // 第3引数はリストビューの各行のレイアウトを示すR値
        // fromとtoの組み合わせでMap内のどのデータをListView各行のどの部品に割り当てるかを指定できる
        SimpleAdapter adapter = new SimpleAdapter(this, numList, R.layout.customlist, from, to);
        listView.setAdapter(adapter);

        // parentはタップされたリスト全体を表す
        // viewはタップされた1行分の画面部品そのものを表す
        // positionはタップされた行番号を表す
        // positionと同じ値が渡される
        this.listView.setOnItemClickListener(new AdapterView.OnItemClickListener() {
            @Override
            public void onItemClick(AdapterView<?> parent, View view, int position, long id) {
                Map<String, String> item = (Map<String, String>) parent.getItemAtPosition(position);
                String itemWord = item.get("word");
                String itemNum = item.get("num");
                String itemIndex = item.get("index");
                Log.d("result", itemWord + ", " + itemNum + ", " + itemIndex);
            }
        });
    }
}
終わりに
今回は、カスタムレイアウトを使ったListViewについて解説しました。ListViewを画面の途中から始める場合のソースコードをすべて示しているので、様々なプログラムを作るときのテンプレとして使ってください。ListViewを表示する際にエラーが出たときは、真っ先にレイアウトファイルを疑ってみましょう。