遅くなりましたが、Xamarin Advent Calendar 2019の17日目です。
以前にAppSyncを使う機会があって、今回XamarinでもAppSyncが使えるかを試してみました。
AWS AppSyncとは
GraphQLを簡単に利用できるマネージドサービスです。データソースにはDynamoDBやLambdaなどが利用でき、リアルタイム更新やオフラインデータ同期にも対応しています。
Xamarin対応
現在AppSyncがXamarinに対応しているかと言うと、していません。NuGetで探すと、AWSSDK.AppSyncというのがあるのですが、これは、AppSyncのプロジェクトの閲覧や更新用のAPIのライブラリの様なので使うことはできません。普通にiOSやAndroidのライブラリはあるので、それを使って自前でバインディングするしかなさそうです。
バインディングライブラリの作成
公式で出ているAndroidやiOSのライブラリをそのままバインディングするのでも良かったのですが、正直問題が起きた時に面倒ですし、GraphQLのコードの自動生成もあるので、Android、iOSそれぞれで今回作るアプリで必要なAppSyncを利用するコードを書いて、それをバインディングすることにしました。
作ったサンプルアプリ
簡単なチャットアプリです。AppSyncの機能としては、メッセージの作成と作成通知を受け取るだけです。
ソースは、ここです。

サンプルアプリを動かすには
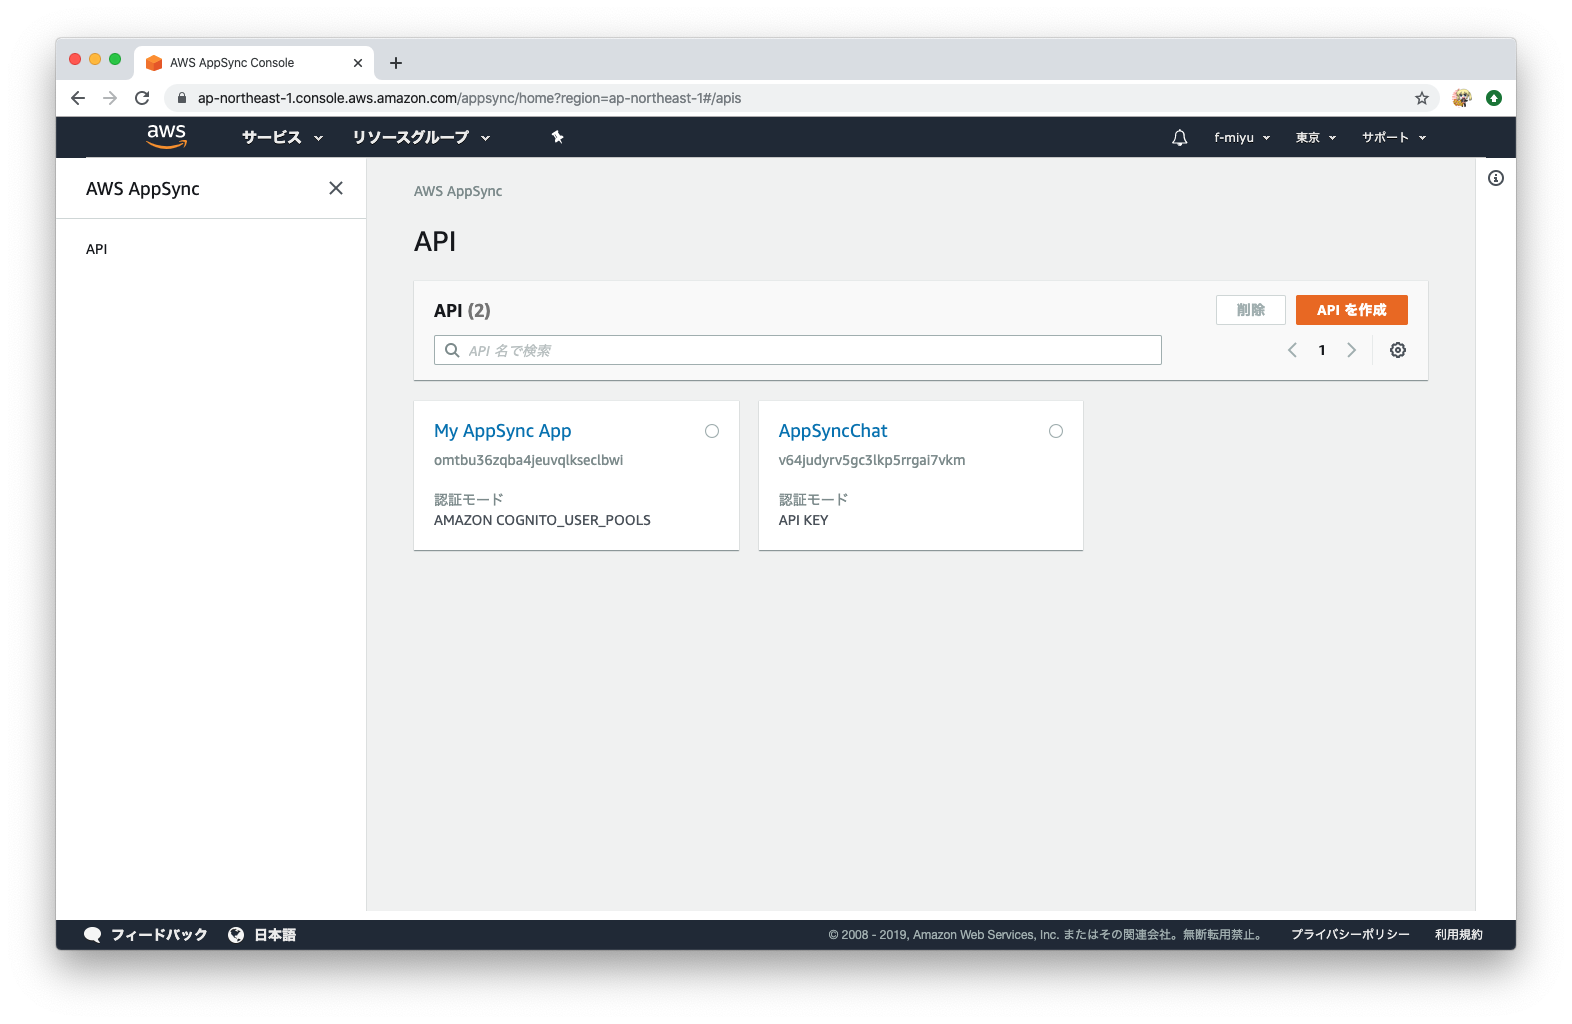
AppSyncのプロジェクトを作る必要があります。AWSのコンソール上で作っていきます。
プロジェクトの作成
AWSのコンソールからAWS AppSyncを選んで、表示画面の[APIを作成]ボタンをクリックします。
ウィザードで作成を選択して、開始をクリックします。
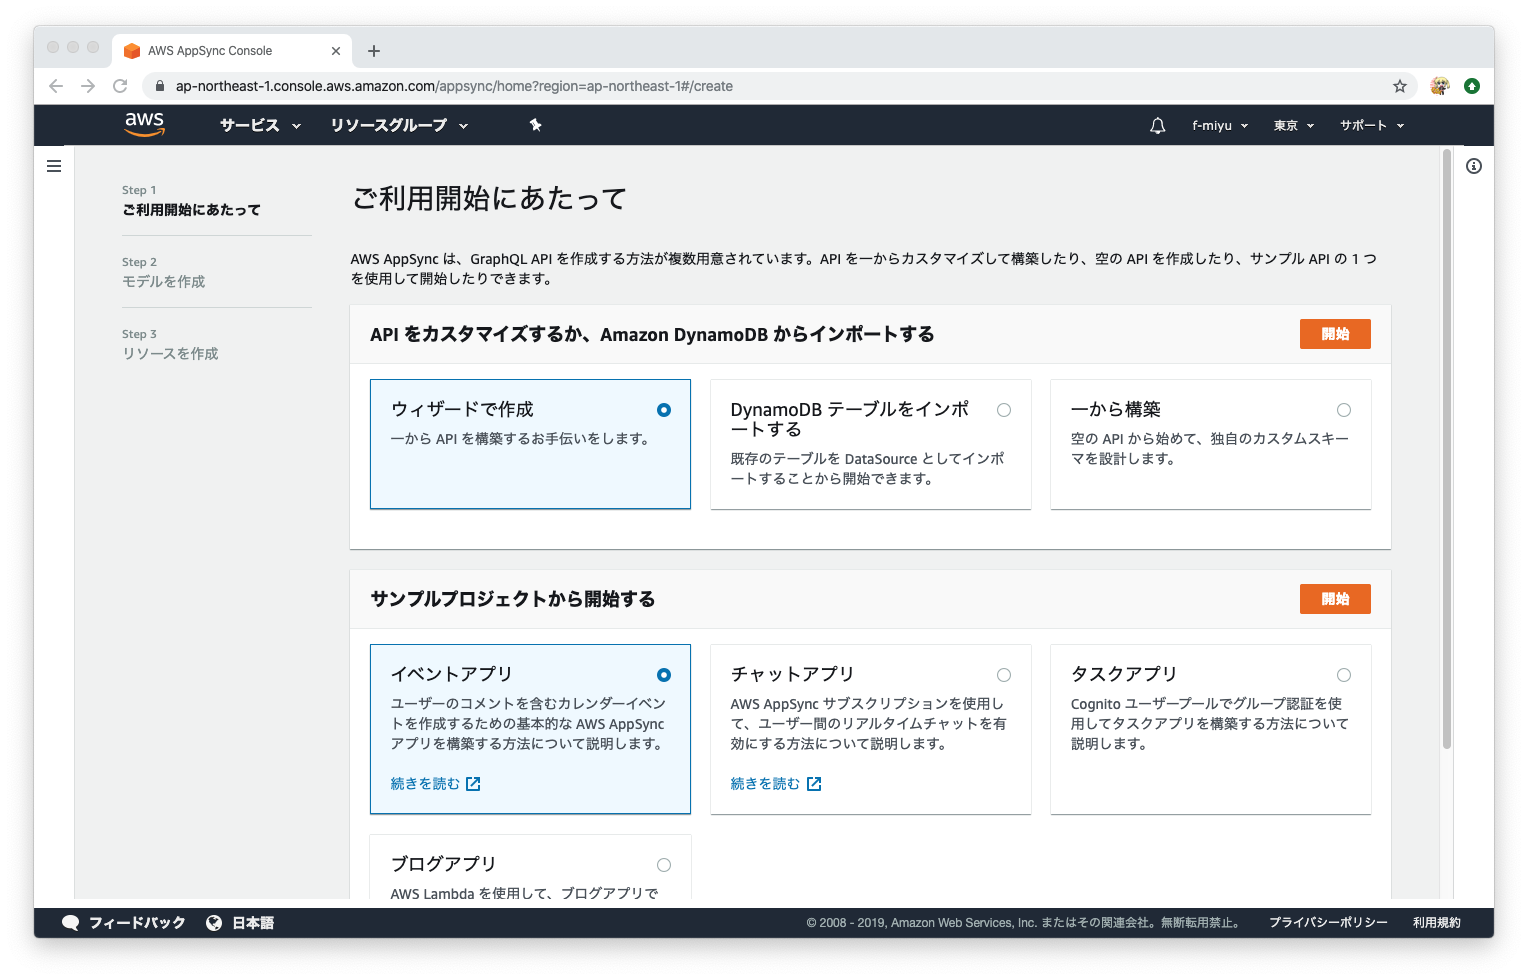
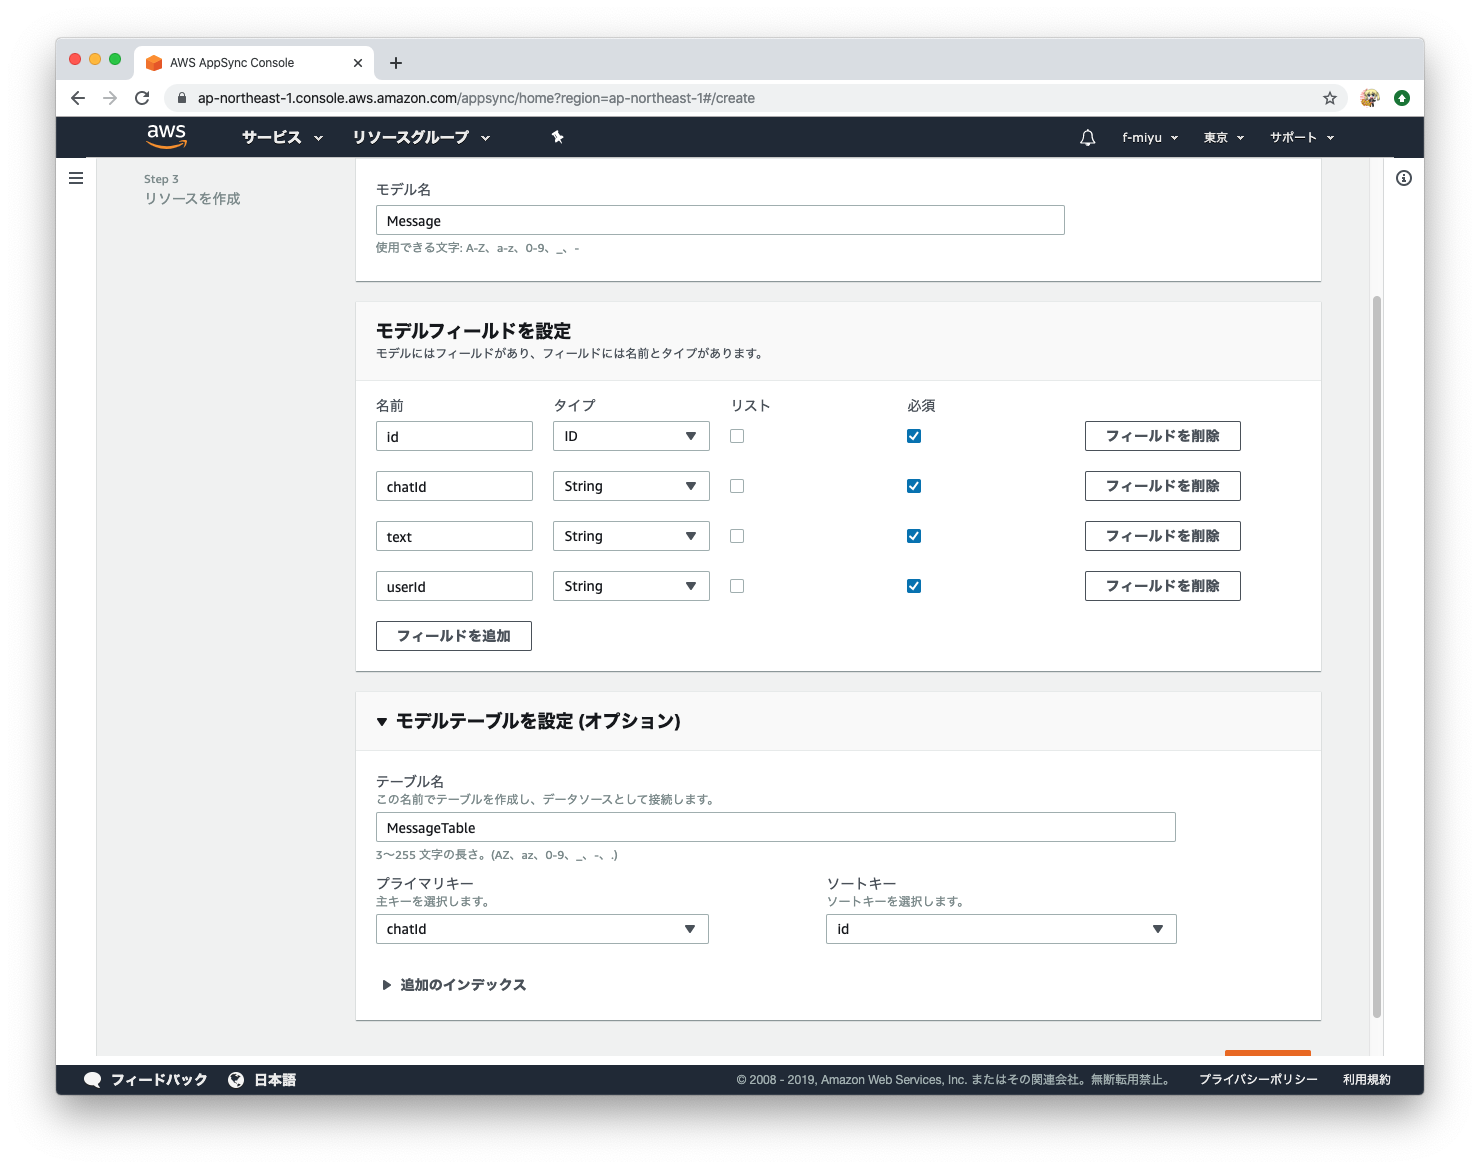
次の画面では以下の様に設定して、Createボタンをクリックします。
モデル名
Message
モデルフィールドの設定
| 名前 | タイプ | リスト | 必須 |
|---|---|---|---|
| id | ID | ✔︎ | |
| chatId | String | ✔︎ | |
| text | String | ✔︎ | |
| userId | String | ✔︎ |
モデルテーブルを設定 (オプション)
テーブル名
MessageTable
プライマリーキー
chatId
ソートキー
Id
API名を設定して、作成ボタンをクリックします。

プロジェクトの編集
スキーマ画面を表示し、作成されているスキーマを以下の様に変更して、スキーマを保存をクリックします。
input CreateMessageInput {
	chatId: String!
	text: String!
	userId: String!
}

input DeleteMessageInput {
	id: ID!
	chatId: String!
}

type Message {
	id: ID!
	chatId: String!
	text: String!
	userId: String!
}

type MessageConnection {
	items: [Message]
	nextToken: String
}

type Mutation {
	createMessage(input: CreateMessageInput!): Message
	updateMessage(input: UpdateMessageInput!): Message
	deleteMessage(input: DeleteMessageInput!): Message
}

type Query {
	getMessage(chatId: String!, id: ID!): Message
	listMessages(filter: TableMessageFilterInput, limit: Int, nextToken: String): MessageConnection
}

type Subscription {
	onCreateMessage(chatId: String!): Message
		@aws_subscribe(mutations: ["createMessage"])
	onUpdateMessage(chatId: String!): Message
		@aws_subscribe(mutations: ["updateMessage"])
	onDeleteMessage(chatId: String!): Message
		@aws_subscribe(mutations: ["deleteMessage"])
}

input TableBooleanFilterInput {
	ne: Boolean
	eq: Boolean
}

input TableFloatFilterInput {
	ne: Float
	eq: Float
	le: Float
	lt: Float
	ge: Float
	gt: Float
	contains: Float
	notContains: Float
	between: [Float]
}

input TableIDFilterInput {
	ne: ID
	eq: ID
	le: ID
	lt: ID
	ge: ID
	gt: ID
	contains: ID
	notContains: ID
	between: [ID]
	beginsWith: ID
}

input TableIntFilterInput {
	ne: Int
	eq: Int
	le: Int
	lt: Int
	ge: Int
	gt: Int
	contains: Int
	notContains: Int
	between: [Int]
}

input TableMessageFilterInput {
	id: TableIDFilterInput
	chatId: TableStringFilterInput
	text: TableStringFilterInput
	userId: TableStringFilterInput
}

input TableStringFilterInput {
	ne: String
	eq: String
	le: String
	lt: String
	ge: String
	gt: String
	contains: String
	notContains: String
	between: [String]
	beginsWith: String
}

input UpdateMessageInput {
	id: ID!
	chatId: String!
	text: String
	userId: String
}
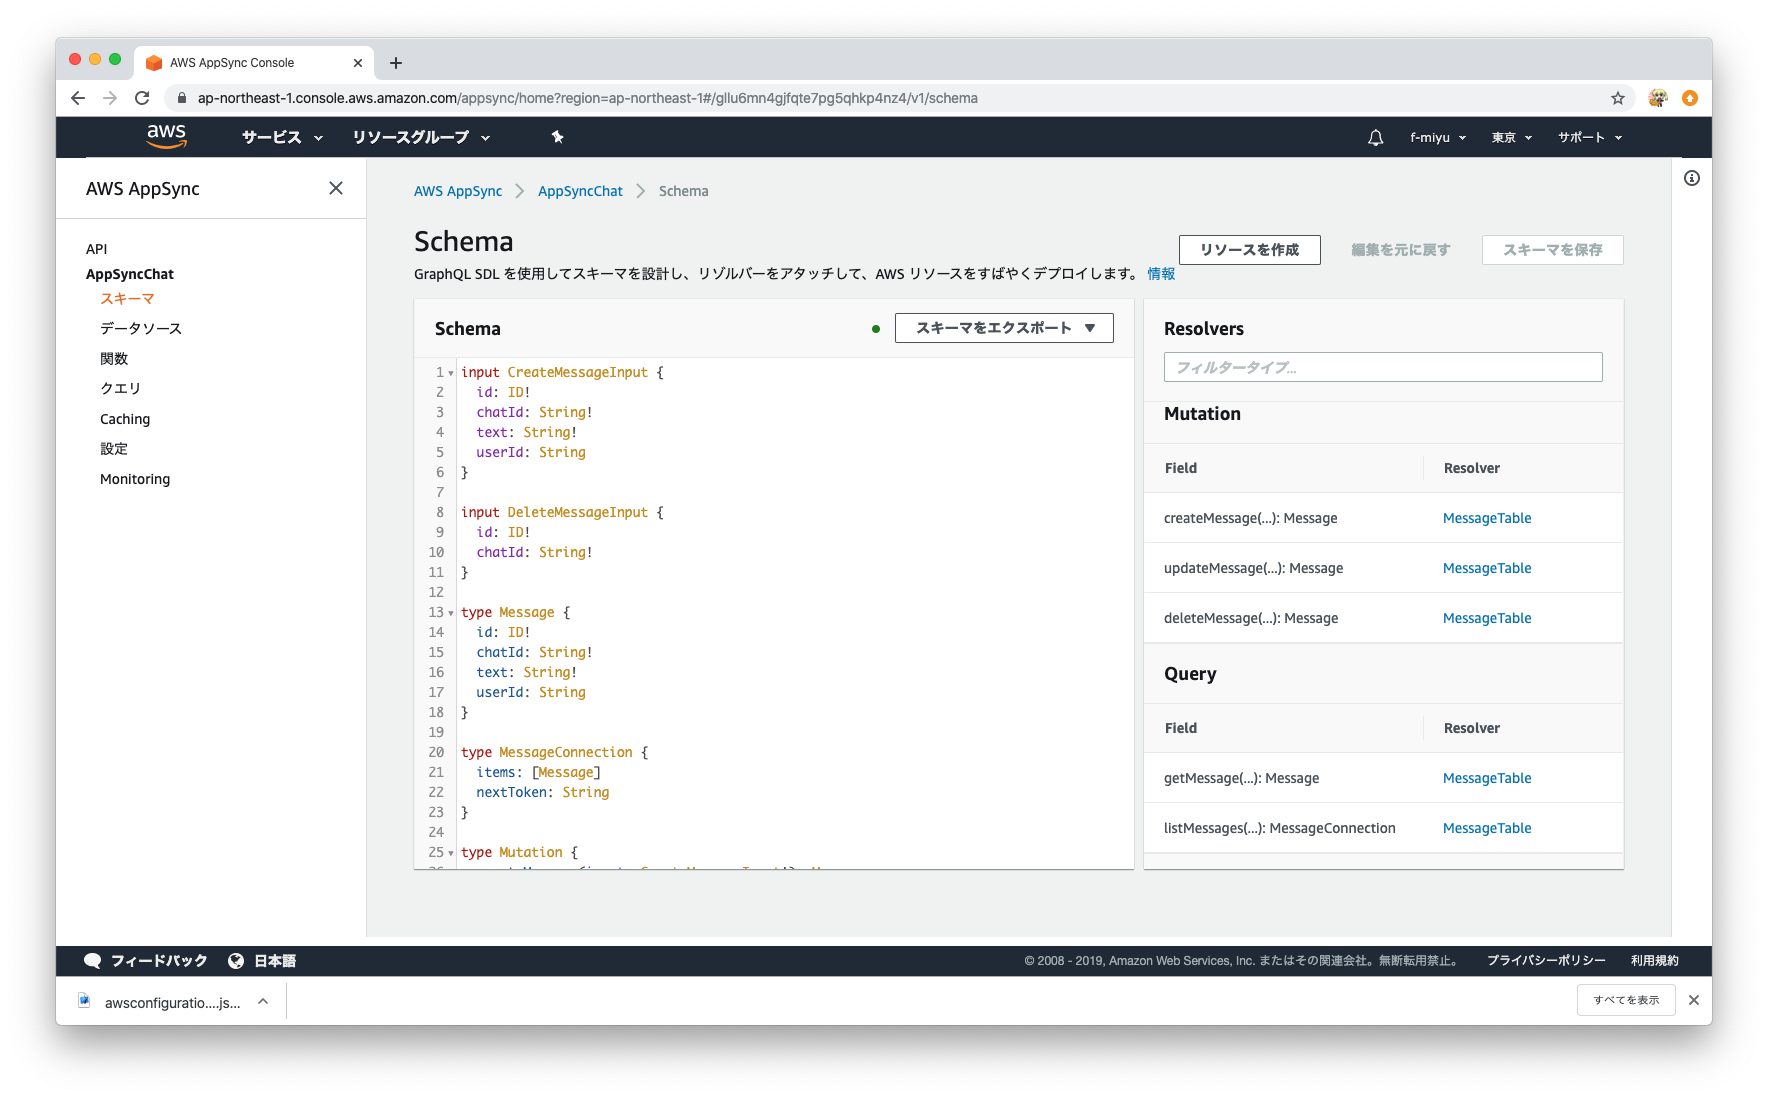
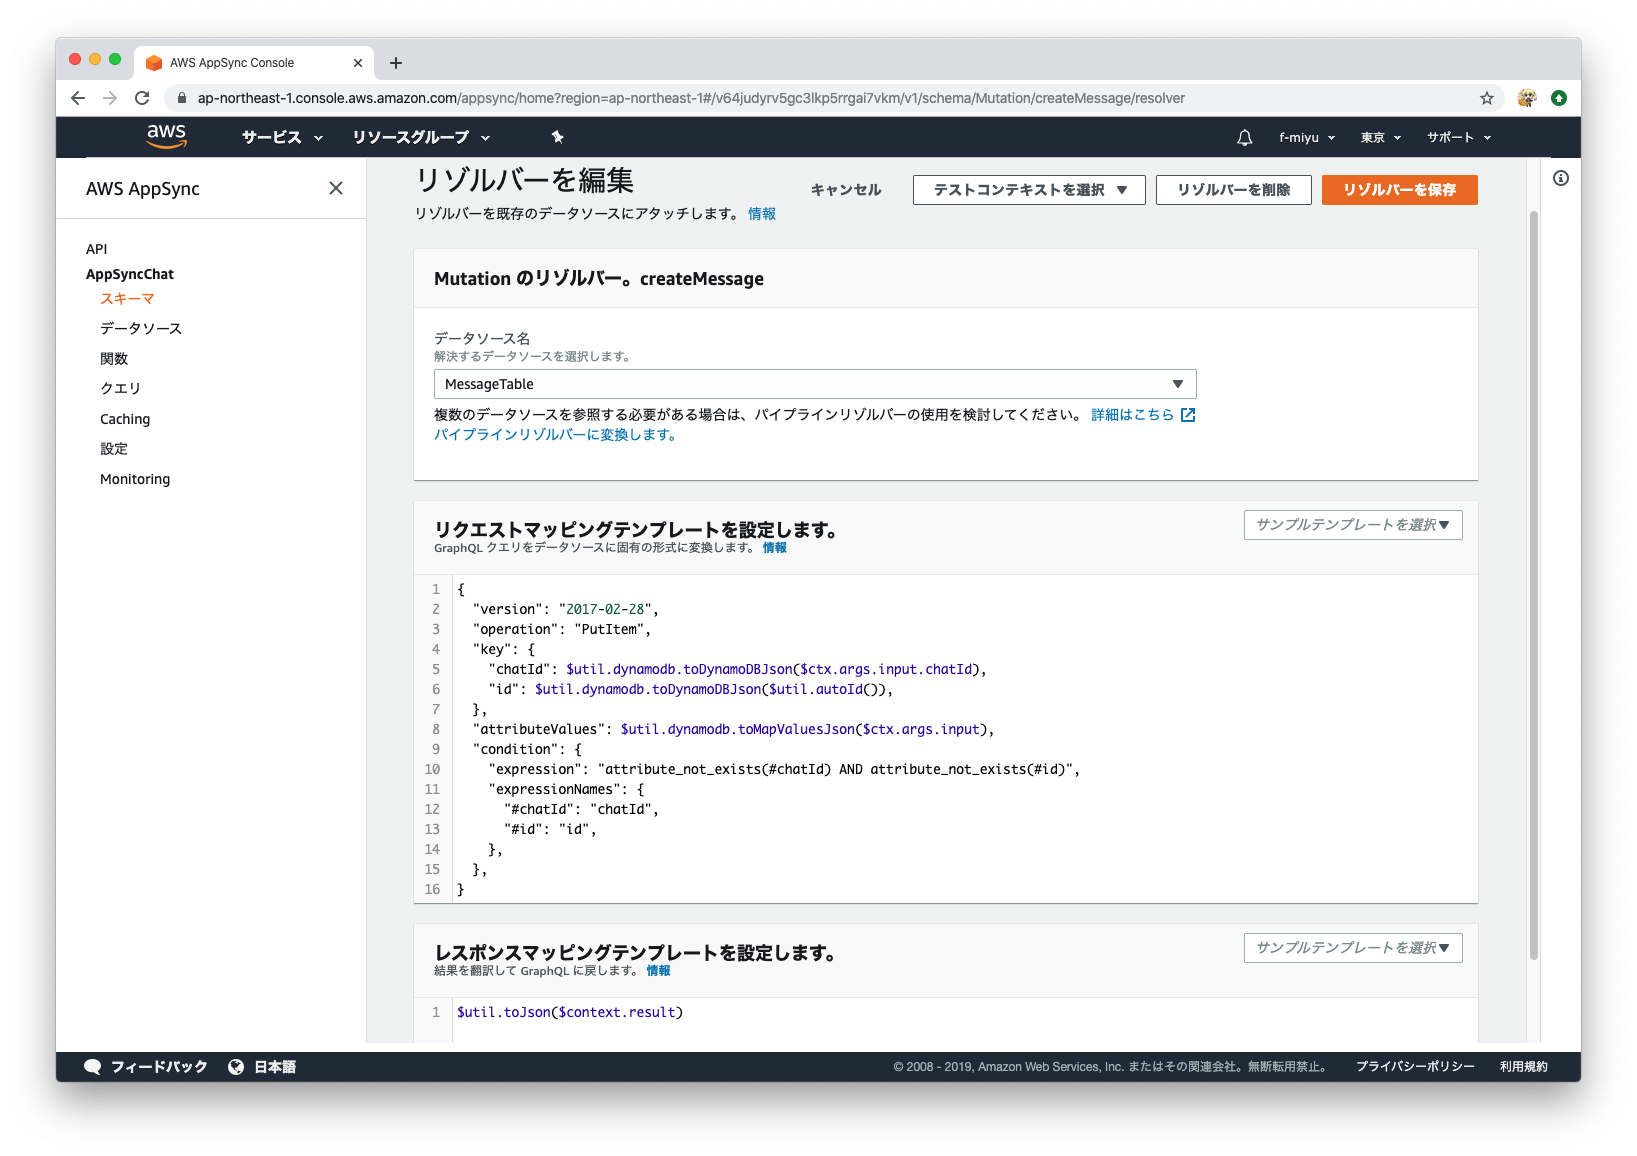
右側のResolversから、createMessageのRssolverをクリックして、リゾルバー編集画面を開き、リクエストマッピングテーブルを以下の様に編集して、保存します。
{
  "version": "2017-02-28",
  "operation": "PutItem",
  "key": {
    "chatId": $util.dynamodb.toDynamoDBJson($ctx.args.input.chatId),
    "id": $util.dynamodb.toDynamoDBJson($util.autoId()),
  },
  "attributeValues": $util.dynamodb.toMapValuesJson($ctx.args.input),
  "condition": {
    "expression": "attribute_not_exists(#chatId) AND attribute_not_exists(#id)",
    "expressionNames": {
      "#chatId": "chatId",
      "#id": "id",
    },
  },
}
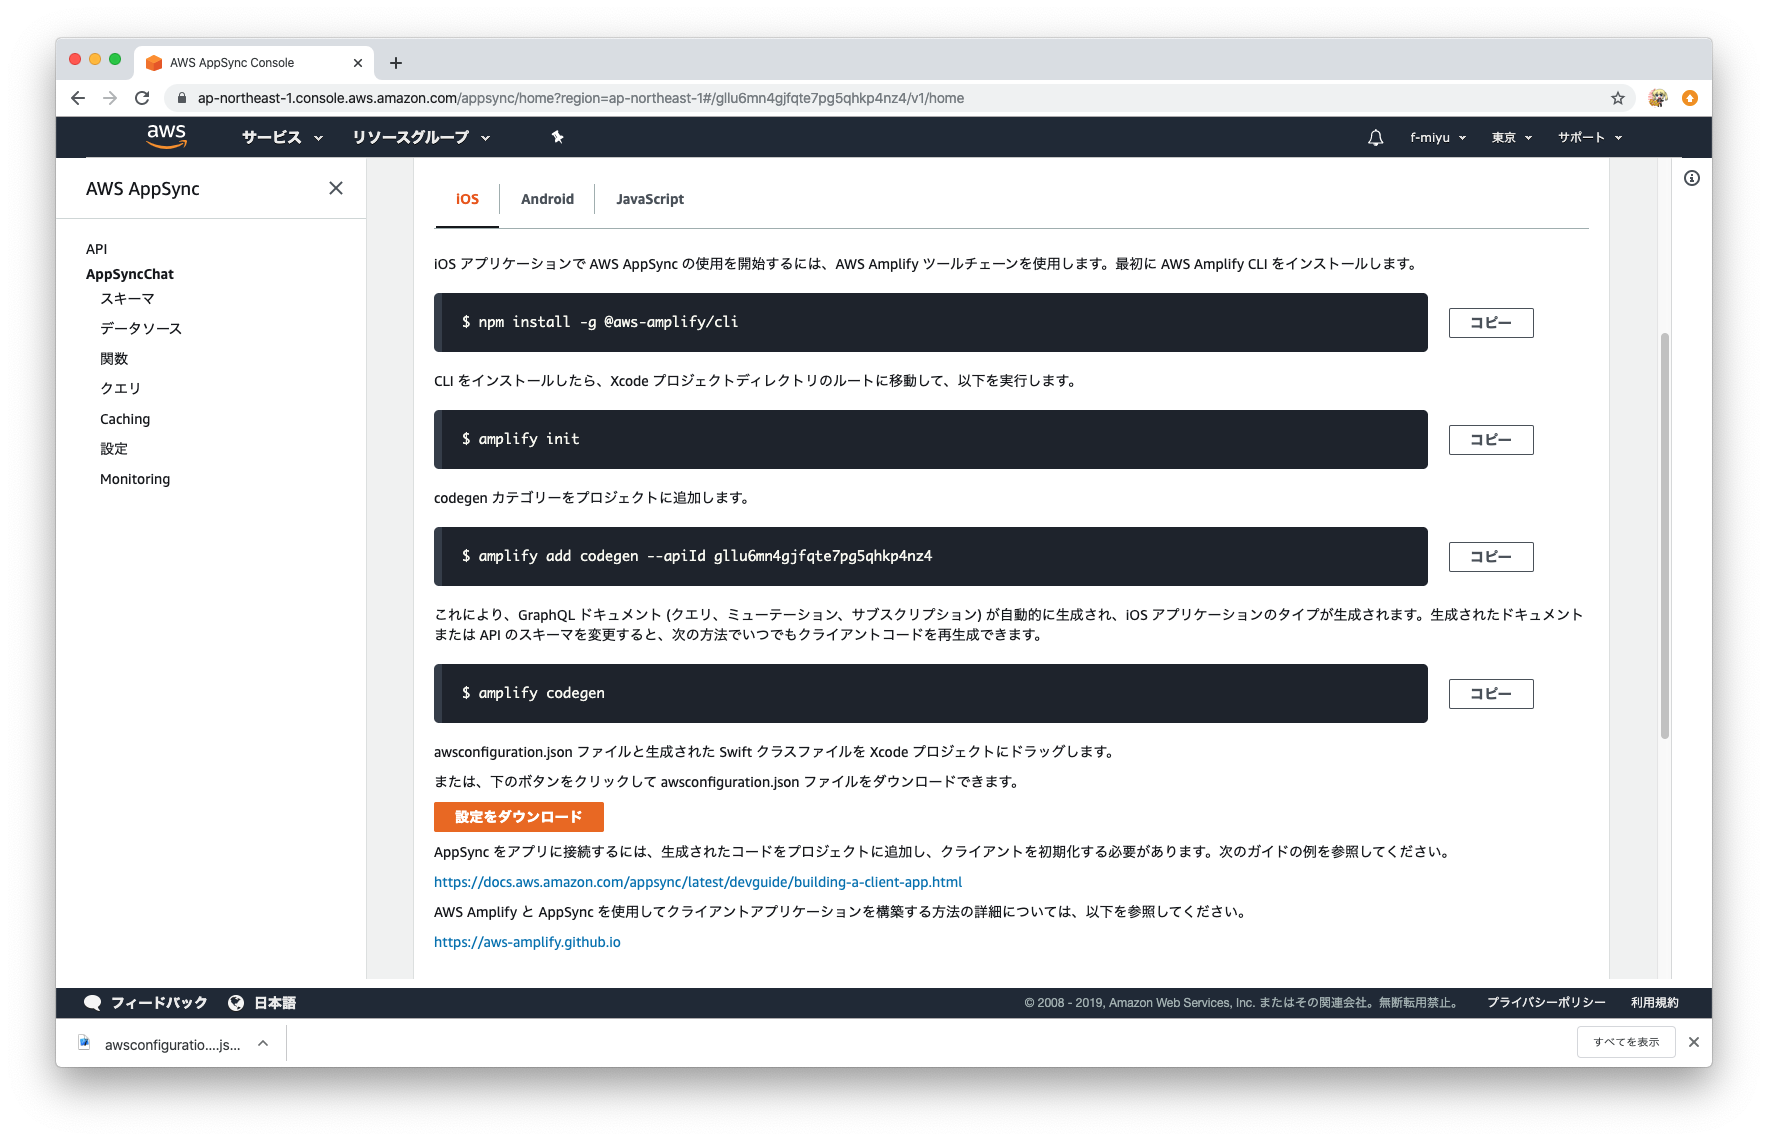
awsconfiguration.jsonファイルの追加
プロジェクトのトップ画面から、設定をダンロードをクリックして、awsconfiguration.jsonファイルをダウンロードします。(iOSもAndroidからでも同じファイルです)
ダウンロードしたファイルをXamarinAppSyncChatApp.Androidプロジェクトには、Resources/rawに追加して、ビルドアクションは、AndroidResourcesにします。
XamarinAppSyncChatApp.iOSプロジェクトには、ルートに追加して、ビルドアクションは、BundleResourceにします。
これでビルドすれば動くはずです。
バインディングの作成方法について
今回行ったバイディングライブラリ作成方法について説明します。なお、AppSyncの使い方しては特に触れないので、気になる方は公式のドキュメントを参照してください。
Android
AARの作成
Android Studioで、プロジェクトを作り、Android Libraryのモジュールを追加して、AARファイルを作成しました。

ソースはKotlinで書いています。以下がメインのコードです。
class AppSyncChatClient(context: Context) {
    private val client: AWSAppSyncClient = AWSAppSyncClient.builder()
        .context(context)
        .awsConfiguration(AWSConfiguration(context))
        .build()

    fun createMessage(chatId: String, text: String, userId: String, callback: Callback<Message?>?) {
        val input = CreateMessageInput.builder()
            .chatId(chatId)
            .text(text)
            .userId(userId)
            .build()
        val mutation = CreateMessageMutation.builder()
            .input(input)
            .build()

        client.mutate(mutation)
            .enqueue(object : GraphQLCall.Callback<CreateMessageMutation.Data>() {
                override fun onFailure(e: ApolloException) {
                    callback?.onFailure(e)
                }

                override fun onResponse(response: Response<CreateMessageMutation.Data>) {
                    val message = response.data()?.createMessage()?.let {
                        Message(
                            id = it.id(),
                            chatId = it.chatId(),
                            text = it.text(),
                            userId = it.userId()
                        )
                    }
                    callback?.onResponse(message)
                }
            })
    }

    fun onCreateMessage(chatId: String, callback: SubscriptionCallback<Message?>?): Cancelable {
        val subscription = OnCreateMessageSubscription.builder()
            .chatId(chatId)
            .build()
        val subscriptionWatcher = client.subscribe(subscription)
        subscriptionWatcher.execute(object :
            AppSyncSubscriptionCall.Callback<OnCreateMessageSubscription.Data> {
            override fun onFailure(e: ApolloException) {
                callback?.onFailure(e)
            }

            override fun onResponse(response: Response<OnCreateMessageSubscription.Data>) {
                val message = response.data()?.onCreateMessage()?.let {
                    Message(
                        id = it.id(),
                        chatId = it.chatId(),
                        text = it.text(),
                        userId = it.userId()
                    )
                }
                callback?.onResponse(message)
            }

            override fun onCompleted() {
                callback?.onCompleted()
            }
        })

        return object : Cancelable {
            override fun cancel() {
                subscriptionWatcher.cancel()
            }
        }
    }
}
バインディング
Visual Studioで、Androidのバインディングライブラリのプロジェクト(AppSyncChatLibraryBinding.Android)を追加し、作成したAARファイルをJarsフォルダに入れます。AARファイルのビルドアクションは、LibraryProjectZipにします。これでビルドすれば、バインディングライブラリができます。
Xamarin.Kotlin.StdLibの追加
今回Kotlinを使っているので、Xamarin.Kotlin.StdLibをアプリのプロジェクトに追加します。
Jar、AARの追加
元々参照していたAppSyncなどのJarファイルやAARファイルもアプリのプロジェクトに含めてやる必要があります。ビルドアクションは、Jarファイルは、AndroidJavaLibrary、AARファイルは、AndroidAarLibraryにします。
iOS
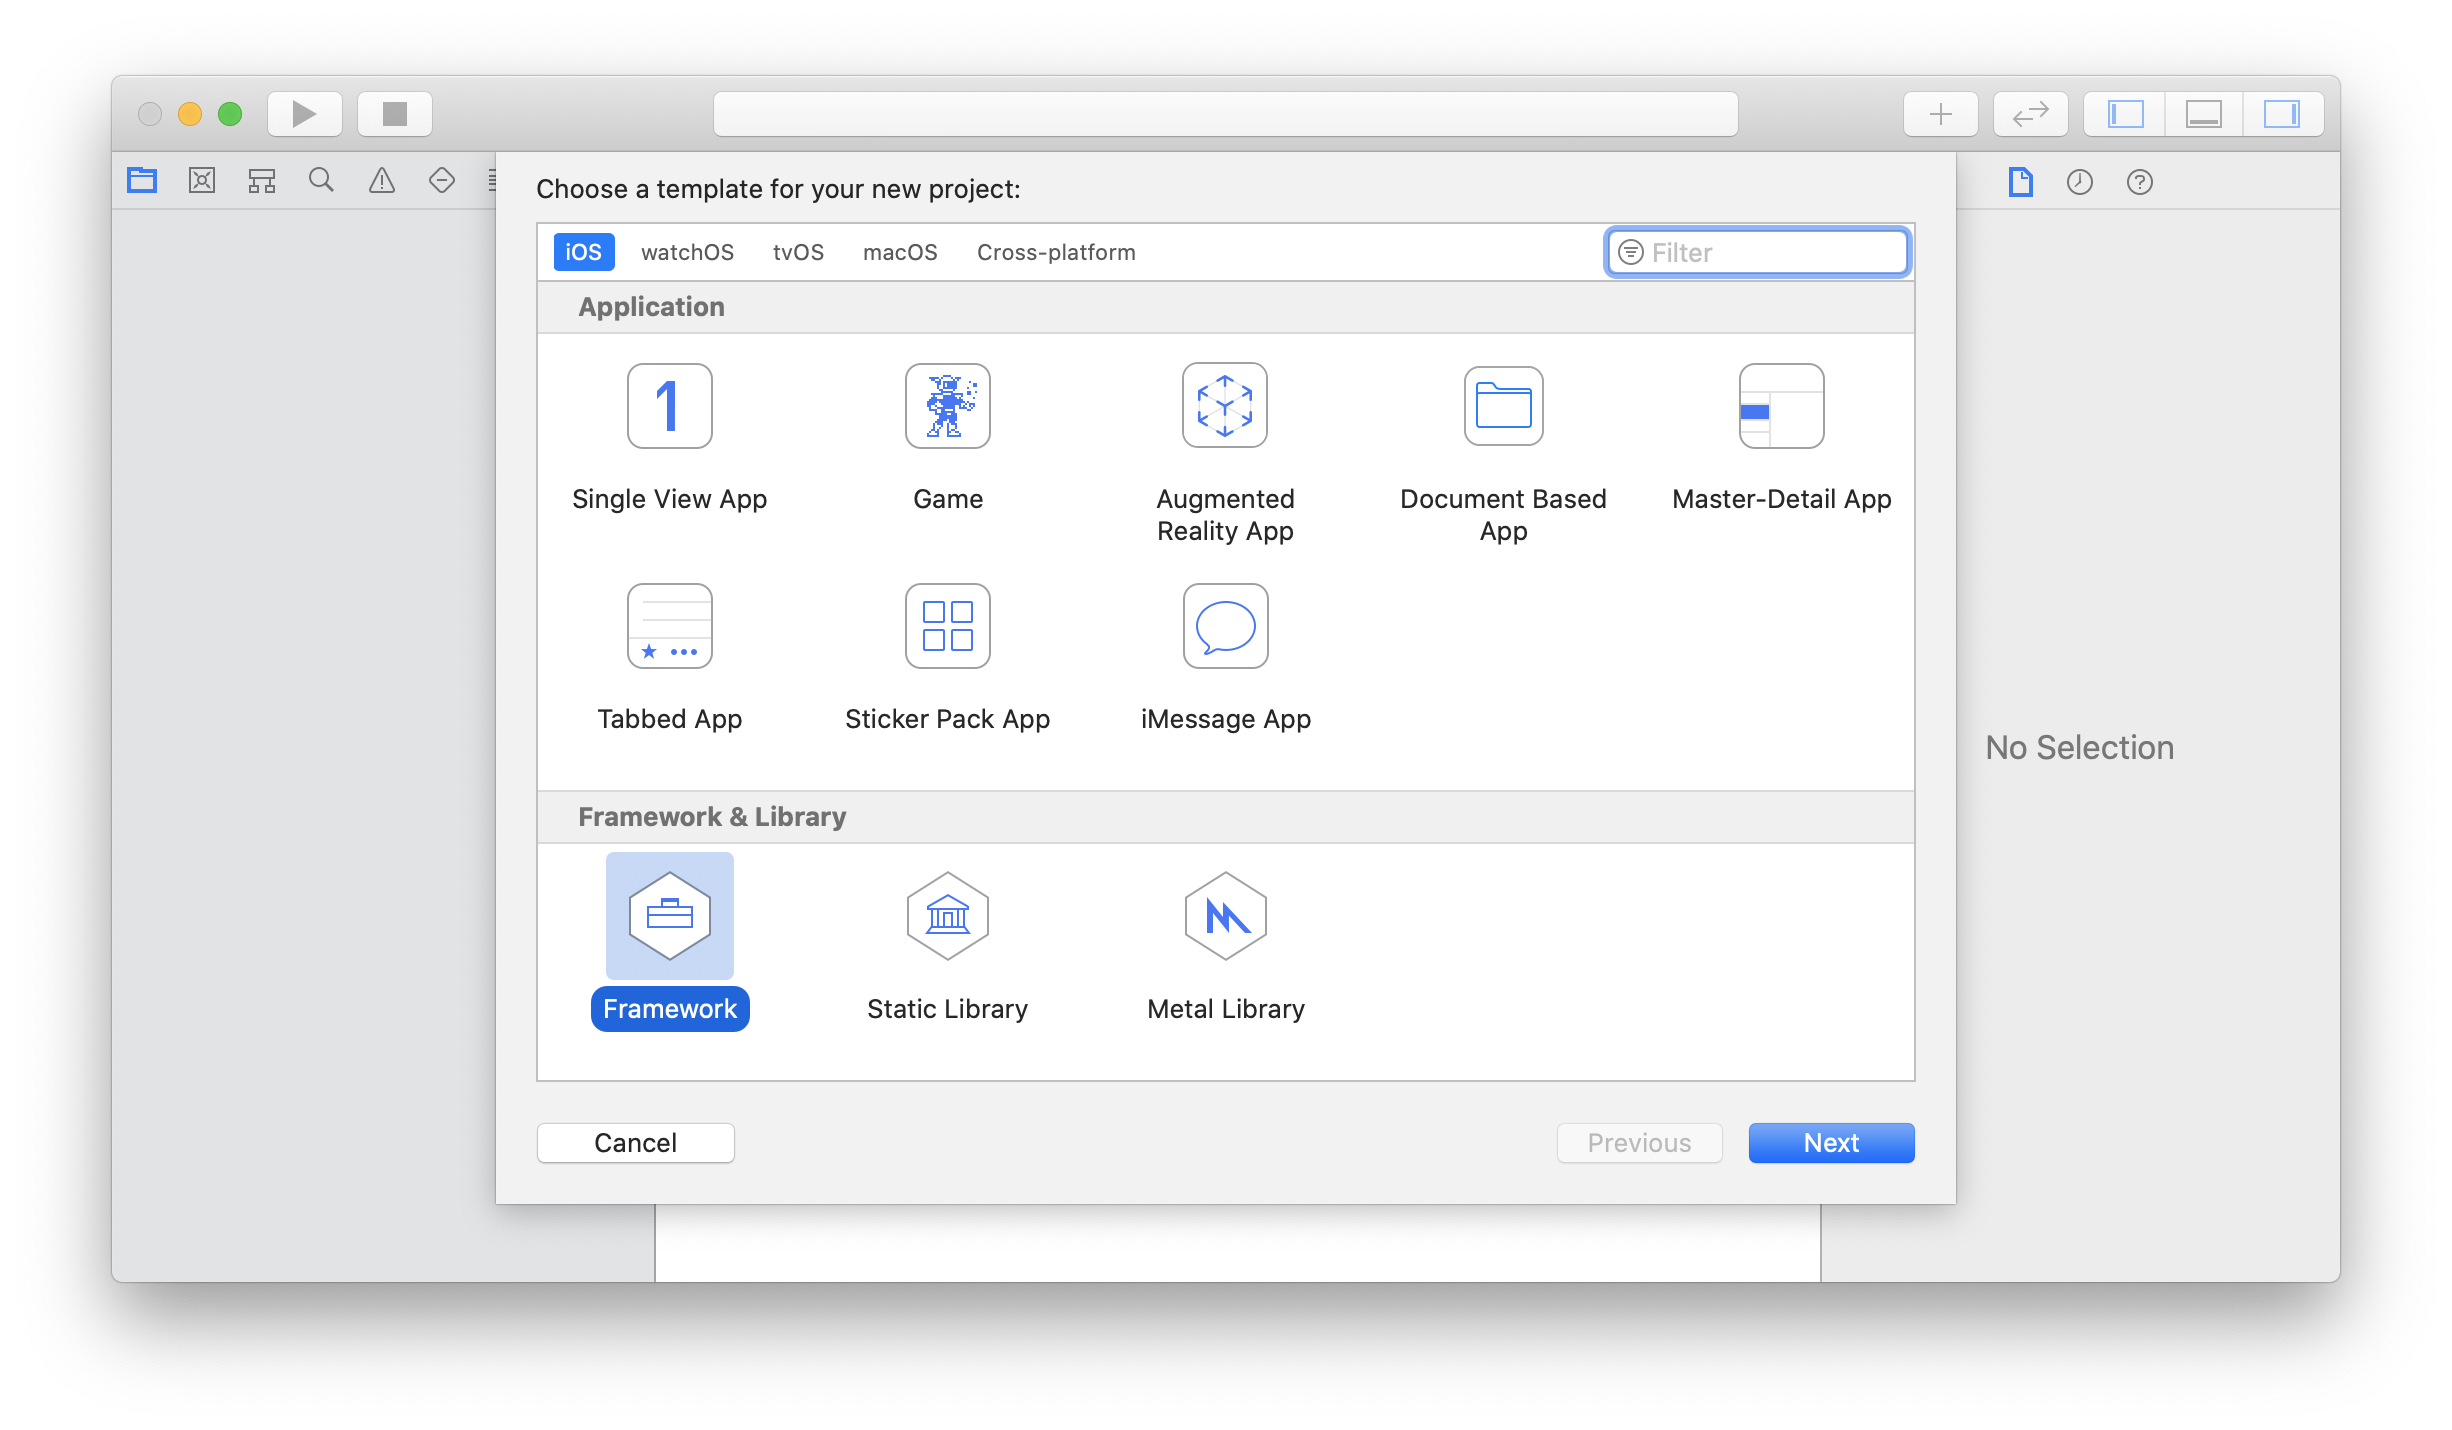
フレームワークの作成
Xcodeでフレームワークのプロジェクトを作成しました。
ソースはSwiftで書いています。以下がメインのコードです。
@objc(AppSyncChatClient)
public class AppSyncChatClient : NSObject {
    private var client: AWSAppSyncClient?

    public override init() {
        do {
            let cacheConfiguration = try AWSAppSyncCacheConfiguration()
            let appSyncConfig = try AWSAppSyncClientConfiguration(appSyncServiceConfig: AWSAppSyncServiceConfig(), cacheConfiguration: cacheConfiguration)
            client = try AWSAppSyncClient(appSyncConfig: appSyncConfig)
        } catch {
            print("Error initializing appsync client. \(error)")
        }

        super.init()
    }

    @objc public func createMessage(chatId: String, text: String, userId: String, onResult: @escaping (_ message: Message?) -> Void,  onError: @escaping (_ error: Error) -> Void) {
        let input = CreateMessageInput(chatId: chatId, text: text, userId: userId)
        let mutation = CreateMessageMutation(input: input)
        client?.perform(mutation: mutation) { (result, error) in
            guard error == nil else {
                onError(error!)
                return
            }

            var message: Message? = nil
            if let createMessage = result?.data?.createMessage {
                message = Message(id: createMessage.id, chatId: createMessage.chatId, text: createMessage.text, userId: createMessage.userId)
            }
            onResult(message)
        }
    }

    @objc public func onCreateMessage(chatId: String, onResult: @escaping (_ message: Message?) -> Void,  onError: @escaping (_ error: Error) -> Void) throws -> Subscription {
        let subscription = OnCreateMessageSubscription(chatId: chatId)
        let subscriptionWatcher = try client?.subscribe(subscription: subscription) { (result, transaction, error) in
            guard error == nil else {
                onError(error!)
                return
            }

            var message: Message? = nil
            if let onCreateMessage = result?.data?.onCreateMessage {
                message = Message(id: onCreateMessage.id, chatId: onCreateMessage.chatId, text: onCreateMessage.text, userId: onCreateMessage.userId)
            }
            onResult(message)
        }

        return Subscription(cancellable: subscriptionWatcher)
    }
}
Xamarinで利用するクラスや関数には、@objcをつけます。クラスには@objc(AppSyncChatClient)を指定しています。名前も指定してあげないとObjective-Cでは名前が変わってしまいます。
Build SettingsのEnable BitcodeはNoにします。
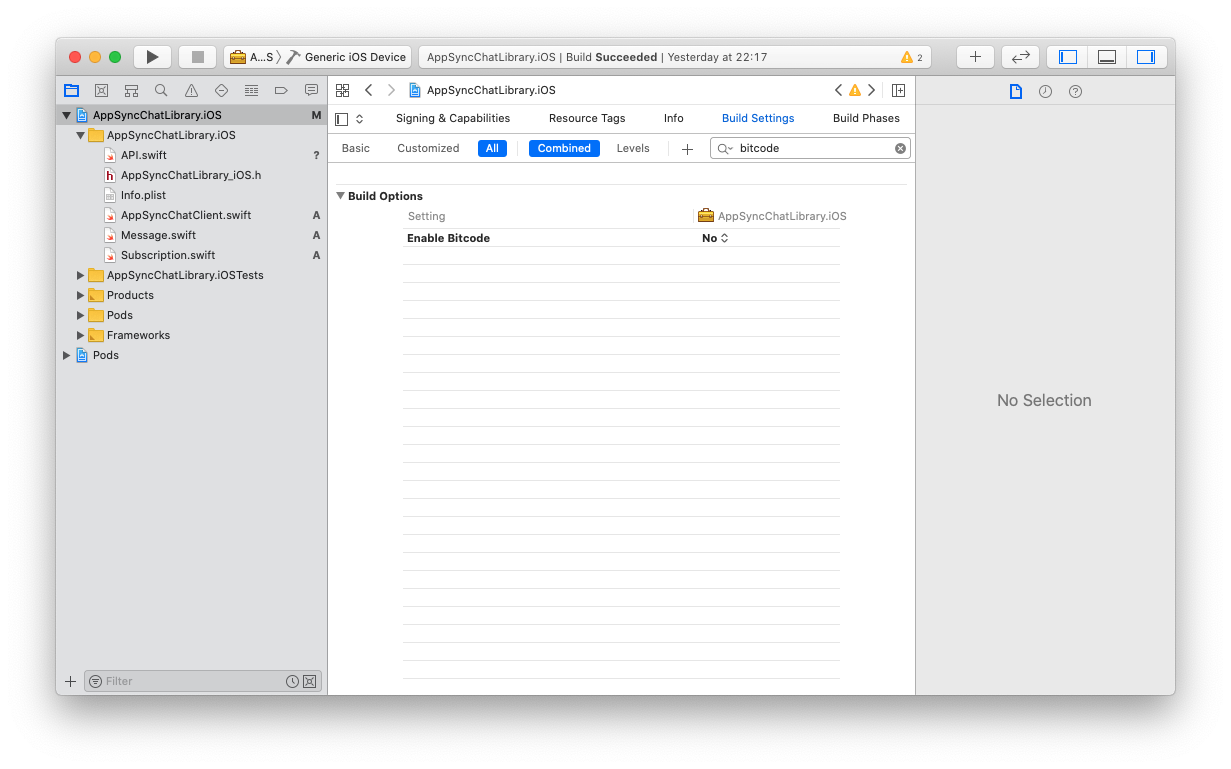
対象デバイスをGeneric iOS Deviceにして、実機用のを、シミュレータにしてシミュレータ用のをそれぞれビルドします。
フレームワークの合成
実機用のフレームワークとシミュレータ用のフレームワークを合成します。以下のコマンドを実行して、実機用のフレームワークに出力していいます。
lipo -create Release-iphonesimulator/AppSyncChatLibrary_iOS.framework/AppSyncChatLibrary_iOS Release-iphoneos/AppSyncChatLibrary_iOS.framework/AppSyncChatLibrary_iOS -output AppSyncChatLibrary_iOS.framework/AppSyncChatLibrary_iOS
また、シミュレータのフレームワークのModules/AppSyncChatLibrary_iOS.swiftmoduleフォルダにあるi386やx86_64のswiftmoduleも含めてあげる必要があります。
参照しているフレームワークに対しても同様のことを行います。
バインディング
iOSのバインディングライブラリのプロジェクト((AppSyncChatLibraryBinding.Android))を作成して、ネイティブ参照にフレームワークを全て追加します。
ApiDefinitionは、Objective Sharpieを使って作成します。ヘッダーファイルはフレームワークのHeadersフォルダのAppSyncChatLibrary_iOS-Swift.hを参照して、以下の様なコマンドを叩けば作成できます。
sharpie bind -sdk iphoneos13.2 AppSyncChatLibrary_iOS.framework/Headers/AppSyncChatLibrary_iOS-Swift.h
作成されたApiDefinitionは大きなものができてしまいますが、作成したクラスのところだけコピーして、プロジェクトのApiDefinitionに貼り付けました。
Xamarin.Swiftの追加
swiftのライブラリを利用するためには、Xamarin.Swiftが必要なので、アプリのプロジェクトに追加します。
まとめ
非常に面倒ではありましたが、XamarinでもAppSyncを利用することができました。今回の様に使いたいサービスがXamarinに対応していなくても、アプリケーションで利用したいものだけを抽出してライブラリ化したものをバインディングするのは、元々のライブラリを丸々バインディングするよりかは問題が起きても対処しやすいのではないかと思います。