はじめに
いくつかM5 Stickと照度センサー使った記事を書きましたが、ふと仕様外の使い方をした場合にどうなるのかが気になりました。
そこで、電圧を変化させた場合にどのような値が取得できるのかを確認してみました。
一般的にはUSBで5Vの電圧を取得すると思いますが、IoTで使用する場合、不安定な電源を使用せざるを得ない可能性も考えられます。(どうしてもコンセントが使用できない場合等) こういった場合、どういったデータが出てくるのかということが単純に気になったというものです。(多くの人には刺さらない記事かと思いますが...)
まずはセンサーや制御器の仕様を確認し、試験条件を定めて結果をみていこうと思います。
構成
実験を行うにあたり設備の構成を紹介します。
センサーと測定機器に分けて紹介します。
センサー
センサーや制御器は下記のものを使用しました。
前回まではM5に照度センサーを直付けしていましたが、拡張性を持たせたかったため、今回はハブで分岐しています。
| 役割 | 部品名 | 備考 |
|---|---|---|
| 制御器 | M5 Stick CPlus2 | - |
| センサー | LIGHT (U021) | ハブを介して3つ使用 |
| ハブ | PbHUB v1.1 (U041-B) | - |
補足ですが、ハブの1,2は少し長めのケーブルを使用しています。それぞれ2m, 1mの延長ケーブルを使用。
試験機器
- 直流安定化電源を使用
- USB AタイプにCタイプ変換コネクタを使用
| 役割 | 部品名 | 備考 |
|---|---|---|
| 電源 | DPS-3005 | 電圧範囲0-30V, 電流範囲0-5A |
| ケーブル | ワニぐちクリップ&USBテストリード | - |
| コネクタ | USB-C (オス) to USB-A (メス) 3.1 Gen1 変換アダプタ | - |
悪い条件を模擬して、Type-AコネクタをType-Cに変換する条件でテスト。
また、電気屋でもなんでもないただのITエンジニアなので設備は有り合わせ&安いものを見繕って使っています。
センサー関係仕様
| パーツ名 | 電圧範囲 | 温度範囲 | 備考 |
|---|---|---|---|
| M5 Stick CPlus2 | –0.3 - 3.6 V | –40 - 85°C | - |
| LIGHT (U021) | ≦ 150V (DC) | 0 - 70℃ | - |
| PbHUB v1.1 (U041-B) | 2.4 - 3.6V | -40 - 85°C | - |
- M5 Stick CPlus2は、ESP32-PICO-V3-02の特性を記載。
- LIGHTは、photoregistor 5528の特性を記載。 ( 参考サイト1, 参考サイト2 )
- PbHubは、STM32F030の特性を記載。
試験条件
| No. | 電圧 (V) | 備考 |
|---|---|---|
| 1 | 5.0 | 標準出力電圧 |
| 2 | 4.5 | - |
| 3 | 4.0 | - |
| 4 | 5.5 | - |
環境構築
DBをDockerで、MQTTブローカーをAWS IoT Coreを用いて作成します。
ディレクトリ構成
M5 Stick C Plus2
./
├── aws_iot_core_test.ino
├── porthub.cpp
├── porthub.h
└── secret_info.cpp
Docker
./
├── postgresql
│   └── Dockerfile
└── docker-compose.yml
Python
./
├── certificates
│   ├── デバイスcertファイル
│   ├── 暗号化キーファイル
│   └── ルートcertファイル
├── .env
├── execute.sh
├── requirements.txt
└── subscribe.py
手順
AWS IoT Core
以前の記事で作成したものを参考に作ってみてください。
Docker
Dockerで開発環境を立ち上げます。
cd /any/path/to/docker/ (docker-compose.ymlがあるディレクトリ)
docker compose up -d --build
DBの準備
Dockerで作成したPostgreSQLコンテナにDB環境を作成します。
DB作成
シェルを開いて下記のコマンドを打ち込んでください。(コンテナIDの入れ間違いに注意)
docker ps
docker exec -it (PostgreSQLのcontainer_id) /usr/bin/createdb -U iotroot -E utf8 -l ja_JP.UTF-8 -T template0 iot_db
テーブル作成
下記のDDLを用いてテーブルを作成します。
(私は面倒だったのでSQL開発ソフト経由で行いました。)
CREATE TABLE IF NOT EXISTS
  light_value
  (
    id BIGSERIAL NOT NULL PRIMARY KEY,
    topic_name VARCHAR(10),
    val_1 INTEGER,
    val_2 INTEGER,
    val_3 INTEGER,
    create_timestamp TIMESTAMP
  )
;
プログラム
書くと長くなるので下記折りたたみに格納しておきます。
publishプログラム
publishプログラム
- aws_iot_core_test.ino
/*
*******************************************************************************
* Copyright (c) 2021 by M5Stack
*                  Equipped with M5StickC-Plus sample source code
*                          配套  M5StickC-Plus 示例源代码
* Visit for more information: https://docs.m5stack.com/en/core/m5stickc_plus
* 获取更多资料请访问: https://docs.m5stack.com/zh_CN/core/m5stickc_plus
*
* Describe: MQTT.
* Date: 2021/11/5
*******************************************************************************
*/
#include <M5StickCPlus2.h>
#include <WiFiClient.h>
#include <WiFiClientSecure.h>
#include <PubSubClient.h>
#include <time.h>
#include "porthub.h"

// porthub type b
PortHub porthub;
uint8_t HUB_ADDR[6] = {
  HUB1_ADDR, HUB2_ADDR, HUB3_ADDR,
  HUB4_ADDR, HUB5_ADDR, HUB6_ADDR};

// wifi
#define QOS 0
WiFiClientSecure httpsClient;
PubSubClient mqttClient(httpsClient);

// [Secret]
// WiFi config information.
extern const char *WIFI_SSID;
extern const char *WIFI_PASSWORD;
extern const char *MQTT_SERVER;
extern const int MQTT_PORT;

// secret_info.cpp (aws iot core)
extern const char *AWS_CLIENT_ID;
extern const char *PUB_TOPIC_NAME;
extern const char *AWS_IOT_ROOT_CA;
extern const char *AWS_IOT_DEVICE_CERT;
extern const char *AWS_IOT_PRIVATE_KEY;
const int mqttPort = 8883;


// For fetch date time from ntp server.
const char* ntpServer = "ntp.nict.jp";
const long gmtOffset_sec     = 0;
const int daylightOffset_sec = 0;

// For mqtt publisher.
unsigned long lastMsg = 0;
#define MSG_BUFFER_SIZE (200)
char msg[MSG_BUFFER_SIZE];
int value = 0;


uint16_t analogRead_value = 0;
uint16_t digitalRead_value = 0;

void setup_wifi() {
  M5.Lcd.print("Connecting to ");
  M5.Lcd.print(WIFI_SSID);

  WiFi.disconnect(true);
  delay(1000);

  WiFi.begin(WIFI_SSID, WIFI_PASSWORD);

  while (WiFi.status() != WL_CONNECTED) {
    delay(500);
    M5.Lcd.print(".");
  }

  M5.Lcd.print("\nWiFi connected");
}

void callback(char*, byte* , unsigned int);

void setup_mqtt_broker() {
  mqttClient.setServer(MQTT_SERVER, mqttPort);
  httpsClient.setCACert(AWS_IOT_ROOT_CA);
  httpsClient.setCertificate(AWS_IOT_DEVICE_CERT);
  httpsClient.setPrivateKey(AWS_IOT_PRIVATE_KEY);
  mqttClient.setServer(MQTT_SERVER, mqttPort);
  mqttClient.setCallback(callback);
}

void connect_mqtt_broker(){
  while (!mqttClient.connected()) {

    M5.Lcd.setTextColor(BLUE);
    M5.Lcd.setCursor(10, 2);
    M5.Lcd.fillScreen(YELLOW);
    M5.Lcd.print("Attempting MQTT connection...\n");
    M5.Lcd.setTextSize(1);
    M5.Lcd.print(AWS_CLIENT_ID);
    M5.Lcd.print("\n");
    M5.Lcd.print(MQTT_SERVER);
    M5.Lcd.print("\n");
    M5.Lcd.setTextSize(2);

    if (mqttClient.connect(AWS_CLIENT_ID)) {
      M5.Lcd.print("Connected.");
    }
    else {
      M5.Lcd.print("Failed\n   rc=");
      M5.Lcd.print(mqttClient.state());
      M5.Lcd.print("\n Try again in 5 seconds");
      delay(5000);
    }
  }
}

void mqtt_callback(char* topic, byte* payload, unsigned int length) {
    Serial.print("Recieved. topic=");
    Serial.println(topic);

    char sub_message[length];
    for (int i = 0; i < length; i++) {
      sub_message[i] = (char)payload[i];
    }
    Serial.println(sub_message);
}


void setup() {

  M5.begin();
  M5.Lcd.setRotation(3);

  porthub.begin();

  M5.Lcd.setTextSize(2);
  M5.Lcd.setTextColor(BLUE);
  M5.Lcd.setCursor(10, 2);
  M5.Lcd.fillScreen(YELLOW);

  setup_wifi();
  setup_mqtt_broker();

  // For fetch current time.
  configTime(gmtOffset_sec, daylightOffset_sec, ntpServer);
}


void callback(char* topic, byte* payload, unsigned int length) {
}


void loop() {

  if (!mqttClient.connected()) {
    connect_mqtt_broker();
  }
  mqttClient.loop();

  unsigned long now = millis();
  if (now - lastMsg > 30000) {
    lastMsg = now;
    ++value;
    String json = createJson();
    char jsonStr[200];
    json.toCharArray(jsonStr,200);
    snprintf(msg, MSG_BUFFER_SIZE, jsonStr);

    // Set display color
    if (porthub.hub_a_read_value(HUB_ADDR[0]) < 2500){
      M5.Lcd.fillScreen(GREEN);
    } else {
      M5.Lcd.fillScreen(WHITE);
    }

    M5.Lcd.setTextSize(2);
    M5.Lcd.setCursor(10, 2);
    M5.Lcd.printf("UNIT LIGHT STATUS\n");
    M5.Lcd.setCursor(0, 20);
    M5.Lcd.printf(
      "   port-1 : %d\n   port-2 : %d\n   port-3 : %d",
      porthub.hub_a_read_value(HUB_ADDR[0]),
      porthub.hub_a_read_value(HUB_ADDR[1]),
      porthub.hub_a_read_value(HUB_ADDR[2])
    );
    M5.Lcd.setCursor(10, 90);
    M5.Lcd.setTextSize(1);
    M5.Lcd.println(msg);

    mqttClient.publish(PUB_TOPIC_NAME, msg);
  }
}

String createJson() {
  String timestampStr = fetchTimestamp();
  String json = "{";
    json +=  "\"timestamp\": \"";
    json +=  timestampStr;
    json +=  "\", ";
    json +=  "\"val1\": ";
    json +=  porthub.hub_a_read_value(HUB_ADDR[0]);
    json +=  ", ";
    json +=  "\"val2\": ";
    json +=  porthub.hub_a_read_value(HUB_ADDR[1]);
    json +=  ", ";
    json +=  "\"val3\": ";
    json +=  porthub.hub_a_read_value(HUB_ADDR[2]);
    json += "}";
  return json;
}

String fetchTimestamp() {

  struct tm timeInfo;
  getLocalTime(&timeInfo);

  char timestamp[20];
  sprintf(timestamp, "%04d/%02d/%02d %02d:%02d:%02d",
    timeInfo.tm_year + 1900,
    timeInfo.tm_mon + 1,
    timeInfo.tm_mday,
    timeInfo.tm_hour,
    timeInfo.tm_min,
    timeInfo.tm_sec);

  return timestamp;
}
- porthub.cpp
#include "porthub.h"

PortHub::PortHub() {
}

void PortHub::begin() {
    Wire.begin();
}

uint16_t PortHub::hub_a_read_value(uint8_t reg) {
    Wire.beginTransmission(IIC_ADDR);
    Wire.write(reg | 0x06);
    Wire.endTransmission();

    uint8_t RegValue_L = 0, RegValue_H = 0;

    Wire.requestFrom(IIC_ADDR, 2);
    while (Wire.available()) {
        RegValue_L = Wire.read();
        RegValue_H = Wire.read();
    }

    return (RegValue_H << 8) | RegValue_L;
}

uint8_t PortHub::hub_d_read_value_A(uint8_t reg) {
    Wire.beginTransmission(IIC_ADDR);
    Wire.write(reg | 0x04);
    Wire.endTransmission();

    uint8_t RegValue = 0;

    Wire.requestFrom(IIC_ADDR, 1);
    while (Wire.available()) {
        RegValue = Wire.read();
    }
    return RegValue;
}

uint8_t PortHub::hub_d_read_value_B(uint8_t reg) {
    Wire.beginTransmission(IIC_ADDR);
    Wire.write(reg | 0x05);
    Wire.endTransmission();

    uint8_t RegValue = 0;

    Wire.requestFrom(IIC_ADDR, 1);
    while (Wire.available()) {
        RegValue = Wire.read();
    }
    return RegValue;
}

void PortHub::hub_d_wire_value_A(uint8_t reg, uint16_t level) {
    Wire.beginTransmission(IIC_ADDR);
    Wire.write(reg | 0x00);
    Wire.write(level & 0xff);
    Wire.endTransmission();
}

void PortHub::hub_d_wire_value_B(uint8_t reg, uint16_t level) {
    Wire.beginTransmission(IIC_ADDR);
    Wire.write(reg | 0x01);
    Wire.write(level & 0xff);
    Wire.endTransmission();
}

void PortHub::hub_a_wire_value_A(uint8_t reg, uint16_t duty) {
    Wire.beginTransmission(IIC_ADDR);
    Wire.write(reg | 0x02);
    Wire.write(duty & 0xff);
    Wire.endTransmission();
}

void PortHub::hub_a_wire_value_B(uint8_t reg, uint16_t duty) {
    Wire.beginTransmission(IIC_ADDR);
    Wire.write(reg | 0x03);
    Wire.write(duty & 0xff);
    Wire.endTransmission();
}

void PortHub::hub_wire_length(uint8_t reg, uint16_t length) {
    Wire.beginTransmission(IIC_ADDR);
    Wire.write(reg | 0x08);
    Wire.write(length & 0xff);
    Wire.write(length >> 8);
    Wire.endTransmission();
}

void PortHub::hub_wire_index_color(uint8_t reg, uint16_t num, uint8_t r,
                                   int8_t g, uint8_t b) {
    Wire.beginTransmission(IIC_ADDR);
    Wire.write(reg | 0x09);
    Wire.write(num & 0xff);
    Wire.write(num >> 8);
    Wire.write(r);
    Wire.write(g);
    Wire.write(b);
    Wire.endTransmission();
}

void PortHub::hub_wire_fill_color(uint8_t reg, uint16_t first, uint16_t count,
                                  uint8_t r, int8_t g, uint8_t b) {
    Wire.beginTransmission(IIC_ADDR);
    Wire.write(reg | 0x0a);
    Wire.write(first & 0xff);
    Wire.write(first >> 8);

    Wire.write(count & 0xff);
    Wire.write(count >> 8);

    Wire.write(r);
    Wire.write(g);
    Wire.write(b);
    Wire.endTransmission();
}

void PortHub::hub_wire_setBrightness(uint8_t reg, uint8_t brightness) {
    Wire.beginTransmission(IIC_ADDR);
    Wire.write(reg | 0x0b);
    Wire.write(brightness & 0xff);
    Wire.endTransmission();
}
- porthub.h
#ifndef __PORTHUB_H__
#define __PORTHUB_H__

#include <Wire.h>

#define IIC_ADDR  0x61
#define HUB1_ADDR 0x40
#define HUB2_ADDR 0x50
#define HUB3_ADDR 0x60
#define HUB4_ADDR 0x70
#define HUB5_ADDR 0x80
#define HUB6_ADDR 0xA0

class PortHub {
   public:
    PortHub();
    void begin();

    uint16_t hub_a_read_value(uint8_t reg);

    uint8_t hub_d_read_value_A(uint8_t reg);
    uint8_t hub_d_read_value_B(uint8_t reg);

    void hub_d_wire_value_A(uint8_t reg, uint16_t level);
    void hub_d_wire_value_B(uint8_t reg, uint16_t level);

    void hub_a_wire_value_A(uint8_t reg, uint16_t duty);
    void hub_a_wire_value_B(uint8_t reg, uint16_t duty);

    void hub_wire_length(uint8_t reg, uint16_t length);

    void hub_wire_index_color(uint8_t reg, uint16_t num, uint8_t r, int8_t g,
                              uint8_t b);

    void hub_wire_fill_color(uint8_t reg, uint16_t first, uint16_t count,
                             uint8_t r, int8_t g, uint8_t b);

    void hub_wire_setBrightness(uint8_t reg, uint8_t brightness);

   public:
   private:
   private:
};

#endif
- secret_info.cpp
const char* WIFI_SSID        = "your wifi ssid";
const char* WIFI_PASSWORD    = "your wifi password";
const char* MQTT_SERVER = "your aws iot core endpoint";
const int MQTT_PORT = 8883;

const char *AWS_CLIENT_ID = "pub_id";
const char *PUB_TOPIC_NAME = "home/test";

const char *AWS_IOT_ROOT_CA = R"(-----BEGIN CERTIFICATE-----
    XXXXXXXXXXX
-----END CERTIFICATE-----
)";

const char *AWS_IOT_DEVICE_CERT = R"(-----BEGIN CERTIFICATE-----
    XXXXXXXXXXX
-----END CERTIFICATE-----)";

const char *AWS_IOT_PRIVATE_KEY = R"(-----BEGIN RSA PRIVATE KEY-----
    XXXXXXXXXXX
-----END RSA PRIVATE KEY-----)";
Docker
Docker関係ファイル
- docker-compose.yml
version: '3'
services:
  postgresql:
    container_name: 'postgresql_for_mqtt'
    build: ./postgresql/
    ports:
      - 5434:5432
    volumes:
      - ./postgresql/data:/var/lib/postgresql/data
      - ./postgresql/init:/docker-entrypoint-initdb.d
    environment:
      POSTGRES_USER: iotroot
      POSTGRES_PASSWORD: password
- PostgreSQL用dockerファイル
FROM postgres:15.8
RUN localedef -i ja_JP -c -f UTF-8 -A /usr/share/locale/locale.alias ja_JP.UTF-8
Subscribeプログラム
requirements.txt
Pythonモジュール一覧
paho-mqtt==2.1.0
psycopg2-binary==2.9.9
python-dotenv==1.0.1
.env
環境変数格納ファイル
DB_HOST="127.0.0.1"
DB_NAME="iot_db"
DB_PORT="5434"
DB_USER="iotroot"
DB_PASS="password"
MQTT_HOST="AWSのエンドポイントを指定してください"
MQTT_PORT=8883
IOT_CORE_CLIENT_ID="sub_id"
# 各自の環境でパスを設定してください。
IOT_CORE_PRIVATE_KEY="/any/path/to/certificates/iot_core_test.private.key"
IOT_CORE_CERT="/any/path/to/certificates/iot_core_test.cert.pem"
IOT_CORE_ROOT_CERT="/any/path/to/certificates/AmazonRootCA1.pem"
subscribe.py
サブスクライブプログラム
# 標準モジュール
import os
import json
import sys
# サードパーティ製モジュール
from paho.mqtt.client import Client, CallbackAPIVersion
import psycopg2
from dotenv import load_dotenv

# https://pypi.org/project/paho-mqtt/

# 環境変数の取得
load_dotenv()


def get_topic_from_argument(args: list):
    """
    引数からトピック名を取得する。

    parameters
    ----------
    args: list
        Pythonファイル実行時の引数

    return
    ------
    topic_name: str
        取得するトピック名

    Exception
    ---------
    - argsがリストでない場合
    - argsの長さが2ではない場合
    """

    if not isinstance(args, list):
        raise Exception(f"引数の型がリストではありません。型: {type(args)}")
    if (len(args) != 2):
        raise Exception(f"引数の長さが2ではありません。 引数長さ: {len(args)}")

    return args[1]


def insert_record_to_database(message):
    """
    jsonデータをパースし、適切にデータベースへの書き込む関数
    """

    try:
        payload = json.loads(message.payload)
    except Exception as e:
        print(f"jsonデコード失敗. error message: {e}")
        return

    # クエリを作成
    try:
        query: str = f"""
            INSERT INTO light_value
            (
                topic_name,
                val_1,
                val_2,
                val_3,
                create_timestamp
            )
            VALUES
            (
                '{message.topic}',
                '{payload['val1']}',
                '{payload['val2']}',
                '{payload['val3']}',
                now()
            );
        """
    except Exception as e:
        print(f"jsonからの値取り出し失敗. error message: {e}")
        return

    # DBとのconnectionを作成
    try:
        connection = connect_database()
    except Exception as e:
        print(f"DB接続失敗. error message: {e}")
        return

    # クエリを実行
    try:
        execute_query(connection, query)
    except Exception as e:
        # closeするためにreturnしない。
        print(f"DB書き込み失敗. error message: {e}")

    # connectionクローズ
    try:
        connection.close()
    except Exception as e:
        print(f"DB切断失敗. error message: {e}")


def connect_database() -> psycopg2.extensions.connection:
    """
    DB接続を行い、コネクションインスタンスを返却する。

    parameter
    ---------
        None

    returns
    -------
        psycopg2.extenstions.connection

    exception
    ---------
        DB接続に失敗した場合
    """
    connection = psycopg2.connect(
        host = os.getenv("DB_HOST"),
        dbname = os.getenv("DB_NAME"),
        port = os.getenv("DB_PORT"),
        user = os.getenv("DB_USER"),
        password = os.getenv("DB_PASS")
    )
    return connection


def execute_query(connection: psycopg2.extensions.connection, query: str) -> None:
    """
    クエリを実行するためのメソッド

    parameter
    ---------
        - connection: psycopg2.extensions.connection
        - query: str

    return
    ------
        - None

    Exception
    ---------
        None
    """
    with connection.cursor() as cur:
        cur.execute(query)
        connection.commit()


def main() -> None:
    """
    main関数
    """
    print("処理を開始します。")

    # topic名をコマンド引数から取得
    arg: list = sys.argv
    topic_name: str = get_topic_from_argument(arg)

    # Connection information
    client_id = os.getenv("IOT_CORE_CLIENT_ID")
    mqtt_host = os.getenv("MQTT_HOST")
    mqtt_port = int(os.getenv("MQTT_PORT"))
    root_cert_path = os.getenv("IOT_CORE_ROOT_CERT")
    device_cert_path = os.getenv("IOT_CORE_CERT")
    private_key_path = os.getenv("IOT_CORE_PRIVATE_KEY")

    # クライアントインスタンスの作成
    client = Client(
        callback_api_version = CallbackAPIVersion.VERSION2,
        client_id=client_id
    )
    # TLS接続の設定
    if not os.path.exists(root_cert_path):
        raise Exception("root証明書パスが間違っています")
    if not os.path.exists(device_cert_path):
        raise Exception("デバイス証明書パスが間違っています")
    if not os.path.exists(private_key_path):
        raise Exception("プライベート証明書パスが間違っています")
    client.tls_set(
        ca_certs=root_cert_path,
        certfile=device_cert_path,
        keyfile=private_key_path
    )

    # コールバック関数
    def on_connect(client, userdata, connect_flags, reason_code, properties):
        """
        MQTTブローカ接続時のアクション
        """
        print(f"Connected with result code: [{reason_code}]")
        client.subscribe(topic_name)

    def on_message(client, userdata, msg):
        """
        メッセージ受信時の処理
        """
        try:
            insert_record_to_database(msg)
        except Exception as e:
            print(e)

    client.on_connect = on_connect
    client.on_message = on_message

    # 接続
    client.connect(mqtt_host, mqtt_port)
    # 永久ループで待機
    client.loop_forever()


if __name__ == "__main__":
    main()
execute.shファイル
サブスクライプの実行ファイル
source /any/path/to/venv-name/bin/activate
python ./subscribe.py "home/test"
実験結果
実験について
- 実験はM5 Stick C Plus2のバッテリを使い切ってから実施。
- 実験順番の概要は下記で行った。 (※1,2)
4.0V --> 3.0V --> 5.5V --> 7.0V
※1. よく考え等たら、ある程度電圧が高い場合充電されて効果確認に時間がかかるので低い電圧から実施。
※2. 4.0Vにて動作が確認されたため4.5Vは実施しなかった。
結果
実験全体から見える結果 (前後の電圧情報が関わる結果)
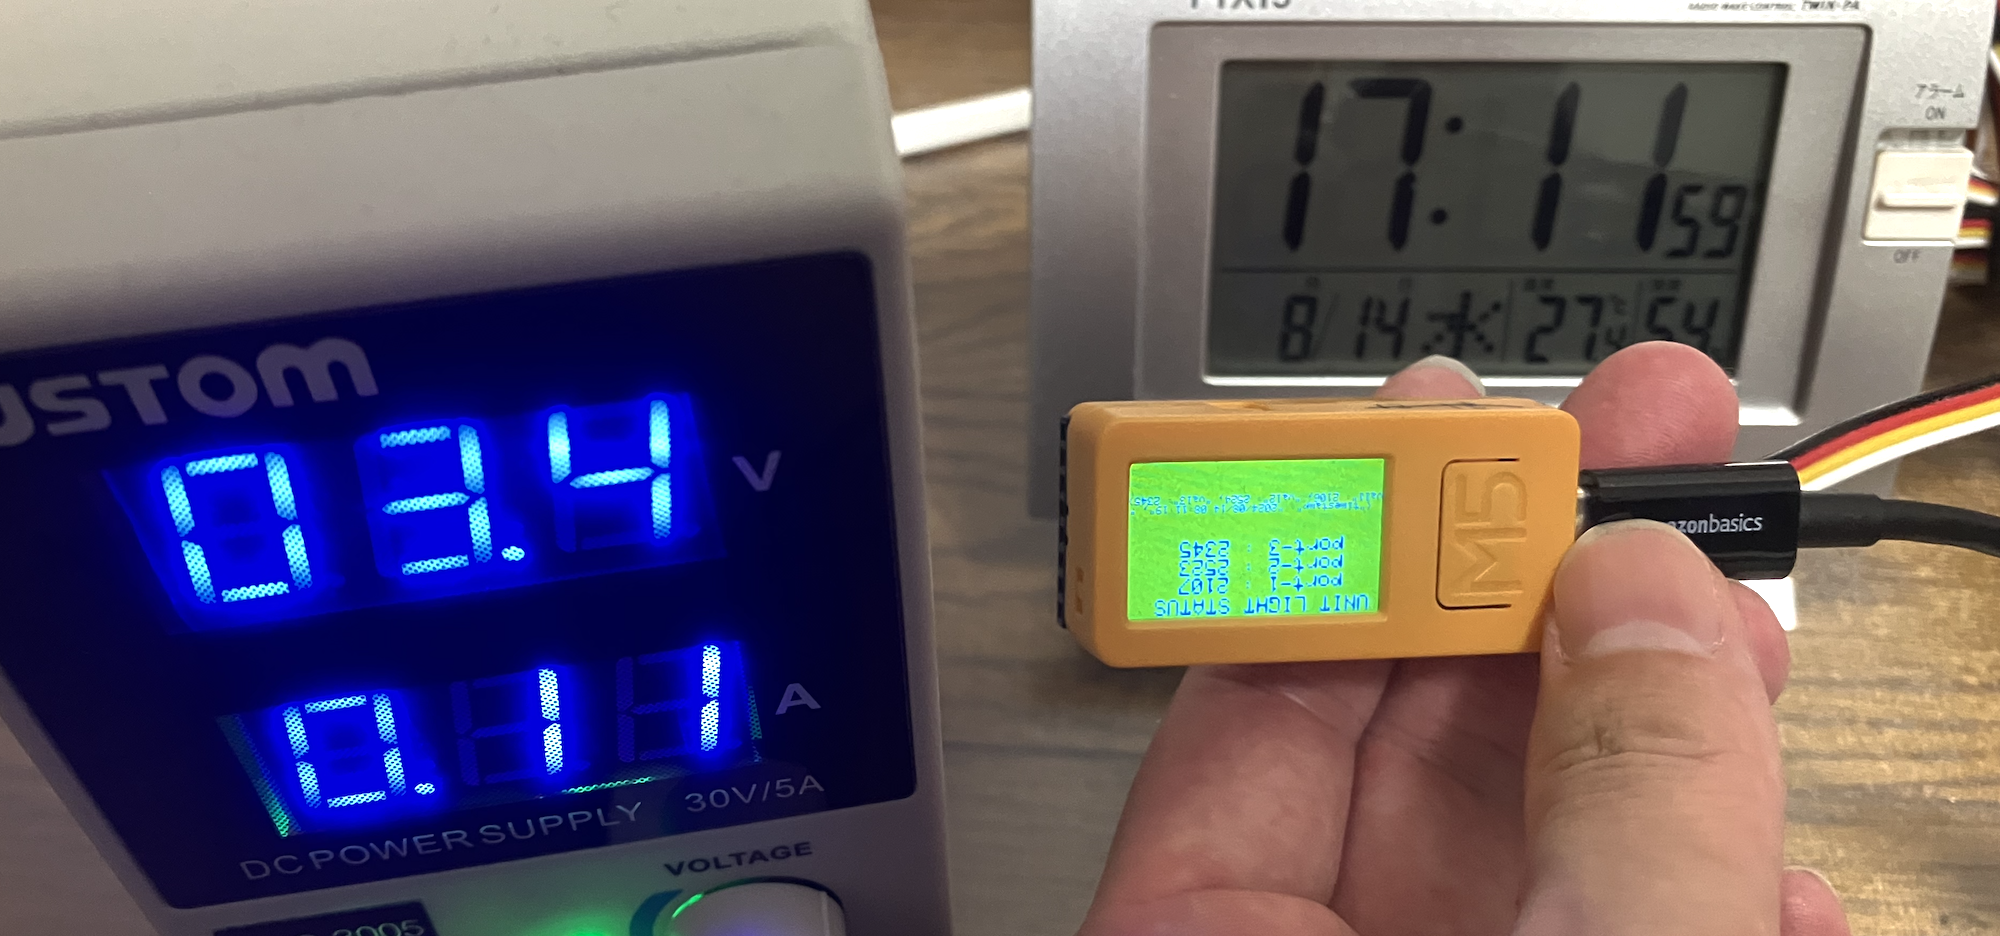
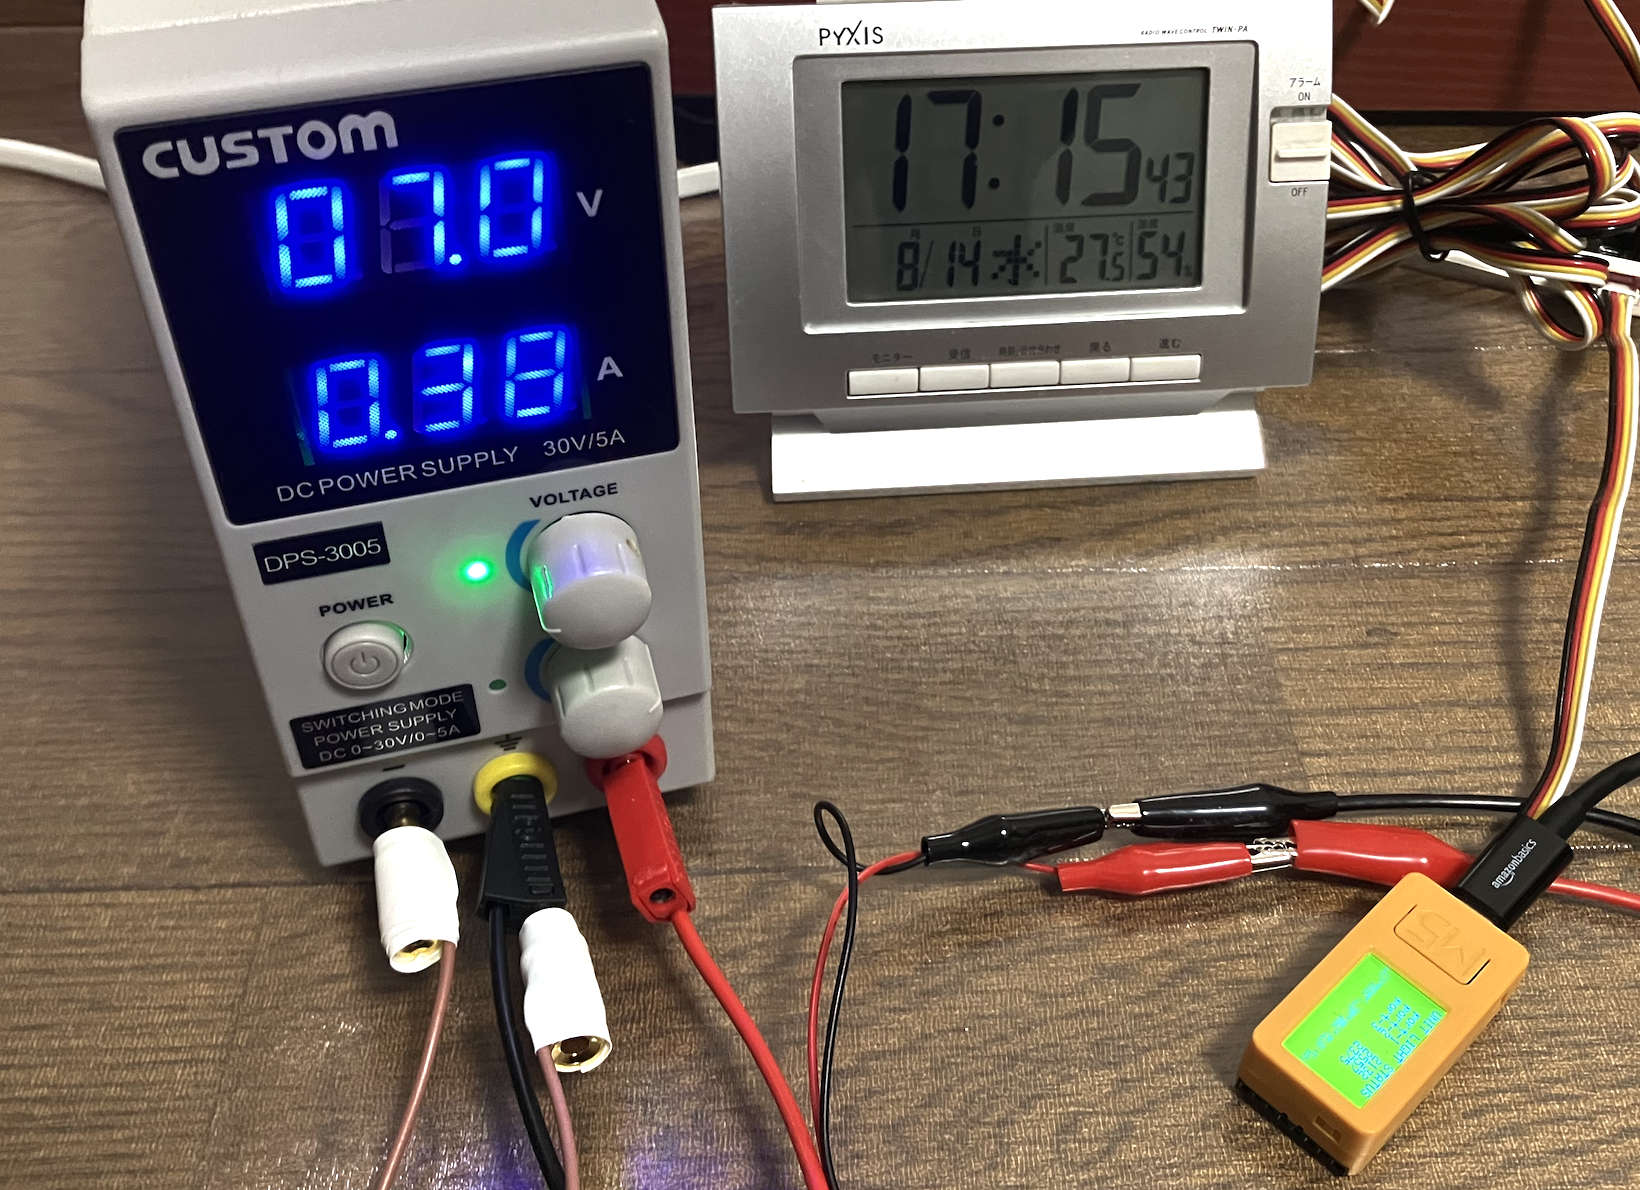
| 電圧イベント | iCloud時刻 | 電波時計 |
|---|---|---|
| 4.0V開始 | 2024/8/14 17:02:26 | 2024/8/14 17:02:47 |
| 3.0V開始 | 2024/8/14 17:10:23 | (撮影ミスのため情報なし) |
| 3.4V開始 | 2024/8/14 17:11:01 | 2024/8/14 17:11:22 |
| 3.8V開始 | 2024/8/14 17:12:08 | 2024/8/14 17:12:29 |
| 5.5V開始 | 2024/8/14 17:12:52 | 2024/8/14 17:13:13 |
| 6.6V開始 | 2024/8/14 17:14:33 | 2024/8/14 17:14:54 |
| 7.0V開始 | 2024/8/14 17:15:22 | 2024/8/14 17:15:43 |
| 3.0V開始 | 2024/8/14 17:16:36 | 2024/8/14 17:16:58 |
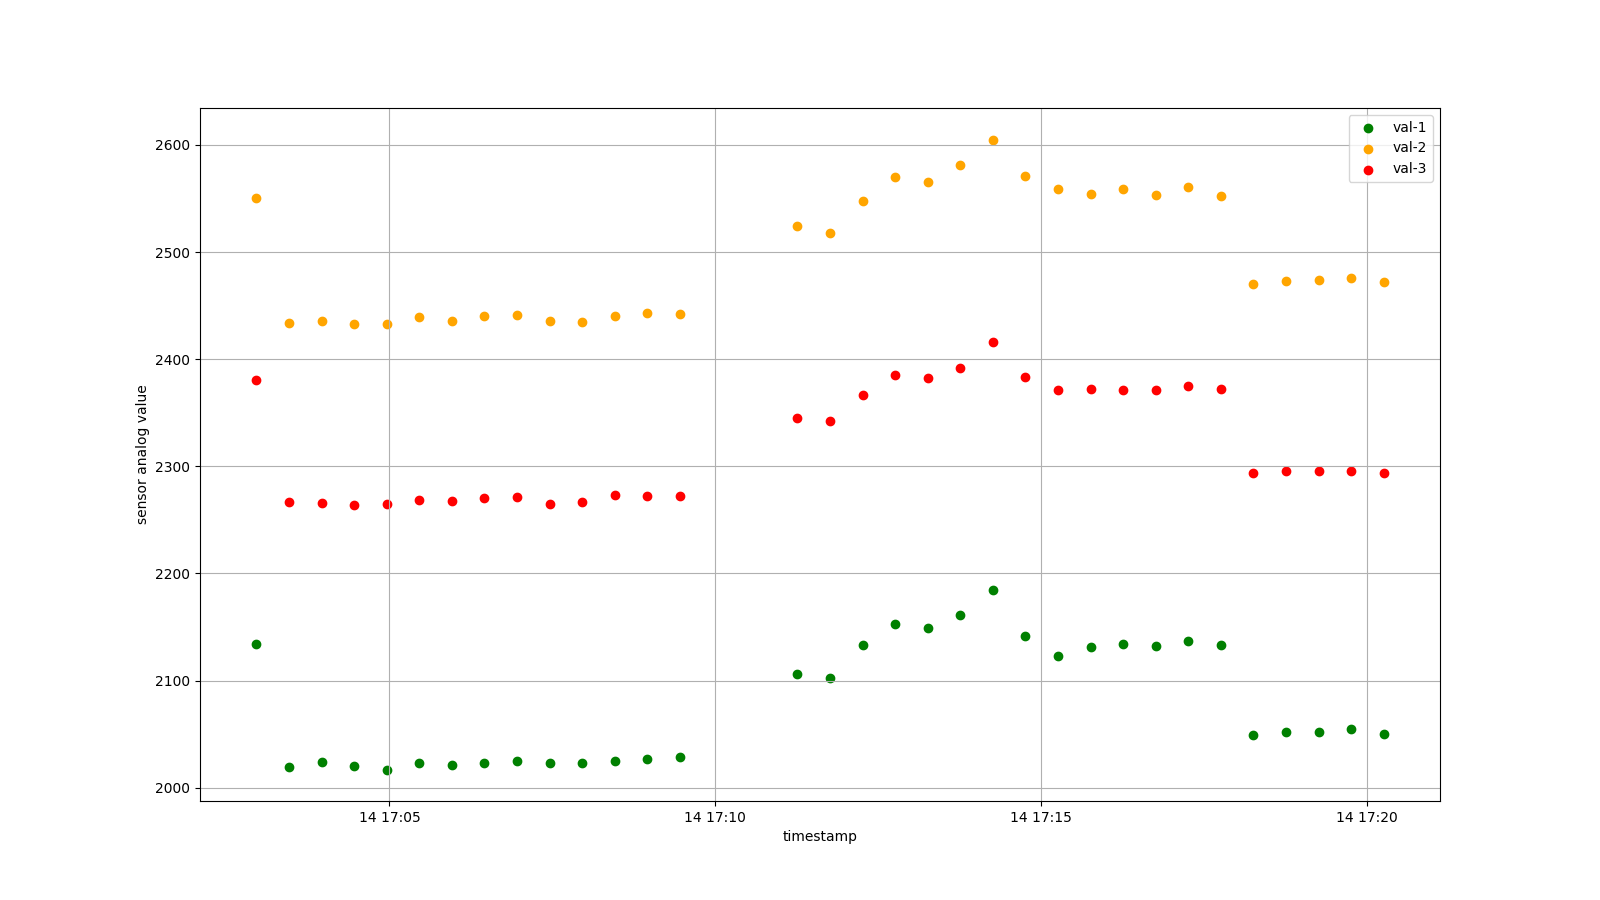
- 10分程度、4Vで連続使用後に3.0Vまで電圧を降下させたところバッテリ切れを起こした。(17:10前後)
- 17:11ごろから徐々に昇圧していったところ、センサーのアナログ値が上昇した。
- 17:16ごろに7.0Vから3.0Vへ電圧降下させたところ、すぐにバッテリはきれなかった。(センサーのアナログ値は4.0Vより若干高めの値だった)
5Vより小さな電圧印加時の結果
-
4Vでもセンサーからの値を取得することが可能であることがわかった。
5Vより大きな電圧印加時の結果
考察
本来最適な条件で使用することが望ましいが、電圧条件を変えても3.4V程度まではデータ取得が可能であることがわかった。しかしながら、電圧によって得られるアナログデータが変わるため、アナログデータを使って二値化をする際には影響を及ぼす可能性がある。電源が安定しない場合、もしくは適切な電圧が取得できない場合はこの点を十分に注意して境界値を設定することが必要であると考える。


