はじめに
前回Cloudformationで構築した環境にServerspecでテストの実施を行うために、Ansibleで環境を構築する。
記事はこちら↓
AWS CloudFormationのテンプレートをLayer別に作成してクロススタック参照を作ってみた。
目指すゴール
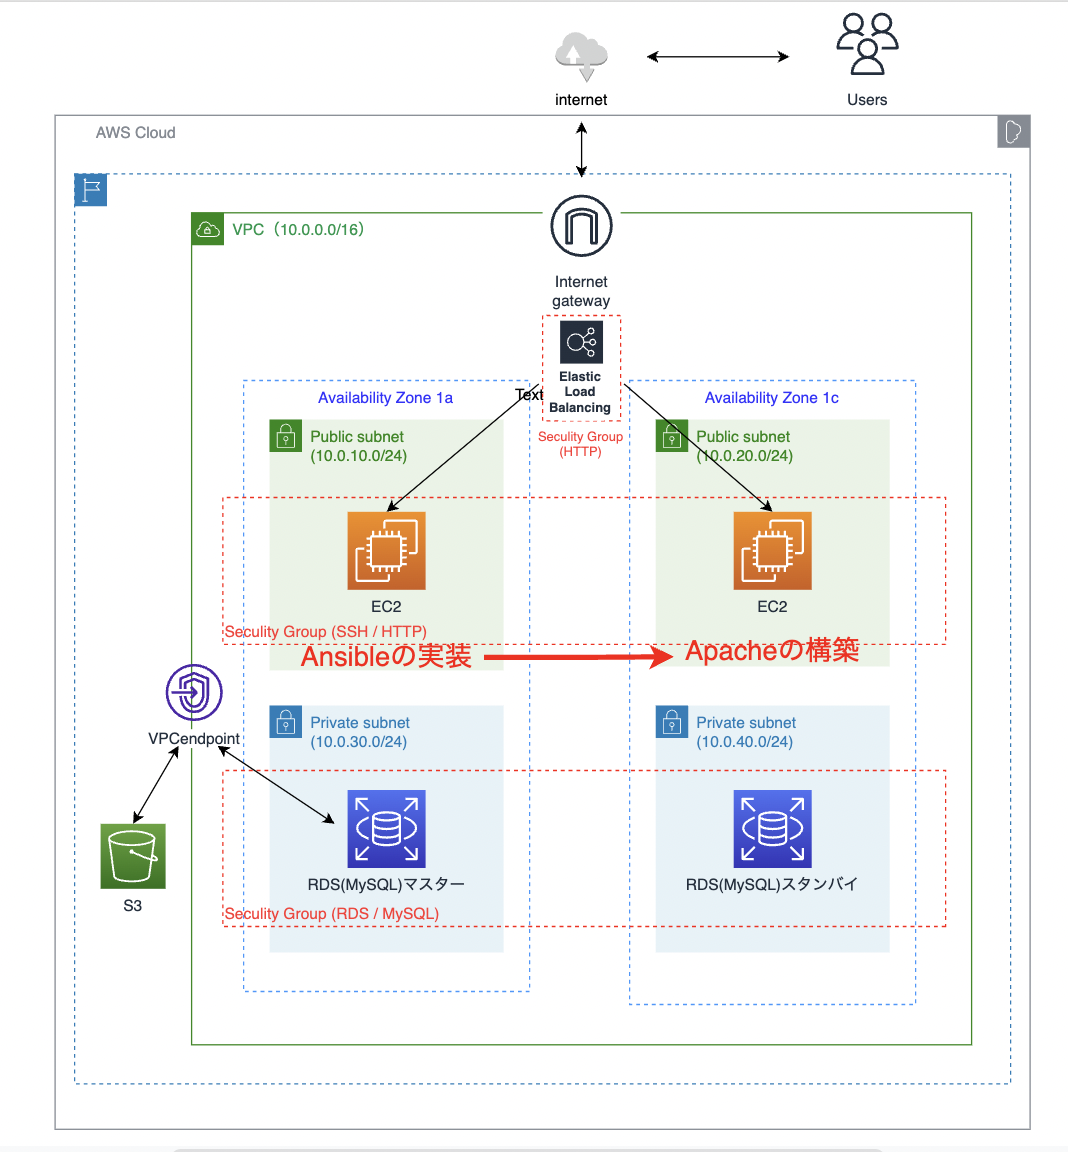
- EC2(1a)にテスト実行サーバーとしてAnsibleを実装
- EC2(1c)にテスト対象サーバーとしてApacheを構築
構成図
Ansibleのインストール
Ansibleサーバにssh接続したところからスタート!
まずはサーバーにAnsibleをインストールさせる。
$ sudo amazon-linux-extras install ansible2 -y
バージョンの確認コマンドで以下のような表示されればインストール完了。
$ ansible --version
ansible 2.9.23
  config file = /etc/ansible/ansible.cfg
  configured module search path = [u'/home/ec2-user/.ansible/plugins/modules', u'/usr/share/ansible/plugins/modules']
  ansible python module location = /usr/lib/python2.7/site-packages/ansible
  executable location = /usr/bin/ansible
  python version = 2.7.18 (default, Jun 10 2021, 00:11:02) [GCC 7.3.1 20180712 (Red Hat 7.3.1-13)]
秘密鍵のコピー
この作業はexitでサーバーから抜けてからローカル端末(今回はターミナル)で実施する。
Ansibleは対象にssh接続をして操作を実行するため秘密鍵が必要になるため、以下のコマンドで
EC2作成時に指定した秘密鍵(もしくは既存の秘密鍵)をAnsibleサーバに配置する。
※scpコマンドでコピーしないとansibleサーバーにデフォルトでは~/.ssh配下に秘密鍵がないため
$ scp -i [ansibleサーバに接続するための秘密鍵] [ansibleサーバが構築対象に接続するための秘密鍵]  ec2-user@[ansibleサーバーのグローバルIPアドレス]:~/.ssh
# e.g.)
$ scp -i ~/.ssh/samplekey.pem ~/.ssh/samplekey.pem ec2-user@1.2.3.4:~/.ssh
インベントリファイル(hosts)の作成
/var/www/ansible 配下にインベトリファイルを作成する。
$ vi hosts
最小限の構成で以下ファイル内に追記
# hosts
[server]
11.22.333.44

[server:vars]
ansible_ssh_port=22
ansible_ssh_user=ec2-user
ansible_ssh_private_key_file=~/.ssh/秘密鍵.pem
__working_user=ec2-user
PLAYBOOKの作成
作成するプレイブック(site.yaml )ではインベントリファイル(hosts)で定義したAnsibleサーバーの機器に対して実行する内容が記述されている。
# 対象の指定(インベントリファイルで指定した名前)
- hosts: server

  # 管理者権限で実行
  become: true

  # 以下に実際の操作を記述していく
  tasks:

    # パッケージの更新
    - name: updated yum
      yum:
        name: "*"
        state: latest

    # 言語設定の変更
    - name: set LANG=ja_JP.UTF-8 in /etc/locale.conf
      lineinfile:
        dest: /etc/locale.conf
        regexp: "^LANG="
        line: "LANG=ja_JP.UTF-8"
        backup: yes

    # httpdのインストール
    - name: installed httpd
      yum:
        name: httpd
        state: installed
      become: yes

    # httpdの起動・自動起動設定
    - name: httpd booted and auto boot conf
      service:
        name: httpd
        state: started
        enabled: yes
      become: yes

    # あらかじめ作っておいたindex.htmlファイルを対象に配置
    - name: deployed index.html
      template:
        src: ./index.html
        dest: /var/www/html/index.html
        mode: 0644
-
hosts
実行対象のグループやホスト名を指定。 -
tasks
セクションでは実行するタスクを実行順に記述。 -
name
実行するタスク名を指定する箇所、何を指定してもOK。 -
state
どのような状態にするかの指示。 -
enabled
運用稼働状態にするかの指示。
構文のチェック
$ ansible-playbook -i hosts site.yml --syntax-check

playbook: site.yaml
# 問題なければこのように表示される
ansible-playbookの実行
$ ansible-playbook -i hosts site.yaml
エラー
[WARNING]: Platform linux on host 11.22.333.44 is using the discovered Python interpreter at /usr/bin/python, but future
installation of another Python interpreter could change this. See
https://docs.ansible.com/ansible/2.9/reference_appendices/interpreter_discovery.html for more information.
[解決策]
Ansibleの設定ファイル(ansible.cfg)に次の設定を追加すれば解決する。
[defaults]
interpreter_python=/usr/bin/python3
[参考にした記事]
Pythonのバージョンを指定してAnsible実行時に表示される警告を消す
エラー
fatal: [example.com]: FAILED! => {"changed": false, "msg": "The Python 2 bindings for rpm are needed for this module.
If you require Python 3 support use the `dnf` Ansible module instead..
The Python 2 yum module is needed for this module.
If you require Python 3 support use the `dnf` Ansible module instead."}
[解決策]
hostsに以下のようにPythonの絶対パスを追記。
# ansible_python_interpreter=/usr/bin/python3
ansible_python_interpreter=/usr/bin/python
[参考にした記事]
[Ansible] yumモジュールをdnfがインストールされていない環境で使う
無事に完了!!
$ ansible-playbook -i hosts site.yaml

# 無事に全ての構築が完了!

PLAY [server] ********************************************************************************************************************

TASK [Gathering Facts] ***********************************************************************************************************
ok: [11.22.333.44]

TASK [updated yum] ***************************************************************************************************************
ok: [11.22.333.44]

TASK [set LANG=ja_JP.UTF-8 in /etc/locale.conf] **********************************************************************************
ok: [11.22.333.44]

TASK [installed httpd] ***********************************************************************************************************
ok: [11.22.333.44]

TASK [httpd booted and auto boot conf] *******************************************************************************************
ok: [11.22.333.44]

TASK [deployed index.html] *******************************************************************************************************
ok: [11.22.333.44]

PLAY RECAP ***********************************************************************************************************************
11.22.333.44           : ok=6    changed=0    unreachable=0    failed=0    skipped=0    rescued=0    ignored=0