以下ユースケースを実現する設定, 実装をする
ユースケース
外部のA社とB社にAmazon API Gateway(以下API Gateway)のREST APIを使用してAPIを公開している
認証方法はA社とB社それぞれにAPI Gatewayで発行したAPIキーを利用してもらう
backendでどの会社からのリクエストかを判定して認可処理をする
アーキテクチャ
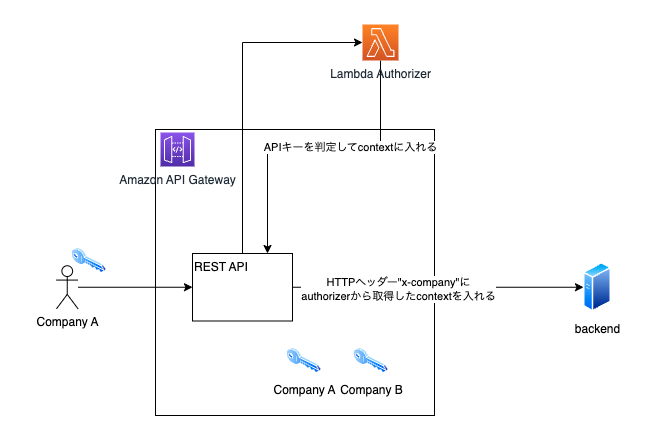
Lambda Authorizerを使用する
設定手順
-
backendを用意する
今回はローカルで立てたexpressサーバーをngrokでpublicに公開する- HTTPリクエストヘッダー"x-company"の値をそのままレスポンスするexpressサーバーを起動する
node.js
const express = require('express'); const app = express(); app.get('/', (req, res) => { res.send(req.headers['x-company']); }); app.listen(80, () => { }); - ngrokを起動する
ngrok http 80
- HTTPリクエストヘッダー"x-company"の値をそのままレスポンスするexpressサーバーを起動する
-
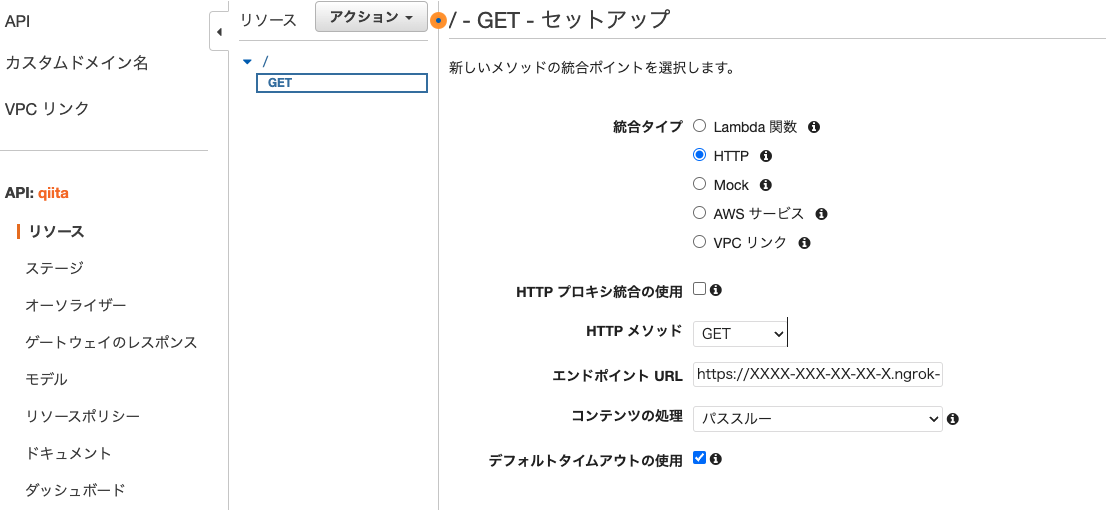
API Gateway REST APIを作成する
- 適当な設定値でREST APIを作成する
- 以下のパラメータでメソッドを作成する
- 統合タイプ: HTTP
- エンドポイント URL: <ngrokのURL>
- [メソッドリクエスト]で[API キーの必要性]をtrueに設定する
-
APIキーを作成する
- company Aとcompany B用のAPIキーを作成する
IDはあとで使用する

- company Aとcompany B用のAPIキーを作成する
-
Lambda Authorizerを作成する
- Node.jsでLambda関数を作成する
- 以下コードを入力する
node.js
import { APIGatewayClient, GetApiKeyCommand } from '@aws-sdk/client-api-gateway'; export const handler = async function(event, context) { const client = new APIGatewayClient(); // API GatewayにあるAPIキーの値を取得する const apiKeyCompanyA = (await client.send(new GetApiKeyCommand({apiKey: '<company AのAPIキーのID>', includeValue: true}))).value; const apiKeyCompanyB = (await client.send(new GetApiKeyCommand({apiKey: '<company BのAPIキーのID>', includeValue: true}))).value; // ヘッダーに付与されたAPIキーを取得 const requestedApiKey = event.headers['x-api-key']; let xCompany = ''; switch (requestedApiKey) { case apiKeyCompanyA: xCompany = 'companyA'; break; case apiKeyCompanyB: xCompany = 'companyB'; break; } let authResponse = {}; authResponse.principalId = 'me'; let policyDocument = {}; policyDocument.Version = '2012-10-17'; policyDocument.Statement = []; let statementOne = {}; statementOne.Action = 'execute-api:Invoke'; statementOne.Effect = 'Allow'; statementOne.Resource = event.methodArn; policyDocument.Statement[0] = statementOne; authResponse.policyDocument = policyDocument; // どの会社かを記録 authResponse.context = { 'xCompany': xCompany, }; return authResponse; } - LambdaからAPIキーを取得するため、LambdaのIAMロールに"apigateway:GET"できるIAMポリシーを追加する
-
REST APIにLambda Authorizerを設定し、Authorizerで設定した変数をbackendに渡す
- 以下のパラメータでLambda Authorizerを作成する
- Lambda イベントペイロード: リクエスト

- Lambda イベントペイロード: リクエスト
- REST API -> [メソッドリクエスト] -> [認可] で作成したLambda Authorizerを設定する

- REST API -> [統合リクエスト] -> [HTTP ヘッダー] で以下設定をする
- 名前: x-company
- マッピング元: context.authorizer.xCompany

- 以下のパラメータでLambda Authorizerを作成する
-
REST APIをデプロイする
-
REST APIと使用量プランとAPIキーを紐づける
動作確認
$ curl <REST APIのURL> -H "x-api-key: <company AのAPIキー>"
companyA%

$ curl <REST APIのURL> -H "x-api-key: <company BのAPIキー>"
companyB%