概要
- OpenSSLがバージョン3.5.0でポスト量子暗号の対応を始めたので、nginxのTLSの鍵交換をポスト量子暗号に対応させてみる
- TLS証明書は既存のままとする。これは真正性と認証に関わるものでHNDL攻撃の影響が少ないし、現在の主要ブラウザが対応していない
- 環境はUbuntu 24.04LTSだが、他のディストリビューションでもそれほど違いはないだろう
1. OpenSSL 3.5.0のビルドとインストール
- ソースコードからのビルドに必要なものをインストールする
$ sudo apt -y install build-essential
- 適当なところにOpenSSL 3.5.0のソースをダウンロードして展開する
opensslのダウンロード、展開
$ sudo mkdir -p /opt/src
$ sudo chown foo:foo /opt/src
$ cd /opt/src
$ curl -LO https://github.com/openssl/openssl/releases/download/openssl-3.5.0/openssl-3.5.0.tar.gz
$ tar zxf openssl-3.5.0.tar.gz
$ ls
openssl-3.5.0 openssl-3.5.0.tar.gz
- OpenSSLをビルド・インストールする
- デフォルトでは
/usr/localにインストールされるが、ここでは/opt/openssl-3.5.0にインストールされるように設定している。好みの問題なのでどちらでもよい -
-staticオプションで今回は煩わしさを回避することにした
OpenSSLのビルド・インストール
$ cd openssl-3.5.0
$ ./Configure --prefix=/opt/openssl-3.5.0 -static
$ make
$ sudo make install
$ /opt/openssl-3.5.0/bin/openssl version
OpenSSL 3.5.0 8 Apr 2025 (Library: OpenSSL 3.5.0 8 Apr 2025)
- 新しいopensslコマンドへのPATHをとおす
新しいopensslコマンドへのPATHをとおす
$ export PATH=/opt/openssl-3.5.0/bin:$PATH
$ which openssl
/opt/openssl-3.5.0/bin/openssl
$ openssl version
OpenSSL 3.5.0 8 Apr 2025 (Library: OpenSSL 3.5.0 8 Apr 2025)
2. nginxのビルド
- 新しいOpenSSLと連携させるためのnginxをビルドする
- まずnginxを稼働させるユーザーとグループを作成する
nginxユーザー・グループ作成
$ sudo adduser --system --group nginx
- nginxのビルドに必要なパッケージをインストールする
$ sudo apt -y install libpcre2-dev zlib1g-dev
- nginxのソースをダウンロードし展開する
$ cd /opt/src
$ ls
openssl-3.5.0  openssl-3.5.0.tar.gz
$ curl -LO https://nginx.org/download/nginx-1.27.5.tar.gz
$ tar zxf nginx-1.27.5.tar.gz
$ ls
nginx-1.27.5  nginx-1.27.5.tar.gz  openssl-3.5.0  openssl-3.5.0.tar.gz
- nginxをビルド・インストールする
-
--with-openssl=/opt/src/openssl-3.5.0の箇所は、前述のOpenSSLのインストール先ではなく、ソースを展開したディレクトリであることに注意
nginxをビルド・インストールする
$ cd nginx-1.27.5
$ ./configure --prefix=/opt/nginx-1.27.5 \
> --user=nginx --group=nginx \
> --with-http_ssl_module \
> --with-http_v2_module \
> --with-openssl=/opt/src/openssl-3.5.0
$ make
$ sudo make install
3. 証明書作成
- TLS証明書の作成は従来どおりで作成する
- 実際にはML-DSA-65といったポスト量子暗号の秘密鍵と証明書を作成することもできるが、一般的なブラウザが対応していないので、今回はしない
証明書作成
$ sudo mkdir /opt/certs
$ cd /opt/certs
$ sudo openssl genpkey -out ecdsa.key \
> -algorithm EC \
> -pkeyopt ec_paramgen_curve:P-256
$ sudo openssl req -new -x509 -days 365 \
> -key ecdsa.key -out ecdsa.crt \
> -subj "/CN=localhost" \
> -addext "subjectAltName = IP:192.168.11.151"
$ ls /opt/certs/*
/opt/certs/ecdsa.crt  /opt/certs/ecdsa.key
4. nginxの設定
- 適当に
ssl-config.mozilla.orgでも参考にしながら設定する
- 設定のポイントは鍵交換に関する設定ディレクティブ
ssl_ecdh_curveのところで、ここにX25519MLKEM768を優先指定すること
nginx.conf
(前略)
http {
(中略)

  server {
    listen 443 ssl;
    listen [::]:443 ssl;
    http2 on;

    server_name localhost;

    ssl_certificate /opt/certs/ecdsa.crt;
    ssl_certificate_key /opt/certs/ecdsa.key;

    ssl_protocols TLSv1.3;
    ssl_prefer_server_ciphers off;
    ssl_ecdh_curve X25519MLKEM768:X25519:prime256v1:secp384r1;

    (中略)

  }
(中略)
}
(後略)
5. 動作確認
- nginxを起動する
nginx起動
$ /opt/nginx-1.27.5/sbin/nginx -t
nginx: the configuration file /opt/nginx-1.27.5/conf/nginx.conf syntax is ok
nginx: configuration file /opt/nginx-1.27.5/conf/nginx.conf test is successful
$ /opt/nginx-1.27.5/sbin/nginx
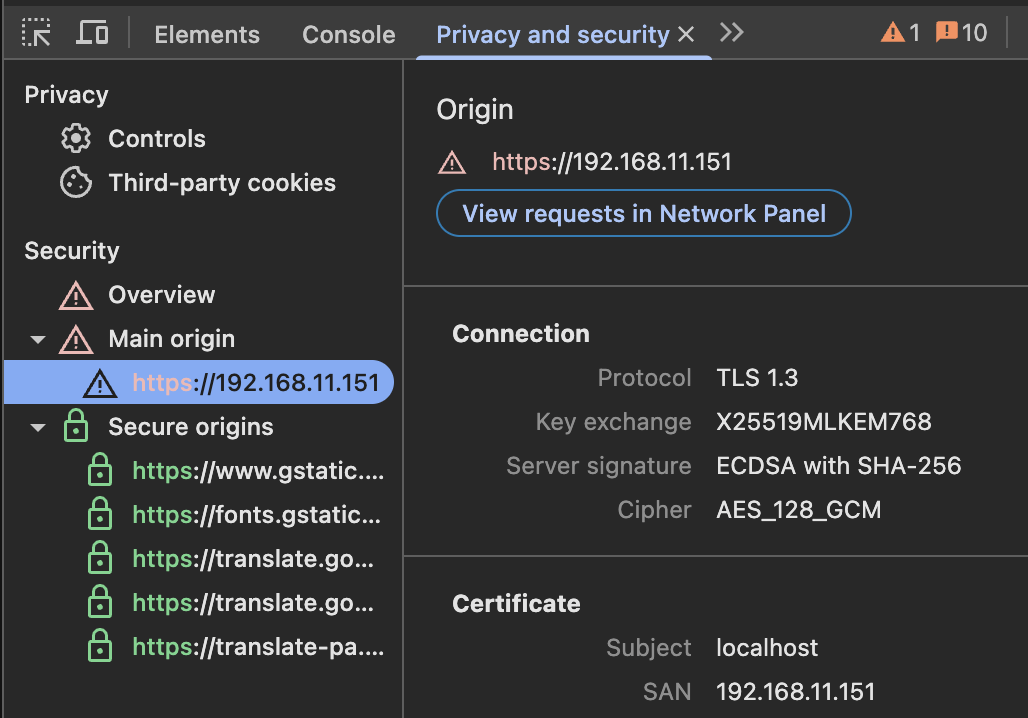
- chromeでアクセスして、デベロッパーツールで
Key exchangeがX25519MLKEM768になっていれば成功
フッター
仲間を募集しています!
ARIではエンジニア・ITコンサルタント・PM職全方位で仲間を募集しております。
カジュアル面談、随時受付中です!
ご興味ある方はこちらをご覧ください。