はじめに
はじめての Traefik v2 + cert-manager による https化 奮闘記 を試していた時は、cert-manager を使わずに traefik で TLS を有効にする方法を知らなかったので、記録として残しておきます。
ここでの作業は、主に 3 点です。
-
cert-managerを使わずにtraefikだけで Let's encrypt - https リダイレクトできるようにする
- acme 証明書を Azure のストレージアカウントに保管(既存のストレージアカウントを活用する前提)
whoami を立てる
はじめての AKS によるサービス公開に沿って、事前に whoami サービスを公開した状態まで持っていきます。
traefik 単体で Let's encrypt を使えるように構成する
はじめての Traefik v2 + cert-manager による https化 奮闘記では、cert-managerの ClusterIssuer や Certificate を作って対応していました。
cert-manager 利用編
cert-manager を使った時は、以下のようなマニフェストを使用していました。
apiVersion: cert-manager.io/v1
kind: ClusterIssuer
metadata:
  name: letsencrypt
spec:
  acme:
    # The ACME server URL
    server: https://acme-v02.api.letsencrypt.org/directory
    # Email address used for ACME registration
    email: admin@try0ut.ml
    # Name of a secret used to store the ACME account private key
    privateKeySecretRef:
      name: letsencrypt
    # Enable the HTTP-01/DNS-01 challenge provider
    solvers:
    - dns01:
        azureDNS:
          # Service principal clientId (also called appId)
          clientID: 430c5a67-157e-4133-89c7-3f974293ea4f
          # The following is the secret we created in Kubernetes.
          # Issuer will use this to present challenge to Azure DNS.
          clientSecretSecretRef:
            name: azuredns-config
            key: client-secret
          # Azure subscription Id
          subscriptionID: xxxxxxxx-xxxx-xxxx-xxxx-xxxxxxxxxxxx
          # Azure AD tenant Id
          tenantID: xxxxxxxx-xxxx-xxxx-xxxx-xxxxxxxxxxxx
          # ResourceGroup name where dns zone is provisioned
          resourceGroupName: aks-learning
          hostedZoneName: try0ut.ml
          environment: AzurePublicCloud
apiVersion: cert-manager.io/v1alpha2
kind: Certificate
metadata:
  name: whoami-cert
  namespace: whoami
spec:
  commonName: whoami.try0ut.ml
  secretName: whoami-cert
  dnsNames:
    - whoami.try0ut.ml
  issuerRef:
    name: letsencrypt
    kind: ClusterIssuer
1. ConfigMap/Secret を作成する
DNS-01 チャレンジに使用していた ClusterIssuer, Certificate の Azure DNS の設定(spec.acme.solvers.dns01.azureDNS) を ConfigMap に移行します。
AZURE_CLIENT_SECRET (clientSecretSecretRef) は、機密データのため、ConfigMap に含めず、Secret で作成します。これは、以前と同じです。
ConfigMap
cert-manager で使用していた以下の設定を、ConfigMap に書き直します。
-
clientID:
430c5a67-157e-4133-89c7-3f974293ea4f(サービスプリンシパルのクライアント ID) -
subscriptionID:
xxxxxxxx-xxxx-xxxx-xxxx-xxxxxxxxxxxx(サブスクリプションIDを設定) -
tenantID:
xxxxxxxx-xxxx-xxxx-xxxx-xxxxxxxxxxxx(Azure AD のテナント IDを設定) -
resourceGroupName:
aks-learning(DNS ゾーンを配置したリソース グループの名前) -
hostedZoneName:
try0ut.ml(DNS ゾーンの名前)
kind: ConfigMap
apiVersion: v1
metadata:
  name: azuredns-config
  namespace: traefik
data:
  AZURE_CLIENT_ID: 430c5a67-157e-4133-89c7-3f974293ea4f
  AZURE_SUBSCRIPTION_ID: xxxxxxxx-xxxx-xxxx-xxxx-xxxxxxxxxxxx
  AZURE_TENANT_ID: xxxxxxxx-xxxx-xxxx-xxxx-xxxxxxxxxxxx
  AZURE_DNS_ZONE: try0ut.ml
  AZURE_RESOURCE_GROUP: aks-learning
# ConfigMap の作成
$ kc apply -f azuredns-config.yaml
⥤ configmap/azuredns-config created
Secret
前回と同様の設定です。
client-secret=dRRzw-gsleqF6BLxdv_d6C.9s5.qjQT04.
後述の envFrom を使って設定する予定の場合は、予め環境変数名を指定しましょう。
ここでは、変数名を AZURE_CLIENT_SECRET で作ったシークレットを使ってみます。
AZURE_CLIENT_SECRET=dRRzw-gsleqF6BLxdv_d6C.9s5.qjQT04.
cert-manager 名前空間は作成しないため traefik 名前空間に作ります。
# 名前空間の切り替え
$ kubens traefik
⥤ Context "try-traefik-https" modified.
⥤ Active namespace is "traefik".

# シークレットの作成
$ kc create secret generic azuredns-config --from-env-file ./credentials.env
⥤ secret/azuredns-config created

# 機密データの破棄
$ rm -f ./credentials.env
2. traefik の values.yaml を設定する
新しく values.yaml を生成します。
$ helm inspect values traefik/traefik > values.yaml
リダイレクト
http から https にリダイレクトする設定です。
# Configure ports
ports:
  web:
    port: 8000
    # hostPort: 8000
    expose: true
    exposedPort: 80
    # The port protocol (TCP/UDP)
    protocol: TCP
    # Use nodeport if set. This is useful if you have configured Traefik in a
    # LoadBalancer
    # nodePort: 32080
    # Port Redirections
    # Added in 2.2, you can make permanent redirects via entrypoints.
    # https://docs.traefik.io/routing/entrypoints/#redirection
+     redirectTo: websecure
環境変数
Azure DNS 周りの設定です。
# Environment variables to be passed to Traefik's binary
#  env:
#  - name: AZURE_CLIENT_SECRET
#    valueFrom:
#      secretKeyRef:
#        name: azuredns-config
#        key: client-secret

- envFrom: []
+ envFrom:
+ - configMapRef:
+     name: azuredns-config
+ - secretRef:
+     name: azuredns-config
# Configure ports
ports:
  websecure:
    port: 8443
    # hostPort: 8443
    expose: true
    exposedPort: 443
    # The port protocol (TCP/UDP)
    protocol: TCP
    # nodePort: 32443
    # Set TLS at the entrypoint
    # https://doc.traefik.io/traefik/routing/entrypoints/#tls
    tls:
-       enabled: false
+       enabled: true
      # this is the name of a TLSOption definition
      # options: ""
+       certResolver: le
+       domains:
+       - main: try0ut.ml
+         sans:
+           - "*.try0ut.ml"

# Enable persistence using Persistent Volume Claims
# ref: http://kubernetes.io/docs/user-guide/persistent-volumes/
# After the pvc has been mounted, add the configs into traefik by using the `additionalArguments` list below, eg:
- additionalArguments: []
+ additionalArguments:
+ - "--certificatesResolvers.le.acme.dnsChallenge.provider=azure"
+ - "--certificatesresolvers.le.acme.email=admin@try0ut.ml"
+ - "--certificatesresolvers.le.acme.storage=/data/acme.json"
+ - "--certificatesresolvers.le.acme.caserver=https://acme-v02.api.letsencrypt.org/directory"
Information:
ports.websecure.tls.certResolverに指定した名前が、
--certificatesResolvers.***.acmeの***に入ります。
3. traefik をアップグレードする
# 名前空間の切り替え
$ kubens traefik
⥤ Context "try-traefik-https" modified.
⥤ Active namespace is "traefik".

# 新しい設定値でアップグレード
$ helm upgrade traefik traefik/traefik -f values.yaml
⥤ Release "traefik" has been upgraded. Happy Helming!
⥤ NAME: traefik
⥤ LAST DEPLOYED: Mon May 10 22:46:11 2021
⥤ NAMESPACE: traefik
⥤ STATUS: deployed
⥤ REVISION: 2
⥤ TEST SUITE: None
4. whoami の IngressRoute を変更します。
以前は、こちらに tls の設定を入れていました。
今回、traefik の設定に含めたので、こちらは消してしまいましょう。
apiVersion: traefik.containo.us/v1alpha1
kind: IngressRoute
metadata:
  name: whoami
spec:
  entryPoints:
    - web
    - websecure
  routes:
    - match: Host(`whoami.try0ut.ml`)
      kind: Rule
      services:
        - name: whoami
          namespace: whoami
          port: 80

  # traefik で設定しているため必要ありません
  # tls:
  #   secretName: whoami-cert
$ kubens whoami
⥤ Context "try-traefik-https" modified.
⥤ Active namespace is "whoami".

$ kc apply -f whoami-ingress.yaml
⥤ ingressroute.traefik.containo.us/whoami configured
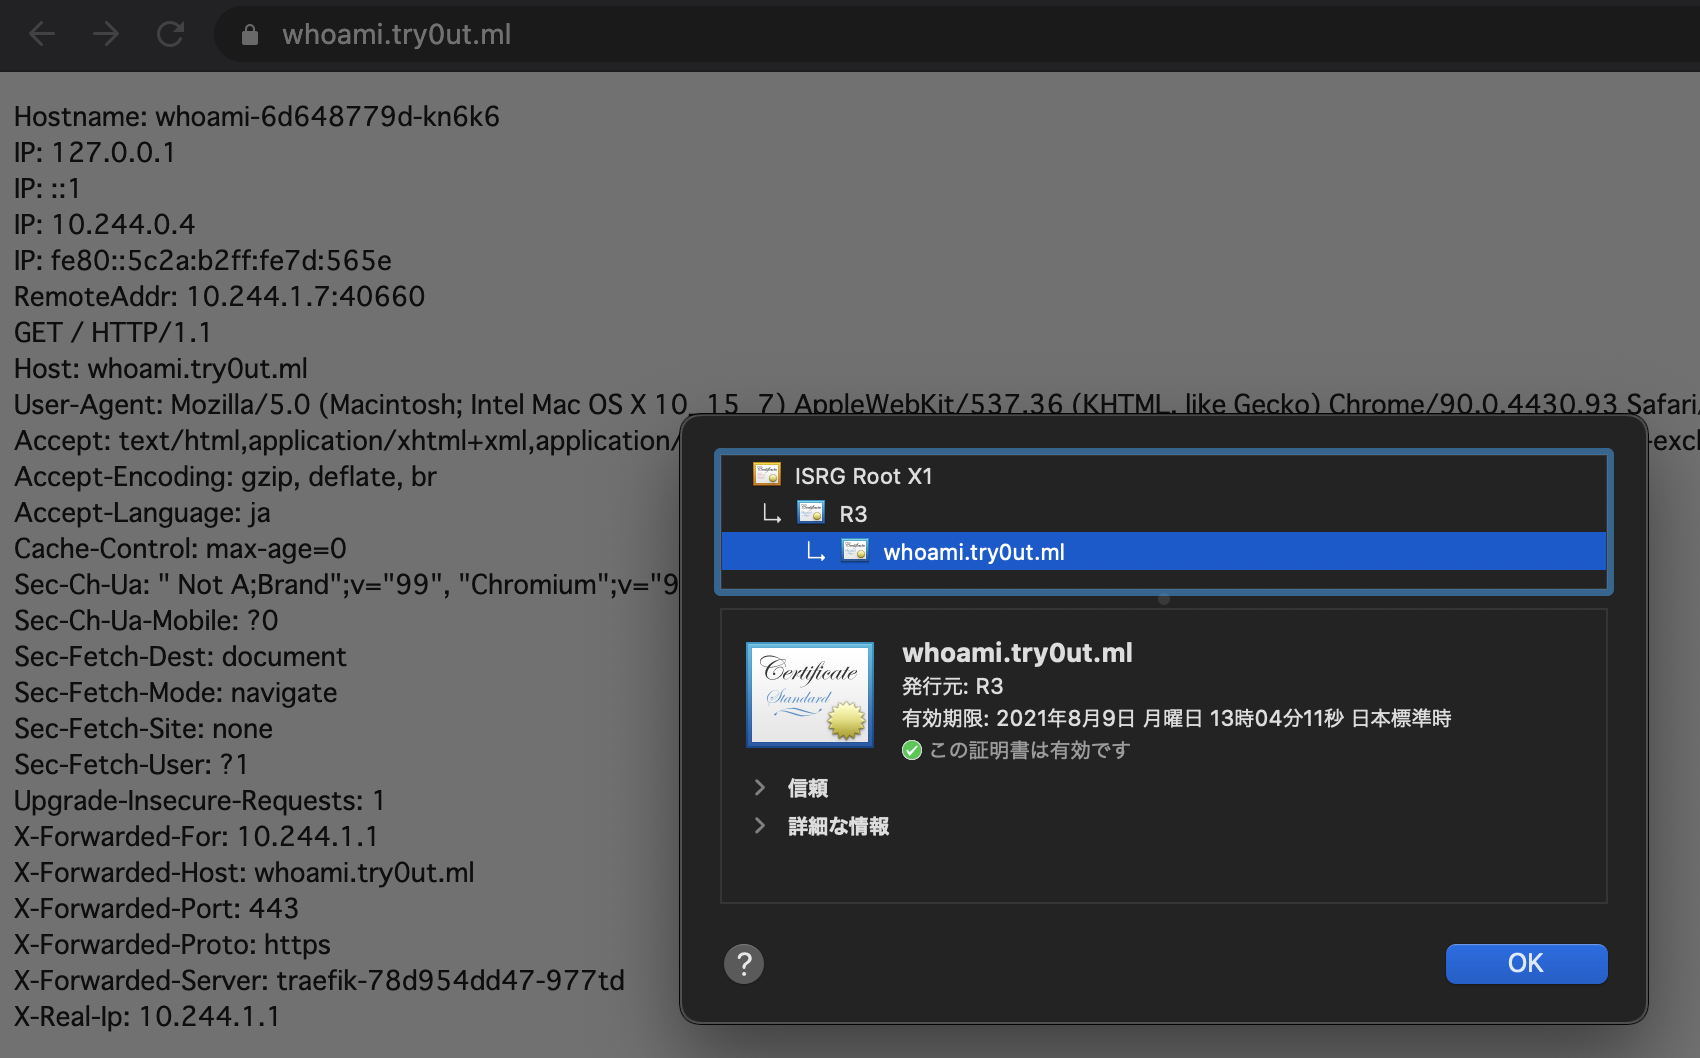
14.Webブラウザーで、https://whoami.try0ut.ml/ にアクセスしてみましょう。
ストレージアカウントに ACME 証明書を保存する
外部ストレージに ACME 証明書を保存しておくと、ポッドが死んでしまった時でも安心です。
ここでは、AKSが自動で作るストレージではなく、既存のストレージアカウントを活用できるようになることを目的として外部ストレージを作成して進めます。
Fallback - Traefik / Let's Encrypt
If Let's Encrypt is not reachable, the following certificates will apply:
- Previously generated ACME certificates (before downtime)
- Expired ACME certificates
- Provided certificates
1. ストレージアカウントを作成する
ストレージアカウントが既にある方は、読み飛ばしてください。
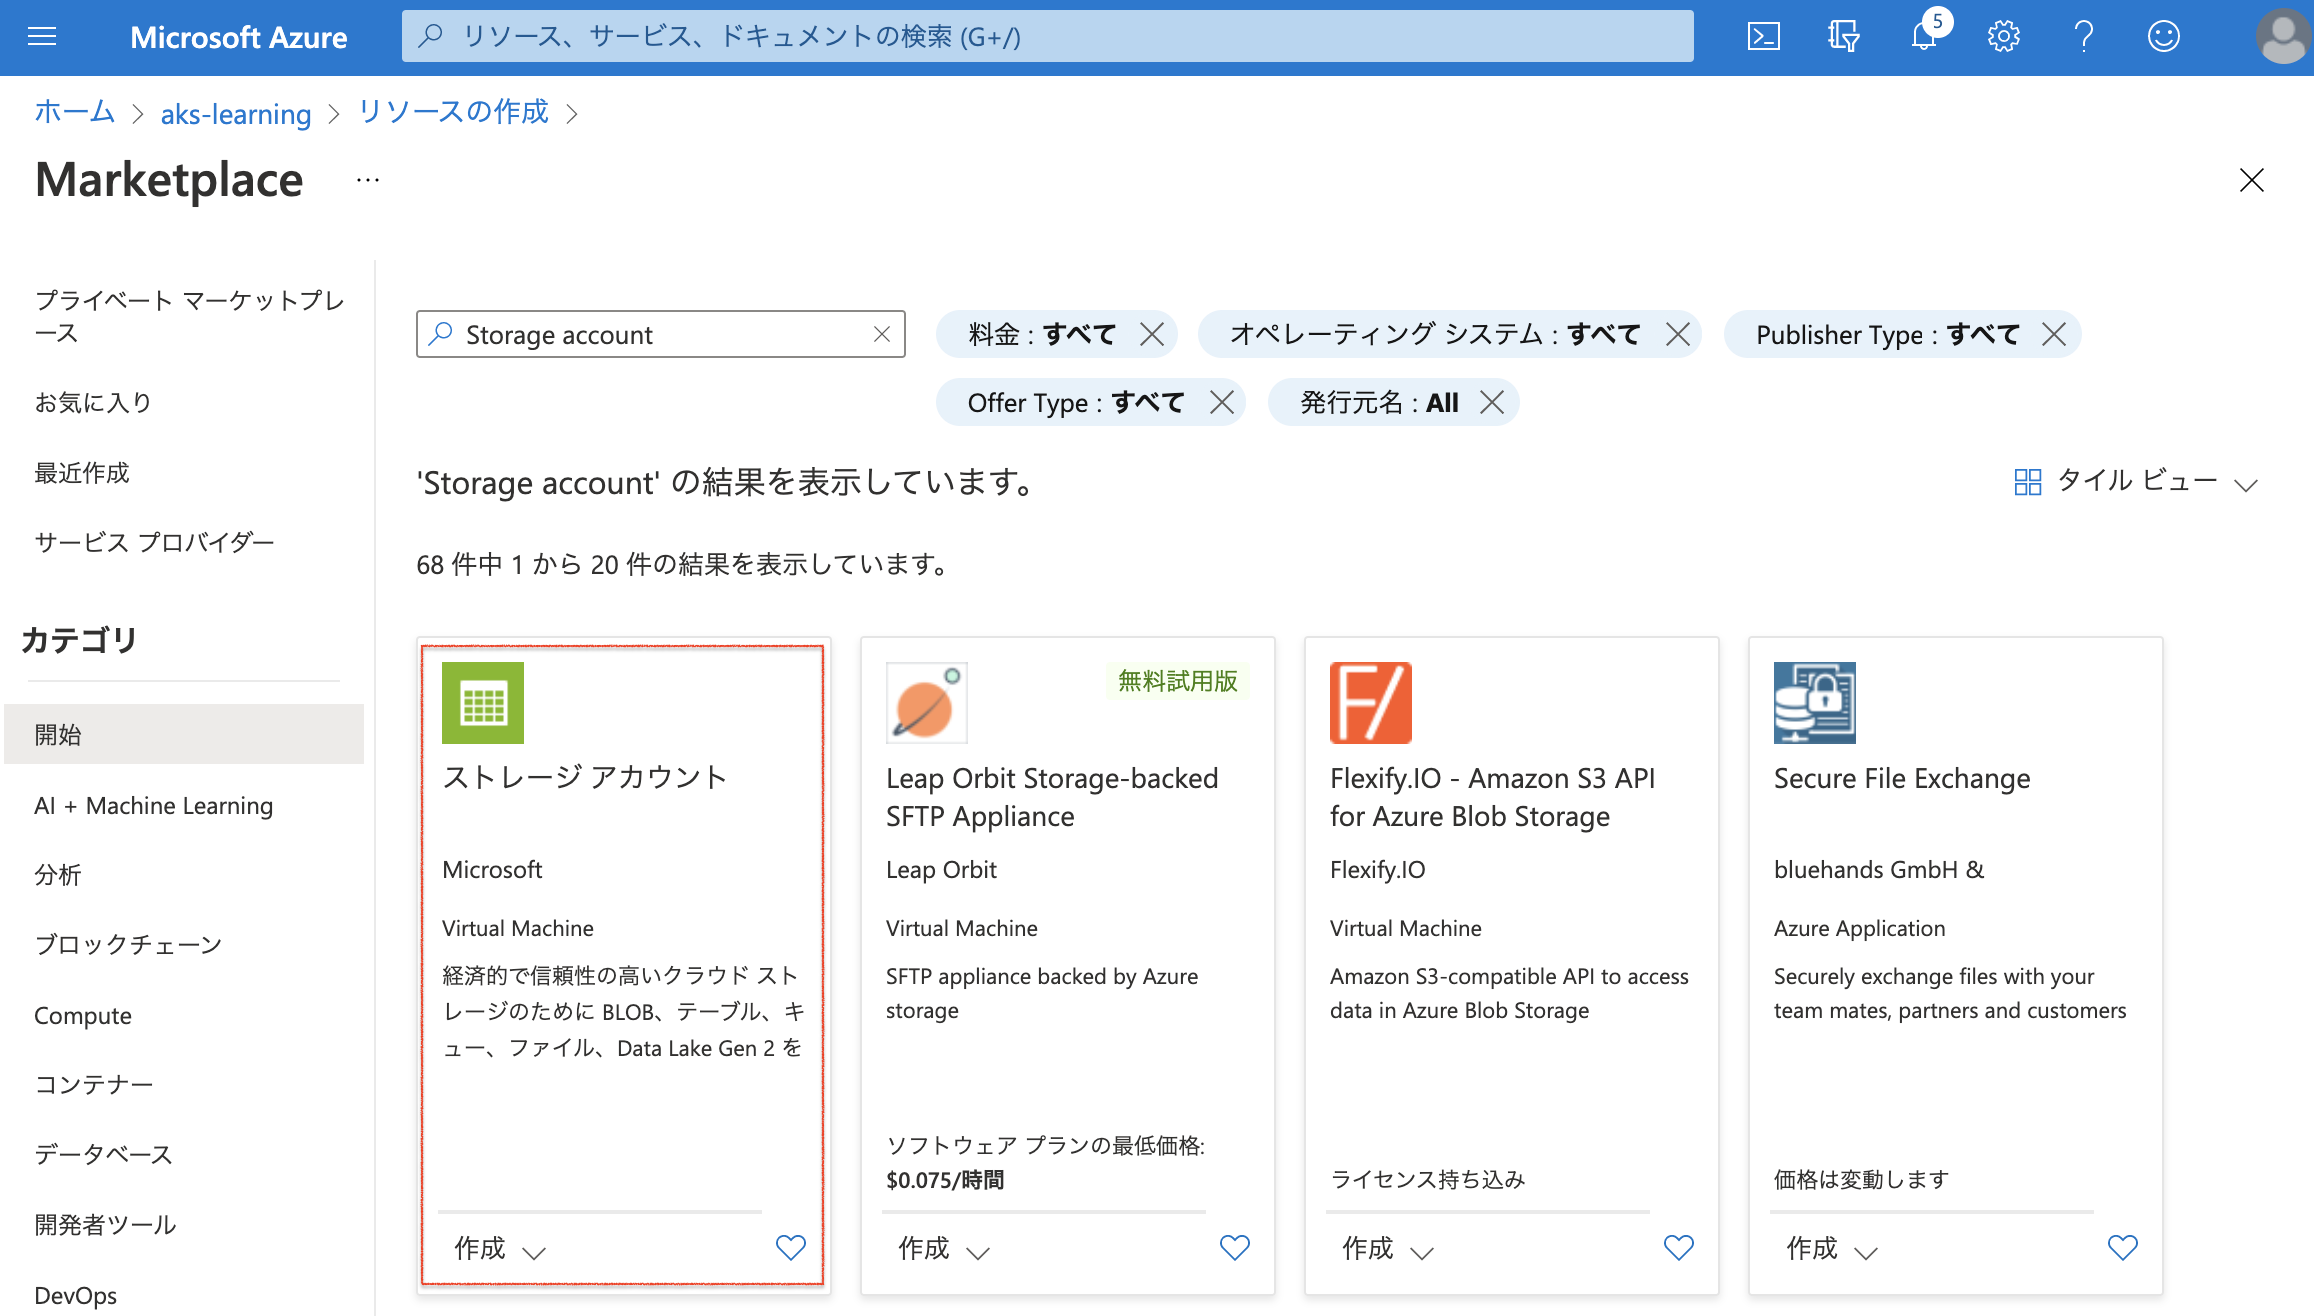
1.クラスターを作ったリソースグループにストレージアカウントを追加します。
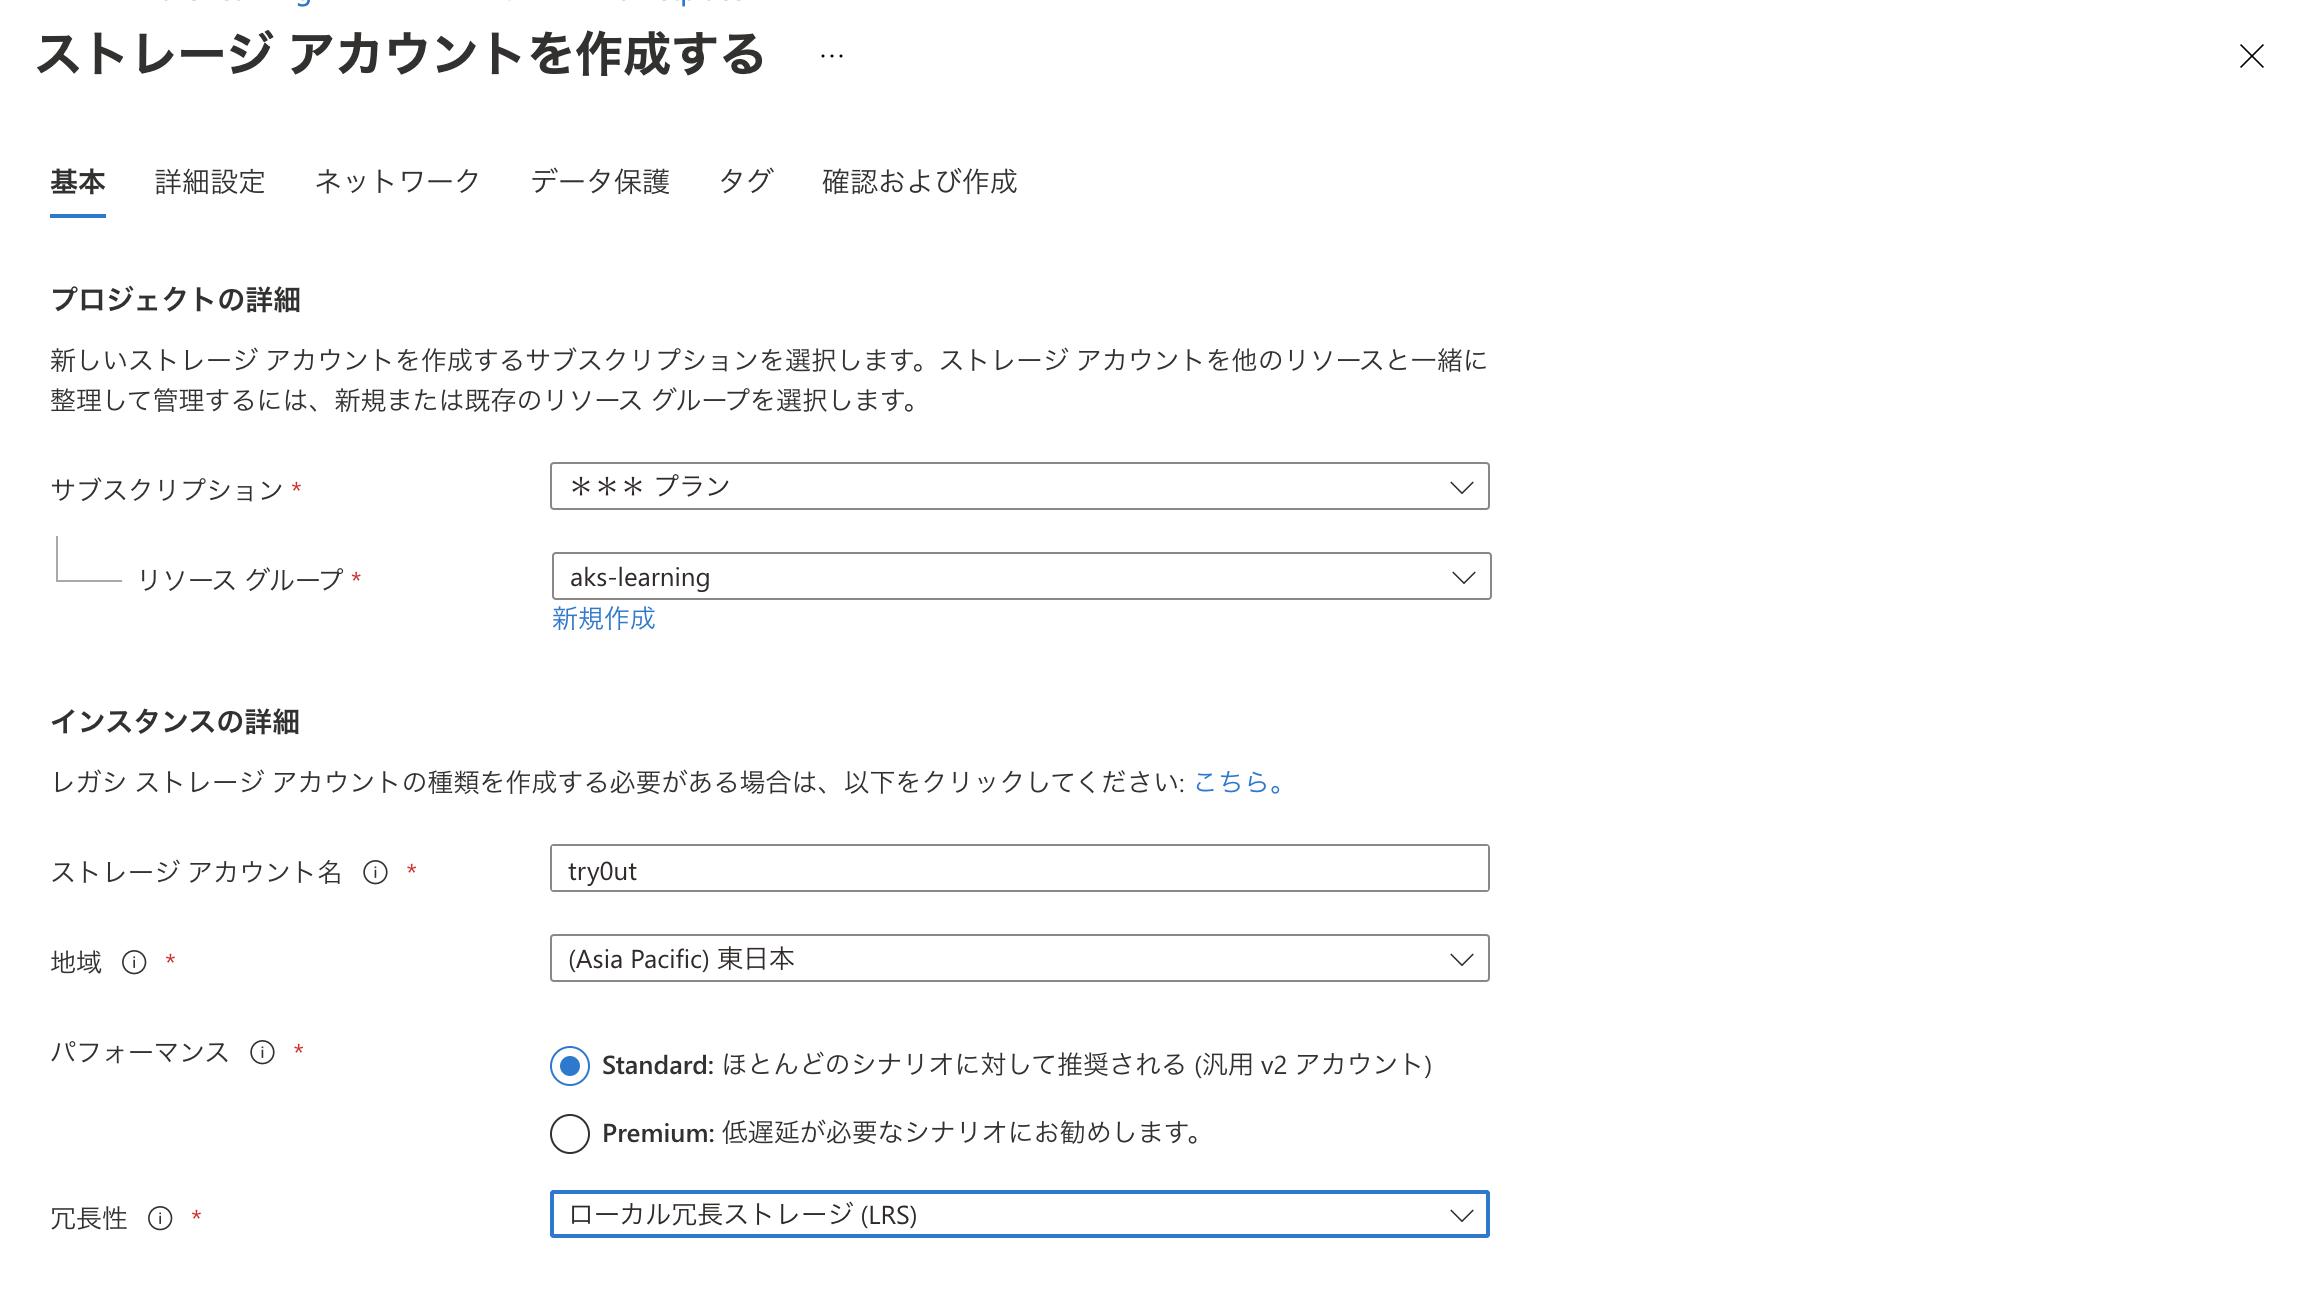
2.ストレージ アカウントを作成するの基本項目を設定します。
-
プロジェクトの詳細
- リソース グループ:
(どこでも良い)
- リソース グループ:
-
インスタンスの詳細
- ストレージ アカウント名:
try0ut(好きな名前でok) - 地域:
東日本(どこでも良いが、遅延が気になるなら地理的に近い方が良い) - パフォーマンス:
Standard(シナリオに合わせて選ぶ) - 冗長性:
ローカル冗長ストレージ(シナリオに合わせて選ぶ)
- ストレージ アカウント名:
3.ストレージ アカウントを作成するの詳細設定、ネットワーク、データ保護は、既定の設定のまま進めました。
4.リソースがデプロイされるのを待ちます。
5.作成したストレージ アカウントから ファイル共有 > +ファイル共有を選び、新しいファイル共有を追加します。
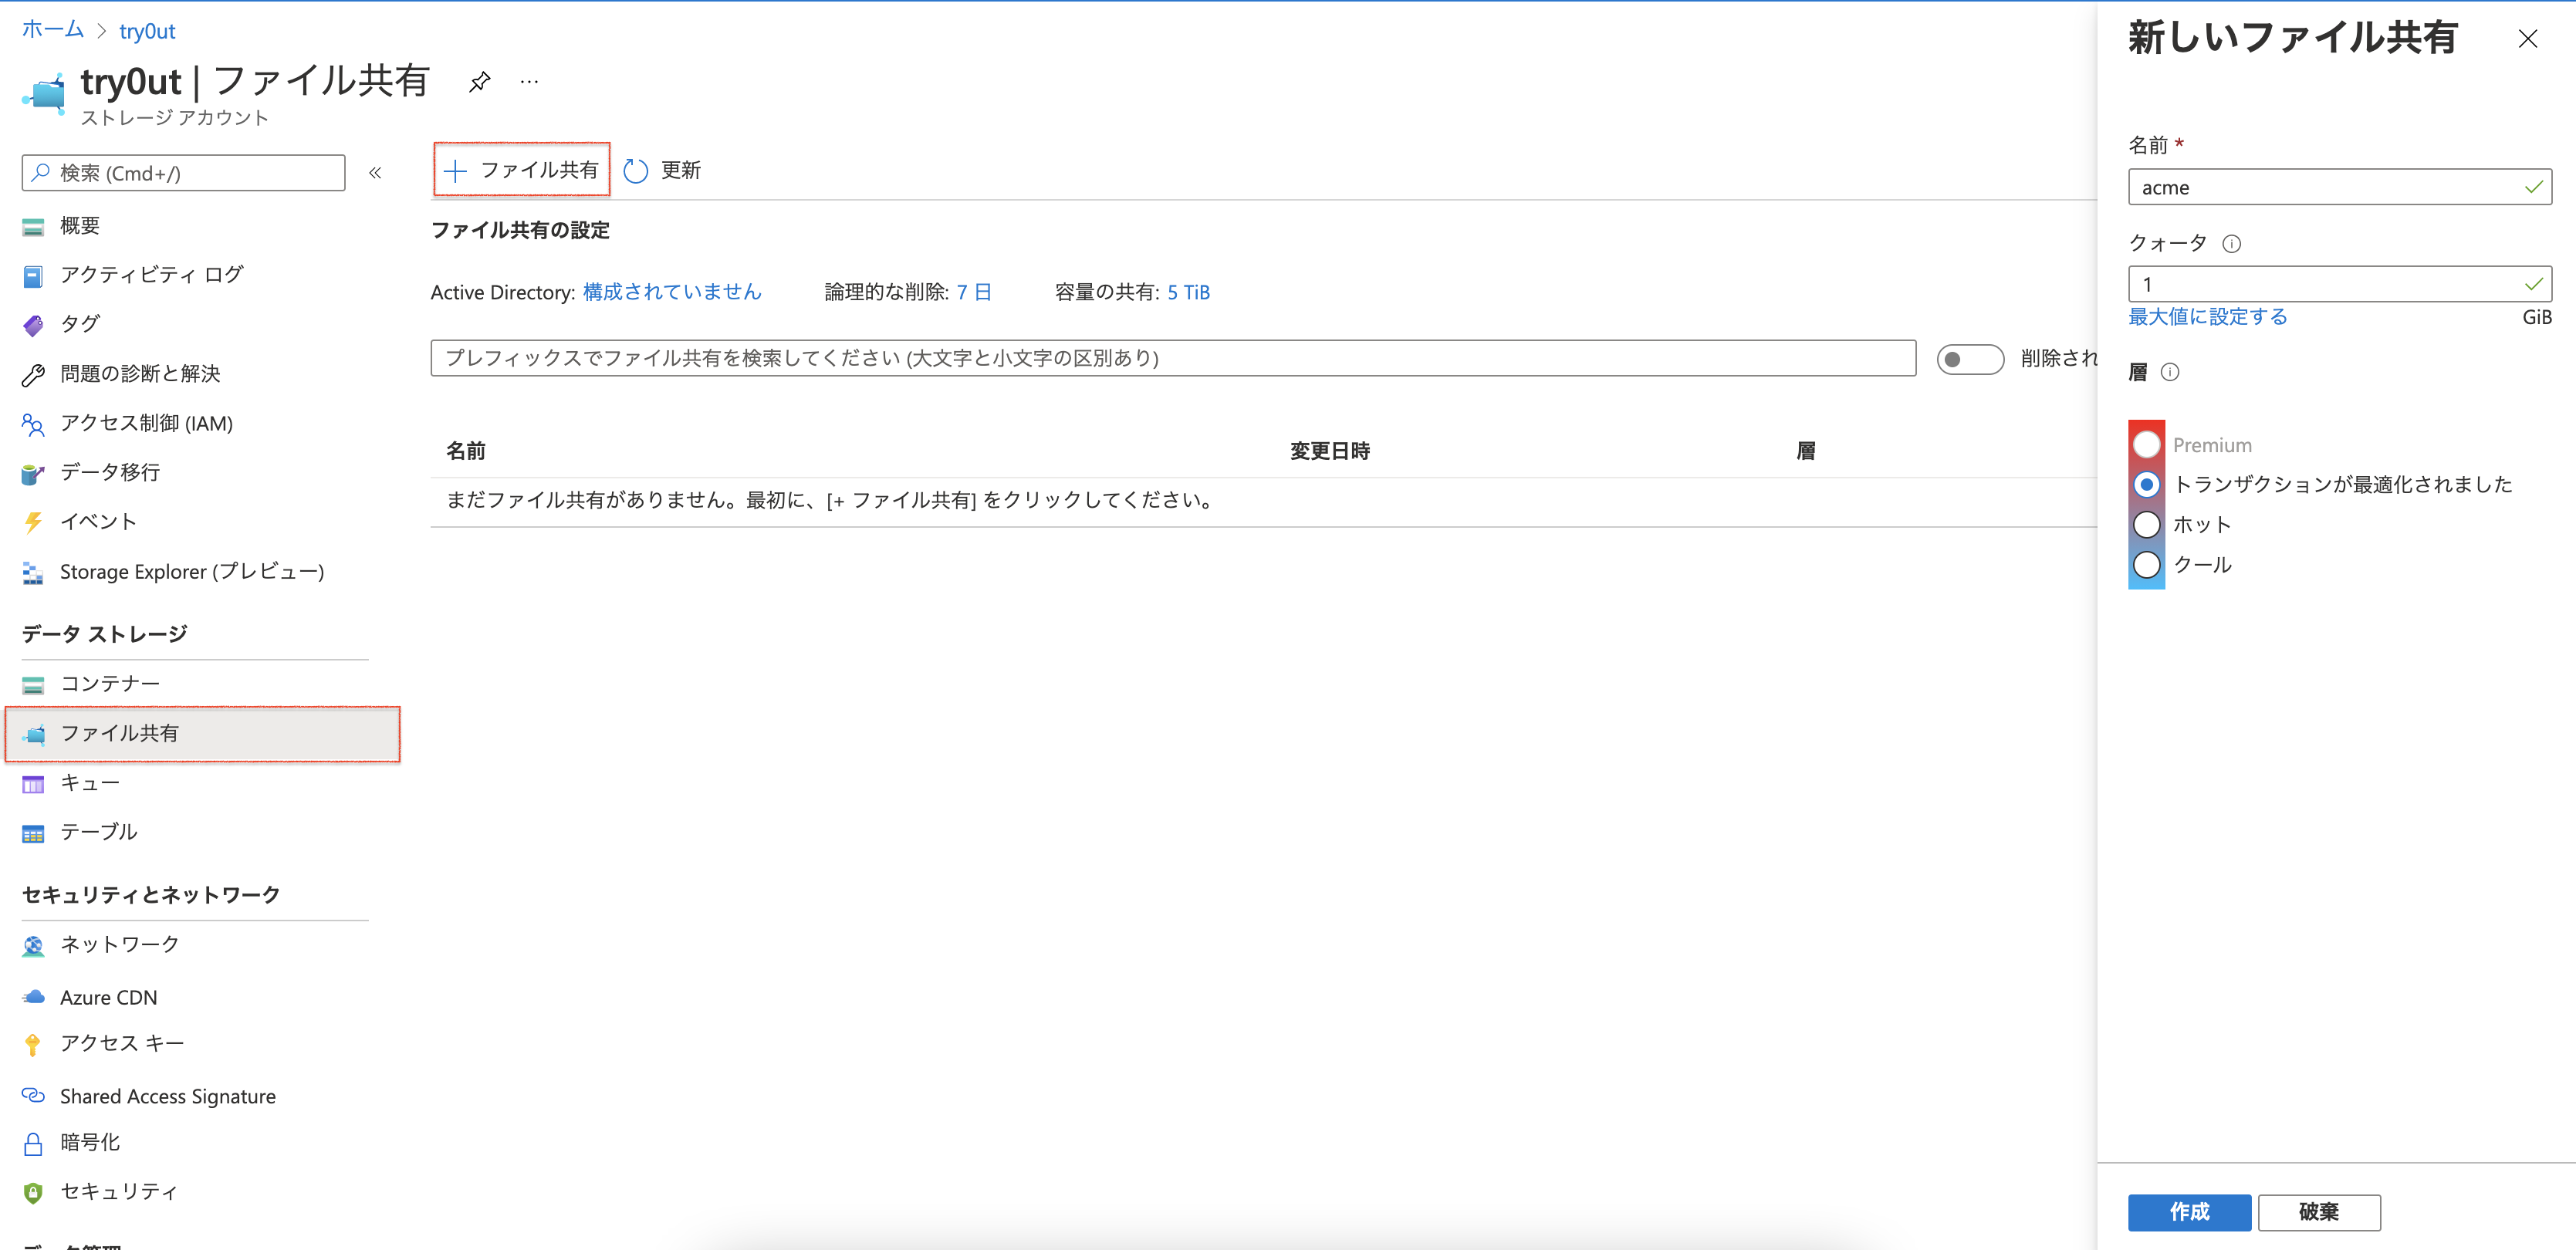
- 名前:
acme(何でも良い) - クォータ:
1GiB - 層:
トランザクションが最適化されました(クールでも良いかも?)
6.必須ではありませんが、ドメイン名でディレクトリを作っておくと良いでしょう。
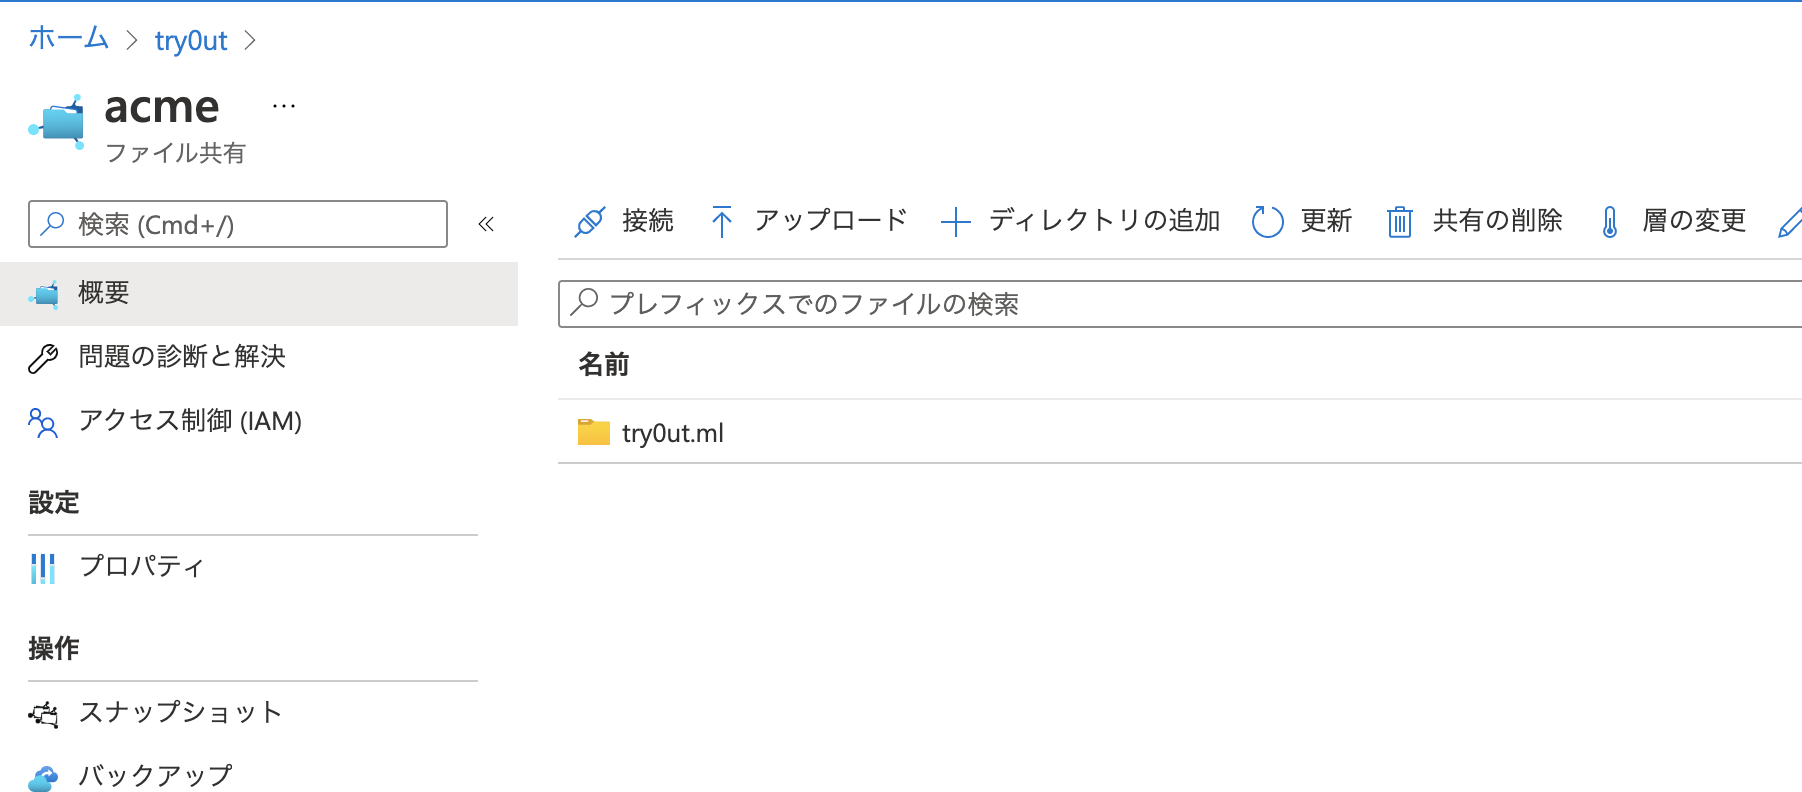
7.アクセス キーを調べます。(本アクセス キーはサンプルです)

ストレージ アカウント名とアクセス キーは、シークレットとして必要となるため、メモしておきます。
アクセス キーは、key1 または key2 のどちらでも構いません。
| key | value |
|---|---|
| azurestorageaccountname | try0ut |
| azurestorageaccountkey | NhWBtKdSrSnpPonVf4MFbKO94uqlgKjmrtDx9eNZsJzeu6jwIh2gkaIBzBUR92Vut552M0u5wiPR0TKD6zDvzw |
2.永続化ボリュームと要求を準備する
1.ストレージアカウントにアクセスするためのSecretを作ります。
azure-storage.envに、ストレージアカウント名とアクセス キーを環境変数として保存します。
azurestorageaccountname=try0ut
azurestorageaccountkey=NhWBtKdSrSnpPonVf4MFbKO94uqlgKjmrtDx9eNZsJzeu6jwIh2gkaIBzBUR92Vut552M0u5wiPR0TKD6zDvzw
# 名前空間の切り替え
$ kubens traefik
⥤ Context "try0ut" modified.
⥤ Active namespace is "traefik".

# シークレットの作成
$ kc create secret generic azure-storage --from-env-file ./azure-storage.env
⥤ secret/azure-storage created

# 確認
$ kc get secret azure-storage -o jsonpath={.data}
⥤ {"azurestorageaccountkey":"TmhXQnRLZFNyU25wUG9uVmY0TUZiS085NHVxbGdLam1ydER4OWVOWnNKemV1Nmp3SWgyZ2thSUJ6QlVSOTJWdXQ1NTJNMHU1d2lQUjBUS0Q2ekR2enc=","azurestorageaccountname":"dHJ5MHV0"}

# azurestorageaccountname の確認
$ echo "dHJ5MHV0" | base64 --decode
⥤ try0ut
2.PersistentVolumeを作ります。
traefikのACME証明書にはパーミッションの指定があり、Microsoft のファイル共有を永続ボリュームとしてマウントする のサンプル通りでは動作しません。
| 値 | ||
|---|---|---|
| シークレット | spec.azureFile.secretName |
azure-storage |
| 名前空間(シークレット) | spec.azureFile.secretNamespace |
traefik |
| ファイル共有の名前 | spec.azureFile.shareName |
acme |
| キャパシティ | spec.capacity.storage |
200Mi (クォータ値以下) |
mountOptions について
traefik の証明書ファイルのパーミッションは、0600でなければなりません。
また、uid,gidは traefik の values.yaml で設定したsecurityContextと一致させます。The ACME resolver "le" is skipped from the resolvers list because: unable to get ACME account: permissions 660 for /data/acme.json are too open, please use 600... - traefik/traefik-helm-chart #164
apiVersion: v1
kind: PersistentVolume
metadata:
  name: acme
  namespace: traefik
spec:
  accessModes:
  - ReadWriteOnce
  azureFile:
    secretName: azure-storage
    secretNamespace: traefik
    shareName: acme
  capacity:
    storage: 200Mi
  # Allow our user 65532 to read, write and
  # -important- execute (i.e. access / list) the directory,
  # and read and write files in that directory.
  # Traefik will require an 0600 for the file.
  mountOptions:
  - dir_mode=0700
  - file_mode=0600
  - uid=65532
  - gid=65532
  - mfsymlinks
  - nobrl
  persistentVolumeReclaimPolicy: Retain
  storageClassName: azurefile
  volumeMode: Filesystem
# 永続化ボリュームの作成
$ kc apply -f traefik-pv.yaml
⥤ persistentvolume/acme created

# 確認
$ kc get pv
⥤ NAME   CAPACITY   ACCESS MODES   RECLAIM POLICY   STATUS      CLAIM            STORAGECLASS   REASON   AGE
⥤ acme   200Mi      RWO            Retain           Available                    azurefile               13s
3.PersistentVolumeClaimを作ります。
ストレージのリクエストは50Miにしていますが、永続化ボリュームのキャパシティ内で必要な分を要求します。
apiVersion: v1
kind: PersistentVolumeClaim
metadata:
  name: try0ut.ml
  namespace: traefik
spec:
  accessModes:
  - ReadWriteOnce
  resources:
    requests:
      storage: 50Mi
  storageClassName: azurefile
  volumeMode: Filesystem
  volumeName: acme
# 永続化ボリューム要求を作成
$ kc apply -f traefik-pvc.yaml
⥤ persistentvolumeclaim/try0ut.ml created

# 確認
$ kc get pvc
⥤ NAME        STATUS   VOLUME   CAPACITY   ACCESS MODES   STORAGECLASS   AGE
⥤ try0ut.ml   Bound    acme     200Mi      RWO            azurefile      4s
3. traefik をアップグレードする
1.traefik の values.yaml を変更します。
作成した永続化ボリューム要求を existingClaim に指定します。subPathは、6 で作成したディレクトリ名です。ディレクトリを作成しなかった場合は、指定なしで構いません。
# It will persist TLS certificates.
persistence:
-   enabled: false
+   enabled: true
  name: data
- #  existingClaim: ""
+   existingClaim: try0ut.ml
-   accessMode: ReadWriteOnce
-   size: 128Mi
  # storageClass: ""
  path: /data
  annotations: {}
  # only mount a subpath of the Volume into the pod
-   # subPath: ""
+   subPath: try0ut.ml
2.traefikに変更を適用します。
$ helm upgrade traefik traefik/traefik -f values.yaml
⥤ Release "traefik" has been upgraded. Happy Helming!
⥤ NAME: traefik
⥤ LAST DEPLOYED: Mon May 17 22:02:59 2021
⥤ NAMESPACE: traefik
⥤ STATUS: deployed
⥤ REVISION: 2
⥤ TEST SUITE: None
3.Webブラウザーで https 接続が正しく出来ているか確認した後、Azure Files のディレクトリ確認してみます。

Information:
ポッドが起動すると、ストレージに acme.jsonが作成されますが、
acme.json が0 KiBとなっている場合は、パーミッションの指定を間違えています。
Troubleshoot
7 の file_mode が正しく設定されているにも関わらず、0 KiB のままの場合は、
traefik の values.yaml に以下の設定を加えて、再度アップグレードします。
#
# Configure the deployment
#
deployment:
  ...
  # Additional initContainers (e.g. for setting file permission as shown below)
-   initContainers: []
+  initContainers:
    # The "volume-permissions" init container is required if you run into permission issues.
    # Related issue: https://github.com/traefik/traefik/issues/6972
+    - name: volume-permissions
+      image: busybox:1.31.1
+      command: ["sh", "-c", "chmod -Rv 600 /data/*"]
+      volumeMounts:
+        - name: data
+          mountPath: /data