Vagrantで建てたゲストOSからホストOSにファイルを送る簡単なやり方
vagrant のboxファイルから建てたゲストOSからホストOSへ単一のファイルを受け渡しする簡単なやり方について備忘録としてここに書き残しておきます(何番煎じか分かりませんが笑)
X.要約
デフォルトでゲストOSの /home/vagrant/ の下が共有フォルダに指定されているのでそこにファイルをコピーしてSFTPする
1.環境
ホストOS
Windows 10 64bit
RLogin http://nanno.dip.jp/softlib/man/rlogin/
Version 2.22.2
ゲストOS
Virtual Box https://www.virtualbox.org
バージョン 5.1.22 r115126 (Qt5.6.2)
vagrant (https://www.vagrantup.com/)
1.9.5
box file (たぶんこれだったはず)
Official Ubuntu 14.05 daily Cloud Image i386 (Development release, No Guest Additions) http://www.vagrantbox.es/
vagrant up
vagrant ssh
vagrant file(デフォルトのままだが念のため全ておいておく)
# -*- mode: ruby -*-
# vi: set ft=ruby :

# All Vagrant configuration is done below. The "2" in Vagrant.configure
# configures the configuration version (we support older styles for
# backwards compatibility). Please don't change it unless you know what
# you're doing.
Vagrant.configure("2") do |config|
  # The most common configuration options are documented and commented below.
  # For a complete reference, please see the online documentation at
  # https://docs.vagrantup.com.

  # Every Vagrant development environment requires a box. You can search for
  # boxes at https://atlas.hashicorp.com/search.
  config.vm.box = "Ubu1486"

  # Disable automatic box update checking. If you disable this, then
  # boxes will only be checked for updates when the user runs
  # `vagrant box outdated`. This is not recommended.
  # config.vm.box_check_update = false

  # Create a forwarded port mapping which allows access to a specific port
  # within the machine from a port on the host machine. In the example below,
  # accessing "localhost:8080" will access port 80 on the guest machine.
  # NOTE: This will enable public access to the opened port
  # config.vm.network "forwarded_port", guest: 80, host: 8080

  # Create a forwarded port mapping which allows access to a specific port
  # within the machine from a port on the host machine and only allow access
  # via 127.0.0.1 to disable public access
  # config.vm.network "forwarded_port", guest: 80, host: 8080, host_ip: "127.0.0.1"

  # Create a private network, which allows host-only access to the machine
  # using a specific IP.
  # config.vm.network "private_network", ip: "192.168.33.10"

  # Create a public network, which generally matched to bridged network.
  # Bridged networks make the machine appear as another physical device on
  # your network.
  # config.vm.network "public_network"

  # Share an additional folder to the guest VM. The first argument is
  # the path on the host to the actual folder. The second argument is
  # the path on the guest to mount the folder. And the optional third
  # argument is a set of non-required options.
  # config.vm.synced_folder "../data", "/vagrant_data"

  # Provider-specific configuration so you can fine-tune various
  # backing providers for Vagrant. These expose provider-specific options.
  # Example for VirtualBox:
  #
  # config.vm.provider "virtualbox" do |vb|
  #   # Display the VirtualBox GUI when booting the machine
  #   vb.gui = true
  #
  #   # Customize the amount of memory on the VM:
  #   vb.memory = "1024"
  # end
  #
  # View the documentation for the provider you are using for more
  # information on available options.

  # Define a Vagrant Push strategy for pushing to Atlas. Other push strategies
  # such as FTP and Heroku are also available. See the documentation at
  # https://docs.vagrantup.com/v2/push/atlas.html for more information.
  # config.push.define "atlas" do |push|
  #   push.app = "YOUR_ATLAS_USERNAME/YOUR_APPLICATION_NAME"
  # end

  # Enable provisioning with a shell script. Additional provisioners such as
  # Puppet, Chef, Ansible, Salt, and Docker are also available. Please see the
  # documentation for more information about their specific syntax and use.
  # config.vm.provision "shell", inline: <<-SHELL
  #   apt-get update
  #   apt-get install -y apache2
  # SHELL
end
ubuntu の環境
# uname -a
Linux Ubu1486 3.13.0-119-generic #166-Ubuntu SMP Wed May 3 12:19:45 UTC 2017 i686 i686 i686 GNU/Linux
# cat /etc/lsb-release
DISTRIB_ID=Ubuntu
DISTRIB_RELEASE=14.04
DISTRIB_CODENAME=trusty
DISTRIB_DESCRIPTION="Ubuntu 14.04.5 LTS"
2.結果
試しにvagrant (ubuntu14.05)からホストOS(windows10 )へファイル(hello)を送ってみる
①ubuntu側でファイル所定の場所まで移動若しくはコピーする
vagrantで建てたubuntuはデフォルトで/home/vagrant/配下が共有フォルダにしていされているのでそこにファイルをコピーする
cp -a /どこどこ/あれあれ/hello /home/vagrant/
②ホストOSにファイルをSFTPで送信する
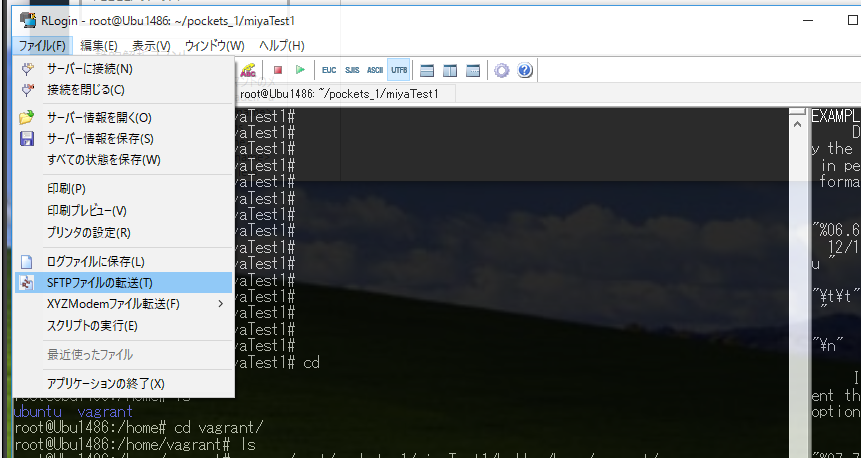
僕はRLoginというリモートログオンクライアントを使用しているので、そのソフトの機能を利用する
②-1 RLoginの上部のバーから「SFTPファイルの転送」を選択(写真参考)
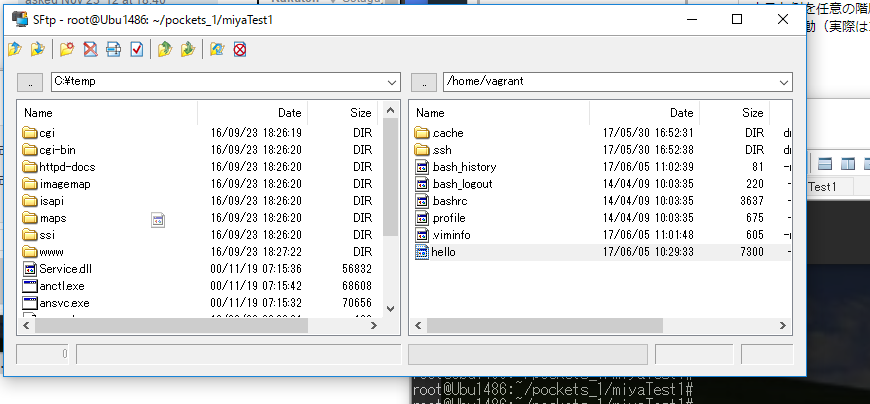
②-②
RLoginの「SFTPファイルの転送」は
左がホストOS(Windows 10)側のファイル階層
右がゲストOS(Ubuntu 14.05)側のディレクトリ階層
になっています
ホスト側を任意の階層に、ゲスト側を/home/vagrantに移動させ、先程コピーしたファイルを移動(実際はコピー)させる(ドラッグアンドドロップでもできる)(写真参考)
③ホストOS(Windows 10)側で歳ほど送信したファイルの階層に移動し、フィアルを正常に送信できているのか確認する
これは各自の環境毎におねしゃす
3.まとめ・補足
今回はwindows10 と、windows上のvirtual boxとvagrantで管理されたubuntのboxファイルから単一のファイルを手動で送信するやり方を実践してみました
常時サーバーとして使用するようなゲストOSであればもっとしっかりとしたファイル共有方法が存在するのでそちらの構成をおすすめします
今回紹介したやり方のメリットは
①デフォルトの設定で行える
②事前準備が殆どいらないのでファイルを1つ、2つ受け渡しする程度の仕事に向いている
③SFTPのコマンドやIPアドレスもしくはホスト名などを覚えたり書いたりする手間がない
です
あともちろんですがみんなだいすきTeratermでも同じノリでできます
上部バー >> ファイル >> SSH SCP >> ファイル選択
Reference
Vagrantでゲストとホストのフォルダを共有する – Koltatt | koltatt.net/programing/vagrant_dirsync/
Tag
vagrant
file share
ファイル共有
sftp
ftp
送信方法
送り方
やり方
RLogin
Teraterm