記念すべき初投稿。
おなじみの枕詞になるが、Flutterは公式のドキュメントが大変充実している。
したがって、我ながら「この記事いる?」という感じではあるが、学習発表会の感覚で書き残しておく。
概要
Flutterアプリケーション上でアニメーションを書く方法は色々あるが、本記事ではAnimatedBuilderを使った最も単純なアニメーションレシピをまとめる。
本質的な理解よりも「早速Flutterアニメーションを体験できる」ことに重きをおく。
Flutter初学者の方は、あらかじめ公式の「Write your first Flutter app, part 1」あたりは(できればpart2も)修了しておくことをおすすめする。
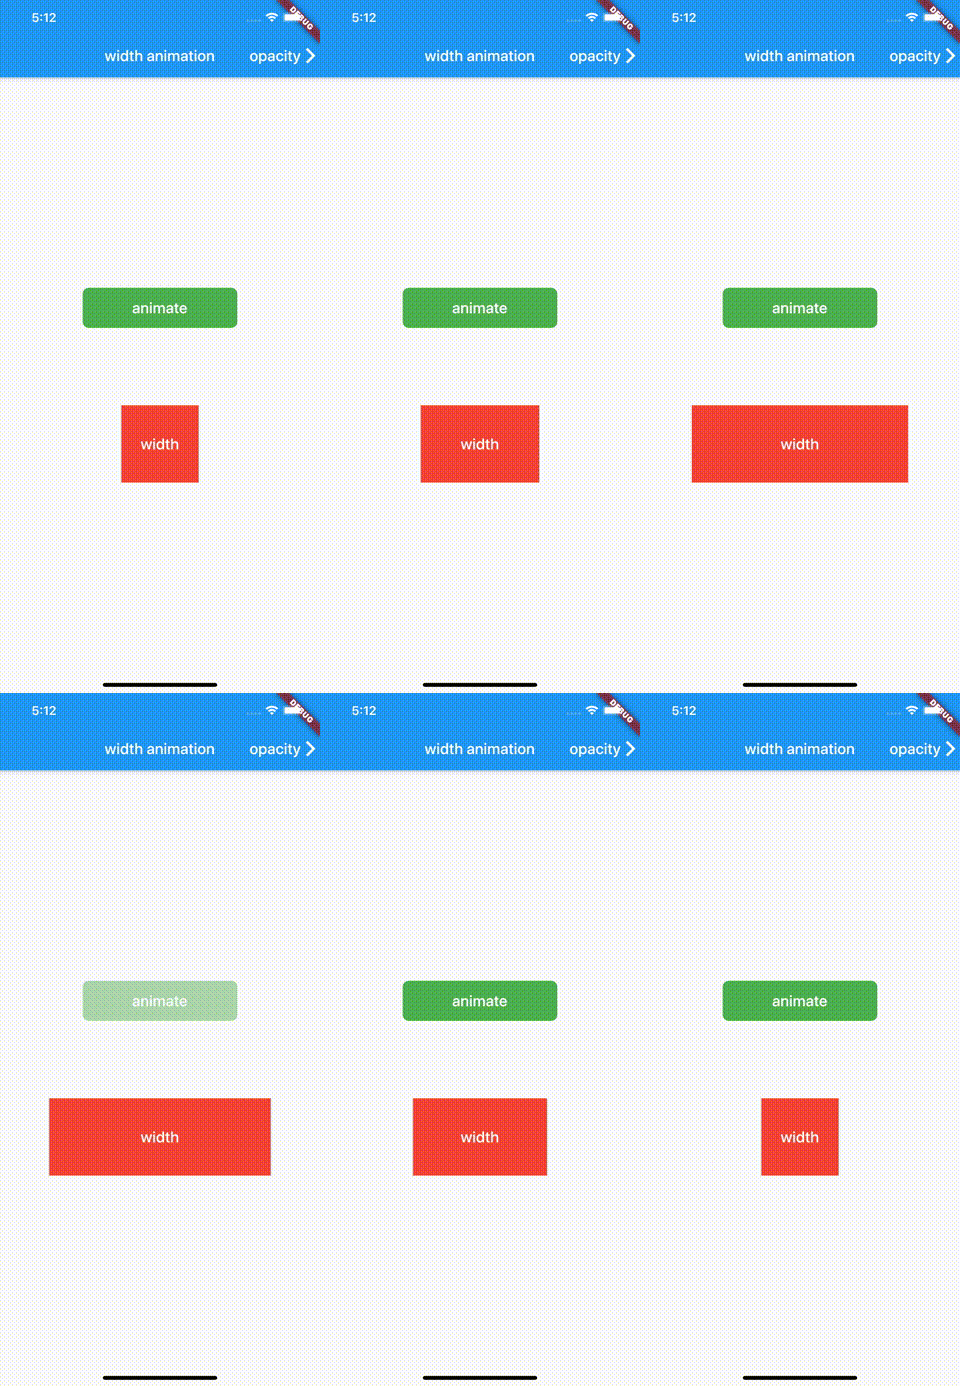
「実用的」とは言いつつも、サンプルはContainerのwidthが広がったりもとに戻ったりするだけのシンプルなもの。
ある程度複雑なアニメーションも、基本的にはこうしたシンプルなアニメーションの組み合わせで実現できる。
animateボタン押下でContainerのwidthが変化

完成サンプル+αはコチラ。
対象読者
- Flutter初学者(?)
- StatelessWidgetとStatefulWidgetの違いが分かっている
AnimatiedBuilderとは?
アニメーションを実装する際に繰り返し記述することになるお約束コードを端折るために用意された、StatefulWidgetのラッパー。シンプルな単一アニメーションから複数のシーケンシャルなアニメーションにまで幅広く使える実用性の高いアニメーション系Widgetである。
Flutterでアニメーションを描く際に最も使用頻度が高い、という方も少なくないのでは無いだろうか。しらんけど。
ざっくりレシピ
- TickerProviderMixinを組み込んだStatefulWidgetを用意する。
- 1.で用意したStatefulWidgetにAnimationControllerのインスタンスを持たせる。
- 2.で用意したAnimationControllerとTweenを用いてAnimationのインスタンスを生成する。
- WidgetツリーにAnimatedBuilderを組み込む。その際、3.で用意したAnimationインスタンスを渡す。
- 任意のタイミングでAnimationControllerを操作する。
ざっくり用語解説
Mixin
クラスの多重継承を避けつつ任意のクラスに汎用的な拡張を組み込むための仕組み。
ここでは詳しく扱わない。
AnimationController
アニメーションの開始、停止、リセットなどの操作や、アニメーション状態の管理、参照を媒介するオブジェクト。
「value」というプロパティを持っており、アニメーションの始点を0.0、終点を1.0とした場合の現在値を参照できる。
Tween
Animationインスタンスを生成するためのオブジェクト。
ちなみに、Tweenはin-betweeningの略とのこと。
Animation
実際にWidgetに動きを与えるための実数値を生成、返却するオブジェクト。
FlutterのAnimationクラスには、始点〜終点の値を指定したDurationとCurveに従ってなめらかに遷移するTween animationと、実際の物理現象をモデリングしたPhysics-based animationの二種類が存在するが、実際に使うことになるのはほぼほぼTweenの方になると思われる。
AnimationControllerも「value」というプロパティを持っているが(上記参照)、Animationインスタンスのvalueは、Tweenに設定した始点と終点の間で現在値を参照できる、というもの。
解説
レシピの内容を順を追って詳しく見ていこう。
1. TickerProviderMixinを組み込んだStatefulWidgetを用意する
AnimationControllerはStatefulWidgetのState内で宣言しライフサイクルを管理してやる必要があるので、そのためのStatefulWidgetを用意する。
class WidthAnimationPage extends StatefulWidget {
  const WidthAnimationPage({super.key});

  static const kRouteName = 'width';

  @override
  State<WidthAnimationPage> createState() => _WidthAnimationPageState();
}

class _WidthAnimationPageState extends State<WidthAnimationPage> {

  late AnimationController _controller;  // AnimationControllerを宣言

}
Controllerにvsyncを提供するため、StatefulWidgetにTickerProviderStateMixinを適用する。
単一のAnimationを組み込む場合はSingleTickerProviderStateMixin、複数のAnimationを組み込む場合はTickerProviderStateMixinを使用する。
class _WidthAnimationPageState extends State<WidthAnimationPage>
    with SingleTickerProviderStateMixin {
2. StatefulWidgetにAnimationControllerのインスタンスを持たせる
initState()でControllerの生成、dispose()でControllerの破棄を行う。
AnimationControllerによるアニメーションのスタート・ストップ等の操作も、このStatefulWidgetで行うことになる。
class _WidthAnimationPageState extends State<WidthAnimationPage>
    with SingleTickerProviderStateMixin {

  late AnimationController _controller;  // AnimationControllerを宣言

  @override
  void initState() {
    super.initState();

    _controller = AnimationController(
      duration: const Duration(milliseconds: 500),  // アニメーションにかける時間の指定
      vsync: this,  // [SingleTickerProviderStateMixin]を組み込んだStatefulWidget自身を指定。
    );
  }

  @override
  void dispose() {
    _controller.dispose();  // Controllerの破棄を忘れずに
    super.dispose();
  }
}
AnimationControllerの生成・破棄まででStatefulWidget全体は以下のような感じになる。(一部省略)
class WidthAnimationPage extends StatefulWidget {
  ...
  @override
  State<WidthAnimationPage> createState() => _WidthAnimationPageState();
}

class _WidthAnimationPageState extends State<WidthAnimationPage>
    with SingleTickerProviderStateMixin {  // StateにTicerの組み込み

  // AnimationControllerの宣言
  late AnimationController _controller;

  @override
  void initState() {
    super.initState();

    // AnimationControllerのインスタンス生成
    _controller = AnimationController(
      duration: const Duration(milliseconds: 500),
      vsync: this,
    );
  }

  @override
  void dispose() {
    // AnimationControllerの破棄
    _controller.dispose();
    super.dispose();
  }

  @override
  Widget build(BuildContext context) {
    return Scaffold(
      ...
    );
  }
}
3. AnimationControllerとTweenを用いてAnimationインスタンスを生成する
AnimationControllerの下準備が終わったら、実際に時間ごとに変化する値を返すAnimationオブジェクトを生成する。
アニメーションパーツは再利用性などを鑑みて予め別Widgetに切り出しておくといいだろう。
イニシャライザでAnimationインスタンスを生成しておけばスッキリ書ける。
今回はContainerのwidthに設定するdouble値を100⇔300で行ったり来たりさせたいので、以下のようにTweenのbeginには100、endには300を設定しておく。
class WidthAnimation extends StatelessWidget {
  WidthAnimation({
    super.key,
    required this.controller,
  }) : _width = Tween<double>(begin: 100.0, end: 300.0).animate(controller);

  final AnimationController controller;
  final Animation<double> _width;

  ...
}
Tweenのanimate()メソッドに任意のAnimationControllerを渡しておくと、戻り値としてAnimationが返される。
そして、そのアニメーションの開始、終了、停止等は引数に渡したController経由で操作できるというスンポーである。
Animationインスタンス生成のタイミングだが、今回のように単一のアニメーションパーツを単一のAnimationControllerで操作するだけのシンプルな構成ならば、予め親のStatefulWidgetで生成して渡すだけでもいい。
class WidthAnimation extends StatelessWidget {
  const WidthAnimation({
    super.key,
    required this.width, // 今回のケースでは生成済みAnimationインスタンスをもらうのでも良い
  });

  final Animation<double> width;

  ...
}
実運用上は、Animationの仕様をどのレイヤーで確定させたいかによって使い分けるといいだろう。
4. WidgetツリーにAnimatedBuilderを組み込む
アニメーションパーツとして切り出したWidthAnimationにAnimatedBuilderを組み込む。
本来、アニメーションを含む全ての画面更新にはStatefulWidgetのSetState()ないしはそれに相当するトリガーが必要だが、そのあたりのことはAnimatedBuilderがよしなにやってくれるので、気にしなくて良い。そしてそれがまさにFlutterアニメーションにAnimatedBuilderを利用する主要な利点の一つである。
直接アニメーションするWidgetの生成関数をbuilderに渡し、その子Widget(アニメーションしない)をchildに渡す。
WidthAnimationの全体は以下のようになる。
class WidthAnimation extends StatelessWidget {
  WidthAnimation({
    super.key,
    required this.controller,
  }) : _width = Tween<double>(begin: 100.0, end: 300.0).animate(controller);

  final AnimationController controller;
  final Animation<double> _width;

  Widget _animationBuilder(BuildContext context, Widget? child) {
    return Container(
      width: _width.value,  // valueが変化する度にbuilderが実行され、アニメーションが実現する
      height: 100.0,
      alignment: Alignment.center,
      color: Colors.red,
      child: child, // 静的な子Widget(Text)はBuilderの親Widget(WidthAnimation)でキャッシュする
    );
  }

  @override
  Widget build(BuildContext context) {
    return AnimatedBuilder(
      builder: _animationBuilder,
      animation: controller,  // AnimationControllerでもAnimationでもよい
      child: Text('width',
        style: Theme.of(context).primaryTextTheme.headline6,
      ),
    );
  }
}
Flutterにおけるbuilder型Widgetの定形的な書き方で、簡単に言えば「動的なWidgetにぶら下がる静的な子WidgetをBuilderの親Widgetでキャッシュする」というテクニックなのだが、具体的にどのような効果があるのかついての説明を始めてしまうと壮大な脱線になってしまうので本記事では扱わない。気が向いたらそのうち別記事で扱いたい。
AnimatedBuilderのanimationにはAnimationControllerもしくはAnimationのインスタンスを渡す。
どちらを渡すべきかの判断基準だが、AnimationControllerが複数のAnimationをハンドリングする場合にはAnimatedBuilderにはAnimationを直接渡す方が間違いが少ないはず。それ以外ならばどちらでも良いだろう。
サンプルではAnimationControllerとAnimatedBuilderが1対1のシンプルな構成なのでどちらを渡しても問題ない。
これでWidthAnimationの準備ができたので、先に用意したWidthAnimationPageに組み込んでやればよい。
class _WidthAnimationPageState extends State<WidthAnimationPage>
    with SingleTickerProviderStateMixin {

  late AnimationController _controller;

  ... // 略

  @override
  Widget build(BuildContext context) {
    return Scaffold(
      appBar: AppBar(
        ... // 略
      ),
      body: Column(
        mainAxisAlignment: MainAxisAlignment.center,
        children: <Widget>[
          SizedBox(height: 100.0), // topマージン用SizedBox()
          WidthAnimation(controller: _controller), // アニメーションパーツ
        ],
      ),
    );
  }
}
5. 任意のタイミングでAnimationControllerを操作する
今回はボタンを押す度にWidthAnimationのwidthが100⇔300を行ったり来たりする仕様なので、そのためのボタンを用意する。
シンプルにこんな感じでいいだろう。
CupertinoButton(
  onPressed: () {
    if (_controller.status == AnimationStatus.dismissed) {
      _controller.forward(); // width: 100 -> 300
    } else if (_controller.status == AnimationStatus.completed) {
      _controller.reverse(); // width: 300 -> 100
    }
  },
  color: Colors.green,
  child: Text('animate',
    style: Theme.of(context).primaryTextTheme.titleLarge,
  ),
),
こいつをWidthAnimationPageに組み込んでやる。
      body: Column(
        mainAxisAlignment: MainAxisAlignment.center,
        children: <Widget>[
          Row(
            children: <Widget>[
              const Spacer(),
              CupertinoButton(
                onPressed: () {
                  if (_controller.status == AnimationStatus.dismissed) {
                    _controller.forward();
                  } else if (_controller.status == AnimationStatus.completed) {
                    _controller.reverse();
                  }
                },
                color: Colors.green,
                child: Text('animate',
                  style: Theme.of(context).primaryTextTheme.titleLarge,
                ),
              ),
              const Spacer(),
            ],
          ),
          const SizedBox(height: 100.0),
          WidthAnimation(controller: _controller),
        ],
      ),
おわりに
できるだけ、「今すぐわからなくてもできる」というような部分には言及しないように努めたつもりだが、それなりに散らかってしまっている気がしてならない。初投稿なので大目に見てほしい。というか、ご質問やご指摘を頂けたら嬉しいです。
継続的に記事を投稿しながら本記事もブラッシュアップしていく所存。
そのうち、「AnimatedBuilderとは何か」という根本の部分をより深く掘り下げた記事なども書いてみたい。
以上。
参考文献:
Flutter公式『Animations tutorial』