(この記事はこちらで書いたものをQiita用に書き直したものです。)
導入
手書き文字認識のデータセットは、有名なデータセットです。
いろいろなライブラリから活用できるように整備されているのですが、当時の自分は「ファイルって外部から読み込むんじゃないの」(←今思えば、よくわかるようなわからないような疑問)とか、あるいはネットで調べても読み込み方がいろいろあって、その関係性がわからなかったりして混同しておりました。
そういう人が他にもいるかもしれないなと思って、情報を整理する目的で書きました。
前提
sklearn、tensorflow、pytorchはインストールされている前提から話を始めます。(自分はAnacondaを使って環境を整えました)
sklearn、tensorflow,pytorchの全てが必須ということではない。それぞれの場合について説明をするという意味です。
OSはMacOSXを使用しています。
注意
いわゆる手書き文字認識のデータセットですが、似たようなものが2つあります。
一つは、sklearnインストール時に一緒についてくる(標準で備わっている)手書き文字認識用のデータセットです。
二つ目は上記以外の方法で入手したものです。
一つ目のほうは、8×8ピクセルの画像から構成されています。
二つ目のほうは、28×28ピクセルの画像から構成されています。
どちらも「手書き文字認識」とか「Mnist」とかの検索で引っかかってくるし、なんとなく画像の雰囲気も同じ感じなので、いろいろ混同しておりました。
sklearnの標準搭載(8×8サイズのデータ)
データセットの場所
sklearn標準のデータセットは以下の場所にあります。
/(環境によって違う部分)/lib/python3.7/site-packages/sklearn/datasets
自分の場合のディレクトリ構成を参考までに。(Anacondaを使っています)
$ls  /Users/hiroshi/opt/anaconda3/lib/python3.7/site-packages/sklearn/    //パスで指定された中のファイル・ディレクトリ一覧を表示

__check_build			dummy.py			model_selection
__init__.py			ensemble			multiclass.py
__pycache__			exceptions.py			multioutput.py
_build_utils			experimental			naive_bayes.py
_config.py			externals			neighbors
_distributor_init.py		feature_extraction		neural_network
_isotonic.cpython-37m-darwin.so	feature_selection		pipeline.py
base.py				gaussian_process		preprocessing
calibration.py			impute				random_projection.py
cluster				inspection			semi_supervised
compose				isotonic.py			setup.py
conftest.py			kernel_approximation.py		svm
covariance			kernel_ridge.py			tests
cross_decomposition		linear_model			tree
datasets			manifold			utils
decomposition			metrics
discriminant_analysis.py	mixture
そしてその中のdatasetsフォルダをみてみると、
s /Users/hiroshi/opt/anaconda3/lib/python3.7/site-packages/sklearn/datasets

__init__.py					california_housing.py
__pycache__					covtype.py
_base.py					data
_california_housing.py				descr
_covtype.py					images
_kddcup99.py					kddcup99.py
_lfw.py						lfw.py
_olivetti_faces.py				olivetti_faces.py
_openml.py					openml.py
_rcv1.py					rcv1.py
_samples_generator.py				samples_generator.py
_species_distributions.py			setup.py
_svmlight_format_fast.cpython-37m-darwin.so	species_distributions.py
_svmlight_format_io.py				svmlight_format.py
_twenty_newsgroups.py				tests
base.py						twenty_newsgroups.py
となっています。
ここに手書き文字認識以外にも、データセットが用意されています。
さらに、フォルダを深く入っていきます。
$ ls /Users/hiroshi/opt/anaconda3/lib/python3.7/site-packages/sklearn/datasets/data
boston_house_prices.csv		diabetes_target.csv.gz		linnerud_exercise.csv
breast_cancer.csv		digits.csv.gz			linnerud_physiological.csv
diabetes_data.csv.gz		iris.csv			wine_data.csv
ここに、sklearnを扱った記事でよく引用されるirisデータセットやboston_house_pricesデータセットなどがあります。
データセットのインポート方法
sklearnの公式ページのコードそのままではありますが。
以下作業はターミナルからpythonを起動して行っています。
>>> from sklearn.datasets import load_digits
>>> import matplotlib.pyplot as plt
>>> digit=load_digits()
>>> digit.data.shape
(1797, 64)      // (8×8=64列の行列として格納されている)

>>> plt.gray()
>>> digit.images[0]
array([[ 0.,  0.,  5., 13.,  9.,  1.,  0.,  0.],
       [ 0.,  0., 13., 15., 10., 15.,  5.,  0.],
       [ 0.,  3., 15.,  2.,  0., 11.,  8.,  0.],
       [ 0.,  4., 12.,  0.,  0.,  8.,  8.,  0.],
       [ 0.,  5.,  8.,  0.,  0.,  9.,  8.,  0.],
       [ 0.,  4., 11.,  0.,  1., 12.,  7.,  0.],
       [ 0.,  2., 14.,  5., 10., 12.,  0.,  0.],
       [ 0.,  0.,  6., 13., 10.,  0.,  0.,  0.]])
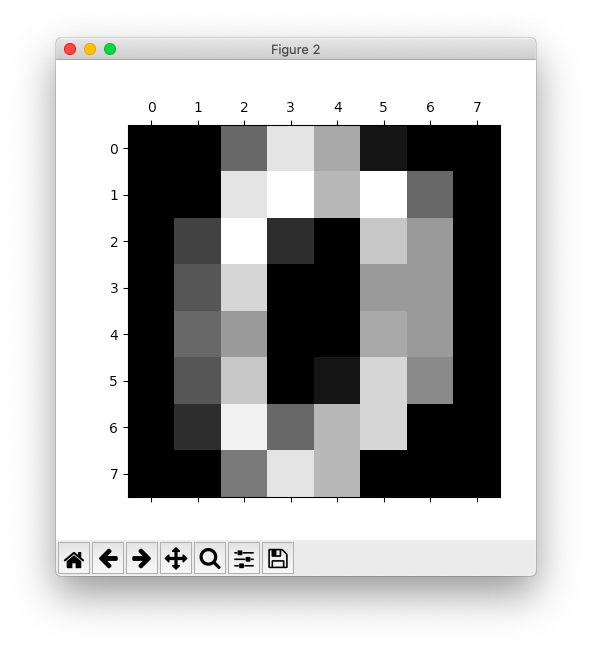
>>> plt.matshow(digit.images[0])
>>> plt.show()
そうすると以下のような画面が立ち上がります。
オリジナルのデータをダウンロード(28×28サイズのデータ)
Mnistオジリナルのデータはこちらにあります。
ただし、ここで入手できるのはそのままでは使用できないバイナリファイルです。
なので、自分でデータを使える形にまで加工しなければいけないところですが、以下でみていくように、Mnistは非常に有名なデータセットなので、いろいろなライブラリにすぐに使えるように整備されているツールがあります。
このバイナリデータを自力で元に戻す方法ももちろん存在はするようですが、そこまでフォローしきれなかったし、そこに時間かけるのもどうかと思ったのでその方法については触れません。
sklearn経由でダウンロード(28×28サイズ)
ネット上の記事をみていると、古い記事では
from sklearn.datasets import fetch_mldata
としている記事もありますが、現在ではアクセスしようとしている先のページが使用できないためエラーになります。
なので現在では以下のようにfetch_openmlを使用するようです。
(scikit-learn(sklearn)のfetch_mldataのエラーの解決法)
これも、ターミナルから起動してます。
>>> import matplotlib.pyplot as plt   // 上からの流れてすでにインポート済かもしれませんが、一応。まだインポートしてなかった場合はこれもやる。
>>> from sklearn.datasets import fetch_openml
>>> digits = fetch_openml(name='mnist_784', version=1)
>>> digits.data.shape
(70000, 784)
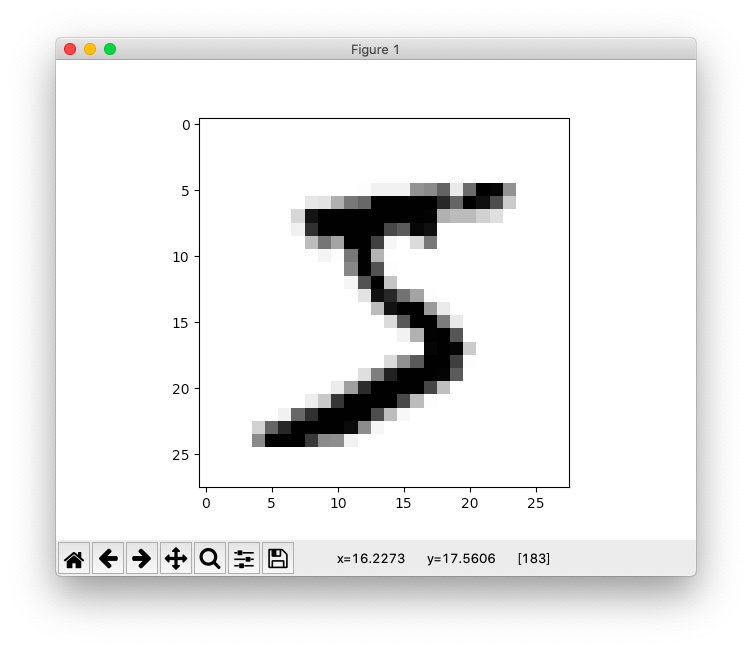
>>> plt.imshow(digits.data[0].reshape(28,28), cmap=plt.cm.gray_r)
<matplotlib.image.AxesImage object at 0x1a299dd850>
>>>>>> plt.show()
tensorflow(28×28サイズ)
tensorflowのチュートリアルから入れる方法。
>>> from tensorflow.examples.tutorials.mnist import input_data
とすればいけるらしいのだが、自分の場合は以下のようなエラーが出てしまいました。
結論からいうと、どうやらtensorflowをインストールする際に、tutorialのフォルダがダウンロードされないことがあるらしいです。
Traceback (most recent call last):
  File "<stdin>", line 1, in <module>
ModuleNotFoundError: No module named 'tensorflow.examples.tutorials'
実際のディレクトリの中身をみてみました。
 $ls /Users/hiroshi/opt/anaconda3/lib/python3.7/site-packages/tensorflow_core/examples/
__init__.py	__pycache__	saved_model
となっている。
以下のページを参考にしました。
- ModuleNotFoundError: No module named 'tensorflow.examples' (Stackoverflow)の上から5番目の回答
- TensorflowのGithubページ
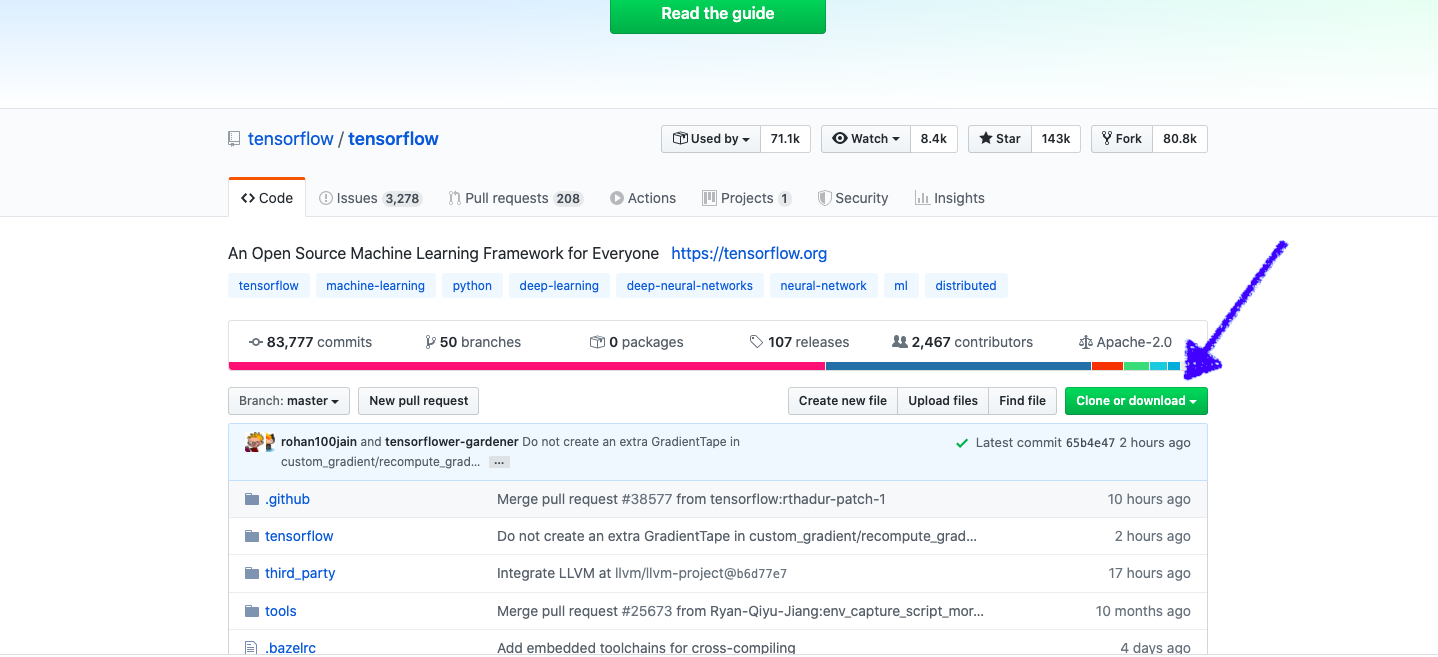
まず、Tensorflowのgithubページへアクセスし、zipファイルをどこでもいいのでダウンロードして解凍します。
tensorflow-masterというフォルダがあるので、そのなかのtensorflow-master\tensorflow\examples\の場所に、tutorialsというフォルダがあります。
このturorialsというフォルダをフォルダごと/Users/hiroshi/opt/anaconda3/lib/python3.7/site-packages/tensorflow_core/examples/の中にコピーします。
ここまでできれば、
>>> import matplotlib.pyplot as plt   // 上からの流れてすでにインポート済かもしれませんが、一応。まだインポートしてなかった場合はこれもやる。
>>> from tensorflow.examples.tutorials.mnist import input_data
>>> mnist = input_data.read_data_sets("MNIST_data", one_hot=True)
>>> im = mnist.train.images[1]
>>> im = im.reshape(-1, 28)
>>> plt.imshow(im)
<matplotlib.image.AxesImage object at 0x64a4ee450>
>>> plt.show()
とすれば、同様に画像が表示されるはずです。
keras(28×28サイズ)
>>> import matplotlib.pyplot as plt   // 上からの流れてすでにインポート済かもしれませんが、一応。まだインポートしてなかった場合はこれもやる。
>>> import tensorflow as tf
>>> mnist = tf.keras.datasets.mnist
>>> mnist
>>> mnist_data = mnist.load_data()
Downloading data from https://storage.googleapis.com/tensorflow/tf-keras-datasets/mnist.npz
11493376/11490434 [==============================] - 1s 0us/step
>>> type(mnist_data[0])
<class 'tuple'>   //タプルで返ってくる。
>>> len(mnist_data[0])
2
>>> len(mnist_data[0][0])
60000
>>> len(mnist_data[0][0][1])
28
>>> mnist_data[0][0][1].shape
(28, 28)

>>> plt.imshow(mnist_data[0][0][1],cmap=plt.cm.gray_r)
<matplotlib.image.AxesImage object at 0x642398550>
>>> plt.show()
もう画像は載せませんが、うまくいけばまた画像が表示されます。
pytorch(28×28サイズ)
まずこれができないと先へ進めないらしいですが、
>>> from torchvision.datasets import MNIST
次のようにエラーがでてしまった。torchvisionがないらしい。
自分の場合にはcondaでpytorchを入れる際に、単に
conda install pytorch
しか行っていないからのようでした。
付属物までいれるには以下のようにするらしいです。
conda install pytorch torchvision -c pytorch
確認を求められるのでyを押します。
(必要であれば)上記を行った上で、以下のようなコードを実行してみます。
>>> import matplotlib.pyplot as plt   // 上からの流れてすでにインポート済かもしれませんが、一応。まだインポートしてなかった場合はこれもやる。


>>> import torchvision.transforms as transforms
>>> from torch.utils.data import DataLoader
>>> from torchvision.datasets import MNIST
>>> mnist_data = MNIST('~/tmp/mnist', train=True, download=True, transform=transforms.ToTensor())
>>> data_loader = DataLoader(mnist_data,batch_size=4,shuffle=False)
>>> data_iter = iter(data_loader)
>>> images, labels = data_iter.next()
>>> npimg = images[0].numpy()
>>> npimg = npimg.reshape((28, 28))
>>> plt.imshow(npimg, cmap='gray')
<matplotlib.image.AxesImage object at 0x12c841810>
>>plt.show()
番外編(はじめてのDeeplearningより)
オライリーから出ている『ゼロから作る Deep Learning』では、この本が提供しているファイルの中で独立して行われています。
具体的には、『ゼロから作る Deep Learning』で使用されるファイルのgithubページでダウンロードしてきたフォルダの中で全て読み進めていきます。(もちろん、予めpythonやnumpyなどは準備しておく必要はありますが。
以下手順。
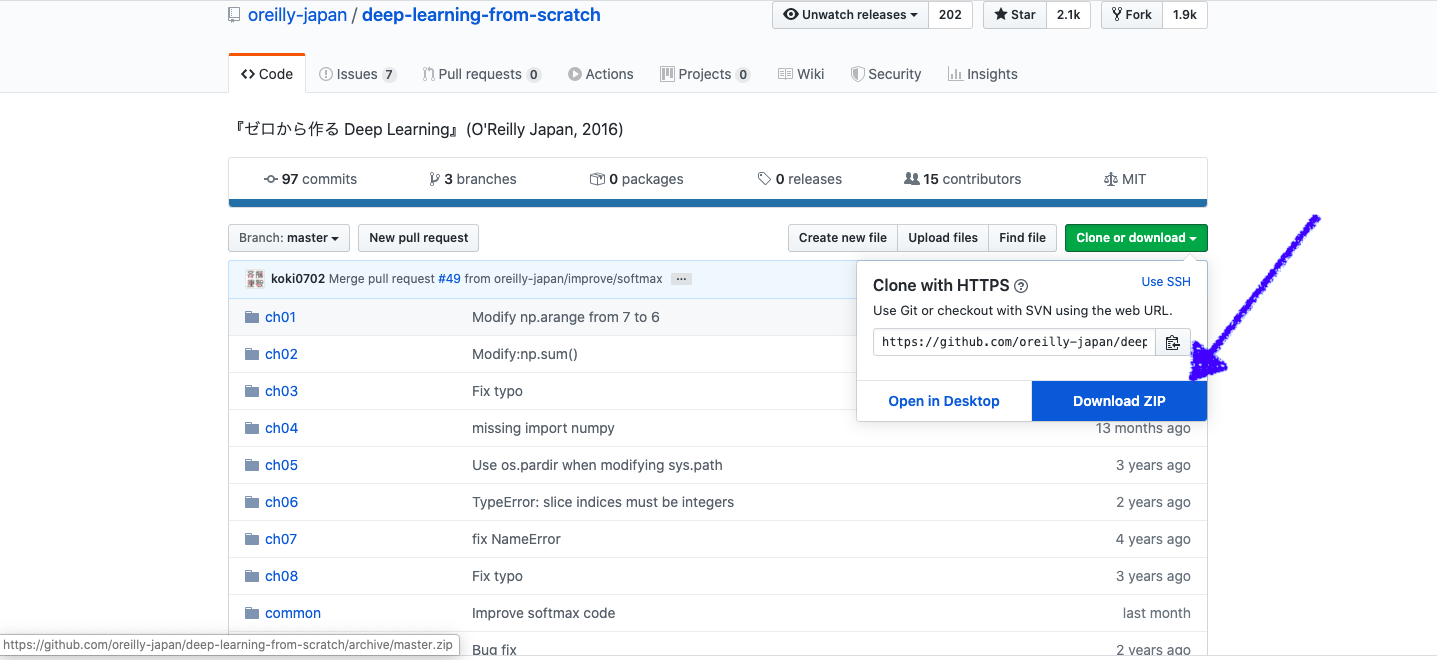
まず、上記で述べたGithubページからフォルダをダウンロードなりクローンしてきます。
ここでは、ダウンロードで行います。そして解凍します。
そうするとdeep-learning-from-scratch-masterというフォルダができます。
各章ごとにフォルダ分けされているので、その章のフォルダへ移動して読み進めていく感じになります。
フォルダ自体はch01からありますが、Mnistのデータが使用されるのは第3章なので、ch03に入ることにします。
$ pwd
/Volumes/SONY_64GB/deep-learning-from-scratch-master/ch03
pythonを起動して・・・
>>> import sys,os
>>> sys.path.append(os.pardir)
>>> from dataset.mnist import load_mnist
>>> (x_train,t_train),(x_test,t_test) = load_mnist(flatten=True,normalize=False)
Downloading train-images-idx3-ubyte.gz ...
Done
Downloading train-labels-idx1-ubyte.gz ...
Done
Downloading t10k-images-idx3-ubyte.gz ...
Done
Downloading t10k-labels-idx1-ubyte.gz ...
Done
Converting train-images-idx3-ubyte.gz to NumPy Array ...
Done
Converting train-labels-idx1-ubyte.gz to NumPy Array ...
Done
Converting t10k-images-idx3-ubyte.gz to NumPy Array ...
Done
Converting t10k-labels-idx1-ubyte.gz to NumPy Array ...
Done
Creating pickle file ...
Done!
>>> print(x_train.shape)
(60000, 784)
>>> print(t_train.shape)
(60000,)
>>> print(x_test.shape)
(10000, 784)
>>> print(t_test.shape)
(10000,)
>>>
参考にしたページ
Mnistのオリジナルのデータ
MNIST handwritten digit database, Yann LeCun, Corinna Cortes and Chris Burges
→Mnistのオリジナルのデータがあるページ。ここでダウンロードできるのはバイナリデータ。
sklearn
sklearnの公式ドキュメントのdigitのページ
(→一番上のdatasetのところをクリックすればsklearnが他にどんなデータセットを標準搭載しているかを示しているページへいける。)
Scikit learnより SVMで手書き数字の認識(Qiita)
scikit-learn(sklearn)のfetch_mldataのエラーの解決法(Qiita)
手書き数字のデータを扱う!Pythonでmnistを使う方法【初心者向け】
7.5.3. Downloading datasets from the openml.org repository
Tensorflow
TensorFlow, Kerasの基本的な使い方(モデル構築・訓練・評価・予測)
ModuleNotFoundError: No module named 'tensorflow.examples' (Stackoverflow)の上から5番目の回答
TensorflowのGithubページ
Keras
TensorFlow, Kerasの基本的な使い方(モデル構築・訓練・評価・予測)
Pytorch
PyTorchでMNISTをやってみる
conda install pytorch torchvision -c pytorch で PackageNotFoundError: Dependencies missing in current osx-64 channels: - pytorch -> mkl >=2018 と言われる
その他
OpenML(の特にデータ一覧のページ)
『ゼロから作る Deep Learning』
『ゼロから作る Deep Learning』で使用されるファイルのgithubページ


