概要
DockerやPHPの勉強にと作成したLaravelプロジェクトにGoogleログイン機能をつけてみました。
手順
- GCPの設定
- Laravel側の設定
GCPの設定
GoogleCloudPlatform(GCP)の登録
Google認証を実装するには、まずGoogleCloudPlatform(GCP)の登録が必要です。
Googleアカウントがあれば簡単に出来ます。
GCP:
https://console.cloud.google.com/getting-started?hl=ja
プロジェクトの作成
GCPのホームから作成ができます。
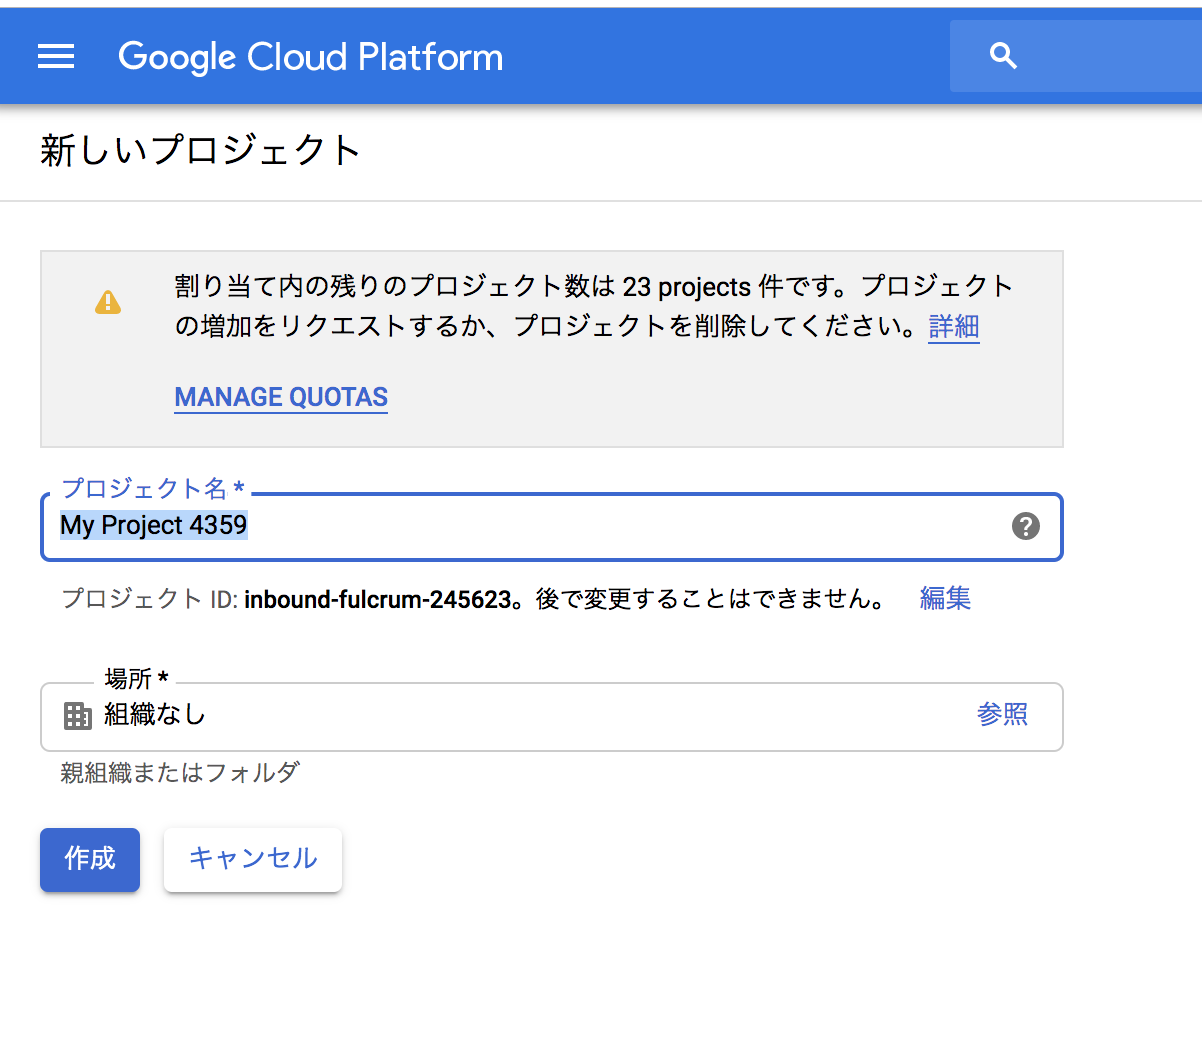
2019.07現在では、「Google Cloud Platform」というロゴマークの右横にプロジェクト名が表示されてます。選択するとモーダルが開き「新しいプロジェクト」作成の導線が現れます。

「プロジェクト名」には、とりあえずLaravelプロジェクトと同一の名前を、
今回は個人のテスト用なので「場所」はそのまま「組織なし」を選択し作成します。
認証情報の設定
作成したプロジェクトから「APIとサービス>認証情報>OAuth同意画面」に移動します。
ここにもLaravelプロジェクトと同一の名前を入れました。
*Google認証をするときに一番上に出てくる「●●●●●」に移動の●部分に入ります。
作成をクリックすると、APIとサービスのページに戻りモーダルが開くので
そこで「認証情報を作成>OAuthクライアントID」を選択します。

下記の画面が表示されるので
「ウェブアプリケーション」にチェック、「名前」、「承認済みのリダイレクトURI」を埋めて作成します。
「名前」は任意で、
「承認済みのリダイレクトURI」はLaravel側で使うのでそれを考慮に入れてください。
とりあえず今回は"http://localhost/auth/callback/google/" にしました。
(重要)
作成したあと、「クライアントID」と「クライアントシークレット」が表示されます。後ほど使用するのでメモっておいてください。

これでGCPの設定は終わりです。
Laravel側の設定
Laravelでの実装ですが、
今回は簡易的に行うため、Laravelのデフォルトで作られるusersテーブルをそのまま使います。
このあと必要になるパッケージを先にインストール
$ composer require laravel/socialite

laravelデフォルトで用意されている認証機能作成のコマンド
$ php artisan make:auth

テーブル作成
$ php artisan migrate

Migration table created successfully.
Migrating: 2014_10_12_000000_create_users_table
Migrated:  2014_10_12_000000_create_users_table
Migrating: 2014_10_12_100000_create_password_resets_table
Migrated:  2014_10_12_100000_create_password_resets_table

さらに後ほど必要になるコントローラを作っておきます
$ php artisan make:controller OAuthLoginController

(dbコンテナにてテーブルが作られていることを確認しておく)
mysql> show tables;
+--------------------------+
| Tables_in_laravel-cloud9 |
+--------------------------+
| migrations               |
| password_resets          |
| users                    |
+--------------------------+
3 rows in set (0.00 sec)
必要な設定を追加していきます
先ほどGCPの設定の時に作成したものを使用します
GOOGLE_CLIENT_ID=クライアントID
GOOGLE_CLIENT_SECRET=クライアントシークレット
GOOGLE_CALLBACK_URL=リダイレクトURL
// サービスプロバイダの登録
'providers' => [

        /*
         * Laravel Framework Service Providers...
         */
        Illuminate\Auth\AuthServiceProvider::class,
        Illuminate\Broadcasting\BroadcastServiceProvider::class,
        /* 省略 */
        App\Providers\EventServiceProvider::class,
        App\Providers\RouteServiceProvider::class,

        Laravel\Socialite\SocialiteServiceProvider::class,//(追加)
    ],

/* 省略 */
 'aliases' => [

        'App' => Illuminate\Support\Facades\App::class,
        'Arr' => Illuminate\Support\Arr::class,
        /* 省略 */
        'Validator' => Illuminate\Support\Facades\Validator::class,
        'View' => Illuminate\Support\Facades\View::class,

        'Socialite' => Laravel\Socialite\Facades\Socialite::class,//(追加)
    ],
return [

    /*
    |--------------------------------------------------------------------------
    | Third Party Services
    |--------------------------------------------------------------------------
    |
    | This file is for storing the credentials for third party services such
    | as Stripe, Mailgun, SparkPost and others. This file provides a sane
    | default location for this type of information, allowing packages
    | to have a conventional place to find your various credentials.
    |
    */

    /* 省略 */

    'stripe' => [
        'model' => App\User::class,
        'key' => env('STRIPE_KEY'),
        'secret' => env('STRIPE_SECRET'),
        'webhook' => [
            'secret' => env('STRIPE_WEBHOOK_SECRET'),
            'tolerance' => env('STRIPE_WEBHOOK_TOLERANCE', 300),
        ],
    ],

    /* 追加ここから */
    'google' => [
        'client_id' => env('GOOGLE_CLIENT_ID'),
        'client_secret' => env('GOOGLE_CLIENT_SECRET'),
        'redirect' => env('GOOGLE_CALLBACK_URL'),
    ],
    /* 追加ここまで */
];
/* 省略 */
Route::get('/home', 'HomeController@index')->name('home');
/* 省略 */
// Controllerメソッドへのルート定義
Route::get('/auth/{service}', 'OAuthLoginController@getGoogleAuth')->where('service', 'google');
Route::get('/auth/callback/google', 'OAuthLoginController@authGoogleCallback');
<?php

namespace App\Http\Controllers;

use Illuminate\Http\Request;
use App\User;
use Socialite;
use Auth;

class OAuthLoginController extends Controller
{
    // Googleの認証ページへのリダイレクト処理
    public function getGoogleAuth($provider)
    {
        return Socialite::driver($provider)->redirect();
    }

    // Googleの認証情報からユーザー情報の取得
    public function authGoogleCallback()
    {
        $googleUser = Socialite::driver('google')->user();
        $user = User::firstOrNew(['email' => $googleUser->email]);

        if (!$user->exists) {
            $user['name'] = $googleUser->getNickName() ?? $googleUser->getName() ?? $googleUser->getNick();
            $user['email'] = $googleUser->email; // Gmailアドレス
            $user['password'] = str_random(); // 適当に生成

            $user->save();
        }

        Auth::login($user);
        return redirect()->route('home');
    }
}
最後に、ログイン画面にGoogleログイン用のボタンを用意します。
// ログイン画面にGoogleログインボタンを配置
<form method="POST" action="{{ route('login') }}">
/* 省略 */
</form>
<a href="auth/google">Googleログイン</a> // 追加
この状態で「localhost:8080/login」にアクセスすると、
アンカーリンクを表示しているだけなので位置はおかしいですが、
「Googleログイン」ボタンを押すとGoogleのログイン画面にリダイレクトします。


*「Word Container」の部分が、GCPで認証情報の設定をした際に入力した名前です。
あとはログインしたいユーザーでログインすれば、
DBにGoogleアカウントの情報が入ります。
mysql> select * from users;
+----+--------------+--------------------+-------------------+------------------+----------------+---------------------+---------------------+
| id | name         | email              | email_verified_at | password         | remember_token | created_at          | updated_at          |
+----+--------------+--------------------+-------------------+------------------+----------------+---------------------+---------------------+
|  1 | ○○○○○     | xxxxxxx@gmail.com | NULL              | ZabdYEZPWOKeIpbp | NULL           | 2019-07-02 23:15:15 | 2019-07-02 23:15:15 |
+----+--------------+--------------------+-------------------+------------------+----------------+---------------------+---------------------+
最後に
今回はGoogleログインでしたが、
SocialiteではFacebook、Twitterはじめ他にもサポートしているサービスがいくつかあるようです。
他のサービスでのログインも併用したい場合にはusersテーブルの構成を少し変える必要がありそうです。
(ex. GoogleとFacebookで同じメールアドレスを登録している可能性があるので)
典型的なフォームベースの認証に付け加え、LaravelはLaravel Socialite(=名士)による、OAuthプロバイダによるシンプルで便利な認証方法も提供しています。Socialiteは現在、Facebook、Twitter、LinkedIn、Google、GitHub、GitLab、Bitbucketによる認証をサポートしています。
参考