背景
Webサイトに載せるコンテンツが1ページで収まり切れないけど、1ページ内に詰め込み過ぎるとUXが下がってしまうときがあると思います。
このような場合、ページ内にタブ切り替えを実装する事でUXが下がる事を防げると思いますので、今回HTML・CSS・JavaScriptを使用し1つのWebページ内でタブ切り替えを実装してみました。
目標
- 1つのWebページ内でのタブ切り替えを実装する。
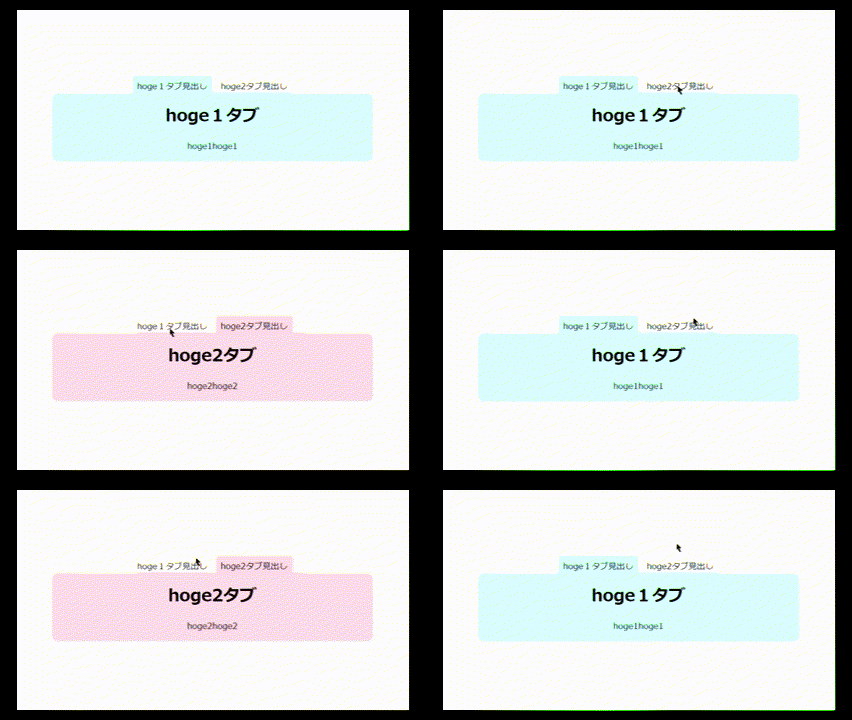
成果物
実装コード
◆ HTML
タブの見出しと内容部分をそれぞれ大きく2つを作成し、JavaScriptファイルの読み込んでいます。
<!DOCTYPE html>
<html lang="en">

<head>
    <meta charset="UTF-8">
    <meta name="viewport" content="width=device-width, initial-scale=1.0">
    <title>switchHtmlTab</title>
    <link rel="stylesheet" href="index.css">
</head>

<body>
    <!-- タブの見出し -->
    <div id="label-container">
        <input type="checkbox" class="checkBtn" id="hoge1" checked="true">
        <label id="hoge1Label" for="hoge1">hoge1タブ見出し</label>
        <input type="checkbox" class="checkBtn" id="hoge2">
        <label id="hoge2Label" for="hoge2">hoge2タブ見出し</label>
    </div>

    <!-- タブの内容部分 -->
    <div id="left-container">
        <h1>hoge1タブ</h1>
        <p>hoge1hoge1</p>
    </div>
    <div id="right-container">
        <h1>hoge2タブ</h1>
        <p>hoge2hoge2</p>
    </div>

    <!-- JavaScriptファイルの読み込み -->
    <script src="index.js"></script>
</body>

</html>
◆ CSS
body {
    background-color: white;
    display: flex;
    flex-direction: column;
    align-items: center;
    justify-content: center;
    height: 100vh;
    margin: 0;
    padding: 0;
    font-family: "Roboto", sans-serif;
}

/* チェックボックス */
.checkBtn {
    display: none;
}

/* ラベル */
#label-container {
    width: 40%;
    margin: 0 auto;
    text-align: center;
}

#hoge1Label {
    padding: 10px 10px 0 10px;
    background-color: rgb(186, 238, 255);
    border-radius: 3px;
    transition: 0.3s;
}

#hoge2Label {
    padding: 10px 10px 0 10px;
    border-radius: 3px;
    transition: 0.3s;
}

/* hoge1タブ */
#left-container {
    width: 70%;
    margin: 0 auto;
    text-align: center;
    background-color: rgb(186, 238, 255);
    border-bottom: none;
    border-radius: 10px;
    box-shadow: 0 2px 4px rgba(0, 0, 0, 0.2);
    transition: 0.2s;
}

/* hoge2タブ */
#right-container {
    display: none;
    width: 70%;
    margin: 0 auto;
    text-align: center;
    background-color: pink;
    border-bottom: none;
    border-radius: 10px;
    box-shadow: 0 2px 4px rgba(0, 0, 0, 0.2);
    transition: 0.2s;
}
◆ JavaScript
画面のロード時に実行される処理を記述しています。
window.addEventListener('load', () => {
    // checkbox
    const checkbox1 = document.getElementById("hoge1");
    const checkbox2 = document.getElementById("hoge2");

    // label
    const label1 = document.getElementById("hoge1Label");
    const label2 = document.getElementById("hoge2Label");

    // タブの内容部分
    const hoge1Content = document.getElementById("left-container");
    const hoge2Content = document.getElementById("right-container");

    // hoge1タブのクリック時
    checkbox1.addEventListener("change", function () {
        if (this.checked) {
            // hoge1タブ見出しのチェックボックスがtrueの時
            label1.style.backgroundColor = "rgb(186, 238, 255)";
            hoge1Content.style.backgroundColor = "rgb(186, 238, 255)";
            hoge1Content.style.display = "block";

            label2.style.backgroundColor = "white";
            hoge2Content.style.display = "none";
            checkbox2.checked = false;
        } else {
            // hoge1タブ見出しのチェックボックスがfalseの時
            label1.style.backgroundColor = "white";
            hoge1Content.style.backgroundColor = "white";
        }
    });

    // hoge2タブのクリック時
    checkbox2.addEventListener("change", function () {
        if (this.checked) {
            // hoge2タブ見出しのチェックボックスがtrueの時
            label2.style.backgroundColor = "pink";
            label1.style.padding = "10px 20px 10px 20px;";
            hoge2Content.style.backgroundColor = "pink";
            hoge2Content.style.display = "block";

            label1.style.backgroundColor = "white";
            hoge1Content.style.display = "none";
            checkbox1.checked = false;
        } else {
            // hoge2タブ見出しのチェックボックスがfalseの時
            label2.style.backgroundColor = "white";
            hoge2Content.style.backgroundColor = "white";
        }
    });
});
◆ タブの見出し部分について
<!-- タブの見出し -->
    <div id="label-container">
        <input type="checkbox" class="checkBtn" id="hoge1" checked="true">
        <label id="hoge1Label" for="hoge1">hoge1タブ見出し</label>
        <input type="checkbox" class="checkBtn" id="hoge2">
        <label id="hoge2Label" for="hoge2">hoge2タブ見出し</label>
    </div>
-
input
2つのチェックボックス(inputタグ)とそれぞれ対応したラベル(labelタグ)を作成しています。
inputタグのtpye属性をtype="checkbox"にすることによりチェックボックスを作成し、checked属性をchecked="true"に設定する事でデフォルトでチェックが入るようにしています。 -
label
for属性に対応するinputタグのidを指定する事でそれらをペアとし関連付けています。
(例:for="hoge1")
このようにラベルとチェックボックスを関連付ける事で、ラベルをクリックしたときにチェックボックスに✓を入れる事ができます。
.checkBtn {
    display: none;
}
inputタグとlabelタグは関連付けられているのに、デフォルトのチェックボックスは見えているとイケてない感じがするので、デフォルトのチェックボックスはdisplay: none;で非表示にしています。
◆ JavaScriptについて
// checkbox
const checkbox1 = document.getElementById("hoge1");
const checkbox2 = document.getElementById("hoge2");

// label
const label1 = document.getElementById("hoge1Label");
const label2 = document.getElementById("hoge2Label");

// タブの内容部分
const hoge1Content = document.getElementById("left-container");
const hoge2Content = document.getElementById("right-container");
HTMLにおいて、要素に付けたidを使用し必要な要素を取得しています。
// hoge1タブのクリック時
checkbox1.addEventListener("change", function () {
    if (this.checked) {
        // hoge1タブ見出しのチェックボックスがtrueの時
        label1.style.backgroundColor = "rgb(186, 238, 255)";
        hoge1Content.style.backgroundColor = "rgb(186, 238, 255)";
        hoge1Content.style.display = "block";

        label2.style.backgroundColor = "white";
        hoge2Content.style.display = "none";
        checkbox2.checked = false;
    } else {
        // hoge1タブ見出しのチェックボックスがfalseの時
        label1.style.backgroundColor = "white";
        hoge1Content.style.backgroundColor = "white";
    }
});
hoge1・hoge2タブのクリック時の処理はほとんど同じなのでhoge1タブを例にご紹介します。
上記のコードではhoge1のタブの見出し(inputタグとlabelタグはforで関連付けられているため)がクリックされた時の処理を記述しています。
hoge1タブ見出しがクリックされチェックボックスがtrueの時は、hoge1タブの見出しとタブの内容の背景色を変更し、display = "block";で表示しています。
一方でこの際にhoge2タブは、見出しの背景色を白色に設定しタブ内容はdisplay = "none";で非表示にしています。またcheckbox2.checked = false;でチェックも外しています。
else~の部分では、hoge1タブ見出しのチェックボックスがfalseの時に背景色を白色にしています。
補足:JavaScriptの処理をTypeScriptで書いた場合
◆ 補足:TypeScript
window.addEventListener('load', () => {
    // checkbox
    const checkbox1 = document.getElementById("hoge1") as HTMLInputElement;
    const checkbox2 = document.getElementById("hoge2") as HTMLInputElement;

    // label
    const label1 = document.getElementById("hoge1Label") as HTMLLabelElement;
    const label2 = document.getElementById("hoge2Label") as HTMLLabelElement;

    // タブの内容部分
    const hoge1Content = document.getElementById("left-container") as HTMLElement;
    const hoge2Content = document.getElementById("right-container") as HTMLElement;

    // hoge1タブのクリック時
    checkbox1.addEventListener("change", function () {
        if (this.checked) {
            // hoge1タブ見出しのチェックボックスがtrueの時
            label1.style.backgroundColor = "rgb(186, 238, 255)";
            hoge1Content.style.backgroundColor = "rgb(186, 238, 255)";
            hoge1Content.style.display = "block";

            label2.style.backgroundColor = "white";
            hoge2Content.style.display = "none";
            checkbox2.checked = false;
        } else {
            // hoge1タブ見出しのチェックボックスがfalseの時
            label1.style.backgroundColor = "white";
            hoge1Content.style.backgroundColor = "white";
        }
    });

    // hoge2タブのクリック時
    checkbox2.addEventListener("change", function () {
        if (this.checked) {
            // hoge2タブ見出しのチェックボックスがtrueの時
            label2.style.backgroundColor = "pink";
            label1.style.padding = "10px 20px 10px 20px";
            hoge2Content.style.backgroundColor = "pink";
            hoge2Content.style.display = "block";

            label1.style.backgroundColor = "white";
            hoge1Content.style.display = "none";
            checkbox1.checked = false;
        } else {
            // hoge2タブ見出しのチェックボックスがfalseの時
            label2.style.backgroundColor = "white";
            hoge2Content.style.backgroundColor = "white";
        }
    });
});
JavaScriptからの変更点としては、checkbox、label、タブの内容部分の変数を宣言する際に変数の型を指定している部分です。他の部分は全てJavaScriptと同じだと思います。
まとめ
以上がタブの切り替えのイベントの実装についてです。
本記事では1つのWebページ内に、タブ切り替えイベントを実装したサンプルをご紹介しました。
表示コンテンツをタブごとにまとめることで、内容が整理され見やすいWebページを作成できると思います。
