はじめに
プライベートクラウドを簡単に構築できる nextcloud を社内に構築し、社員間のファイル共有サービスとして運用しています。
その nextcloud に機能を追加できる「アプリ」の中には Full text search があり、さらに Elasticsearch と連携させてドキュメントや PDF の全文検索を構築出来る事を知ったので、とりあえず日本語の全文検索が動くまでやってみました。
nextcloud 自体の構築は Docker + Rancher v1.6系を使用しているので、Elasticsearch も同様に構築しています。カタログに使用した docker-compose.yml は記載していますが、細かい話は端折っておりますので悪しからず。
Environment
- Docker + Rancher v1.6.x
- nextcloud:14.0.3-apache
- elasticsearch:5.3-alpine
    - analysis-kuromoji
    - analysis-icu
    - ingest-attachment
- postgres:11-alpine
以下の yaml は実装メモリ 6GB 以上のホスト上で実行するか、環境に合わせて適宜編集してください。
version: '2'
services:
  app:
    image: nextcloud:14.0.3-apache
    volumes:
    - nextcloud-data:/var/www/html
    links:
    - postgres:postgres
    - elasticsearch:elasticsearch
  elasticsearch:
    image: elasticsearch:5.3-alpine
    environment:
      ES_JAVA_OPTS: -Xms6G -Xmx6G
    volumes:
    - nextcloud-es-config:/usr/share/elasticsearch/config
    - nextcloud-es-data:/usr/share/elasticsearch/data
    - nextcloud-es-plugins:/usr/share/elasticsearch/plugins
    mem_reservation: 6291456000
    command:
    - sh
    - -c
    - "./bin/elasticsearch-plugin list | grep -q analysis-kuromoji || ./bin/elasticsearch-plugin install analysis-kuromoji; ./bin/elasticsearch-plugin list | grep -q analysis-icu || ./bin/elasticsearch-plugin install analysis-icu; ./bin/elasticsearch-plugin list | grep -q ingest-attachment || ./bin/elasticsearch-plugin install ingest-attachment; /docker-entrypoint.sh elasticsearch"
  postgres:
    image: postgres:11-alpine
    environment:
      POSTGRES_PASSWORD: <パスワード>
      POSTGRES_DB: <DB 名>
      POSTGRES_USER: <ユーザ名>
    volumes:
    - nextcloud-db:/var/lib/postgresql/data
volumes:
  nextcloud-es-plugins:
    external: true
    driver: rancher-nfs
  nextcloud-es-config:
    external: true
    driver: rancher-nfs
  nextcloud-db:
    external: true
    driver: rancher-nfs
  nextcloud-data:
    external: true
    driver: rancher-nfs
  nextcloud-es-data:
    external: true
    driver: rancher-nfs
nextcloud の設定
GUI 側
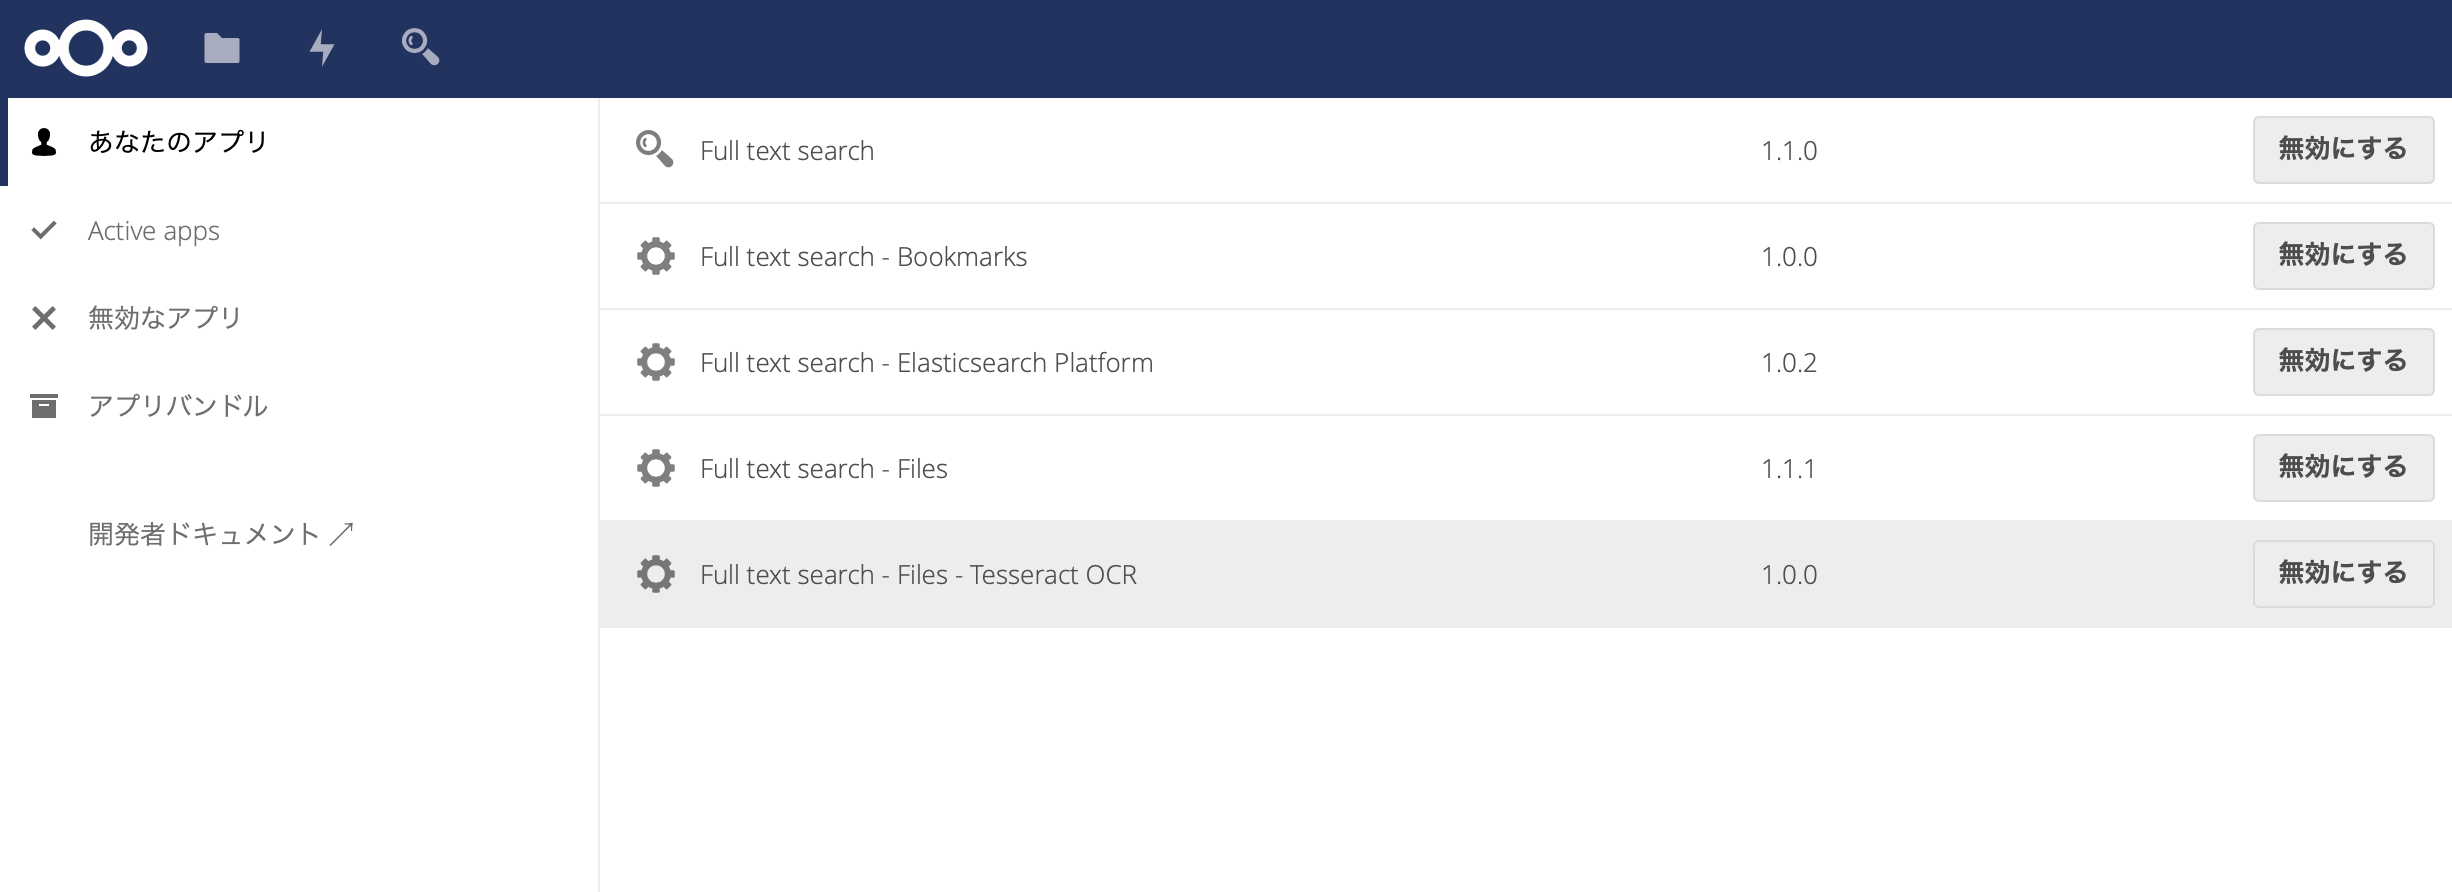
アプリの追加
一通り Full text search の付くアプリを有効化していますが、OCR と Bookmarks は要らないような気はします。
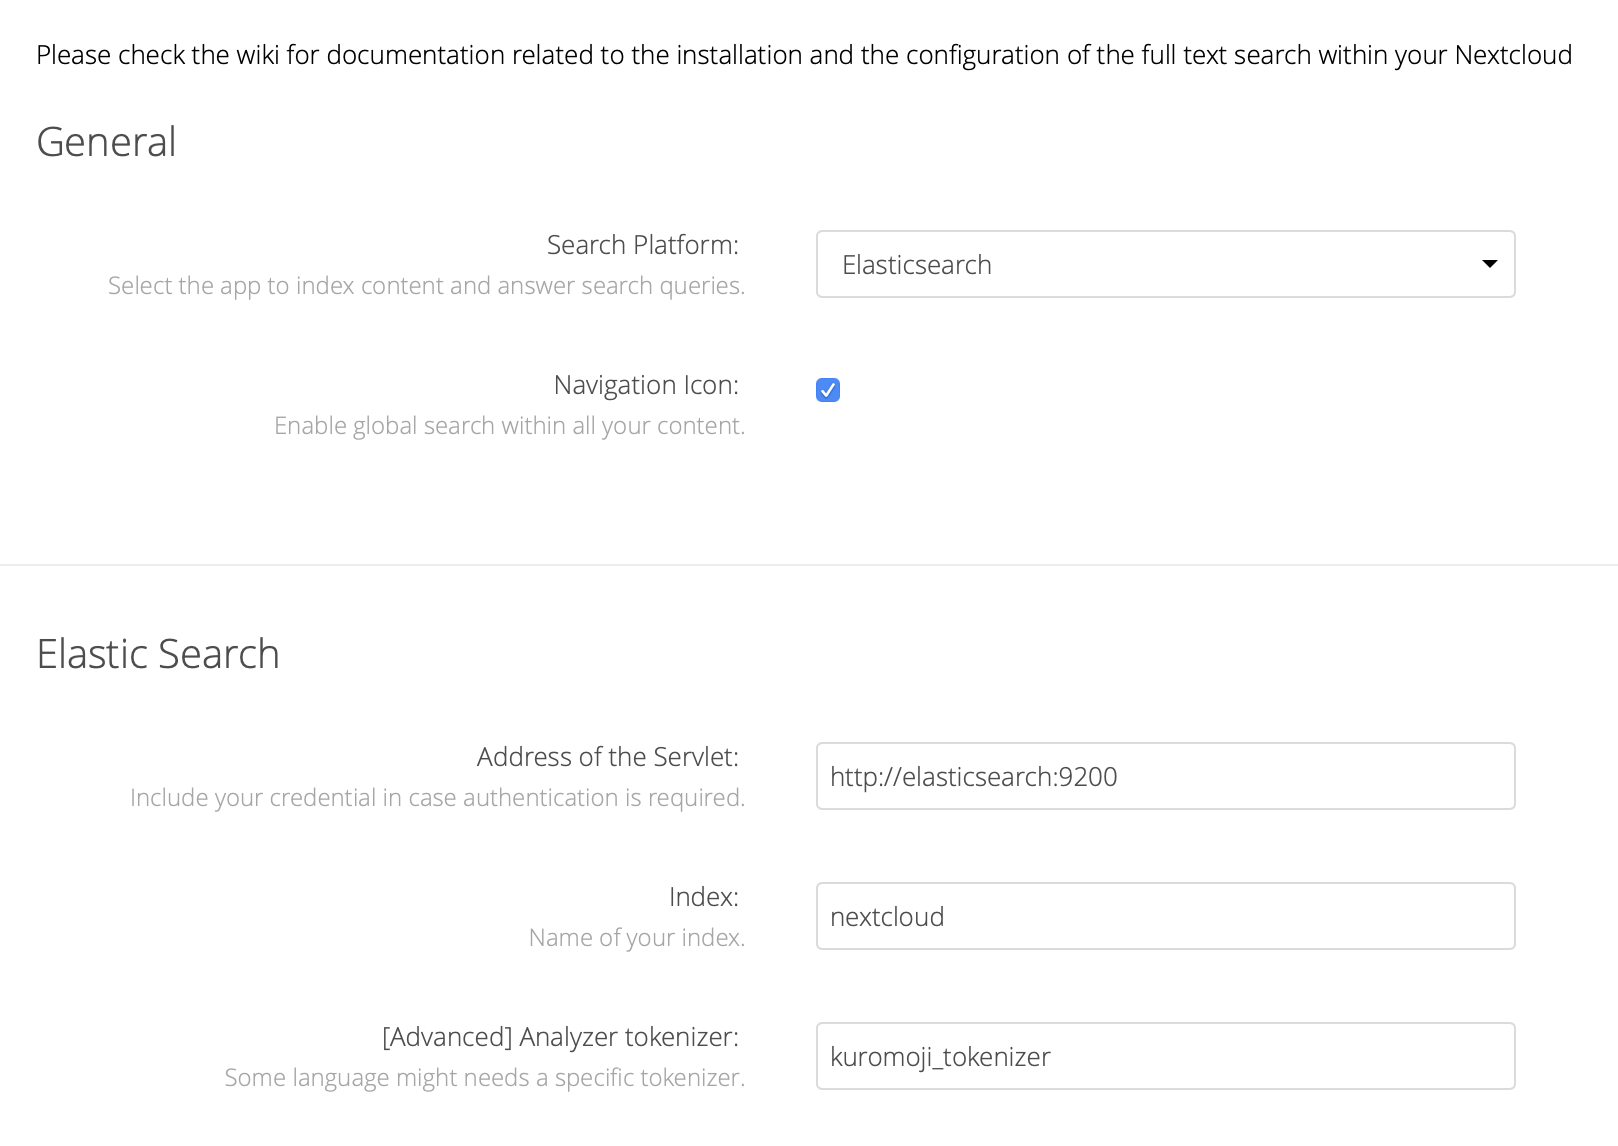
Full text search の設定
Analyzer tokenizer に kuromoji_tokenizer を指定、当然 Platform は Elasticsearch を選択。
CLI 側
今度は nextcloud に用意されている CLI を使って操作します (CLI については こちら を読んでください)。
nextcloud の Docker コンテナに exec します(ユーザ名を www-data にする)。
[yttm@localhost ~]$ docker exec -it -u www-data <CONTAINER NAME> /bin/bash
fulltextsearch:test で全体的なテストと Elasticsearch との接続確認が出来ます。
www-data@nextcloud-app-1:~/html$ php ./occ fulltextsearch:test

.Testing your current setup:
Creating mocked content provider. ok
Testing mocked provider: get indexable documents. (2 items) ok
Loading search platform. (Elasticsearch) ok
Testing search platform. ok
Locking process ok
Removing test. ok
Pausing 3 seconds 1 2 3 ok
Initializing index mapping. ok
Indexing generated documents. ok
Pausing 3 seconds 1 2 3 ok
Retreiving content from a big index (license). (size: 32386) ok
Comparing document with source. ok
Searching basic keywords:
 - 'test' (result: 1, expected: ["simple"]) ok
 - 'document is a simple test' (result: 2, expected: ["simple","license"]) ok
 - '"document is a test"' (result: 0, expected: []) ok
 - '"document is a simple test"' (result: 1, expected: ["simple"]) ok
 - 'document is a simple -test' (result: 1, expected: ["license"]) ok
 - 'document is a simple +test' (result: 1, expected: ["simple"]) ok
 - '-document is a simple test' (result: 0, expected: []) ok
Updating documents access. ok
Pausing 3 seconds 1 2 3 ok
Searching with group access rights:
 - 'license' - [] -  (result: 0, expected: []) ok
 - 'license' - ["group_1"] -  (result: 1, expected: ["license"]) ok
 - 'license' - ["group_1","group_2"] -  (result: 1, expected: ["license"]) ok
 - 'license' - ["group_3","group_2"] -  (result: 1, expected: ["license"]) ok
 - 'license' - ["group_3"] -  (result: 0, expected: []) ok
Searching with share rights:
 - 'license' - notuser -  (result: 0, expected: []) ok
 - 'license' - user2 -  (result: 1, expected: ["license"]) ok
 - 'license' - user3 -  (result: 1, expected: ["license"]) ok
Removing test. ok
Unlocking process ok
ここで fulltextsearch:index を実行すれば、この時点で nextcloud にアップロードされているファイルに対して検索インデックスの作成が行われます。
www-data@nextcloud-app-1:~/html$ php ./occ fulltextsearch:index
Options: []
Memory: 10 MB
┌─ Indexing  ────
│ Action: fillDocument
│ Provider: Files                Account: ********
│ Document: 3322
│ Info: httpd/unix-directory
│ Title: ********************************
│ Content size: 0
│ Progress:    all/127
└──
┌─ Results ────
│ Result:      0/0
│ Index:
│ Status:
│ Message:
│
│
└──
┌─ Errors ────
│ Error:     0/0
│ Index:
│ Exception:
│ Message:
└──
## x:first result ## c/v:prec/next result ## b:last result
## f:first error ## h/j:prec/next error ## d:delete error ## l:last error
## q:quit ## p:pause
ですが fulltextsearch:index はファイルを追加したらその都度実行しなければならないので、自動的にインデックスを作成するようにします。
自動的にインデックスを作成する
fulltextsearch:live をデーモンとして実行すれば、アップロードされたファイルは随時インデックス化が走るようになるので、nextcloud コンテナ内にその仕組みを作ります(この辺もうちょっとうまいやり方があれば良いのですが...)。
今回使用した nextcloud コンテナでは start-stop-daemon が利用出来るので、デーモンを操作するスクリプトを作成します(こちら を参考にしました)。
# !/bin/sh

# Quick start-stop-daemon example, derived from Debian /etc/init.d/ssh
set -e

# Must be a valid filename
NAME=fulltextsearch-daemon
PIDFILE=/var/run/$NAME.pid
# This is the command to be run, give the full pathname
DAEMON=/usr/local/bin/php
DAEMON_OPTS="/var/www/html/occ fulltextsearch:live"

export PATH="${PATH:+$PATH:}/usr/sbin:/sbin"

case "$1" in
  start)
        echo -n "Starting daemon: "$NAME
        start-stop-daemon --start --background --quiet --pidfile $PIDFILE --exec $DAEMON -- $DAEMON_OPTS
        echo "."
        ;;
  stop)
        echo -n "Stopping daemon: "$NAME
        start-stop-daemon --stop --quiet --oknodo --pidfile $PIDFILE
        echo "."
        ;;
  restart)
        echo -n "Restarting daemon: "$NAME
        start-stop-daemon --stop --quiet --oknodo --retry 30 --pidfile $PIDFILE
        start-stop-daemon --start --background --quiet --pidfile $PIDFILE --exec $DAEMON -- $DAEMON_OPTS
        echo "."
        ;;

  *)
        echo "Usage: "$1" {start|stop|restart}"
        exit 1
esac

exit 0
あとはこれをコンテナの中で実行しておきます。
www-data@nextcloud-app-1:~/html$ ./ssd.sh start
Starting daemon: fulltextsearch-daemon.
完成!
参考
公式が GitHub Wiki に書いてあるので、詳しくはこちらをご覧ください。
https://github.com/nextcloud/fulltextsearch/wiki/Basic-Installation
※ 公式は Live index に systemd を使ってますが、コンテナ環境ではうまく動きませんでした