はじめに
本記事では、WRIMEデータセットを用いて感情分析モデルのファインチューニング手順を解説します。感情分析は、テキストデータから感情的な傾向を抽出する重要なタスクであり、ビジネスや研究において広く利用されています。WRIMEデータセットは、日本語のツイートを対象とした感情分析に適したデータセットです。
環境の準備
まず、必要なライブラリをインストールし、乱数シードを固定します。
!pip install transformers[ja,torch] datasets matplotlib japanize-matplotlib
from transformers.trainer_utils import set_seed

# 乱数シードを42に固定(再現性確保のため)
set_seed(42)
データセットの準備
WRIMEデータセットをHugging Face Hubから読み込みます。
from pprint import pprint
from datasets import load_dataset

# WRIMEデータセットの読み込み
train_dataset = load_dataset("llm-book/wrime-sentiment", split="train")
valid_dataset = load_dataset("llm-book/wrime-sentiment", split="validation")

# データセットの内容表示
pprint(train_dataset[0])
pprint(train_dataset.features)
出力:
{'datetime': '2012/7/31 23:48',
 'label': 1,
 'sentence': 'ぼけっとしてたらこんな時間。チャリあるから食べにでたいのに…',
 'user_id': 1}
{'datetime': Value(dtype='string', id=None),
 'label': ClassLabel(names=['positive', 'negative'], id=None),
 'sentence': Value(dtype='string', id=None),
 'user_id': Value(dtype='int64', id=None)}
WRIMEデータセットは、日本語のツイートを含み、ラベルはポジティブとネガティブの二値分类です。
トークナイザ
日本語BERTモデルのトークナイザを読み込み、テキストをトークン化します。
from transformers import AutoTokenizer

# トークナイザの読み込み
model_name = "cl-tohoku/bert-base-japanese-v3"
tokenizer = AutoTokenizer.from_pretrained(model_name)

# トークナイザの動作確認
print(type(tokenizer).__name__)
tokenizer.tokenize("これはテストです。")
encoded_input = tokenizer("これはテストです。")
print(type(encoded_input).__name__)
pprint(encoded_input)
tokenizer.convert_ids_to_tokens(encoded_input["input_ids"])
出力:
BertJapaneseTokenizer
BatchEncoding
{'attention_mask': [1, 1, 1, 1, 1, 1, 1],
 'input_ids': [2, 12538, 465, 14985, 13037, 385, 3],
 'token_type_ids': [0, 0, 0, 0, 0, 0, 0]}
['[CLS]', 'これ', 'は', 'テスト', 'です', '。', '[SEP]']
日本語特化のBERTモデルのトークナイザを使用し、入力テキストをトークン化します。
データセット統計の可視化
データセット内のテキスト長とラベル分布を可視化します。
from collections import Counter
import japanize_matplotlib
import matplotlib.pyplot as plt
from datasets import Dataset
from tqdm import tqdm

plt.rcParams["font.size"] = 18  # 文字サイズを大きくする

def visualize_text_length(dataset: Dataset):
    """テキストのトークン数分布を可視化"""
    length_counter = Counter()
    for data in tqdm(dataset):
        length = len(tokenizer.tokenize(data["sentence"]))
        length_counter[length] += 1
    plt.bar(length_counter.keys(), length_counter.values(), width=1.0)
    plt.xlabel("トークン数")
    plt.ylabel("事例数")
    plt.show()

visualize_text_length(train_dataset)
visualize_text_length(valid_dataset)


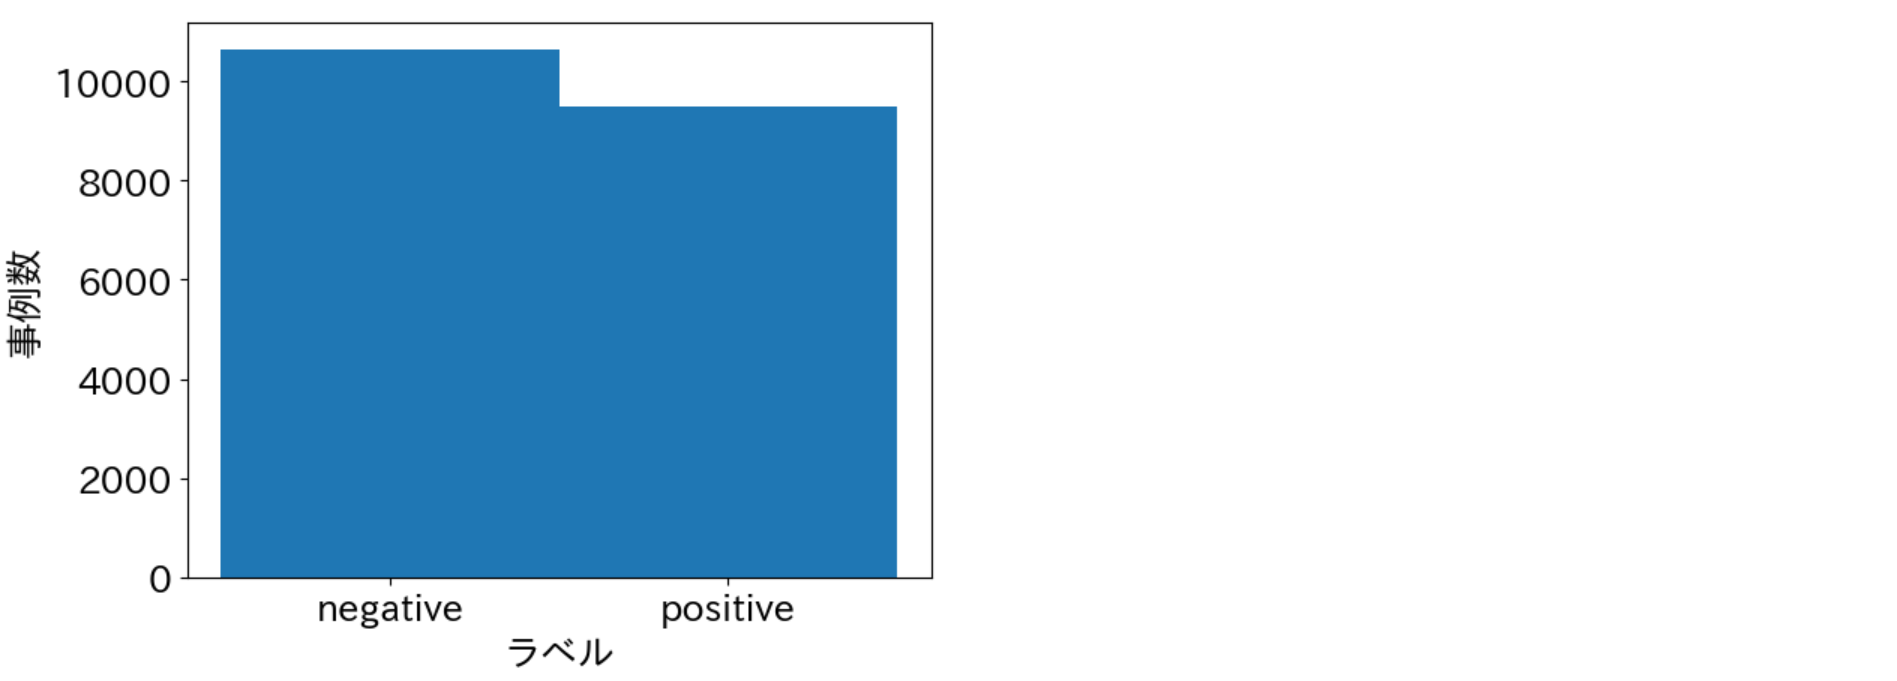
def visualize_labels(dataset: Dataset):
    """ラベル分布を可視化"""
    label_counter = Counter()
    for data in dataset:
        label_id = data["label"]
        label_name = dataset.features["label"].names[label_id]
        label_counter[label_name] += 1
    plt.bar(label_counter.keys(), label_counter.values(), width=1.0)
    plt.xlabel("ラベル")
    plt.ylabel("事例数")
    plt.show()

visualize_labels(train_dataset)
visualize_labels(valid_dataset)

データセットの前処理
テキストをトークン化し、モデルの入力形式に変換します。
from transformers import BatchEncoding

def preprocess_text_classification(example: dict[str, str | int]) -> BatchEncoding:
    """テキストをトークン化し、ラベルを追加"""
    encoded_example = tokenizer(example["sentence"], max_length=512)
    encoded_example["labels"] = example["label"]
    return encoded_example

encoded_train_dataset = train_dataset.map(preprocess_text_classification, remove_columns=train_dataset.column_names)
encoded_valid_dataset = valid_dataset.map(preprocess_text_classification, remove_columns=valid_dataset.column_names)
print(encoded_train_dataset[0])
出力:
{'input_ids': [2, 478, 7139, 15269, 441, 456, 13123, 21311, 12671, 385, 12651, 7065, 12485, 12488, 13781, 461, 457, 13030, 464, 461, 29, 29, 29, 3], 'token_type_ids': [0, 0, 0, 0, 0, 0, 0, 0, 0, 0, 0, 0, 0, 0, 0, 0, 0, 0, 0, 0, 0, 0, 0, 0], 'attention_mask': [1, 1, 1, 1, 1, 1, 1, 1, 1, 1, 1, 1, 1, 1, 1, 1, 1, 1, 1, 1, 1, 1, 1, 1], 'labels': 1}
ミニバッチ構築
データセットをミニバッチに分割します。
from transformers import DataCollatorWithPadding

data_collator = DataCollatorWithPadding(tokenizer=tokenizer)
batch_inputs = data_collator(encoded_train_dataset[0:4])
pprint({name: tensor.size() for name, tensor in batch_inputs.items()})
出力:
{'attention_mask': torch.Size([4, 36]),
 'input_ids': torch.Size([4, 36]),
 'labels': torch.Size([4]),
 'token_type_ids': torch.Size([4, 36])}
モデルの準備
感情分析用のモデルを読み込みます。
from transformers import AutoModelForSequenceClassification

class_label = train_dataset.features["label"]
label2id = {label: id for id, label in enumerate(class_label.names)}
id2label = {id: label for id, label in enumerate(class_label.names)}

model = AutoModelForSequenceClassification.from_pretrained(
    model_name,
    num_labels=class_label.num_classes,
    label2id=label2id,
    id2label=id2label,
)

# パラメータをメモリ上に隣接した形で配置
for param in model.parameters():
    param.data = param.data.contiguous()

print(model.forward(**data_collator(encoded_train_dataset[0:4])))
出力:
SequenceClassifierOutput(loss=tensor(0.8075, grad_fn=<NllLossBackward0>), logits=tensor([[ 0.2869, -0.2644],
        [ 0.1715,  0.0095],
        [ 0.0040,  0.1524],
        [ 0.2233, -0.2968]], grad_fn=<AddmmBackward0>), hidden_states=None, attentions=None)
訓練の実行
モデルの訓練を実行します。
from transformers import TrainingArguments

training_args = TrainingArguments(
    output_dir="output_wrime",
    per_device_train_batch_size=32,
    per_device_eval_batch_size=32,
    learning_rate=2e-5,
    lr_scheduler_type="linear",
    warmup_ratio=0.1,
    num_train_epochs=3,
    save_strategy="epoch",
    logging_strategy="epoch",
    evaluation_strategy="epoch",
    load_best_model_at_end=True,
    metric_for_best_model="accuracy",
    fp16=True,
    report_to="none",
)

import numpy as np

def compute_accuracy(eval_pred: tuple[np.ndarray, np.ndarray]) -> dict[str, float]:
    """正解率を計算"""
    predictions, labels = eval_pred
    predictions = np.argmax(predictions, axis=1)
    return {"accuracy": (predictions == labels).mean()}

from transformers import Trainer

trainer = Trainer(
    model=model,
    train_dataset=encoded_train_dataset,
    eval_dataset=encoded_valid_dataset,
    data_collator=data_collator,
    args=training_args,
    compute_metrics=compute_accuracy,
)

trainer.train()
訓練後のモデルの評価
訓練後のモデルを検証セットで評価します。
eval_metrics = trainer.evaluate(encoded_valid_dataset)
pprint(eval_metrics)
モデルの保存
訓練済みモデルをGoogle DriveまたはHugging Face Hubに保存します。
Google Driveへの保存
from google.colab import drive

drive.mount("drive")
!mkdir -p drive/MyDrive/llm-book
!cp -r output_wrime drive/MyDrive/llm-book
Hugging Face Hubへの保存
from huggingface_hub import login

login()
repo_name = "YOUR-ACCOUNT/bert-base-japanese-v3-wrime-sentiment"
tokenizer.push_to_hub(repo_name)
model.push_to_hub(repo_name)
まとめ
本記事では、WRIMEデータセットを用いた感情分析モデルのファインチューニング手順を解説しました。WRIMEデータセットの特徴とモデルファインチューニングの重要性を理解し、実装手法を学ぶことができました。ぜひ自身の環境で試してみてください。
参考資料: