Outline
フルスクリーンショットで画像を比較する機能は、T-DASHの標準動作でサポートされている
ただ、特定の要素の画像を比較したい場合、工夫がいる。
Yahoo Top Pageを例とする
https://www.yahoo.co.jp/
以下図のように、赤枠の部分を期待画像と比較したい場合である

技術的情報
pythonで3つの機能を用いる
・selenium libraryを用いてフルスクリーンショットを取る
・selenium libraryを用いてxpathの要素のlocation情報を取得する
・Image libraryを用いて画像を切り抜く
これにより、現在のページのxpathの画像ファイルを作成することができる。
あとは、2つの画像比較を行い、一致度を計算し、指定数値以上であるかを検証すればよい
T-DASH 実装
カスタム動作
robotframework library
以下設定ファイルを Image.yaml で保存する
ACT-CAT-CUSTOM-53c469f0-2a3e-4504-9e31-aa8d3da6ff99:
  action_category_name: Image
  icon: ''
  color: '#57fe30'
  custom_data:
    file_name: Image
    pip_list: []
    library_list:
    - lib_image.py
  actions:
    ACT-CUSTOM-bc9e7d9e-7db8-4549-bbe4-c6265f25bf92:
      action_name: 数字が大きいことを検証
      action_type: expectation
      action_format: 「設定値1」の値が期待値「設定値2」より高いことを検証
      action_note: ''
      action_args:
      - value1
      - value2
      action_def:
      - - Log
        - ${value1}
      - - Log
        - ${value2}
      - - Should Be True
        - ${value1} > ${value2}
    ACT-CUSTOM-344faacc-ce34-4438-8a7c-e1eb7d8ac943:
      action_name: xpathの要素をPNG画像にする
      action_type: operation
      action_format: 画面「画面名」要素「要素名」を「設定値」にPNG画像する
      action_note: ''
      action_args:
      - screen
      - element
      - value
      action_def:
      - - save_xpath_element_screenshot
        - ${location}
        - ${value}
      - - Log
        - ' <img src="${value}">'
        - html=true
    ACT-CUSTOM-e73dd0bb-100b-4a53-ae65-a7c52779a9e5:
      action_name: 2つの画像を比較する
      action_type: operation
      action_format: 画像1「設定値1」と画像2「設定値2」を比較する
      action_note: ''
      action_args:
      - value1
      - value2
      action_def:
      - - ${vars}=
        - Get Variables
      - - Log
        - ${vars['\${OUTPUT_DIR}']}
      - - Set Test Variable
        - ${image}
        - \\diff_image.png
      - - Set Test Variable
        - ${diff_image}
        - ${vars['\${OUTPUT_DIR}']}${image}
      - - save_diff_image
        - ${value1}
        - ${value2}
        - ${diff_image}
      - - 'Log '
        - <img src="${diff_image}">
        - html=true
      - - ${diff_ratio} =
        - calculate_matching
        - ${value1}
        - ${value2}
      - - Log
        - ${diff_ratio}
      - - Set Suite Variable
        - ${share_diff_ratio}
        - ${diff_ratio}
次に、Image.yamlをT-DASHの動作定義 -> カスタム動作 -> カスタム動作をインポート にてインポートし、実際にインポートされた設定内容を開く

「xpathの要素をPNG画像にする」の設定を開く

ここで、「ライブラリを追加する」を開く
⇒pythonのライブラリ追加に続く。
python ライブラリ
以下スクリプトを lib_image.pyのファイル名として保存する
import cv2
import numpy as np
import base64
from robot.libraries.BuiltIn import BuiltIn
from selenium import webdriver
from selenium.webdriver.common.by import By
from PIL import Image
import io

def save_xpath_element_screenshot(xpath, output_path):
	"""
	save xpath element by png format

	Args:
		xpath (str): スクリーンショットを撮りたい要素のXPath。
		output_path (str): スクリーンショットの保存パス。
	"""
	driver = None
	driver = BuiltIn().get_library_instance('SeleniumLibrary').driver
	element = driver.find_element(By.XPATH, xpath)

	# get element size & location
	location = element.location
	size = element.size


	cdp_browser = ['chrome', 'MicrosoftEdge', 'chrome-headless-shell', 'edge-headless-shell']
	browser_name = driver.capabilities['browserName']

	image = None
	if browser_name in cdp_browser:
		width = driver.execute_script("return document.body.scrollWidth;")
		height = driver.execute_script("return document.body.scrollHeight;")

		# 高さが0の場合は、htmlの高さを取得
		if height == 0:
			height = driver.execute_script("return document.documentElement.scrollHeight;")
		if height == 0:
			height = 10000

		print(f"full screen size is {width} x {height}")

		viewport = {
			"x": 0,
			"y": 0,
			"width": width,
			"height": height,
			"scale": 1
		}
		# Chrome Devtools Protocolコマンドを実行し、取得できるBase64形式の画像データをデコードしてファイルに保存
		image_base64 = driver.execute_cdp_cmd(
			"Page.captureScreenshot", {"clip": viewport, "captureBeyondViewport": True})
		img_bytes  = base64.b64decode(image_base64["data"])
	else:
		image_base64 = driver.get_full_page_screenshot_as_base64()
		img_bytes  = base64.b64decode(image_base64)

	img = Image.open(io.BytesIO(img_bytes ))
	left = location['x']
	top = location['y']
	right = location['x'] + size['width']
	bottom = location['y'] + size['height']

	# cut element
	element_image = img.crop((left, top, right, bottom))
	element_image.save(output_path)

	print(f"save XPath element in {output_path}")

def calculate_matching (file1,file2):
	img1 = cv2.imread(file1)
	img2 = cv2.imread(file2)
	if img1.shape[0] > img2.shape[0]:
		print( "crop image1 " )
		cropped_img = img1[0:img2.shape[0], 0:img1.shape[1]]
		img1 = cropped_img
	elif img1.shape[0] < img2.shape[0]:
		print( "crop image2 " )
		cropped_img = img2[0:img1.shape[0], 0:img2.shape[1]]
		img2 = cropped_img
	height = img1.shape[0]
	width = img1.shape[1]
	print( "image size = " + str(height) + ' ' + str(width)  )
	img_size = (int(width), int(height))
	rate = np.count_nonzero(img1 == img2) / img1.size
	return rate

def save_diff_image (file1,file2,file3):
	img1 = cv2.imread(file1)
	img2 = cv2.imread(file2)
	print( "image1 size = " + str (img1.shape[0]) + ' ' + str (img1.shape[1])  )
	print( "image2 size = " + str (img2.shape[0]) + ' ' + str (img2.shape[1])  )
	if img1.shape[0] > img2.shape[0]:
		if img1.shape[1] > img2.shape[1]:
			print( "crop image1 {img2.shape[0]} x {img2.shape[1]}" )
			cropped_img = img1[0:img2.shape[0], 0:img2.shape[1]]
			img1 = cropped_img
		else:
			print( "crop image1&2 {img2.shape[0]} x {img1.shape[1]}" )
			cropped_img = img1[0:img2.shape[0], 0:img1.shape[1]]
			img1 = cropped_img
			cropped_img = img2[0:img2.shape[0], 0:img1.shape[1]]
			img2 = cropped_img
	elif img1.shape[0] < img2.shape[0]:
		if img1.shape[1] > img2.shape[1]:
			print( "crop image1&2 {img1.shape[0]} x {img2.shape[1]}" )
			cropped_img = img1[0:img1.shape[0], 0:img2.shape[1]]
			img1 = cropped_img
			cropped_img = img2[0:img1.shape[0], 0:img2.shape[1]]
			img2 = cropped_img
		else:
			print( "crop image2 {img1.shape[0]} x {img1.shape[1]}" )
			cropped_img = img2[0:img1.shape[0], 0:img1.shape[1]]
			img2 = cropped_img
	im_diff = img1.astype(int) - img2.astype(int)
	im_diff_abs = np.abs(im_diff)
	im_diff_abs_norm = im_diff_abs / im_diff_abs.max() * 255
	cv2.imwrite(file3, im_diff_abs_norm)
①作成したpython scriptを自作ライブラリのフォルダに格納する
フォルダは、「ファイルを開く」を選択すると、格納先がエクスプローラーで指定される。
②自作ライブラリから、今回追加した「lib_image.py」を選び、⊕をクリックする。
すると、Libraryにリストされる

テストケース
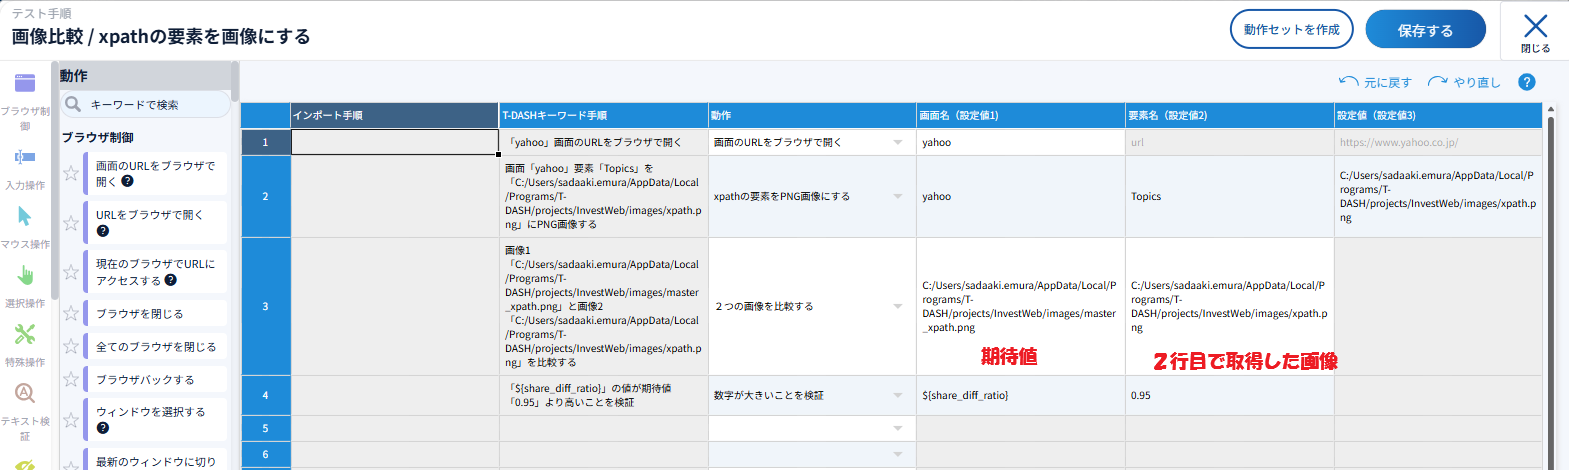
2行目で、画像を取得したいxpath(画面定義)を指定し、保存先を指定する
3行目で、期待値画像と2行目で作成された画像を比較する 差分が変数${share_diff_ratio}に格納される
4行目で、期待値0.95と比較を行う
実行結果
期待値(左)と実際値(真ん中)が異なる(エラー)の例を示す。
差分画像(右)が黒であると、差分がないことを示す。
