概要
機械学習の勉強を始めようと思い、まず機械学習、深層学習の基本といわれている、手書き数字の認識をやってみました。
Flaskを使ってその機能を組み込んだwebサイトを作ってみたのでそのメモです。
- 仮想環境構築
- MnistのデータセットとKerasを用いて機械学習
- Flaskを使ってWebアプリケーションを作る
- Herokuでデプロイ
環境
Windows10
ディレクトリ構成
keras_learning
     └── learning.py

char_recognition
     ├── app.py
     ├── prediction.py
     ├── Procfile
     ├── requirements.txt
     ├── mnist_mlp_model.json
     ├── mnist_mlp_weights.h5
     └── templates
             └── index.html
keras_learningは学習モデルを作るための一時的なフォルダとなっており、char_recognitionが本体?のフォルダです。
※Procfile、requirements.txt、templates、index.htmlはその名前じゃないとうまくいかないので注意が必要です。
仮想環境の構築
なぜ仮想環境を使うか
仮想環境を使うとプロジェクトごとにライブラリのバージョンを管理することができる。これにより、今のプロジェクトに必要なバージョンのライブラリをインストールして使い、不要になったらすぐに消すことができる。
今回の僕の場合では、CPUの問題で最近のtensorflowが使えなかったため、古いtensorflowをインストールする必要があった。
利用方法
$ pip install venv
仮想環境を作るライブラリであるvenvをインストールする
$ python -m venv env
カレントディレクトリに「env」という名前のフォルダができる。
$ cd フォルダ名
$ cd Scripts
$ activate
Scriptsフォルダに移動し、中にあるactivateを実行する。
(env)c:\Scripts\activate
上のようにコマンドの最初に(env)とついていたら仮想環境構築成功である。
仮想環境を立ち上げた状態でpip install をすると、作成した「env」フォルダの中にインストールされる。また、その状態でプログラムを実行すると「env」フォルダにインストールされているバージョンのライブラリが使われる。使わなくなったら「env」フォルダを削除すればよい。
ライブラリのインストール
$ pip install sklearn Keras flask Pillow numpy gunicorn tensorflow
特にバージョンの指定がなければこれで良いが、僕の場合のようにバージョン指定しなければいけないときは、tensorflow==1.5.0のように書けばそのバージョンのライブラリがインストールされる。
学習モデルの作成
learning.py
from sklearn.datasets import fetch_openml
from keras.models import Sequential
from keras.layers import Dense, Dropout, Flatten, Conv2D, MaxPooling2D
from keras.utils import np_utils

mnist = fetch_openml("mnist_784", version=1)
Data, label = mnist["data"], mnist["target"]

train_data, test_data = Data[:60000], Data[60000:]
train_label, test_label = label[:60000], label[60000:]

train_data = train_data.reshape(train_data.shape[0],28,28,1)
test_data = test_data.reshape(test_data.shape[0],28,28,1)

train_data = train_data.astype("float32")
test_data = test_data.astype("float32")

train_data /= 255
test_data /= 255

train_label = np_utils.to_categorical(train_label, 10)
test_label = np_utils.to_categorical(test_label, 10)

model = Sequential()
model.add(Conv2D(32, kernel_size=(3, 3),activation='relu',input_shape=(28,28,1)))
model.add(MaxPooling2D(pool_size=(2, 2)))
model.add(Dropout(0.25))
model.add(Flatten())
model.add(Dense(128, activation='relu'))
model.add(Dense(10, activation='softmax'))

model.compile(loss='categorical_crossentropy',optimizer='sgd',metrics=['accuracy'])

model.fit(train_data, train_label, epochs=10)

score = model.evaluate(test_data, test_label, verbose=0)
print(score)

model_json_str = model.to_json()
open("mnist_mlp_model.json","w").write(model_json_str)
model.save_weights("mnist_mlp_weights.h5")
解説
mnist = fetch_openml("mnist_784", version=1)
Data, label = mnist["data"], mnist["target"]
scikit-learnのfetch_openmlを使ってMnistから画像データをダウンロードする。
dataとtargetもkeyに持つ辞書型が返されるので、Dataとlabelに分ける。
Dataは画像のデータ、labelはその画像に対応する正解のラベルになっている。
train_data, test_data = Data[:60000], Data[60000:]
train_label, test_label = label[:60000], label[60000:]
画像データとラベルをそれぞれ、訓練用データとテスト用データに分ける。train_dataとtrain_labelを使って学習モデルを作成し、test_dataとtest_labelを使って、そのモデルの完成度を測定するためである。Mnistでは70000個のデータが取得できるため、今回は60000と10000に分割している。
train_data = train_data.reshape(train_data.shape[0],28,28,1)
test_data = test_data.reshape(test_data.shape[0],28,28,1)
与えられるデータは(70000,784)の形であり、これは70000の画像に対し、縦x横(28x28=784)の画素を持つことを表している。これをkerasで使うために、(60000,28,28,1)のように次元を変更する。
train_data = train_data.astype("float32")
test_data = test_data.astype("float32")
kerasで扱えるようにデータのタイプをfloat32に変更する。
train_data /= 255
test_data /= 255
画素のデータは、0~255の数値でその濃さが表されている。よって全ての要素を255で割り、正規化することで、全ての要素が0~1の間に収まり、処理が速くなる。
train_label = np_utils.to_categorical(train_label, 10)
test_label = np_utils.to_categorical(test_label, 10)
kerasで扱えるようにラベルをバイナリに変更する。
model = Sequential()
まずモデルを作成し、そこに層を追加していく。
model.add(Conv2D(32, kernel_size=(3, 3),activation='relu',input_shape=(28,28,1)))
3次元で受け取ったデータを畳み込んで次の層に流す。
model.add(MaxPooling2D(pool_size=(2, 2)))
プーリング層。無駄な情報を取り除くことで、学習効率を上げる。
model.add(Dropout(0.25))
ドロップアウト層。ここでは、25%をドロップする。過学習を防ぐなどの効果がある。
model.add(Flatten())
データを1次元にする。
model.add(Dense(128, activation='relu'))
128次元の全結合層とrelu層(ランプ関数層)を追加する。
model.add(Dense(10, activation='softmax'))
10次元の全結合層とsoftmax層を追加する。
model.compile(loss='categorical_crossentropy',optimizer='sgd',metrics=['accuracy'])
どのように学習させるかを選択する。lossは損失関数、optimizerは最適化手法、metricsは評価関数を選択できる。ここでは、交差エントロピー、確率的勾配降下法を選択している。いろいろな選択肢があるが、それぞれの仕組みをあまり理解できていないので、これから勉強していこうとおもう。
model.fit(train_data, train_label, epochs=10)
作ったモデルに訓練用のデータとラベルを入れて、学習させる。epochsでは学習を何回繰り返すかを選択できる。
score = model.evaluate(test_data, test_label, verbose=0)
print(score)
作成したモデルにtest_dataを入力して、出た結果とtest_labelを比較することで、そのモデルの制度を測定する。
model_json_str = model.to_json()
open("mnist_mlp_model.json","w").write(model_json_str)
model.save_weights("mnist_mlp_weights.h5")
モデルをjson形式に変更して保存する。また、学習結果も保存する。
これにより、keras_learningフォルダ上に、mnist_mlp_model.json(モデル)とmnist_mlp_weights.h5(学習結果)が保存される。最後にこの2つをchar_recognitionフォルダにコピーする。
Flaskに組み込む
prediction.py
# -*- coding: utf-8 -*-

import numpy as np
from PIL import Image, ImageEnhance, ImageOps
from keras.models import model_from_json
import tensorflow as tf

def prediction(im):
    # モデルの読み込み
    model = model_from_json(open('mnist_mlp_model.json', 'r').read())
    # 学習結果の読み込み
    model.load_weights('mnist_mlp_weights.h5')

    #画像を明瞭化する
    im_enh = ImageEnhance.Brightness(im).enhance(2)
    #画像をグレースケール化する
    im_gray = im_enh.convert(mode="L")
    #画像を28x28にリサイズする
    im_8x8 = im_gray.resize((28,28))
    im_inv = ImageOps.invert(im_8x8)
    #2次元のndarrayに変更
    x_im2d = np.asarray(im_inv)
    x_mult = x_im2d/255
    x_mult = x_mult.reshape(1,28,28,1)

    output = model.predict_classes(x_mult,batch_size=1)[0]
    return output
画像を受けとってそれを学習に適した形に変更した後に学習し、その結果をreturnするprediction関数を別のファイルで作った。
index.html
<!DOCTYPE html>
<html lang="ja">
    <head>
        <meta charset="utf-8">
        <!--解消度をディスプレイサイズに合わせる-->
        <meta name="viewport" content="width=device-width, initial-scale=1">
        <link href="https://stackpath.bootstrapcdn.com/bootstrap/4.1.2/css/bootstrap.min.css" rel="stylesheet" integrity="sha384-Smlep5jCw/wG7hdkwQ/Z5nLIefveQRIY9nfy6xoR1uRYBtpZgI6339F5dgvm/e9B" crossorigin="anonymous">
        <title>画像から数字を認識する</title>
    </head>
    <body>
        <h1 class="text-center bg-warning" >数字認識するマン</h1>

        <!--ファイルをアップロードする場合は次のようにenctypeを設定する必要がある-->
        <form method="POST" action="/send" enctype="multipart/form-data">
            <div class="text-center">
                <!--nameでapp.pyで受け取る際の名前を付ける-->
                <input type="file"  name="inputImage">
                <input type="submit" value="検索">
            </div>
        </form>
        <p>結果: {{output}}</p>
    </body>
</html>
実際に表示されるwebサイトの作成。app.pyから受け取って表示したい要素は{{}}で囲む。
app.py
# -*- coding: utf-8 -*-

from flask import Flask, render_template, request, redirect, url_for
from PIL import Image
#さっき作ったprediction.pyをimportする
import prediction

app = Flask(__name__)


@app.route('/')
def index():
    #最初はindex.htmlをそのまま返す
    return render_template("index.html")

#action="/send"を持ったformが送られたときにこの関数を呼び出す
@app.route('/send', methods=["GET", "POST"])
def send():

    #index.htmlのformから送られてきた画像データ(inputImage)を受け取る
    stream = request.files["inputImage"].stream
    im = Image.open(stream)

    #prediction.pyからprediction関数を呼び出して使う
    output = prediction.prediction(im)

    #結果をindex.html内のoutputの部分に埋め込んでhtmlを返す
    return render_template('index.html',output=output)

if __name__ == "__main__":
    app.run(debug=True)
index.html内のformでapp.pyの関数を呼び出し、何かしらの処理をしたのち指定の空白を埋めた状態のhtmlを返すといいうような仕組みになっている。
Procfile
web: gunicorn -b 0.0.0.0:$PORT app:app
起動時のファイルを指定する。ここではappと指定している。
requirements.txt
gunicorn
Flask==1.1.1
tensorflow==1.5.0
Keras==2.2.3
Pillow==6.1.0
numpy==1.17.4
使用したライブラリとそのバージョンを書く。
pip freeze
で確認することができる。
herokuでデプロイ
gitとHerokuCLIをインストールする。今回は省略。
$ heroku login -i
IDとpassを入力してherokuにログインする。
$ heroku create アプリケーション名
herokuにアプリケーションを追加。今まで誰も使ってない名前にする必要がある。
$ git add .
$ git commit -m "new"
$ git remote add heroku https://git.heroku.com/アプリケーション名.git
$ git push heroku master
$ heroku open
完了
https://numprediction.herokuapp.com/ 完成したサイトのリンク
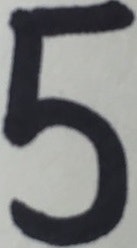
手で書いたこの画像を入れてみたところ「5」と出力され、うまくいっている様子。
しかしこのままでは、入れる画像の文字の太さや余白の大きさで結果が変わってしまう可能性があるため、opencsvなどを使って見ようと思った。
最後に
メモなので適当な説明はあしからず、、
参考にしたサイト
https://torina.top/detail/346/
https://www.codexa.net/cnn-mnist-keras-beginner/
https://qiita.com/ynakayama/items/2cc0b1d3cf1a2da612e4