iOS16新機能
iOS16からロック画面ウィジェットが新しく登場しました。
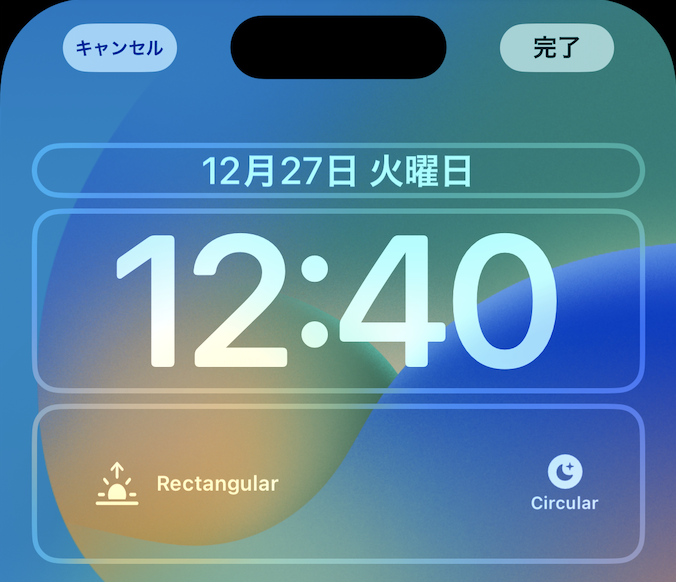
ロック画面ウィジェットは、iOS14から登場したホーム画面ウィジェットを追加するWidgetFamilyに以下3点が新しく追加されました。
・accessoryRectangular = 晴れアイコンの箇所
・accessoryCircular = 月アイコンの箇所
・accessoryInline = 12月27日火曜日のテキストの箇所
今回はRectangularとCircularウィジェットの実装方法を紹介します。
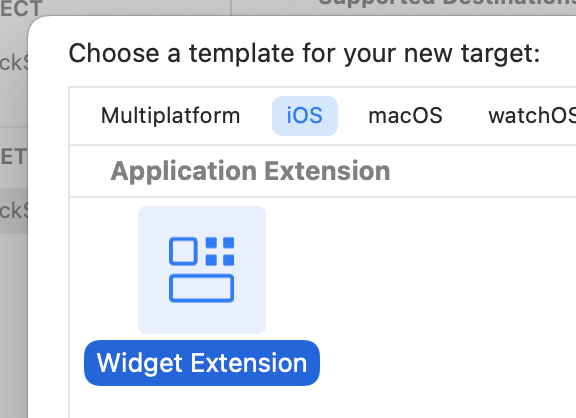
1.WidgetExtensionの作成
File→New→Target→Widget Extension
2.WidgetBundleの作成
WidgetBundle.swift
import SwiftUI
import WidgetKit

@main
struct WidgetBundle: SwiftUI.WidgetBundle {
    @WidgetBundleBuilder
    var body: some Widget {
        LockScreenWidget()
    }
}
3.WidgetConfigurationの作成
LockScreenWidget.swift
struct LockScreenWidget: Widget {
    let kind: String = "LockScreenWidget"

    var body: some WidgetConfiguration {
        StaticConfiguration(kind: kind,  provider: LockScreenWidgetProvider()) { entry in
            ContentView()
        }
        .configurationDisplayName("My Widget")
        .description("This is an example widget.")
        .supportedFamilies([.accessoryCircular, .accessoryRectangular])
    }
}
4.Viewの作成
ContentView.swift
import WidgetKit
import SwiftUI

@available(iOSApplicationExtension 16.0, *)
struct ContentView: View {
    @Environment(\.widgetFamily) var family
    var body: some View {
        switch family {
        case .accessoryRectangular:
            ZStack {
                HStack(spacing: 10) {
                    Image(systemName: "sunrise.fill")
                        .resizable()
                        .frame(width: 25, height: 25)
                    VStack() {
                        Text("Rectangular")
                    }
                    .bold()
                    .font(.system(size: 12))
                }
            }

        case .accessoryCircular:
            ZStack {
                VStack(spacing: 2) {
                    Image(systemName: "moon.stars.circle.fill")
                        .resizable()
                        .frame(width: 20, height: 20)
                    VStack {
                        Text("Circular")
                    }
                }
                .bold()
                .font(.system(size: 10))
            }
        default:
            Text("頭痛ーる")
        }
    }
}
5.EntryModelの作成
LockScreenWidgetEntryModel.swift
import WidgetKit
import SwiftUI

struct LockScreenWidgetEntryModel: TimelineEntry {
    let date: Date
}
6.Providerの作成
LockScreenWidgetProvider.swift
import SwiftUI
import WidgetKit

struct LockScreenWidgetProvider: TimelineProvider {

    func placeholder(in context: Context) -> LockScreenWidgetEntryModel {
        LockScreenWidgetEntryModel(date: Date())
    }

    func getSnapshot(in context: Context, completion: @escaping (LockScreenWidgetEntryModel) -> Void) {
        let entry = LockScreenWidgetEntryModel(date: Date())
        completion(entry)
    }

    func getTimeline(in context: Context, completion: @escaping (Timeline<LockScreenWidgetEntryModel>) -> Void) {
        var entries: [LockScreenWidgetEntryModel] = []

        let currentDate = Date()
        for hourOffset in 0 ..< 5 {
            let entryDate = Calendar.current.date(byAdding: .hour, value: hourOffset, to: currentDate)!
            let entry = LockScreenWidgetEntryModel(date: entryDate)
            entries.append(entry)
        }

        let timeline = Timeline(entries: entries, policy: .atEnd)
        completion(timeline)
    }
}
7.ハマった点
問題:widgetBundle内で既存のSmallWidgetの下にLockScreenWidgetを追加するとエラー
解決策:LockScreenPressureAlertWidget.swiftファイル内のWidgetConfiguration内で16.0の条件分岐を書き、ios16以外のosでは、EmptyWidgetConfiguration()を返しておく。
LockScreenWidget.swift
import SwiftUI
import WidgetKit

struct LockScreenWidget: Widget {

    let kind = "LockScreenWidget"
    var body: some WidgetConfiguration {
        if #available(iOSApplicationExtension 16.0, *) {
            return StaticConfiguration(kind: kind, provider: LockScreenPressureAlertProvider()) { entry in
                ContentView()
            }
            .configurationDisplayName("My Widget")
            .description("This is an example widget.")
            .supportedFamilies([.accessoryCircular, .accessoryRectangular])
        } else {
            return EmptyWidgetConfiguration()
        }
    }
}
おまけ
AccessoryWidgetBackground()
で背景を表示させることができます。