今回やったこと
TelloをMacbookからキーボードで操作しながら、遅延なしのリアルタイムで、以下の4つの画面をウィンドウに並べて表示させてみた。
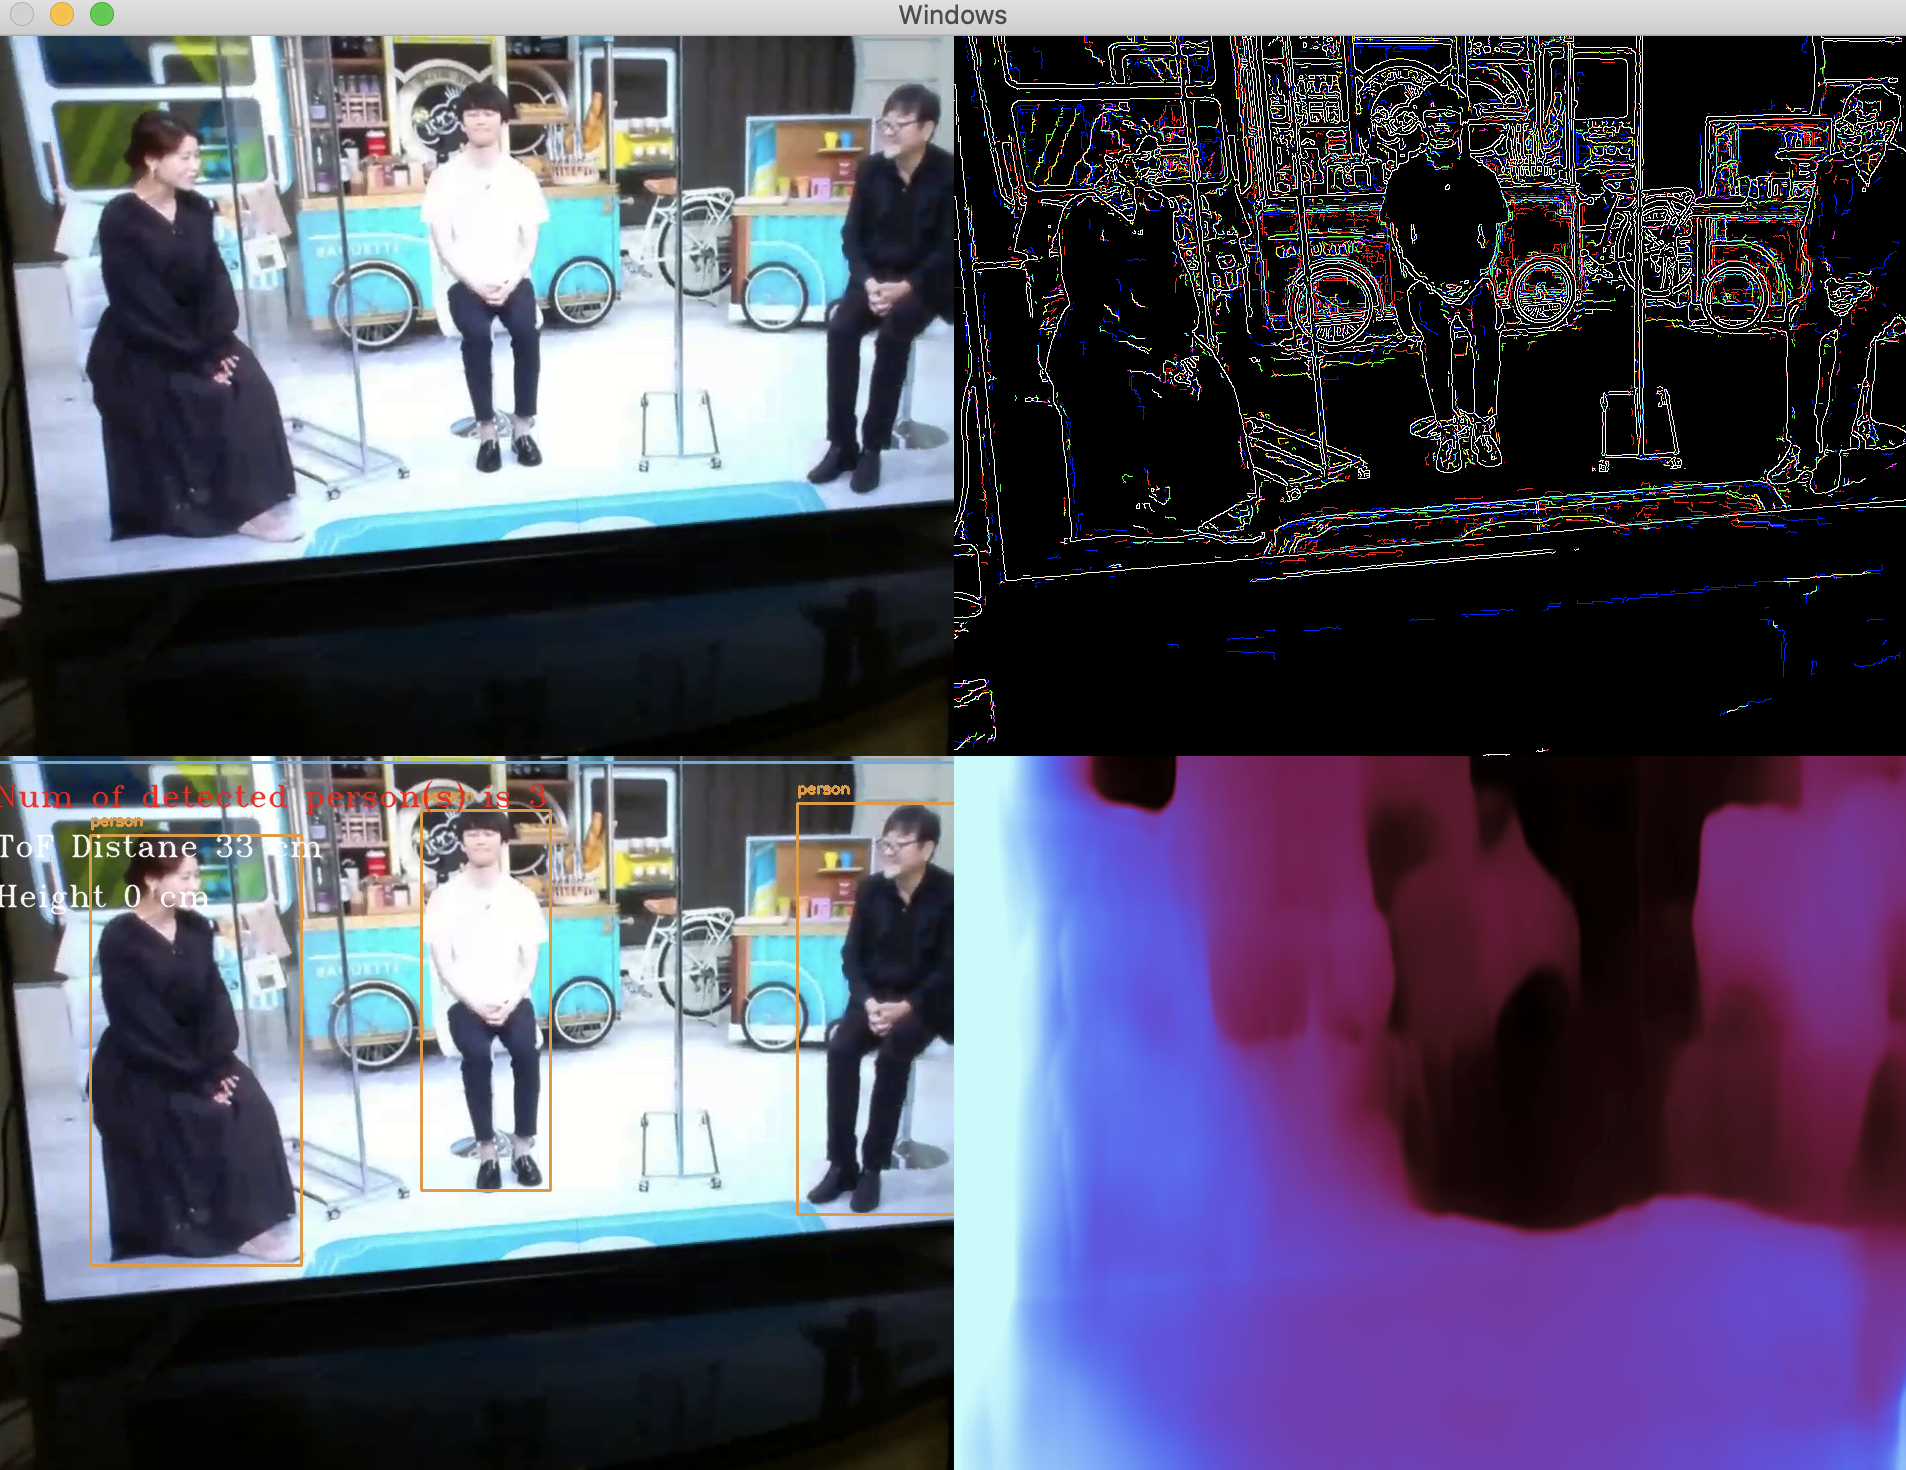
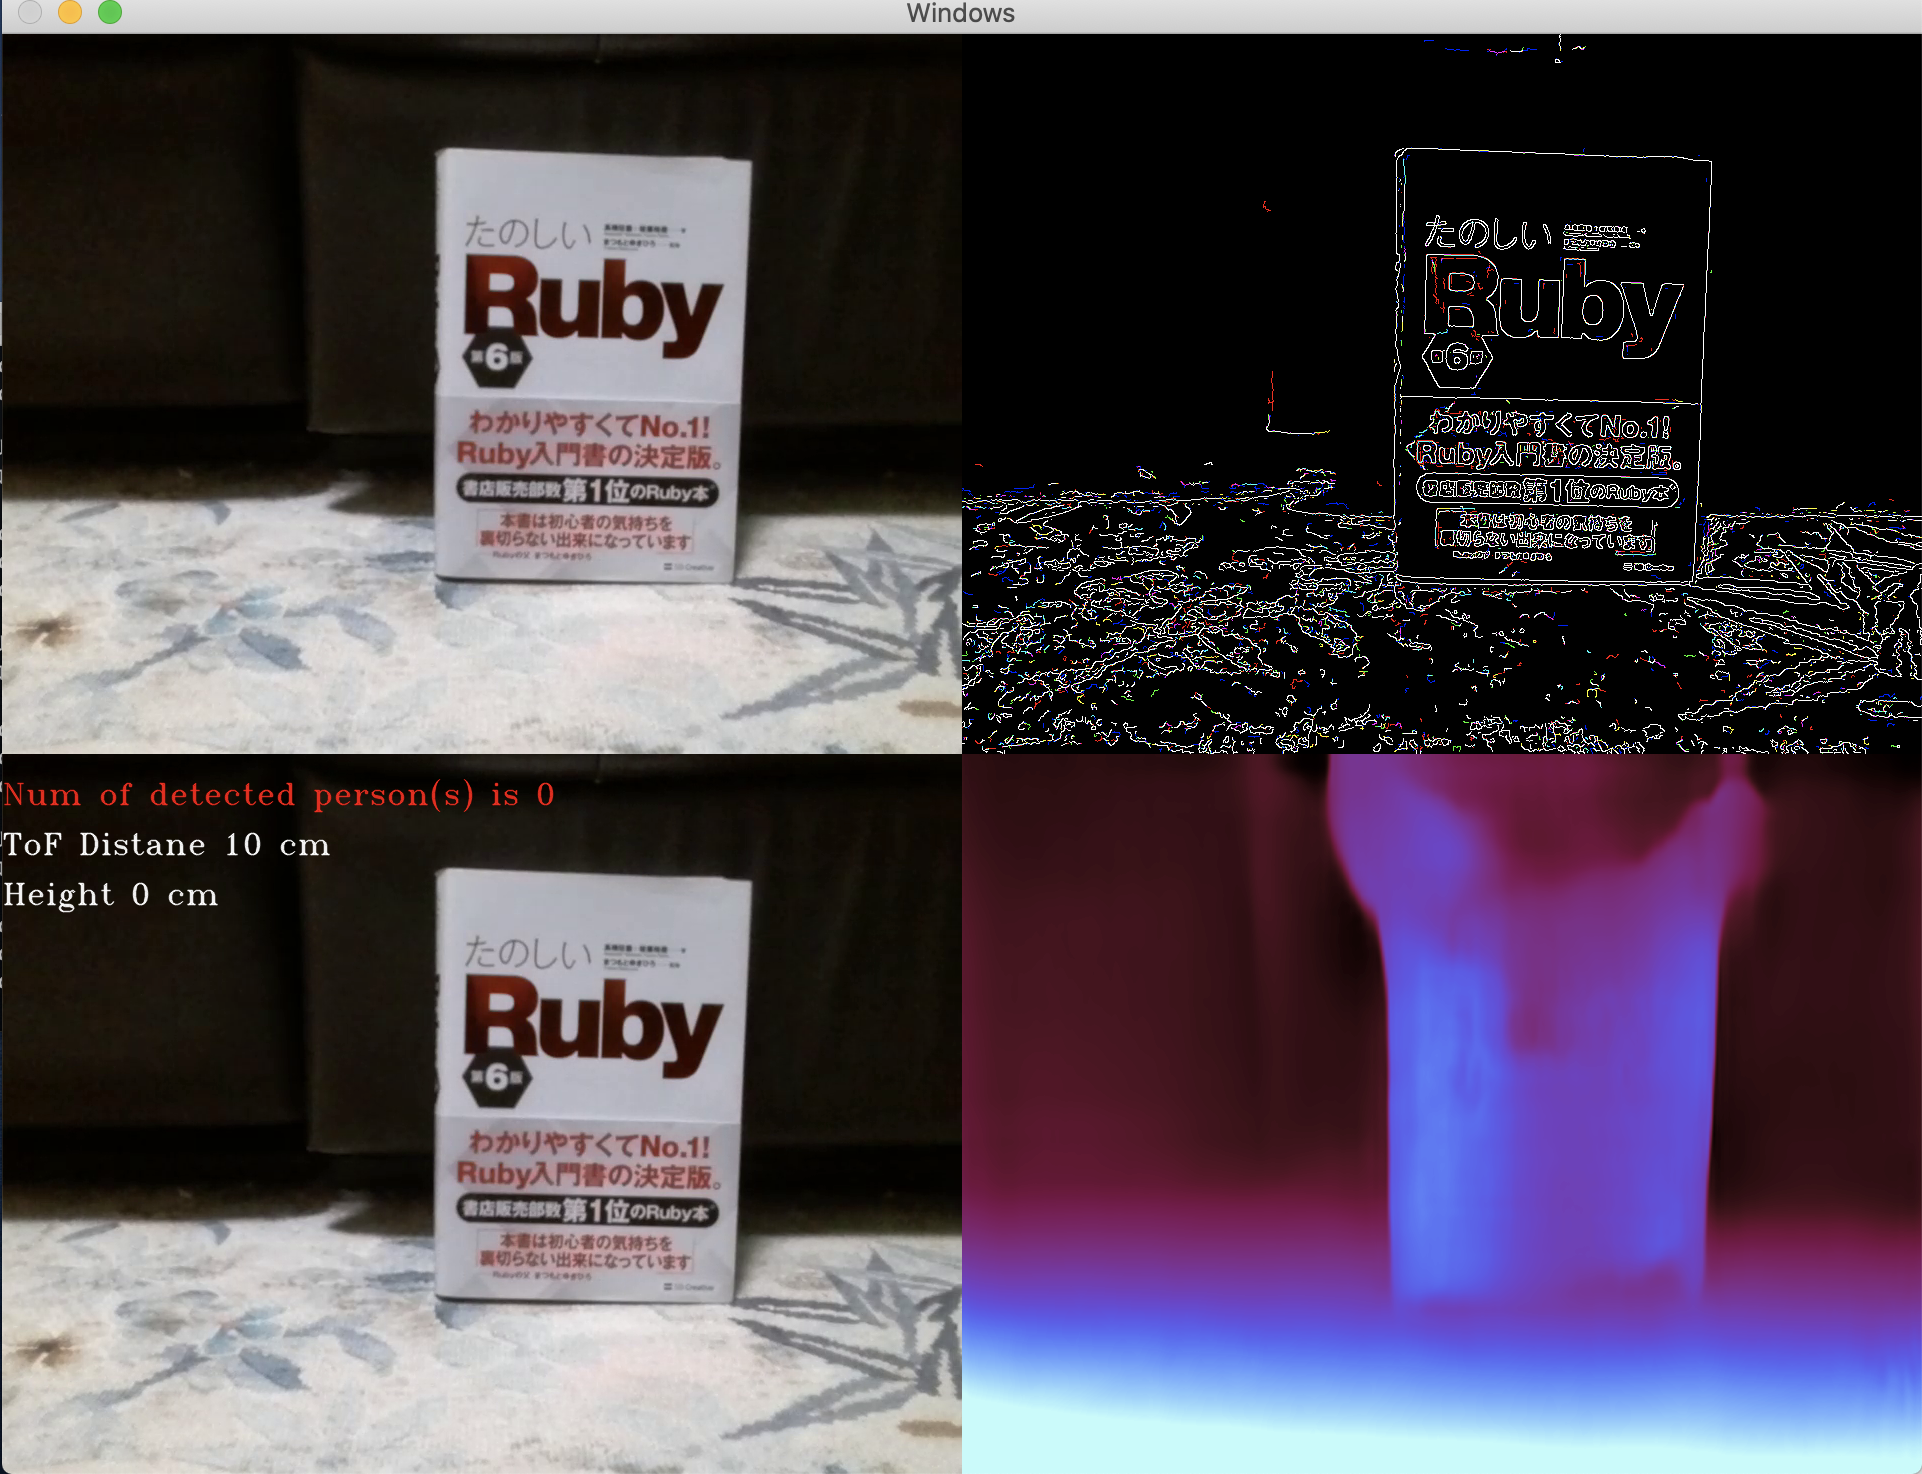
ウィンドウに表示される画面
- (左上) Telloから受信したオリジナル画像
- (左下) 物体検出結果の重畳表示(※1) & 機体高度(※2)・検出人数(※1)のメッセージ表記
- (右上) エッジ検出した画像(※3)
- (右下) 単眼深度推定結果の画面 (※4)
( 裏側で動いている解析器 )
※1: cvlibモジュール
※2: Telloから受信した機体情報
※3: cv2.Cannyメソッド
※4: MonoSense2モデル (PyTorch)
実行中のTerminal画面
Terminal
electron@diynoMacBook-Pro DJITelloPy_copy % pwd
/Users/electron/Desktop/DJITelloPy_copy
electron@diynoMacBook-Pro DJITelloPy_copy %
Terminal
electron@diynoMacBook-Pro DJITelloPy_copy % python3 keyboard-control-multi_frames_to_integrated_window_including_depth.py
スクリプト・ファイル
keyboard-control-multi_frames_to_integrated_window_including_depth.py
from __future__ import absolute_import, division, print_function
from timeout_decorator import timeout, TimeoutError
from djitellopy import Tello
import cv2, math, time
import os
import sys
import glob
import argparse
import numpy as np
import PIL.Image as pil
import matplotlib as mpl
import matplotlib.cm as cm
import numpy
import torch
import cvlib as cvl
import datetime
from cvlib.object_detection import draw_bbox
from torchvision import transforms, datasets
from depth_frame import *

TIMEOUT_SEC = 0.1

@timeout(TIMEOUT_SEC)
def input_with_timeout(msg=None):
   return input(msg)


tello = Tello()
tello.connect()

tello.streamon()
frame_read = tello.get_frame_read()

# tello.takeoff()

while True:
    # In reality you want to display frames in a seperate thread. Otherwise
    #  they will freeze while the drone moves.
    img = frame_read.frame
    original_image = img.copy()
    #bitwised_img = cv2.bitwise_not(img)

    #https://stackoverflow.com/questions/64546859/combine-several-canny-edge-detection-in-one-window-using-opencv-python
    b,g,r = cv2.split(img)
    b_edge = cv2.Canny(b,30,50)
    g_edge = cv2.Canny(g,30,50)
    r_edge = cv2.Canny(r,30,50)
    edge_img = cv2.merge([b_edge, g_edge, r_edge])
    #canny_img = cv2.Canny(img, 100, 200)
    #cv2.imshow("frame_canny", canny_img)
    #MonoDepth2モデル
    depth_image = mono_depth2(img)

    #フレーム画像の物体検出(輪郭線描画)及び指定オブジェクトの検出個数の説明文字列埋込み
    label_name  = "person"
    bbox, label, conf = cvl.detect_common_objects(img)
    output_image = draw_bbox(img, bbox, label, conf)
    #dt_now = datetime.datetime.now()
    message = "Num of detected {0}(s) is {1}".format(label_name, str(label.count(label_name)))
    input_text_0 = message
    cv2.putText(output_image, str(input_text_0), (0, 50), cv2.FONT_HERSHEY_TRIPLEX, 1, (0, 0, 255), 1, cv2.LINE_AA)

    #https://djitellopy.readthedocs.io/en/latest/tello/#djitellopy.tello.Tello.query_battery
    time_of_flight_distance_senser_val = tello.get_distance_tof()
    input_text_1 = "ToF Distane {0} cm".format(time_of_flight_distance_senser_val)

    height= tello.get_height()
    input_text_2 = "Height {0} cm".format(height)

    # カメラ画像にTelloの現在高度(ToFセンサ計測距離(cm)、高さ(cm))を埋込む
    cv2.putText(output_image, str(input_text_1), (0, 100), cv2.FONT_HERSHEY_TRIPLEX, 1, (255, 255, 255), 1, cv2.LINE_AA)
    cv2.putText(output_image, str(input_text_2), (0, 150), cv2.FONT_HERSHEY_TRIPLEX, 1, (255, 255, 255), 1, cv2.LINE_AA)

    #numpyのhstack, hstackでなくても、opencv2のcv2.vconcat, hconcatも使える
    merged_image_group_1 = cv2.hconcat((original_image, edge_img))
    merged_image_group_2 = cv2.hconcat((output_image, depth_image))
    finally_merged_image = cv2.vconcat((merged_image_group_1, merged_image_group_2))
    cv2.imshow("Windows", finally_merged_image)
    #次の行(key = cv2.・・・)を削除すると、画像が受信できなくなる。
    key = cv2.waitKey(1) & 0xff

    try:
        msg = input_with_timeout('\n{}秒以内に操作コマンドを入力して下さい :'.format(TIMEOUT_SEC))
        print('\n操作コマンド: {} を受信しました。\n'.format(msg))
        if msg == "i":
            tello.takeoff()
        elif msg == "w":
            tello.move_forward(30)
        elif msg == "s":
            tello.move_back(30)
        elif msg == "a":
            tello.move_left(30)
        elif msg == "d":
            tello.move_right(30)
        elif msg == "e":
            tello.rotate_clockwise(30)
        elif msg == "q":
            tello.rotate_counter_clockwise(30)
        elif msg == "r":
            tello.move_up(30)
        elif msg == "f":
            tello.move_down(30)
        elif msg == "g":
            tello.land()
    except TimeoutError:
        print('\n操作コマンド入力時間切れ。次のフレーム画像を読み込みます。\n')

tello.land()
depth_frame.py
from __future__ import absolute_import, division, print_function
from timeout_decorator import timeout, TimeoutError
from djitellopy import Tello
import cv2, math, time
import os
import sys
import glob
import argparse
import numpy as np
import PIL.Image as pil
import matplotlib as mpl
import matplotlib.cm as cm
import torch
from torchvision import transforms, datasets

# 以下、MonoDepth2モデルを利用。このスクリプトファイルの格納先ディレクトリ直下に、networksディレクトリ等の資源の配置が必要
import networks
from layers import disp_to_depth
from utils import download_model_if_doesnt_exist
from evaluate_depth import STEREO_SCALE_FACTOR

model_name = "mono+stereo_640x192"

def mono_depth2(image):
    if torch.cuda.is_available() and not args.no_cuda:
        device = torch.device("cuda")
    else:
        device = torch.device("cpu")

    download_model_if_doesnt_exist(model_name)
    model_path = os.path.join("models", model_name)
    print("-> Loading model from ", model_path)
    encoder_path = os.path.join(model_path, "encoder.pth")
    depth_decoder_path = os.path.join(model_path, "depth.pth")

    # LOADING PRETRAINED MODEL
    print("   Loading pretrained encoder")
    encoder = networks.ResnetEncoder(18, False)
    loaded_dict_enc = torch.load(encoder_path, map_location=device)

    # extract the height and width of image that this model was trained with
    feed_height = loaded_dict_enc['height']
    feed_width = loaded_dict_enc['width']
    filtered_dict_enc = {k: v for k, v in loaded_dict_enc.items() if k in encoder.state_dict()}
    encoder.load_state_dict(filtered_dict_enc)
    encoder.to(device)
    encoder.eval()

    print("   Loading pretrained decoder")
    depth_decoder = networks.DepthDecoder(
        num_ch_enc=encoder.num_ch_enc, scales=range(4))

    loaded_dict = torch.load(depth_decoder_path, map_location=device)
    depth_decoder.load_state_dict(loaded_dict)

    depth_decoder.to(device)
    depth_decoder.eval()

    # PREDICTING ON EACH IMAGE IN TURN
    with torch.no_grad():
        # Load image and preprocess
        #input_image = pil.open(image).convert('RGB')
        #https://imagingsolution.net/program/python/numpy/python_numpy_pillow_image_convert/
        input_image = pil.fromarray(image)
        original_width, original_height = input_image.size
        input_image = input_image.resize((feed_width, feed_height), pil.LANCZOS)
        input_image = transforms.ToTensor()(input_image).unsqueeze(0)

        # PREDICTION
        input_image = input_image.to(device)
        features = encoder(input_image)
        outputs = depth_decoder(features)

        disp = outputs[("disp", 0)]
        disp_resized = torch.nn.functional.interpolate(
        disp, (original_height, original_width), mode="bilinear", align_corners=False)

        # return colormapped depth image
        disp_resized_np = disp_resized.squeeze().cpu().numpy()
        vmax = np.percentile(disp_resized_np, 95)
        normalizer = mpl.colors.Normalize(vmin=disp_resized_np.min(), vmax=vmax)
        mapper = cm.ScalarMappable(norm=normalizer, cmap='magma')
        colormapped_im = (mapper.to_rgba(disp_resized_np)[:, :, :3] * 255).astype(np.uint8)
        #im = pil.fromarray(colormapped_im)

        return colormapped_im
        #以下は、このメソッドの返り値の受け取り元のコードで行う
        #ウィンドウ出力
        #cv2.imshow("MonoDepth2", im)