OTA (OVER The Air) の使い方です。
Arduino IDE からのプログラムの更新を USB 経由でなく、WiFi 経由で行うものです。
最初のプログラムを USB で書き込み、次のプログラムは、WiFi 経由で行います。
注意すべきは、更新するプログラムに、必ず OTA の仕組みを組み込むことです。
共通の設定
config.h
#define SSID "****"
#define PASSWORD "*****"
connectWiFi.ino
// ---------------------------------------------------------------------
/*
	connectWiFi.ino
						Mar/08/2025
*/
// ---------------------------------------------------------------------
void connectWiFi()
{
	WiFi.begin(ssid, password);
	Serial.print("WiFi connecting...");
	while(WiFi.status() != WL_CONNECTED) {
		Serial.print(".");
		delay(100);
	}
	Serial.print(" connected. ");
	Serial.println(WiFi.localIP());
}

// ---------------------------------------------------------------------
最初に USB で書き込むプログラム
ota_base.ino
#include <WiFi.h>
#include <ArduinoOTA.h>
#include "config.h"

const char* ssid = SSID;
const char* password = PASSWORD;

void setup() {
	Serial.begin(115200);
	Serial.println("*** ota_base.ino aaa ***");

	connectWiFi();

    // OTAの初期化
	ArduinoOTA.begin();
}

void loop() {
	ArduinoOTA.handle(); // OTAのハンドリング

	delay(100);

	if ( WiFi.status() == WL_DISCONNECTED ) {
		connectWiFi();
	}
}
プログラムが起動したら、 USB をパソコンからはずして、電源供給に切り替えます。
OTA で書き込むプログラム
LED 14 を点滅させます。
ota_second.ino
#include <WiFi.h>
#include <ArduinoOTA.h>
#include <uTimerLib.h>
#include "config.h"

#define LED_TEST 14

const char* ssid = SSID;
const char* password = PASSWORD;

bool led_on = false;
int count = 0;

void setup() {
    Serial.begin(115200);
    Serial.println("*** OTA Update Example ***");

	connectWiFi();

    // OTAの初期化
    ArduinoOTA.begin();

	pinMode(LED_TEST, OUTPUT);

	TimerLib.setInterval_us(blink_led, 2000000);
}

void blink_led() {
	led_on = !led_on;
	digitalWrite(LED_TEST, led_on);
}

void loop() {
    ArduinoOTA.handle(); // OTAのハンドリング

    // ここに他の処理を追加できます

	delay(100);
	if ( WiFi.status() == WL_DISCONNECTED ) {
		connectWiFi();
	}

	count++;
}
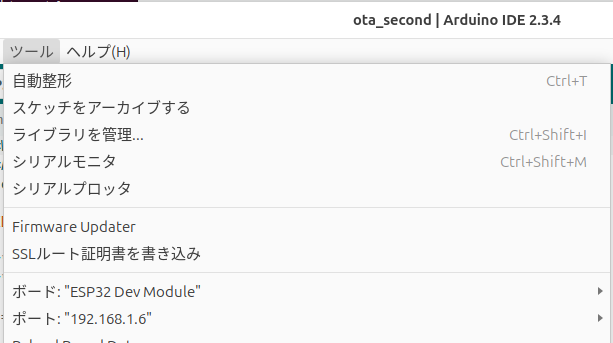
ポートをネットワークポートにします。
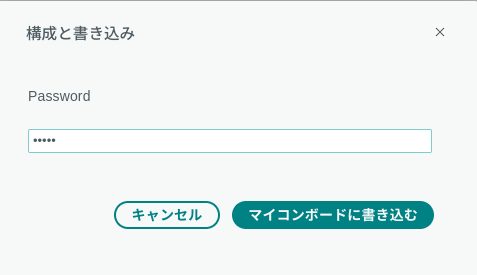
パスワードを要求されますが、設定してないので、
aa でも bb でも何かを入力するだけでオーケーです。
次の更新プログラム
LED 12 を点滅させます。
ota_third.ino
#include <WiFi.h>
#include <ArduinoOTA.h>
#include <uTimerLib.h>
#include "config.h"

#define LED_TEST 12

const char* ssid = SSID;
const char* password = PASSWORD;
bool led_on = false;
int count = 0;

void setup() {
    Serial.begin(115200);
    Serial.println("*** OTA Update Example ***");

	connectWiFi();

    // OTAの初期化
    ArduinoOTA.begin();

	pinMode(LED_TEST, OUTPUT);

	TimerLib.setInterval_us(blink_led, 2000000);
}

void blink_led() {
	led_on = !led_on;
	digitalWrite(LED_TEST, led_on);
}

void loop() {
    ArduinoOTA.handle(); // OTAのハンドリング
    // ここに他の処理を追加できます
	delay(100);
	if ( WiFi.status() == WL_DISCONNECTED ) {
		connectWiFi();
	}

	count++;
}
次の更新プログラム
LED 27 を点滅させます。
ota_fourth.ino
#include <WiFi.h>
#include <ArduinoOTA.h>
#include <uTimerLib.h>
#include "config.h"

#define LED_TEST 27

const char* ssid = SSID;
const char* password = PASSWORD;
bool led_on = false;
int count = 0;

void setup() {
    Serial.begin(115200);
    Serial.println("*** OTA Update Example ***");

	connectWiFi();

    // OTAの初期化
	ArduinoOTA.begin();

	pinMode(LED_TEST, OUTPUT);

	TimerLib.setInterval_us(blink_led, 2000000);
}

void blink_led() {
	led_on = !led_on;
	digitalWrite(LED_TEST, led_on);
}

void loop() {
	ArduinoOTA.handle(); // OTAのハンドリング
    // ここに他の処理を追加できます
	delay(100);
	if ( WiFi.status() == WL_DISCONNECTED ) {
		connectWiFi();
	}

	count++;
}