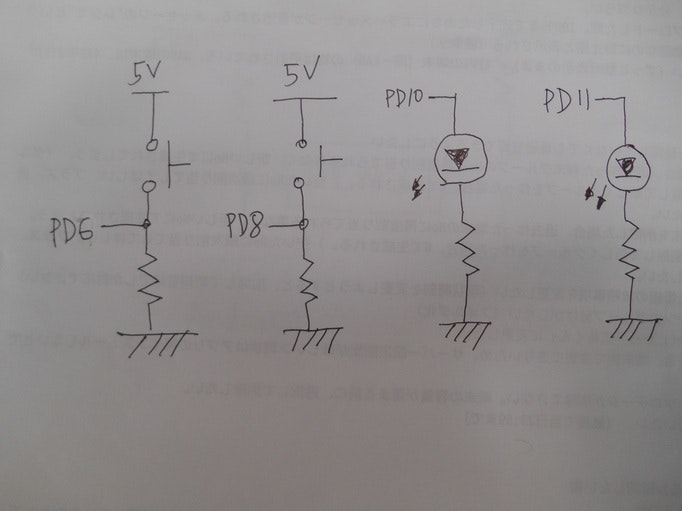
ハードの構成
ボタン A --- PD6
ボタン B --- PD8
LED A --- PD10
LED B --- PD11
結線図

プログラム
button.ino
// ---------------------------------------------------------------------
/*
	button.ino

					May/29/2024

*/
// ---------------------------------------------------------------------
#define BUTTON_A 6
#define BUTTON_B 8
#define LED_A 10
#define LED_B 11

int count = 0;

void setup() {
	pinMode(BUTTON_A, INPUT);
	pinMode(BUTTON_B, INPUT);
	pinMode(LED_A, OUTPUT);
	pinMode(LED_B, OUTPUT);
	Serial.begin(19200);
	delay(1000);
	Serial.println("*** start ***");
	delay(500);

	led_proc();
}

// ---------------------------------------------------------------------
void led_proc() {
	for (int it =0; it<5; it++)
		{
		digitalWrite(LED_A, HIGH);
		digitalWrite(LED_B, HIGH);
		delay(500);

		digitalWrite(LED_A, LOW);
		digitalWrite(LED_B, LOW);
		delay(500);
		}
}

// ---------------------------------------------------------------------
void loop() {
	int status_a = digitalRead(BUTTON_A);
	int status_b = digitalRead(BUTTON_B);

	if ((count % 20) == 0)
		{
		display_proc(count,status_a,status_b);
		}

	if (status_a == 1)
		{
		digitalWrite(LED_A, HIGH);
		}
	else
		{
		digitalWrite(LED_A, LOW);
		}

	if (status_b == 1)
		{
		digitalWrite(LED_B, HIGH);
		}
	else
		{
		digitalWrite(LED_B, LOW);
		}


	delay(50);


  	count++;
}

// ---------------------------------------------------------------------
void display_proc(int count,int status_a,int status_b)
{
	Serial.print("count = " + String(count) + "\t");
	Serial.print(String(BUTTON_A) + " = ");
	Serial.print(status_a);
	Serial.print("\t" + String(BUTTON_B) + " = ");
	Serial.println(status_b);
}

// ---------------------------------------------------------------------