何がやりたい?
今回は、IOS-XE を対象として動作を確認しますが、NETCONFとRESTCONFを比較する内容となります。
まず、スクリプトの目的としては、ルータに対してスタティックルートを追加するという内容になります。
その他の内容としては、ルータ上に設定された内容の確認、ルータのコンフィグを取得して、設定したい内容をどのような記述すれば良いかを確認して、設定したコンフィグの内容を保存するまでを目標としています。
その後、RESTCONFに関するサンプルを幾つか紹介して、最後にPostmanを使う際に設定する項目を確認します。
ルータの設定
show version
ここで使用したスクリプトの動作はCSR1000vを利用して確認しています。
hogehoge#show version | include Cisco IOS
Cisco IOS XE Software, Version 16.09.04
Cisco IOS Software [Fuji], Virtual XE Software (X86_64_LINUX_IOSD-UNIVERSALK9-M), Version 16.9.4, RELEASE SOFTWARE (fc2)
Cisco IOS-XE software, Copyright (c) 2005-2019 by cisco Systems, Inc.
All rights reserved.  Certain components of Cisco IOS-XE software are
hogehoge#
show version
NETCONFのスクリプトを動作させる際には、下記バージョンのncclientを利用しています。
$ pip list | grep ncclient
ncclient     0.6.9
アクセス先のIPアドレス
NETCONF及びRESTCONFを使ってアクセスする際の宛先アドレスです。
hogehoge#show ip interface brief
Interface              IP-Address      OK? Method Status                Protocol
GigabitEthernet1       172.16.62.151   YES DHCP   up                    up
GigabitEthernet2       unassigned      YES NVRAM  administratively down down
GigabitEthernet3       unassigned      YES NVRAM  administratively down down
hogehoge#
ルータへのConfig
NETCONFとRESTCONFを有効にするための設定です。
username cisco privilege 15 password 0 cisco
aaa new-model
aaa authorization exec default local

line vty 0 4
 login local

hostname hogehoge
ip domain name cisco.com
ip ssh version 2
crypt key generate rsa
netconf-yang

restconf
ip http secure-server
ip http authentication local
ルータにスタティックルートの追加
ルータへのConfig
スクリプトから設定したいコンフィグの内容は下記の通りです。
hogehoge#show running-config | include ip route
ip route 1.1.1.1 255.255.255.255 Null0
ip route 1.1.1.2 255.255.255.255 Null0
ip route 1.1.1.3 255.255.255.255 Null0
hogehoge#
[ NETCONF ]
NETCONFのPythonコード
下記がNETCONFのスクリプト本体です。
# !/usr/bin/env python

from ncclient import manager
from xml.dom import minidom
import lxml.etree as ET
import xmltodict

payload = """
<config xmlns:xc="urn:ietf:params:xml:ns:netconf:base:1.0" xmlns="urn:ietf:params:xml:ns:netconf:base:1.0">
  <native xmlns="http://cisco.com/ns/yang/Cisco-IOS-XE-native">
    <ip>
      <route>
        <ip-route-interface-forwarding-list>
          <prefix>1.1.1.1</prefix>
          <mask>255.255.255.255</mask>
          <fwd-list>
            <fwd>Null0</fwd>
          </fwd-list>
        </ip-route-interface-forwarding-list>
        <ip-route-interface-forwarding-list>
          <prefix>1.1.1.2</prefix>
          <mask>255.255.255.255</mask>
          <fwd-list>
            <fwd>Null0</fwd>
          </fwd-list>
        </ip-route-interface-forwarding-list>
        <ip-route-interface-forwarding-list>
          <prefix>1.1.1.3</prefix>
          <mask>255.255.255.255</mask>
          <fwd-list>
            <fwd>Null0</fwd>
          </fwd-list>
        </ip-route-interface-forwarding-list>
      </route>
    </ip>
</native>
</config>
"""

# connect to netconf agent
m = manager.connect(host='172.16.62.151', port=830, username='cisco', password='cisco', hostkey_verify=False, device_params={'name': 'iosxe'})

# response = m.get_config(source='running', filter=payload)
print '###########################################################################'
print '### XML'
print '###########################################################################'
response = m.edit_config(target='running', config=payload).xml
print response

print '###########################################################################'
print '### XML Formatstring'
print '###########################################################################'
data = ET.fromstring(response)
print(ET.tostring(data, pretty_print=True))
NETCONFの実行結果
下記がNETCONFの実行結果です。
###########################################################################
### XML
###########################################################################
<?xml version="1.0" encoding="UTF-8"?>
<rpc-reply xmlns="urn:ietf:params:xml:ns:netconf:base:1.0" message-id="urn:uuid:a9a10b14-fb15-40e8-a6a7-145c76e1a435" xmlns:nc="urn:ietf:params:xml:ns:netconf:base:1.0"><ok/></rpc-reply>
###########################################################################
### XML Formatstring
###########################################################################
<rpc-reply xmlns="urn:ietf:params:xml:ns:netconf:base:1.0" xmlns:nc="urn:ietf:params:xml:ns:netconf:base:1.0" message-id="urn:uuid:a9a10b14-fb15-40e8-a6a7-145c76e1a435">
  <ok/>
</rpc-reply>
[ RESTCONF ]
RESTCONFのPythonコード
下記がRESTCONFのスクリプト本体です。
# !/usr/bin/python
import requests
import sys
import json

# disable warnings from SSL/TLS certificates
requests.packages.urllib3.disable_warnings()

# the IP address or hostname of the networking device
HOST = '172.16.62.151'

# use your user credentials to access the networking device
USER = 'cisco'
PASS = 'cisco'
PORT = 443

# create a main() method
def main():
    """Main method that retrieves the interface details from a
    networking device via RESTCONF."""

    # RESTCONF url of the networking device
    url = "https://{h}:{p}/restconf/data/Cisco-IOS-XE-native:native/ip/route/ip-route-interface-forwarding-list".format(h=HOST, p=PORT)

    # RESTCONF media types for REST API headers
    headers = {'Content-Type': 'application/yang-data+json',
               'Accept': 'application/yang-data+json'}


    # RESTCONF doby
    body_data = {
                    "Cisco-IOS-XE-native:ip-route-interface-forwarding-list": [
                        {
                            "prefix": "1.1.1.1",
                            "mask": "255.255.255.255",
                            "fwd-list": [
                                {
                                "fwd": "Null0"
                                }
                            ]
                        },
                        {
                            "prefix": "1.1.1.2",
                            "mask": "255.255.255.255",
                            "fwd-list": [
                                {
                                "fwd": "Null0"
                                }
                            ]
                        },
                        {
                            "prefix": "1.1.1.3",
                            "mask": "255.255.255.255",
                            "fwd-list": [
                                {
                                "fwd": "Null0"
                                }
                            ]
                        }
                    ]
                }

    # this statement performs a PATCH on the specified url
    response = requests.patch(url, auth=(USER, PASS),
                            headers=headers, data=json.dumps(body_data), verify=False)

    # print the json that is returned
    print(response)

if __name__ == '__main__':
    sys.exit(main())
RESTCONFの実行結果
下記がRESTCONFの実行結果です。
<Response [204]>
ルータからスタティックルートの削除
[ NETCONF ]
NETCONFのPythonコード
下記がNETCONFのスクリプト本体です。
# !/usr/bin/env python

from ncclient import manager
from xml.dom import minidom
import lxml.etree as ET
import xmltodict

payload = """
<config xmlns:xc="urn:ietf:params:xml:ns:netconf:base:1.0" xmlns="urn:ietf:params:xml:ns:netconf:base:1.0">
  <native xmlns="http://cisco.com/ns/yang/Cisco-IOS-XE-native">
      <ip>
        <route>
          <ip-route-interface-forwarding-list xc:operation="delete">
          <prefix>1.1.1.1</prefix>
            <mask>255.255.255.255</mask>
          </ip-route-interface-forwarding-list>
          <ip-route-interface-forwarding-list xc:operation="delete">
          <prefix>1.1.1.2</prefix>
            <mask>255.255.255.255</mask>
          </ip-route-interface-forwarding-list>
          <ip-route-interface-forwarding-list xc:operation="delete">
          <prefix>1.1.1.3</prefix>
            <mask>255.255.255.255</mask>
          </ip-route-interface-forwarding-list>
        </route>
      </ip>
</native>
</config>
"""

# connect to netconf agent
m = manager.connect(host='172.16.62.151', port=830, username='cisco', password='cisco', hostkey_verify=False, device_params={'name': 'iosxe'})

# response = m.get_config(source='running', filter=payload)
print '###########################################################################'
print '### XML'
print '###########################################################################'
response = m.edit_config(target='running', config=payload).xml
print response

print '###########################################################################'
print '### XML Formatstring'
print '###########################################################################'
data = ET.fromstring(response)
print(ET.tostring(data, pretty_print=True))
NETCONFの実行結果
下記がNETCONFの実行結果です。
###########################################################################
### XML
###########################################################################
<?xml version="1.0" encoding="UTF-8"?>
<rpc-reply xmlns="urn:ietf:params:xml:ns:netconf:base:1.0" message-id="urn:uuid:00e9c5ba-e4b9-4371-8076-b05fe6cd802c" xmlns:nc="urn:ietf:params:xml:ns:netconf:base:1.0"><ok/></rpc-reply>
###########################################################################
### XML Formatstring
###########################################################################
<rpc-reply xmlns="urn:ietf:params:xml:ns:netconf:base:1.0" xmlns:nc="urn:ietf:params:xml:ns:netconf:base:1.0" message-id="urn:uuid:00e9c5ba-e4b9-4371-8076-b05fe6cd802c">
  <ok/>
</rpc-reply>
[ RESTCONF ]
RESTCONFのPythonコード
下記がRESTCONFのスクリプト本体です。
RESTCONFの場合は、スタティックルートを1つだけ削除する内容となります。
# !/usr/bin/python
import requests
import sys
import json

# disable warnings from SSL/TLS certificates
requests.packages.urllib3.disable_warnings()

# the IP address or hostname of the networking device
HOST = '172.16.62.151'

# use your user credentials to access the networking device
USER = 'cisco'
PASS = 'cisco'
PORT = 443

# create a main() method
def main():
    """Main method that retrieves the interface details from a
    networking device via RESTCONF."""

    # RESTCONF url of the networking device
    url = "https://{h}:{p}/restconf/data/Cisco-IOS-XE-native:native/ip/route/ip-route-interface-forwarding-list=1.1.1.1,255.255.255.255".format(h=HOST, p=PORT)

    # RESTCONF media types for REST API headers
    headers = {'Content-Type': 'application/yang-data+json',
               'Accept': 'application/yang-data+json'}

    # this statement performs a PATCH on the specified url
    response = requests.delete(url, auth=(USER, PASS),
                            headers=headers, verify=False)

    # print the json that is returned
    print(response)

if __name__ == '__main__':
    sys.exit(main())
RESTCONFの実行結果
下記がRESTCONFの実行結果です。
<Response [204]>
ルータ上のスタティックルート確認
追加・削除されたスタティックルートがルータ上で反映されているかを確認します。
[ RESTCONF ]
RESTCONFのPythonコード
下記がRESTCONFのスクリプト本体です。
# !/usr/bin/python
import requests
import sys

# disable warnings from SSL/TLS certificates
requests.packages.urllib3.disable_warnings()

# the IP address or hostname of the networking device
HOST = '172.16.62.151'

# use your user credentials to access the networking device
USER = 'cisco'
PASS = 'cisco'
PORT = 443

# create a main() method
def main():
    """Main method that retrieves the interface details from a
    networking device via RESTCONF."""

    # RESTCONF url of the networking device
    # url = "https://{h}:{p}/restconf/data/Cisco-IOS-XE-native:native/ip/route/ip-route-interface-forwarding-list".format(h=HOST, p=PORT)
    url = "https://{h}:{p}/restconf/data/Cisco-IOS-XE-native:native/ip/route/ip-route-interface-forwarding-list".format(h=HOST, p=PORT)

    # RESTCONF media types for REST API headers
    headers = {'Content-Type': 'application/yang-data+json',
               'Accept': 'application/yang-data+json'}

    # this statement performs a GET on the specified url
    response = requests.get(url, auth=(USER, PASS),
                            headers=headers, verify=False)

    # print the json that is returned
    print(response.text)
    print(response)

if __name__ == '__main__':
    sys.exit(main())
RESTCONFの実行結果
下記がRESTCONFの実行結果です。
{
  "Cisco-IOS-XE-native:ip-route-interface-forwarding-list": [
    {
      "prefix": "1.1.1.1",
      "mask": "255.255.255.255",
      "fwd-list": [
        {
          "fwd": "Null0"
        }
      ]
    },
    {
      "prefix": "1.1.1.2",
      "mask": "255.255.255.255",
      "fwd-list": [
        {
          "fwd": "Null0"
        }
      ]
    },
    {
      "prefix": "1.1.1.3",
      "mask": "255.255.255.255",
      "fwd-list": [
        {
          "fwd": "Null0"
        }
      ]
    }
  ]
}

<Response [200]>
コンフィグ取得のPythonコード
ここでの確認は必須だと思います。が、RESTCONFからコンフィグを取得する方法についてです。
実際に設定したい内容からYANGモデルを探すのは大変なので、実機にターミナルから設定して、そのコンフィグを取得して前後で比較することで、実際にRESTCONFで設定したい内容をどのように記述すれば良いかを確認しています。
[ RESTCONF ]
RESTCONFのPythonコード
下記がRESTCONFのスクリプト本体です。
# !/usr/bin/python
import requests
import sys
import json

# disable warnings from SSL/TLS certificates
requests.packages.urllib3.disable_warnings()

# the IP address or hostname of the networking device
HOST = '172.16.62.151'

# use your user credentials to access the networking device
USER = 'cisco'
PASS = 'cisco'
PORT = 443

# create a main() method
def main():
    """Main method that retrieves the interface details from a
    networking device via RESTCONF."""

    # RESTCONF url of the networking device
    url = "https://{h}:{p}/restconf/data/Cisco-IOS-XE-native:native/ip/route/ip-route-interface-forwarding-list=1.1.1.1,255.255.255.255".format(h=HOST, p=PORT)

    # RESTCONF media types for REST API headers
    headers = {'Content-Type': 'application/yang-data+json',
               'Accept': 'application/yang-data+json'}

    # this statement performs a PATCH on the specified url
    response = requests.delete(url, auth=(USER, PASS),
                            headers=headers, verify=False)

    # print the json that is returned
    print(response)

if __name__ == '__main__':
    sys.exit(main())
RESTCONFの実行結果
下記がRESTCONFの実行結果です。
<Response [204]>
コンフィグ保存のPythonコード
ルータの設定を保存して、ルータを再起動してもコンフィグが消えないようにします。
[ RESTCONF ]
RESTCONFのPythonコード
下記がRESTCONFのスクリプト本体です。
# !/usr/bin/python
import requests
import sys
import json

# disable warnings from SSL/TLS certificates
requests.packages.urllib3.disable_warnings()

# the IP address or hostname of the networking device
HOST = '172.16.62.151'

# use your user credentials to access the networking device
USER = 'cisco'
PASS = 'cisco'
PORT = 443

# create a main() method
def main():
    """Main method that retrieves the interface details from a
    networking device via RESTCONF."""

    # RESTCONF url of the networking device
    url = "https://{h}:{p}/restconf/operations/cisco-ia:save-config".format(h=HOST, p=PORT)

    # RESTCONF media types for REST API headers
    headers = {'Content-Type': 'application/yang-data+json',
               'Accept': 'application/yang-data+json'}

    # this statement performs a PATCH on the specified url
    response = requests.post(url, auth=(USER, PASS),
                            headers=headers, verify=False)

    # print the json that is returned
    print(response)

if __name__ == '__main__':
    sys.exit(main())
RESTCONFの実行結果
下記がRESTCONFの実行結果です。
<Response [204]>
Postman
最後に少しだけPostmanについて設定箇所について確認します。
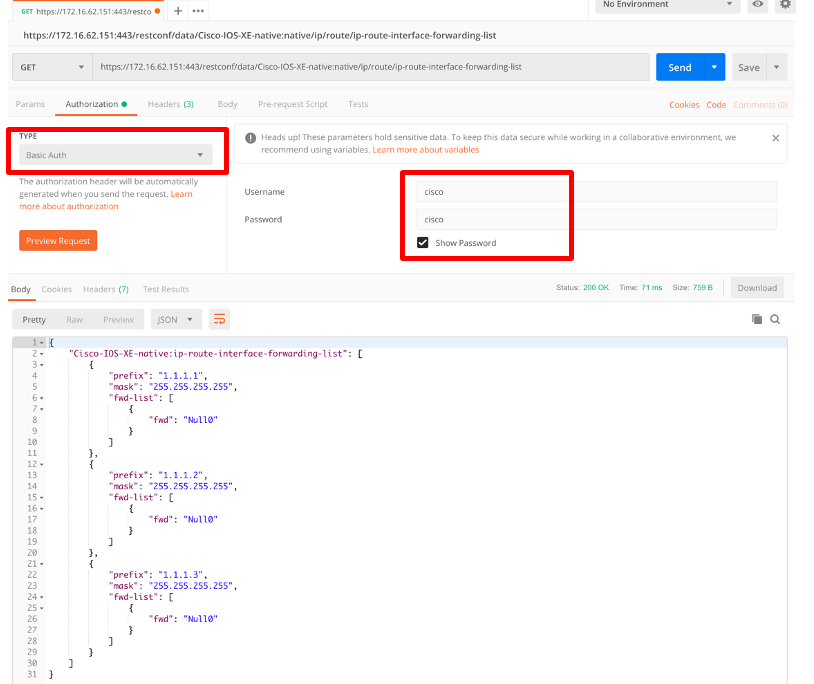
認証の設定
ここでは、TYPEからBasic Authを選択して、Usenameをcisco、Passwordをciscoに設定しています。
下記の赤枠で囲った部分を参照してください。
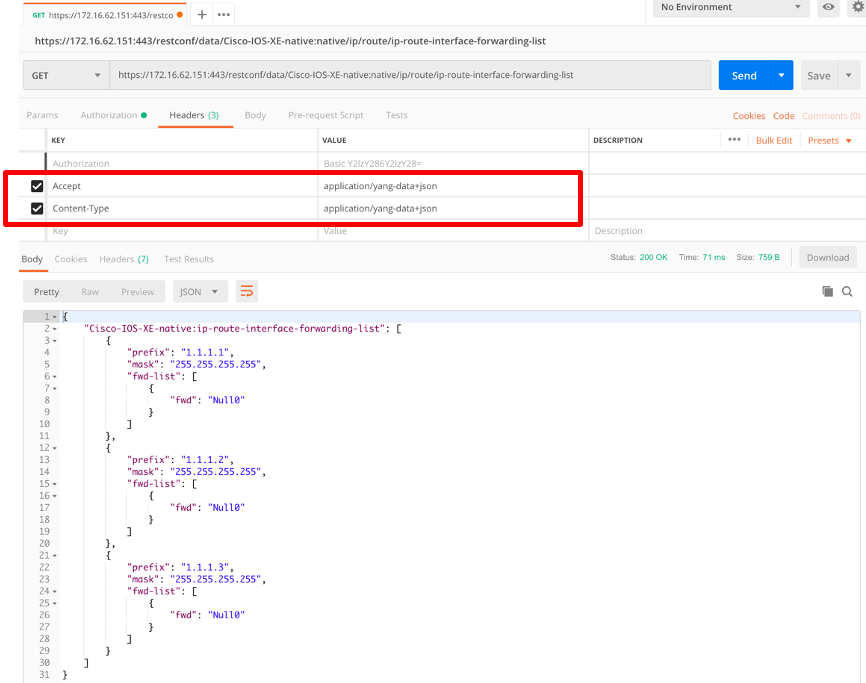
ヘッダーの設定
今度は、Headersを選択して、KEYとVALUEの部分をダブルクリックして、直に値を書き込みます。
下記の赤枠で囲った部分を参照してください。
| KEY | VALUE |
|---|---|
| Accept | application/yang-data+json |
| Content-Type | application/yang-data+json |
URL部分には、下記の値を指定します。
https://172.16.62.151:443/restconf/data/Cisco-IOS-XE-native:native/ip/route/ip-route-interface-forwarding-list
後は、GETを選択して、SendをクリックするとRESTCONFで取得した場合と同じ内容になることが確認できます。
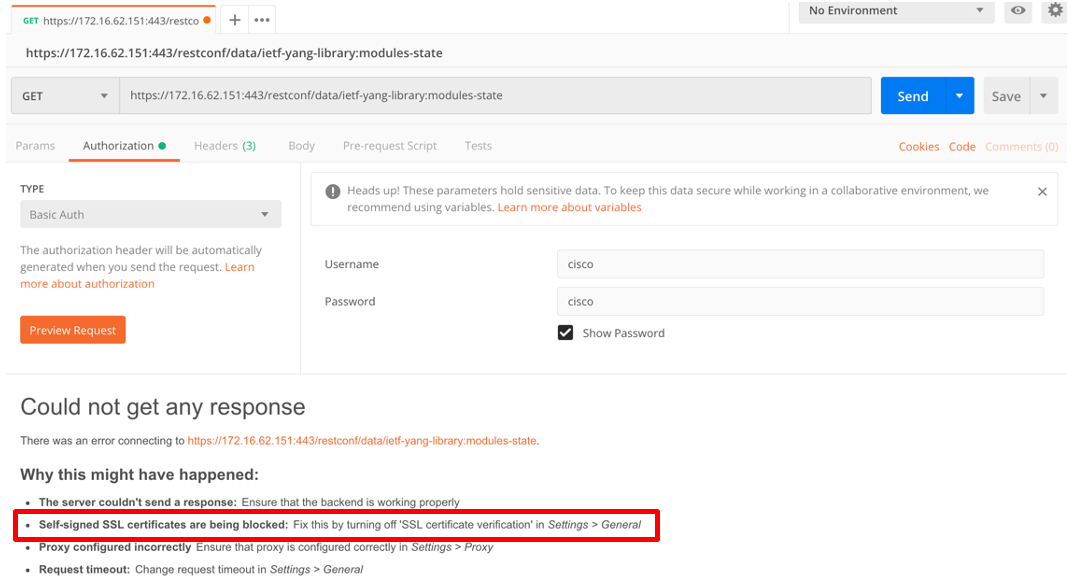
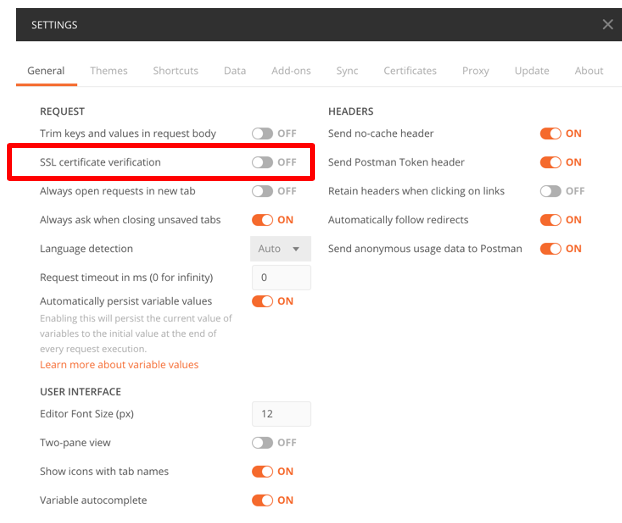
エラーが表示される場合
下記のエラーが表示される場合は、Preferenceを開いて、SSL certificate verificationの部分をOFFに変更することで改善されるかを確認してみてください。
Self-signed SSL certificates are being blocked: Fix this by turning off 'SSL certificate verification' in Settings > General