Swift、Objective-cでの画面遷移をする際の遷移方法、メモリ使用についてまとめました。
画面遷移する方法
ViewController間での画面遷移は、storyboard ID、Segue Identifierを使用する方法と
dismissViewControllerAnimatedを使用する方法があります。
//storyboard IDを使用した画面遷移
UIStoryboard *storyboard = [UIStoryboard storyboardWithName:@"Main" bundle:nil];
UIViewController *vc = [storyboard instantiateViewControllerWithIdentifier:@"storyboard ID"];
[self presentViewController:vc animated:NO completion:nil];

//Segue Identifierを使用した画面遷移
[self performSegueWithIdentifier:@"Segue Identifier" sender:self];

//dismissViewControllerAnimatedを使用した画面遷移
[self dismissViewControllerAnimated:NO completion:nil];
//storyboard IDを使用した画面遷移
let secondViewController = self.storyboard?.instantiateViewController(withIdentifier: "storyboard ID") as! nextViewController
        self.present(secondViewController, animated: true, completion: nil)

//Segue Identifierを使用した画面遷移
self.performSegue(withIdentifier: "Segue Identifier", sender: self)

//dismissViewControllerAnimatedを使用した画面遷移
self.dismiss(animated: false, completion: nil)
画面遷移する場合のメモリ使用量
2つのViewController間を画面遷移した場合、メモリ使用量の変化は以下のようになります。
-
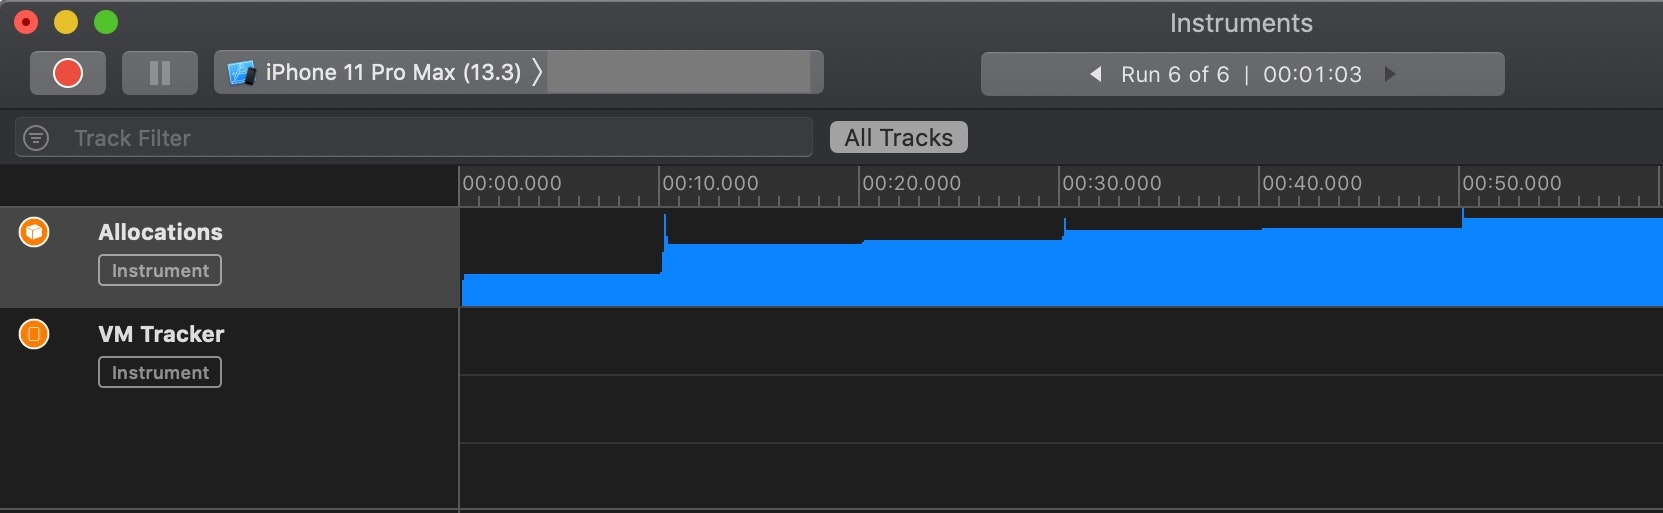
dismissViewControllerAnimatedで画面遷移をした場合のメモリ使用量
画面遷移した時に、メモリが解放されます。
-
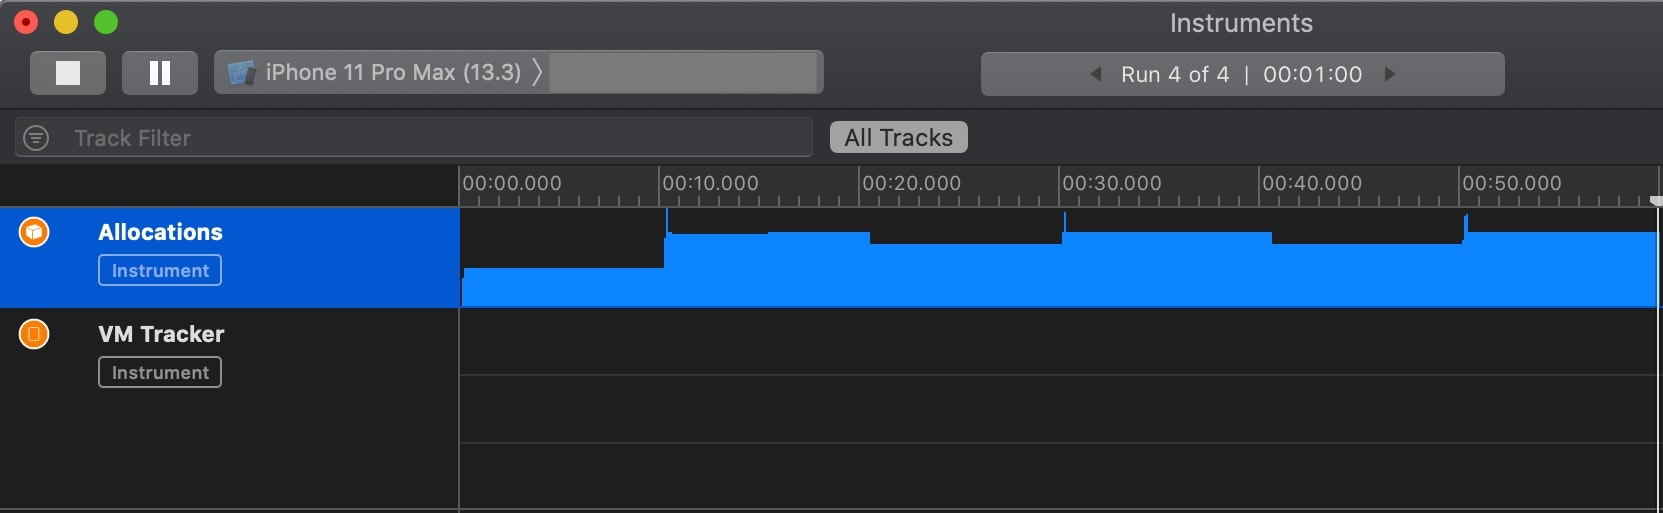
storyboard ID、Segue Identifierで画面遷移をした場合のメモリ使用量
画面遷移をした時に新しく画面を作成していくため、画面遷移してもメモリが解放されず、
メモリが溜まっていきます。
dismissViewControllerAnimated以外での画面遷移では新しく画面を作成する。
そのため、storyboard ID、Segue Identifierのみで画面遷移を続けた場合、メモリが解放されず溜まっていき、
結果として動作が重くなりアプリが強制終了してしまう。
そのため、新しい画面への画面遷移以外は、dismissViewControllerAnimatedで戻った方が良い。
dismissViewControllerAnimatedで遷移した場合の問題点
メモリ解放のため、dismissViewControllerAnimatedを使用した画面遷移を使用していきたいが、dismissViewControllerAnimatedは、現在表示されているViewControllerを削除することで画面遷移するため、戻った後のViewControllerは更新されない。
そのため、TableViewの画面情報を再表示したい場合、追加の処理を行う必要がある。
NSNotificationを使用したTableViewの更新
解決策として事前にmainViewControllerでNSNotificationの通知要求を登録しておき、遷移後のViewControllerから画面遷移する時に、通知を送ることで画面遷移後にTableViewを更新することができます。
- (void)viewDidLoad {
     [super viewDidLoad];

     //通知要求の登録をする
     [[NSNotificationCenter defaultCenter] addObserver:self selector:@selector(hoge:) name:@"reload" object:nil];
}

//通知を受信した時に実行する
-(void)hoge:(NSNotification *)notification {
     if([[notification name]isEqual:@"reload"]) {
          //TableViewの更新処理
          [tableView reloadData];
     }
}
//画面遷移後に通知を送信する
[self dismissViewControllerAnimated:NO completion:^{
     [[NSNotificationCenter defaultCenter]postNotificationName:@"reload" object:self];
}];
override func viewDidLoad() {
     super.viewDidLoad()

     //通知要求の登録をする
     let nc = NotificationCenter.default
     nc.addObserver(self, selector: #selector(hoge), name: Notification.Name(rawValue:"reload"), object: nil)
}

//通知を受信した時に実行する
@objc func hoge(notification: Notification?) {
     if notification!.name.rawValue == "reload" {
          tableView.reloadData()
     }
}
//画面遷移後に通知を送信する
self.dismiss(animated: false, completion: {
     NotificationCenter.default.post(name: NSNotification.Name(rawValue: "reload"), object: nil)
})
mainViewControllerまで一気に戻る場合
複数画面遷移している状態から一気にmainViewControllerまで戻る場合以下のようにすれば良い。
[[UIApplication sharedApplication].windows[0].rootViewController dismissViewControllerAnimated:NO completion:nil];
let window = UIApplication.shared.windows[0].rootViewController
window?.dismiss(animated: false, completion: nil)
参考
presentViewController:animated:completion:
dismissViewControllerAnimated:completion:
https://tutorialmore.com/questions-2605800.htm