Objective-CとSwiftでTableViewを使用する際に行う、基本的な設定についてまとめました。
実行環境
・Xcode 10.2.1
・Objective-C
・Swift 5.0
1.共通設定
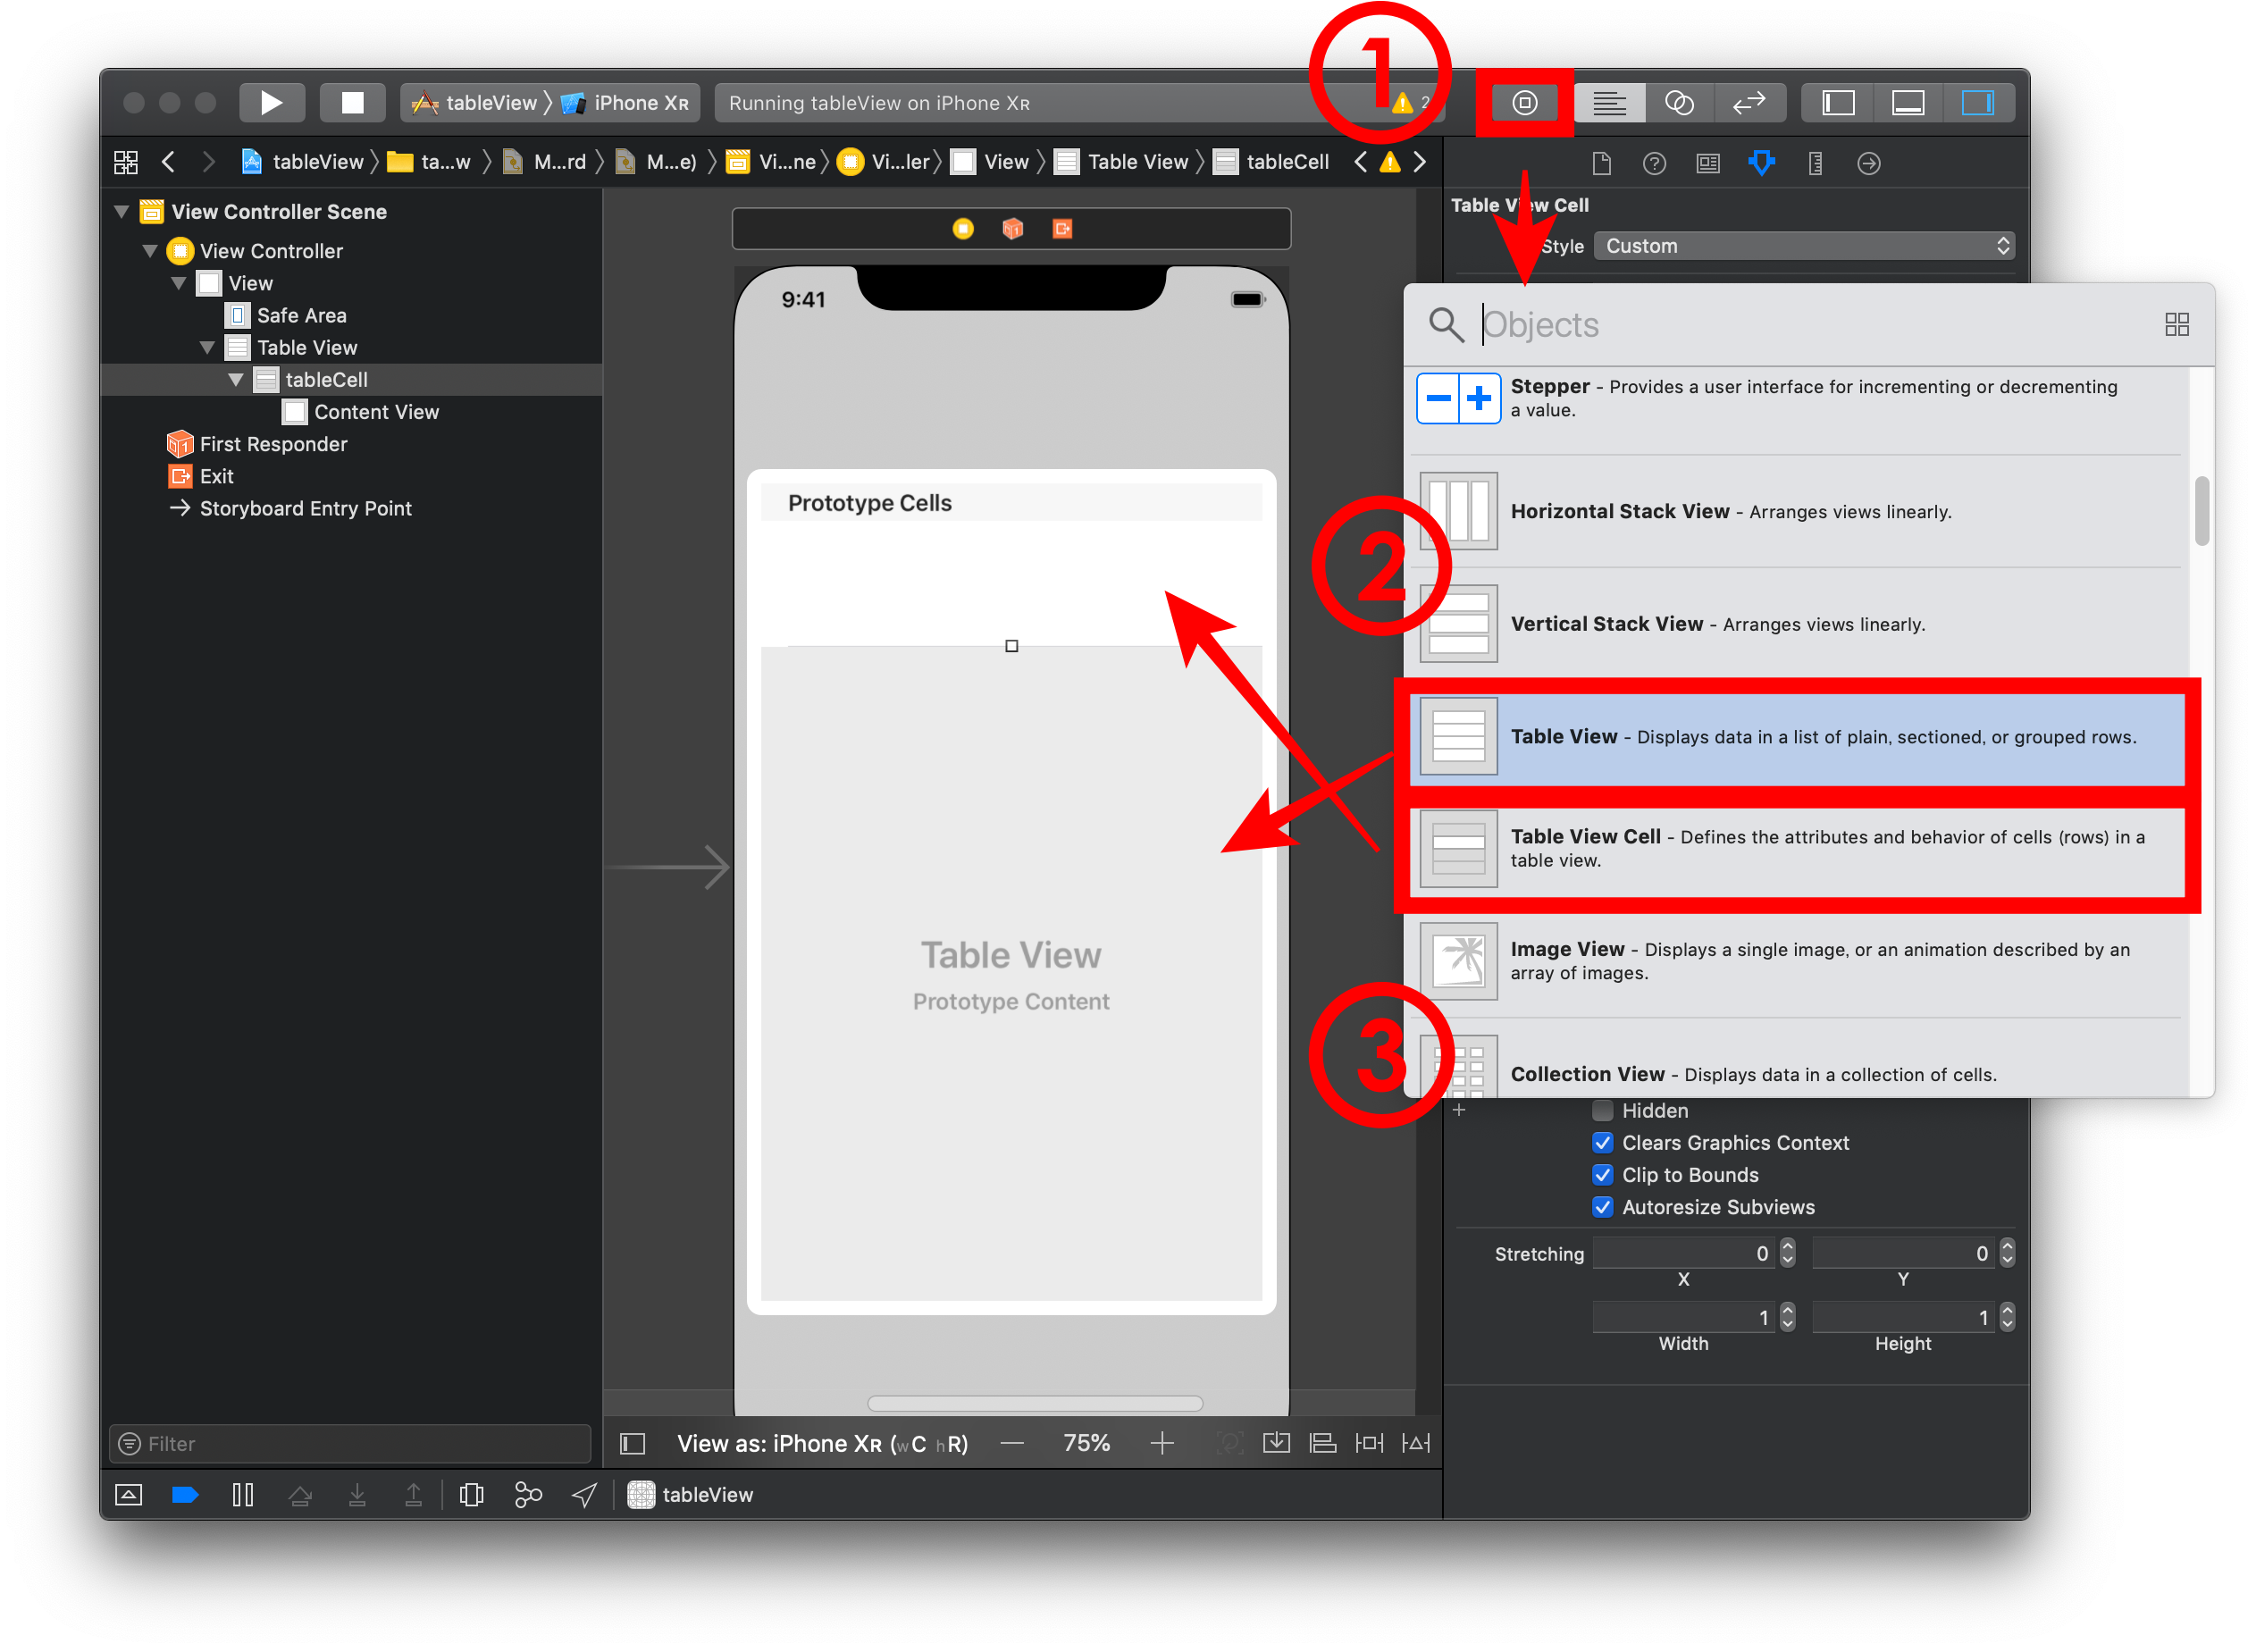
- StorybordにTableView, TableViewCellを画面に配置する。
① Libraryを選択する。
② Library内のTableViewを選択し、ViewControllerに配置する。
③ Library内のTableViewCellを選択し、TableView内に配置する。
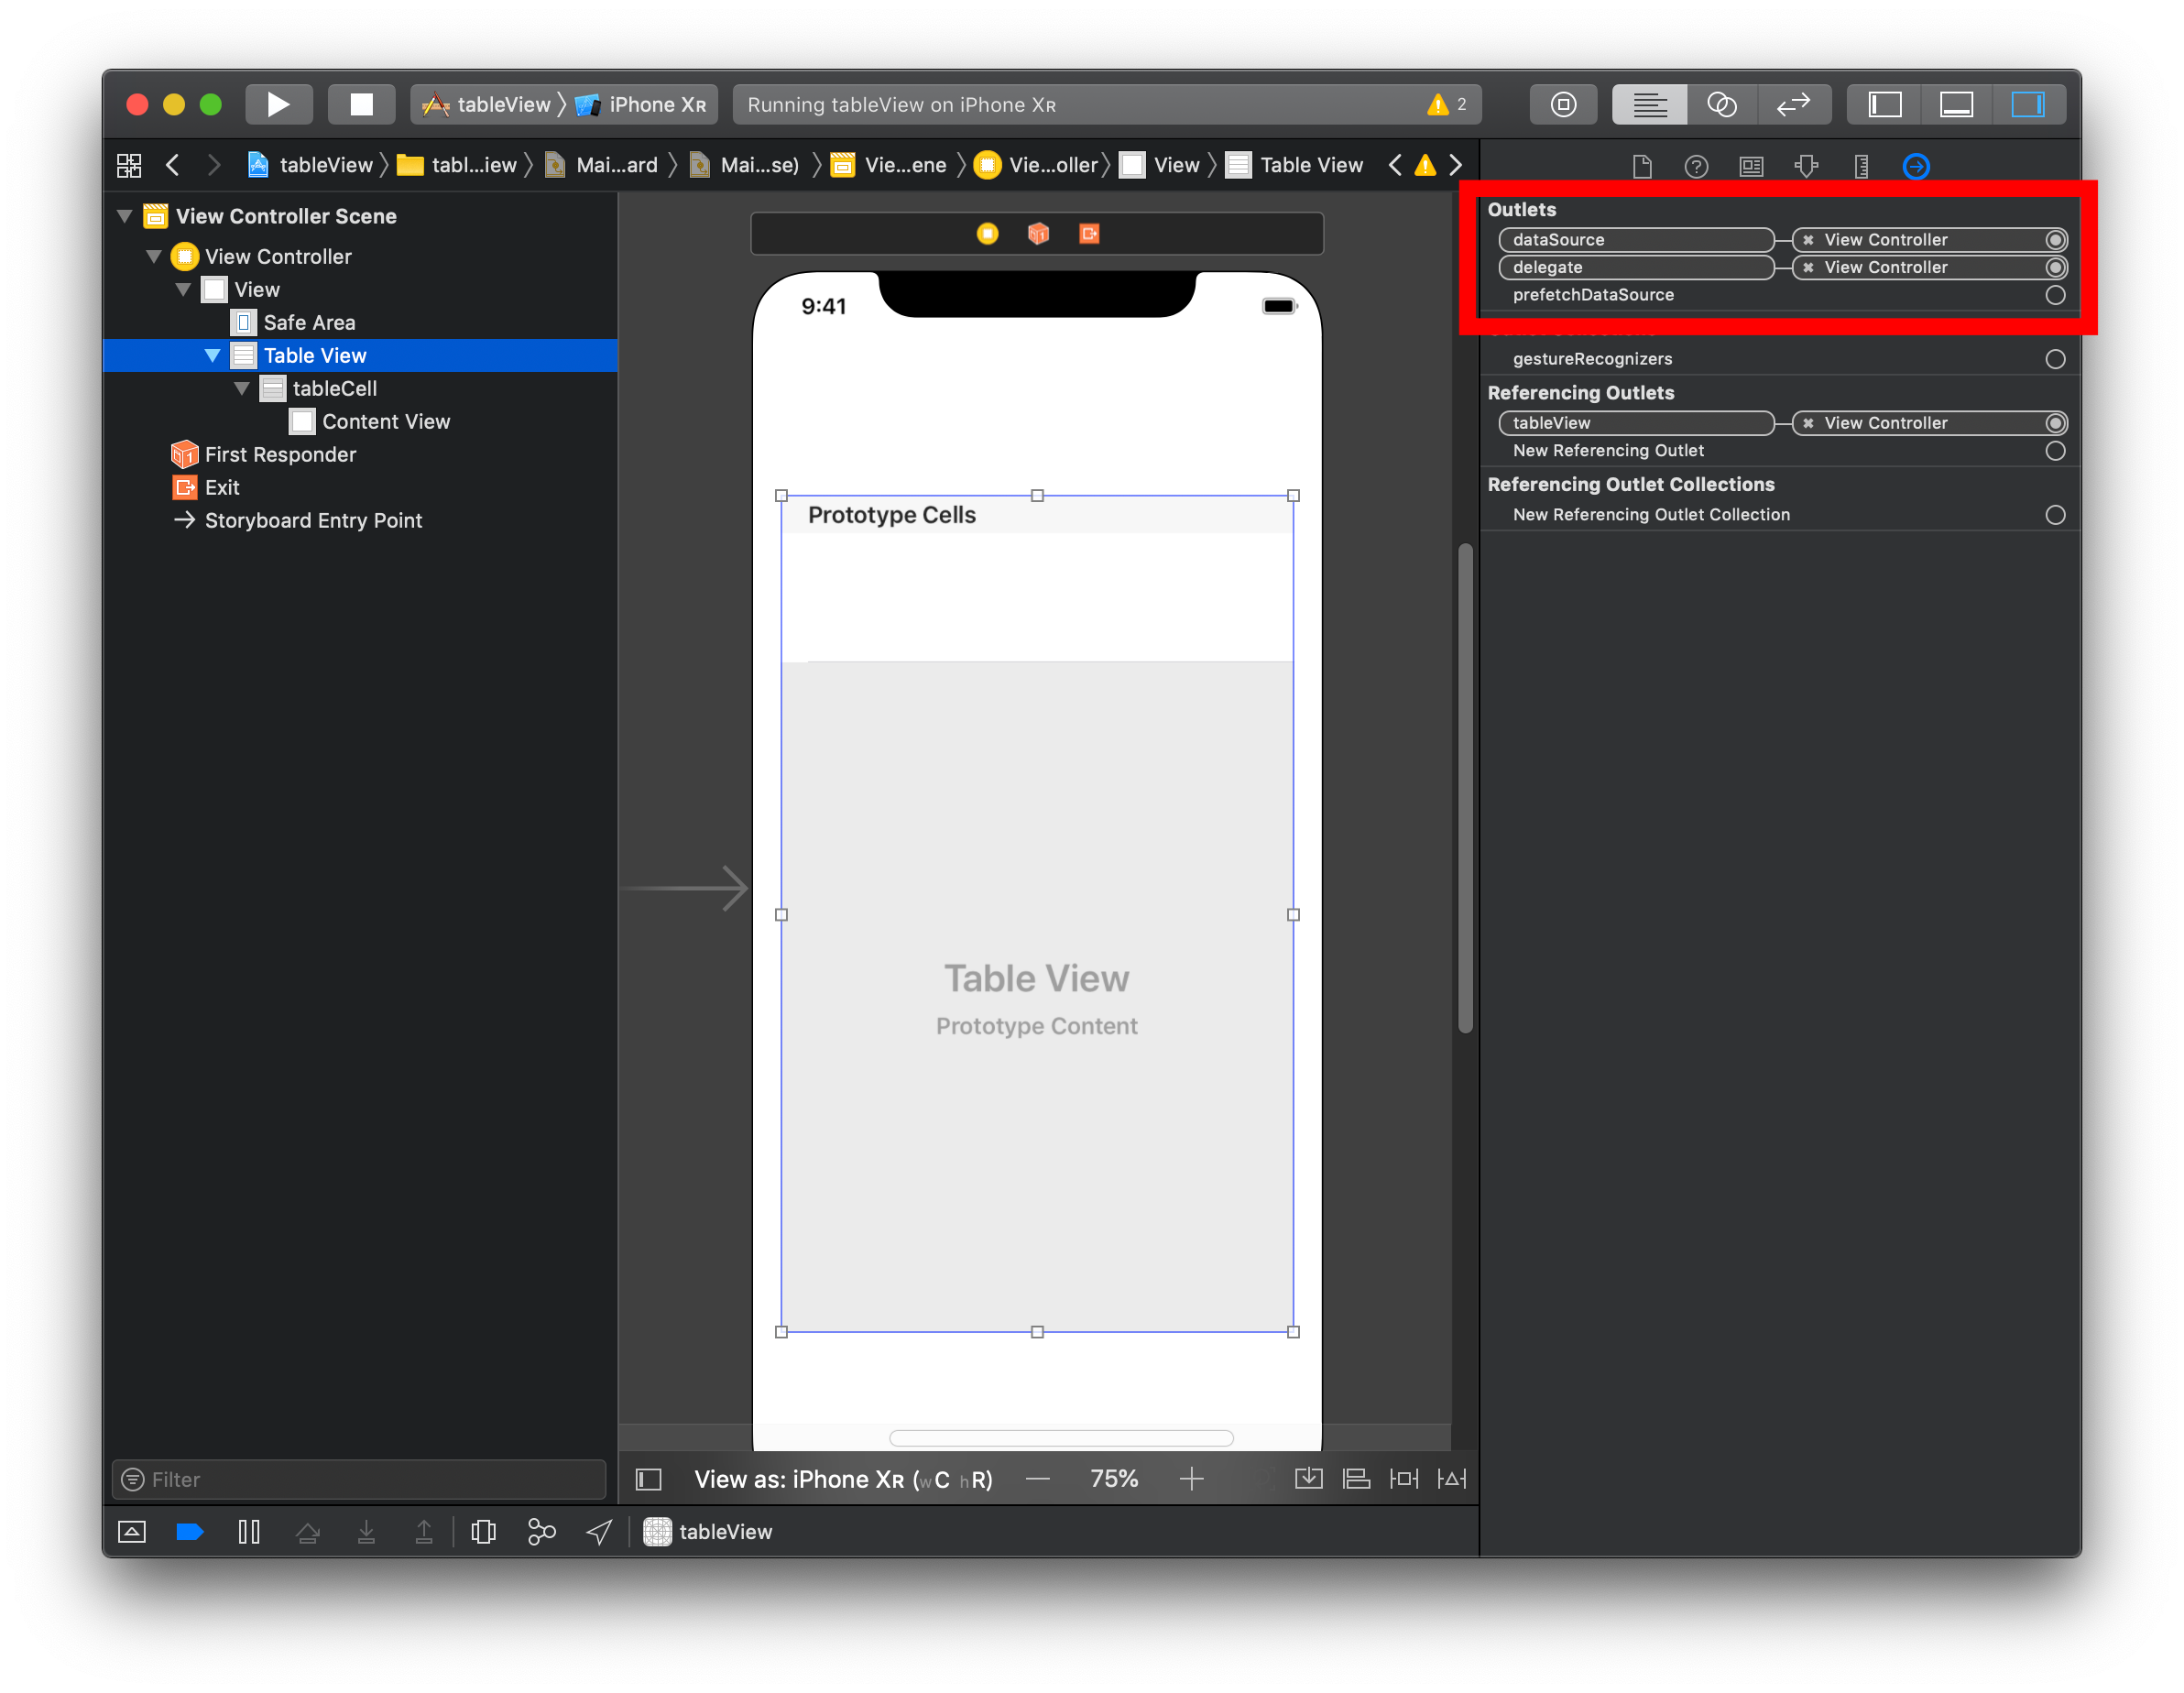
- delegate, datasourceの設定
Storybord、コード内のどちらでも設定することができます。
Storybordでの設定
コード内での設定
Objective-C .h
@interface ViewController : UIViewController<UITableViewDelegate, UITableViewDataSource>
Objective-C .m
- (void)viewDidLoad
{
    [super viewDidLoad];

    //storybordで設定した場合不要
    self.tableView.dataSource = self;
    self.tableView.delegate = self;
}
Swift
class ViewController: UIViewController, UITableViewDataSource, UITableViewDelegate
{
    override func viewDidLoad()
    {
        super.viewDidLoad()

        //storybordで設定した場合不要
        tableView.dataSource = self
        tableView.delegate = self
    }
}
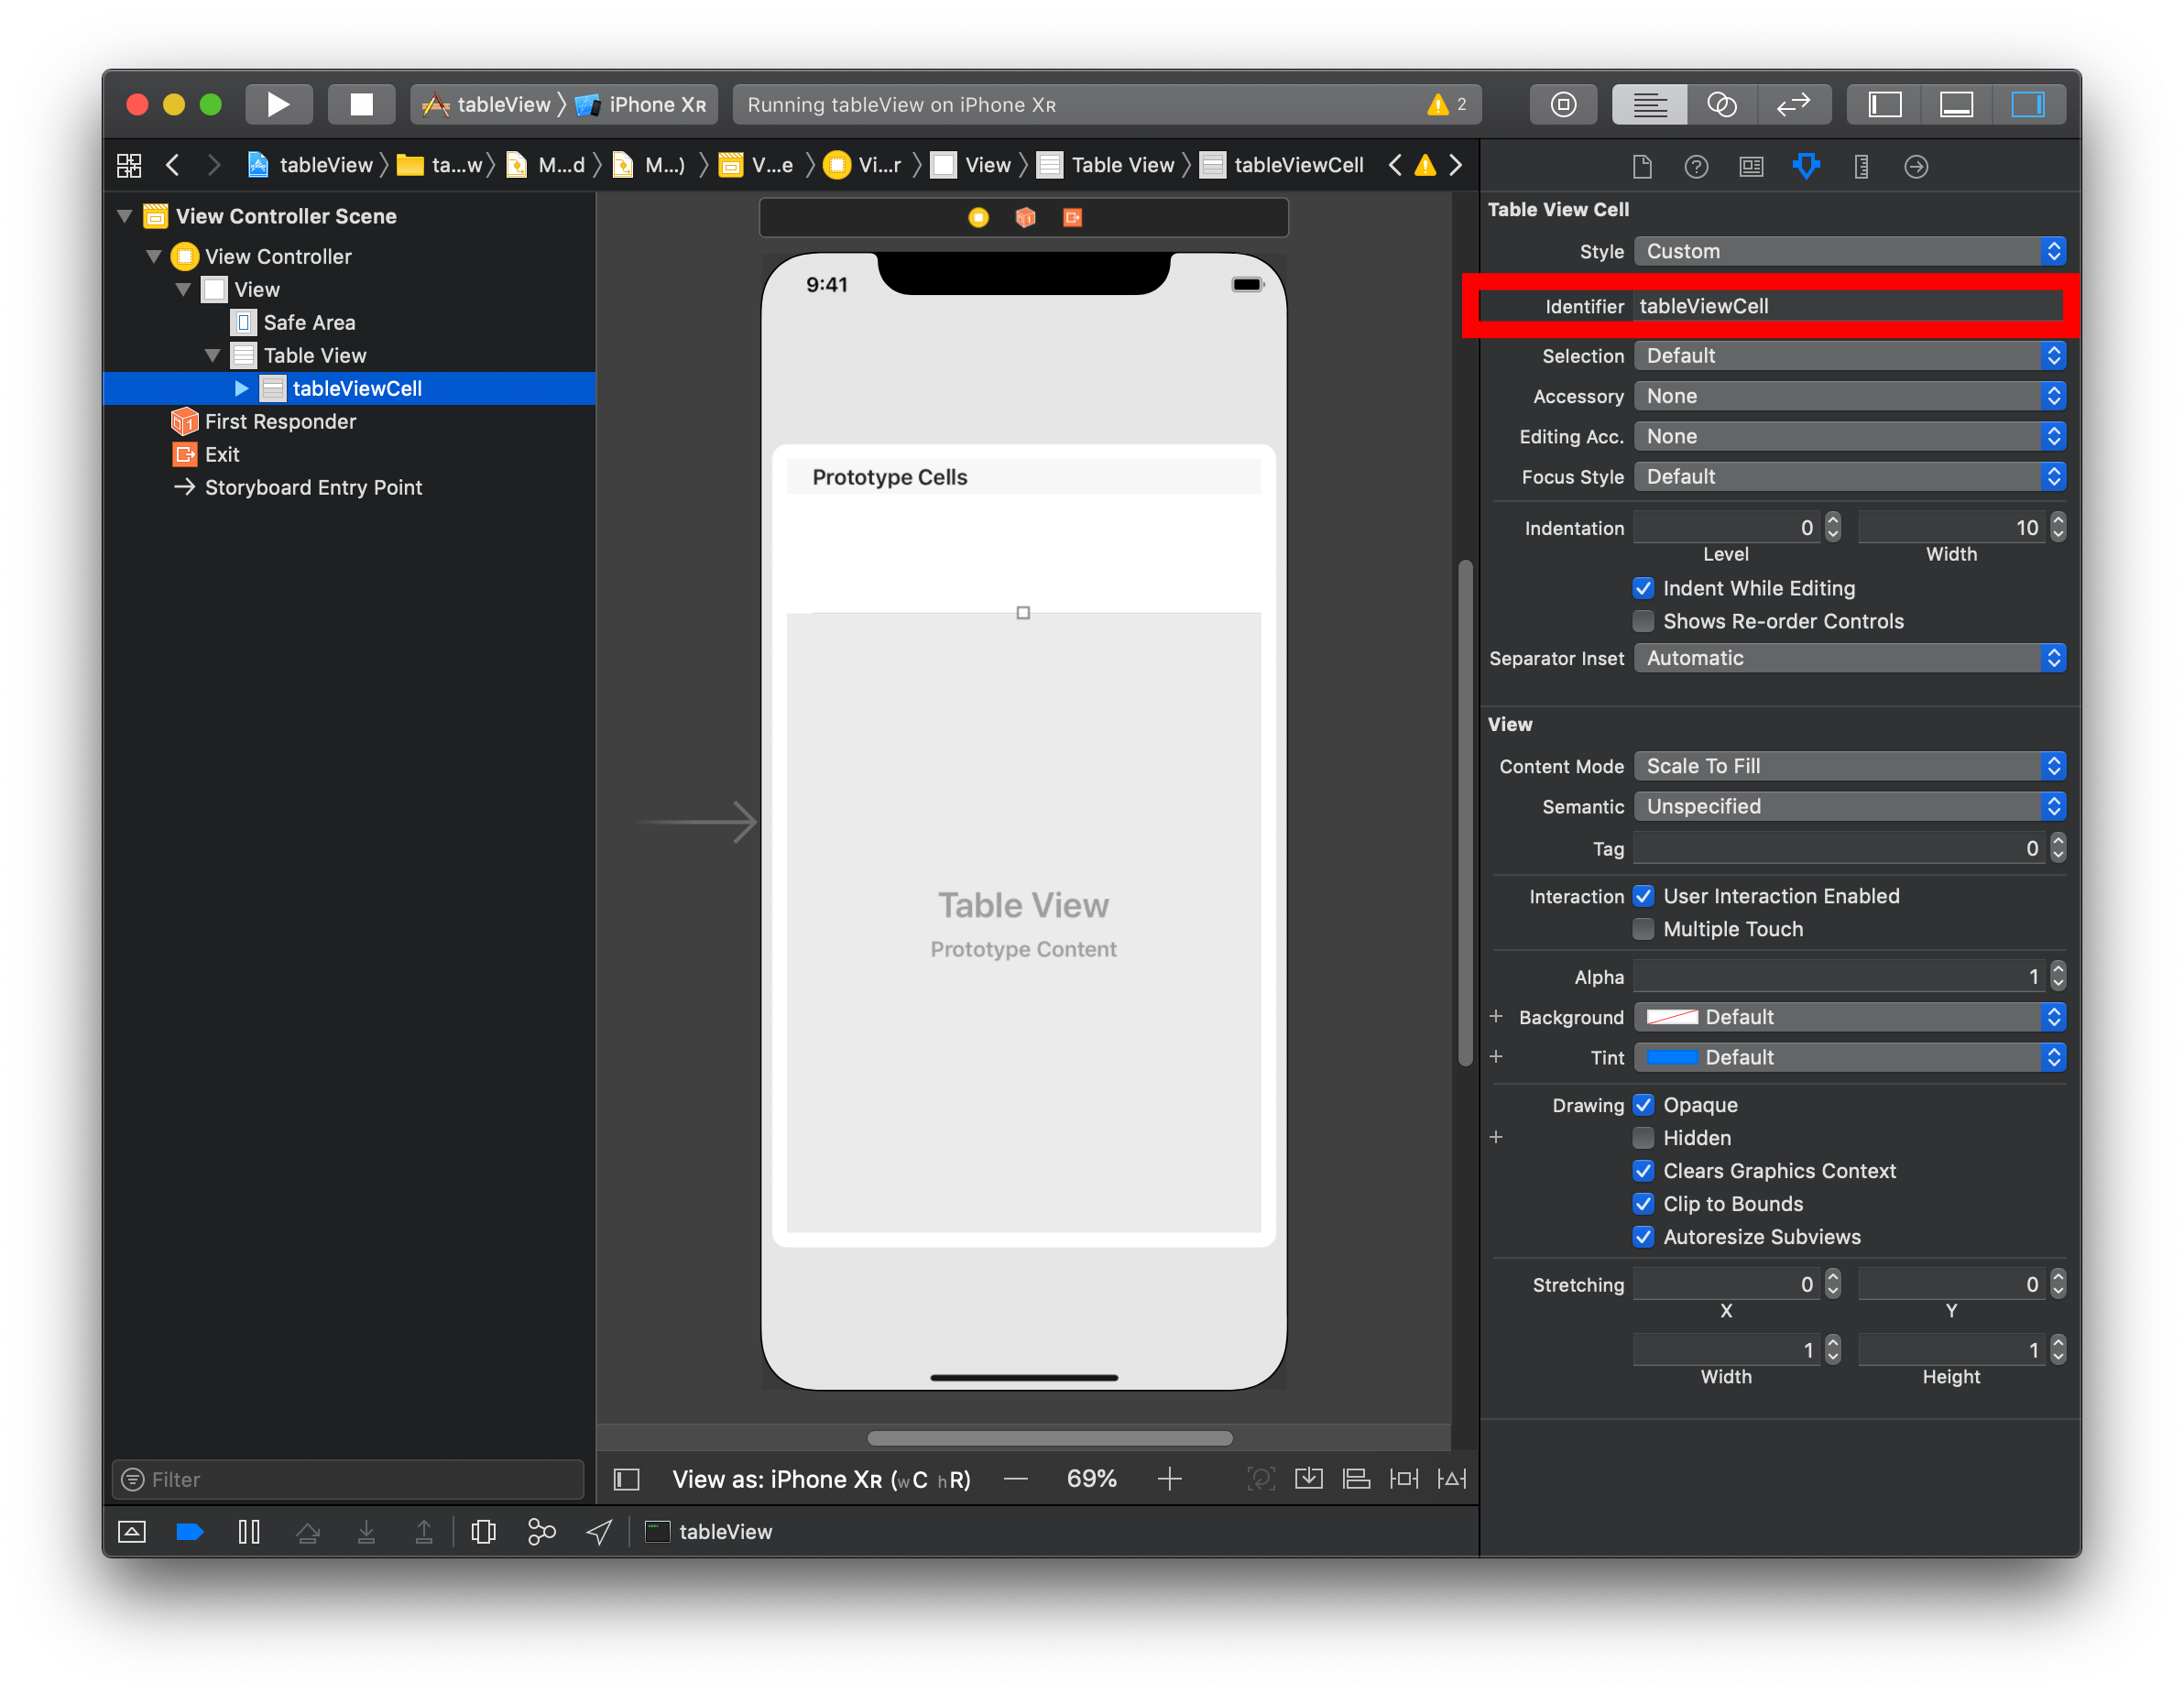
- Identifierの設定
StorybordでTableViewCellのIdentifierを設定します。
- TableViewの追加
Storybordに追加したTableViewとコード内のTableViewの関連付けを行います。
objective-c.h
@property (weak, nonatomic) IBOutlet UITableView *tableView;
swift
@IBOutlet weak var tableView: UITableView!
2.Objective-C
- 行数の設定
Objective-C .m
- (NSInteger)tableView:(UITableView *)tableView numberOfRowsInSection:(NSInteger)section
{
    return 5;
}
- セクション数の設定
Objective-C .m
- (NSInteger)numberOfSectionsInTableView:(UITableView *)tableView
{
    return 1;
}
- セルの設定
Storybordで設定した、Identifierを使用することで、TableViewCellに値を設定できます。
indexPath.row, indexPath.sectionを使用することで表示するセルの行数、セクションを指定できます。
Objective-C .m
//セルの高さ
- (CGFloat)tableView:(UITableView*)tableView heightForRowAtIndexPath:(NSIndexPath *)indexPath
{
    return 50;
}

//セルの内容
- (UITableViewCell *)tableView:(UITableView *)tableView cellForRowAtIndexPath:(NSIndexPath *)indexPath
{
    NSString* identifier = @"tableViewCell";
    UITableViewCell* cell = [tableView dequeueReusableCellWithIdentifier: identifier forIndexPath:indexPath];
    //セルの内容
    cell.textLabel.text = [NSString stringWithFormat:@"indexPath: %ld", indexPath.row];
    return cell;
}
- 選択時の処理
セルを選択した際に実行されます。
indexPath.row, indexPath.sectionを使用することで選択したセルの行数、セクションを取得できます。
cell.textLabel.textで選択したセルの内容を取得できます。
Objective-C .m
- (void)tableView:(UITableView *)tableView didSelectRowAtIndexPath:(NSIndexPath *)indexPath
{

}
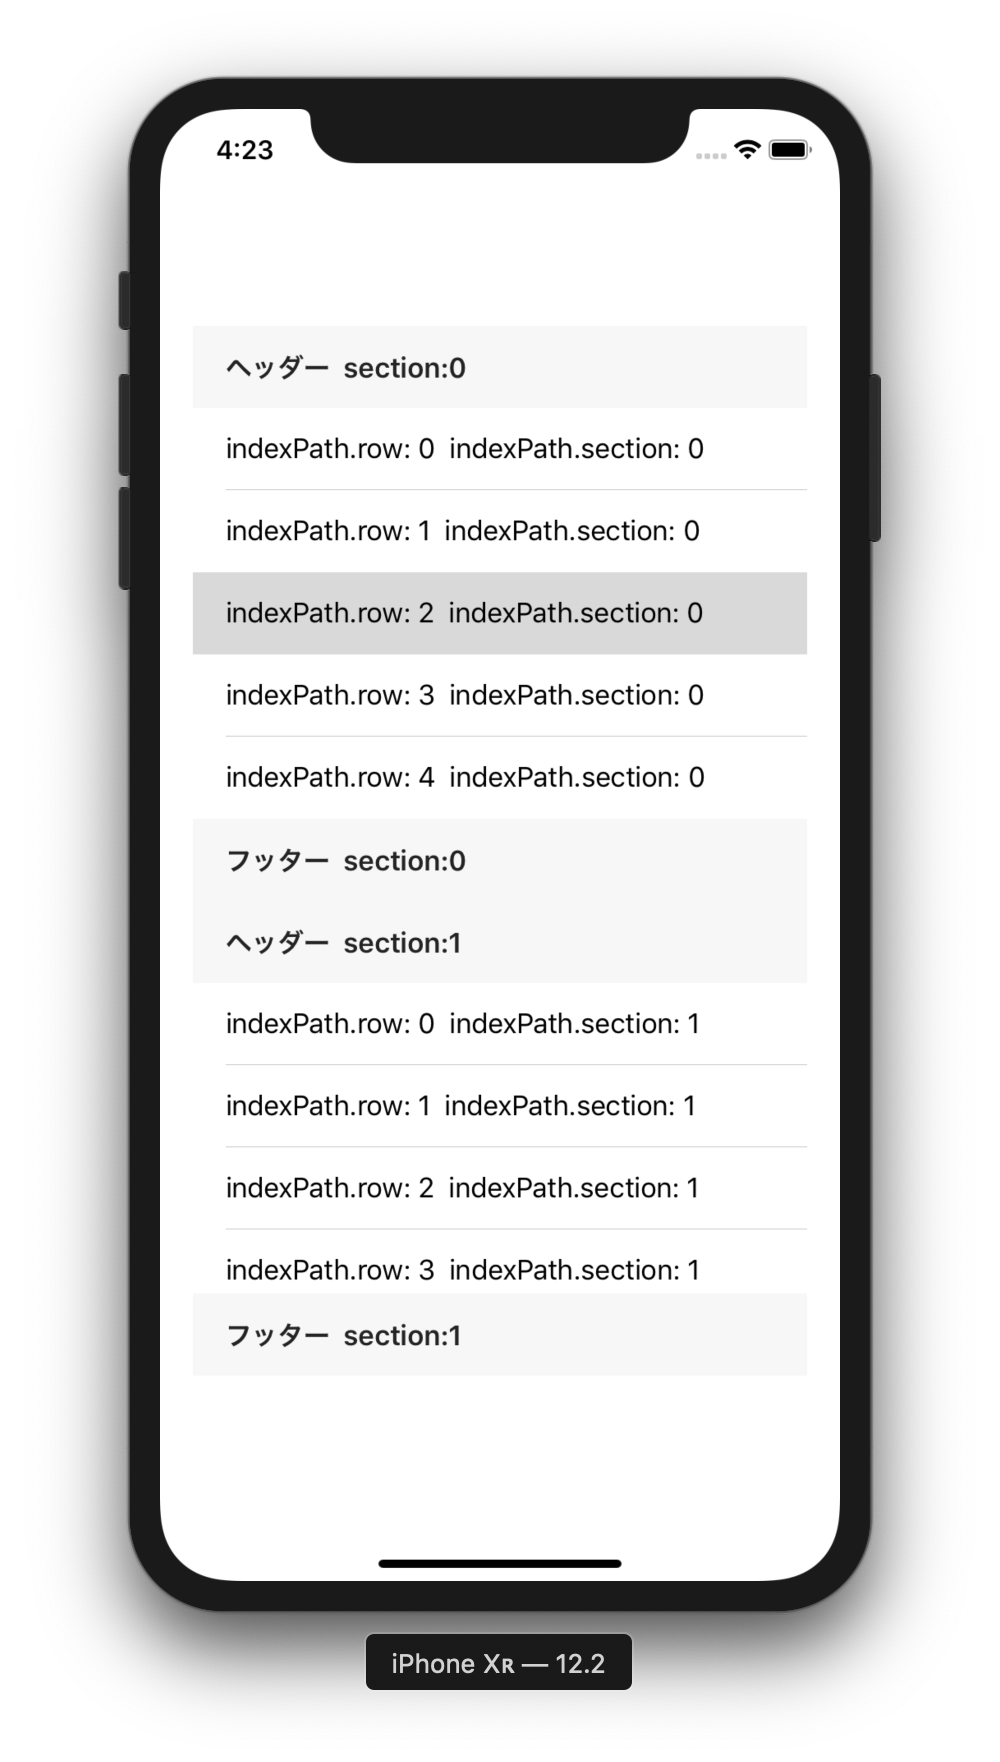
- ヘッダー、フッターの設定
各セクション毎に表示するヘッダー、フッターの設定を行います。
Objective-C .m
//ヘッダーの高さ
- (CGFloat)tableView:(UITableView *)tableView heightForFotterInSection:(NSInteger)section
{
    return 50;
}

//ヘッダーのタイトル
- (NSString *)tableView:(UITableView *)tableView titleForHeaderInSection:(NSInteger)section
{
    return [NSString stringWithFormat: @"ヘッダー  section: %ld", section];
}

//フッターの高さ
- (CGFloat)tableView:(UITableView *)tableView heightForHeaderInSection:(NSInteger)section
{
    return 50;
}

//フッターのタイトル
- (NSString *)tableView:(UITableView *)tableView titleForFooterInSection:(NSInteger)section
{
    return [NSString stringWithFormat: @"フッター  section: %ld", section];
}
# 3.Swift
- 行数の設定
Swift
func tableView(_ tableView: UITableView, numberOfRowsInSection section: Int) -> Int
{
    return 5
}
- セクション数の設定
Swift
func numberOfSections(in tableView: UITableView) -> Int
{
    return 1
}
- セルの設定。
storybordで設定した、Identifierを使用することで、TableViewCellに値を設定できます。
indexPath.row, indexPath.sectionを使用することで表示するセルの行数、セクションを指定できます。
Swift
//セルの高さ
func tableView(_ tableView: UITableView, heightForRowAt indexPath: IndexPath) -> CGFloat
{
    return 50
}

//セルの内容
func tableView(_ tableView: UITableView, cellForRowAt indexPath: IndexPath) -> UITableViewCell
{
    let identifier = "tableViewCell"
    let cell = tableView.dequeueReusableCell(withIdentifier: identifier, for: indexPath)
    cell.textLabel?.text = "indexPath.row: \(indexPath.row)  indexPath.section: \(indexPath.section)"
    return cell
}
- セル選択時の処理
セルを選択した際に実行されます。
indexPath.row, indexPath.sectionを使用することで選択したセルの行数、セクションを取得できます。
table.cellForRow(at: indexPath)!.textLabel!.text!)で選択したセルの内容を取得できます。
Swift
func tableView(_ table: UITableView, didSelectRowAt indexPath: IndexPath)
{

}
- ヘッダー, フッターの設定
各セクション毎に表示するヘッダー、フッターの設定を行います。
Swift
//ヘッダーの高さ
func tableView(_ tableView: UITableView, heightForHeaderInSection section: Int) -> CGFloat
{
    return 50
}

//ヘッダーのタイトル
func tableView(_ tableView: UITableView, titleForHeaderInSection section: Int) -> String?
{
    return "ヘッダー section:\(section)"
}

//フッターの高さ
func tableView(_ tableView: UITableView, heightForFooterInSection section: Int) -> CGFloat
{
    return 50
}

//フッターのタイトル
func tableView(_ tableView: UITableView, titleForFooterInSection section: Int) -> String?
{
    return "フッター section:\(section)"
}
4. 実行結果