はじめに
WPFを触り始めて一番最初にピンとこなかったのは
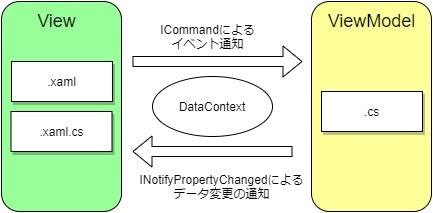
ViewとViewModelとの間でどのようにイベントやデータを連携しているのか? ということでした。
そのあたりについて学習したので、理解の整理のためにアウトプットします。
参考
WPF実践
この資料をベースに学習を進めましたが、わかりやすくまとまっておりとても参考になりました。
今回の内容
MVVMとは
MVVMは Mode-View-ViewModel Pattern と呼ばれるデザインパターンの1つ。
ソフトウェアをModel、View、ViewModelの3種類に分類し設計・実装していきます。
MVC(Model-View-Controller)が派生したものらしく、考え方に共有したものが多いです。
今回はこの中のViewとViewModelにフォーカスした内容になっています。
ViewModelとは
.xamlファイルはViewで、.xaml.csファイルがViewModelだと思っていたが 全然違うらしい 。
Visual StudioでWPFのプロジェクトを作成した際にデフォルトで用意されているファイル構成は
そもそもでMVVMを意識したものになっておらずViewModelが存在しない状態になっている。
なので、まずはViewModelを作成することから始める。
namespace MVVMPractice
{
  class MainViewModel
  {
    public string Text { get; set; } = "テキスト"
  }
}
.xaml.csは何者?
.xaml.csがViewModelでないのなら、じゃぁ何者なのか。
正解は .xamlと.xaml.csの2ファイルを合わせてView となる。
.xaml.csは コードビハインド 呼ばれ、本来Viewに関する裏処理を担当するのだが
MVVMの考え方からは逸脱してしまうため、原則何も記載しないのがよいとされているようだ。
View上に表示する
ViewModelで保持している情報をView上に表示するためには Binding を使用する。
やることは2つ。
- DataContextにViewModelを設定
- XAML上でBindingを使用する
DataContextは、かなり咀嚼するとViewのデータ保管領域...でいいのだろうか。
ここに対してViewModelのオブジェクトをセットすることで、View側から参照することが可能となる。
DataContextへの設定方法は色々あるが、ViewのXAMLに記載するのがよい。
<Window
~略~
>
  <Window.DataContext>
    <local:MainViewModel />
  </Window.DataContext>
どこで使用するかはBindingを使用する
<TextBlock Text="{Binding Text}" />
ViewModelからプロパティの変化をViewに通知する
さて、ここからが少しややこしい。
ViewModelで保持している情報が変化したとき、その変化をViewに伝え何かしらの動作をさせたいケースなどは多いと思う。
例えば、テキストボックスに文字が入力されたときに〇〇したい、などだ。
そういったことをやりたい場合は INotifyPropertyChanged インターフェースを実装することで実現できる。
namespace MVVMPractice : INotifyPropertyChanged
{
  class MailViewModel
  {
    private string _text;
    public string Text
    {
      get => _text;
      set
      {
        if (_text != value)
        {
          _text = value;
          RaisePropertyChanged();
        }
      }
    }

    #region INotifyPropertyChanged1の実装
    public event PropertyChangedEventHandler PropertyChanged;

    private void RaisePropertyChanged([CallerMemberName]string propertyName = null)
      => PropertyChanged?.Invoke(this, new PropertyChangedEventArgs(propertyName));
    #endregion
}
プロパティのSetterで値の変更がある時に、 PropertyChangedEventHandler イベントを発火させることで
Viewにプロパティの変化を伝搬させることができます。
Viewの操作をViewModelに通知する
逆にViewからViewModelへ、UIの操作イベントなどを伝えたい場合もある。
そういうった時は ICommond インターフェースを実装する。
namespace MVVMPractice
{
  internal class DelegateCommand : ICommand
  {
    private Action<object> _Execute;
    private Func<object, bool> _CanExecute;

    public DelegateCommand(Action<object> Execute)
      : this(Execute, null)
    {
    }

    public DelegateCommand(Action<object> Execute, Func<object, bool> CanExecute)
    {
      this._Execute = Execute;
      this._CanExecute = CanExecute;
    }

    #region ICommandの実装
    public event EventHandler CanExecuteChanged;

    public void RaiseCanExecuteChanged()
      => CanExecuteChanged?.Invoke(this, EventArgs.Empty);

    public bool CanExecute(object parameter)
      => (this._CanExecute != null) ? this._CanExecute(parameter) : true;

    public void Execute(object parameter)
    {
      if (this._Execute != null)
      {
        this._Execute(parameter);
      }
    }
    #endregion
  }
}
namespace MVVMPractice : INotifyPropertyChanged
{
  class MailViewModel
  {
    private string _text;
    public string Text
    {
      get => _text;
      set
      {
        if (_text != value)
        {
          _text = value;
          RaisePropertyChanged();
        }
      }
    }

    // INotifyPropertyChnagedの実装(省略)

    private DelegateCommand _clearCommand;
    public DelegateCommand ClearCommand
  {
    get => this._clearCommand ?? (this._clearCommand = new DelegateCommand(
      _ => this.Text= "",
      _ => !string.IsNullOrEmpty(this.Text)));
  }
}
どのUIから通知するかはView側に記載する。
<Button Commnad="{Binding ClearCommand}" />