AR.jsのLocation Basedで無理やりモデルを表示したい
前回AR.jsを使用してLocation Basedで遠くにモデルを表示させたかった話を書きました。
おさらいするとAR.jsのLocation Basedは、1km以上遠方の位置を指定するとコンテンツが表示されません。
解決策としてvideoTexture: true;オプションを指定すると表示できますが、手持ちのiPhone(iOS14)では、うまく動かなかったので今回は無理やり表示させていきたいと思います。
はじめに断っておきますが、根本的な解決策ではないです。
プラン
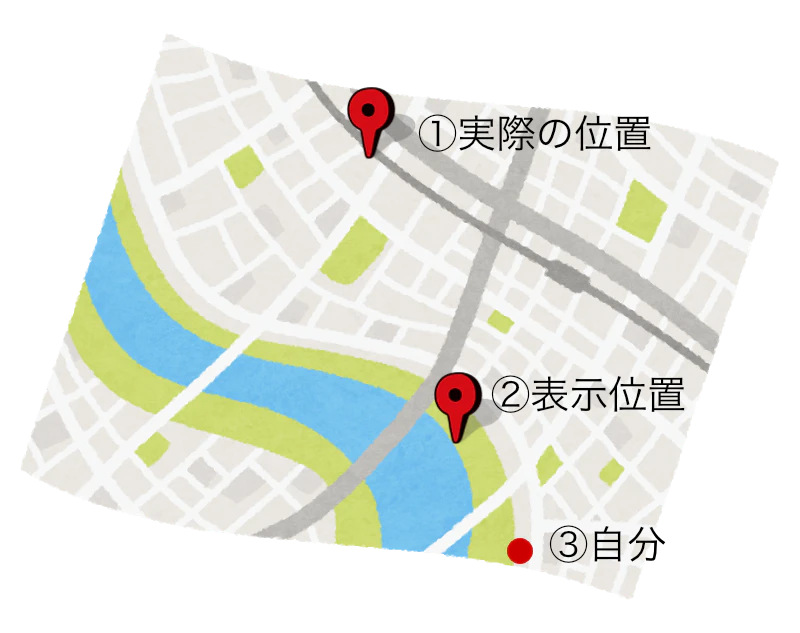
①の実際の位置を指定するとオブジェクトを表示させることができないので、③の自分の位置から①の角度と距離を求めて、②の表示位置を計算します。
目的地が複数ある場合には遠い位置ほど小さく表示させたいので、距離によりスケールを変えたいと思います。
便宜上①の地点を目的地。②を表示位置、③を現在地と呼ぶこととします。
コード
githubにあげてみました。
javascriptも未熟ですが、ご容赦願います。
ファイル等構成
同じ階層にindex.htmlと位置計算用のcalc.jsを配置しています。
<!DOCTYPE html>
<html>

<head>
<meta charset="utf-8" />
<title>LocationBased Sample</title>
<script src="https://aframe.io/releases/1.0.4/aframe.min.js"></script>
<script src="https://unpkg.com/aframe-look-at-component@0.8.0/dist/aframe-look-at-component.min.js"></script>
<script src="https://raw.githack.com/AR-js-org/AR.js/master/aframe/build/aframe-ar-nft.js"></script>
</head>

<body style="margin: 0; overflow: hidden;">
        <a-scene
            renderer="logarithmicDepthBuffer: true;"
            embedded
            loading-screen="enabled: false;"
            arjs="sourceType: webcam; debugUIEnabled: true;"
        >
            <a-camera gps-camera="gpsMinDistance:200;" rotation-reader></a-camera>
        </a-scene>
	<script src="./calc.js" type="module"></script>
    </body>
</html>
1.方角と距離を得る
これには、jsライブラリのgeodesyを使用します。
緯度経度から、距離等を求めることができます。素晴らしい😃ありがとうgeodesy‼️。
ここからはcalc.jsを作っていきます。
まずはimportします。
import LatLon from 'https://cdn.jsdelivr.net/npm/geodesy@2.2.1/latlon-spherical.min.js';
今回はクラスにしますので、定義を行います。
export class CalcVR {
    constructor() {
        this.distance = 0;
        this.bearing = 0;
        this.newPosition = [0, 0];
        this.currentPosition = [0, 0];
        this.objectSize = '0, 0, 0';
        this.newDistance = 800;
    }
distance: 距離
bearing : 方角
newPosition: 表示位置の緯度経度の配列。
currentPosition: 現在地。緯度経度の配列。
objectSize: 表示サイズ。
newDistance: 1km以内で、表示させる距離。今回は800mに設定。
AR.jsは、positionとかも単位はメートルです。
距離と角度を求めます。
calcDist(currentPosiArg, targetPosition) {
        const current = new LatLon(currentPosiArg[0], currentPosiArg[1]);
        const target = new LatLon(targetPosition[0], targetPosition[1]);
        this.distance = current.distanceTo(target);
        this.bearing = current.finalBearingTo(target)
        this.currentPosition = currentPosiArg;
    }
引数
currentPosiArg: 現在地の緯度経度の配列。
targetPosition: 目的地の緯度経度の配列。
まず現在地と目的地のgeodesyインスタンスを作成します。
距離は、distanceToで求めます。
角度は、finalBearingToで求めます。
2.新しい表示位置を計算する。
calcNewPosition(currentPosition, bearing, newTargetToDistance) {
        const current = new LatLon(currentPosition[0], currentPosition[1]);
        const calculatedlced = current.destinationPoint(newTargetToDistance, bearing);
        this.newPosition = [calculatedlced.latitude, calculatedlced.longitude];
    }
引数
currentPosiArg: 現在地の緯度経度の配列。
bearing: 先ほど求めた角度
newTargetToDistance: 先ほど設定した距離。
newPositionに表示位置の緯度経度の配列が返ります。
3.サイズを計算する。
距離にあわせて表示サイズを決定します。
とはいえ、複数ある場合には表示位置に差がありません。遠いほど小さく、また遠いオブジェクトは手前のオブジェクトの後ろに表示させたいと思います。
え〜雑ですが😅、距離にあわせてサイズを決定するとともに、実際の距離の1000分の1の距離をベース距離に足して、オブジェクト間の奥行きを演出します。
もちろん足して1kmを超えると、意味がありません。
ここはもっといい方法があると思うので、改善したいですね。
calcSizeDist(distance) {
        if(distance <= 1000 && distance >= 500){
            this.objectSize = '25 25 25';
            this.newDistance = 800;
        }else if(distance > 1000 && distance <= 8000) {
            this.objectSize = '20 20 20';
            this.newDistance = 800 + (distance/1000);
        }else if(distance > 8000 && distance <= 16000) {
            this.objectSize = '18 18 18';
            this.newDistance = 800 + (distance/1000);
        }else if(distance > 16000 && distance <= 20000) {
            this.objectSize = '15 15 15';
            this.newDistance = 800 + (distance/1000);
        }else if(distance > 20000) {
            this.objectSize = '10 10 10';
            this.newDistance = 800 + (distance/1000);
        }
    }
4.表示させます。
ここからは、AR.jsのサンプルのようにjsonで目的地を設定し、htmlに要素を追加していくことになります。
index.htmlの同階層にassetsディレクトリがあり、そこにgftlモデルがある前提です。
// 目的地情報を追加。19個くらいまでは大丈夫そう。
function staticLoadPlaces() {
    return [
        {
            name: 'Time Desk',
            modelName: 'timedesk.gltf',
            location: {
                lat: 43.062533,
                lng: 141.353638,
            }
        },

    ];
}

// 描画するため、a-sceneに追加。
function renderPlaces(places, pos) {
    let scene = document.querySelector('a-scene');
    var crd = pos.coords;
    let cal = new CalcVR();

    places.forEach((place) => {
        let latitude = place.location.lat;
        let longitude = place.location.lng;
        let name = place.name;
        let modelName = place.modelName;
        cal.calcDist([crd.latitude, crd.longitude], [latitude, longitude]);
        cal.calcNewPosition(cal.currentPosition, cal.bearing, cal.newDistance);
        cal.calcSizeDist(cal.distance);
        let model = document.createElement('a-entity');
        model.setAttribute('look-at', '[gps-camera]');
        model.setAttribute('gps-entity-place', `latitude: ${cal.newPosition[0]}; longitude: ${cal.newPosition[1]};`);
        model.setAttribute('gltf-model', `./assets/${modelName}`);
        model.setAttribute('animation-mixer', '');
        model.setAttribute('scale', `${cal.objectSize}`);

        model.addEventListener('loaded', () => {
            window.dispatchEvent(new CustomEvent('gps-entity-place-loaded'))
        });

        scene.appendChild(model);
    });
}
以上です。
これで、geolocationで現在地を取得した時にrenderPlacesを走らせれば、どんなに遠くてもオブジェクトを表示させることができました。
でも、根本的な解決にはなっていないので・・・・、色々と不備は出てくると思います。
何かの参考になれば、幸いです。
5.コード全文
以下のコードでは、gltfモデルではなく赤いBOXを表示させます。
gltfモデルを使用する場合は、「4.表示させます」の例に書き換えてください。
import LatLon from 'https://cdn.jsdelivr.net/npm/geodesy@2.2.1/latlon-spherical.min.js';

export class CalcVR {
    constructor() {
        this.distance = 0;
        this.bearing = 0;
        this.newPosition = [0, 0];
        this.currentPosition = [0, 0];
        this.objectSize = '0, 0, 0';
        this.newDistance = 800;
    }
    // 距離と方角を計算
    calcDist(currentPosiArg, targetPosition) {
        const current = new LatLon(currentPosiArg[0], currentPosiArg[1]);
        const target = new LatLon(targetPosition[0], targetPosition[1]);
        this.distance = current.distanceTo(target);
        this.bearing = current.finalBearingTo(target)
        this.currentPosition = currentPosiArg;
    }
    //表示位置を計算
    calcNewPosition(currentPosition, bearing, newTargetToDistance) {
        const current = new LatLon(currentPosition[0], currentPosition[1]);
        const calculatedlced = current.destinationPoint(newTargetToDistance, bearing);
        this.newPosition = [calculatedlced.latitude, calculatedlced.longitude];
    }
    // サイズを計算
    calcSizeDist(distance) {
        if(distance <= 1000 && distance >= 500){
            this.objectSize = '25 25 25';
            this.newDistance = 800;
        }else if(distance > 1000 && distance <= 8000) {
            this.objectSize = '20 20 20';
            this.newDistance = 800 + (distance/1000);
        }else if(distance > 8000 && distance <= 16000) {
            this.objectSize = '18 18 18';
            this.newDistance = 800 + (distance/1000);
        }else if(distance > 16000 && distance <= 20000) {
            this.objectSize = '15 15 15';
            this.newDistance = 800 + (distance/1000);
        }else if(distance > 20000) {
            this.objectSize = '10 10 10';
            this.newDistance = 800 + (distance/1000);
        }
    }

}
window.onload = () => {
    navigator.geolocation.getCurrentPosition(success, error, options);
};
// 目的地を設定
function staticLoadPlaces() {
    return [
        {
            name: 'Time Desk',
            location: {
            lat: 43.062533,
            lng: 141.353638,
            }
        },

    ];
}
// 描画
function renderPlaces(places, pos) {
    let scene = document.querySelector('a-scene');
    var crd = pos.coords;
    let cal = new CalcVR();

    places.forEach((place) => {
        let latitude = place.location.lat;
        let longitude = place.location.lng;
        cal.calcDist([crd.latitude, crd.longitude], [latitude, longitude]);
        cal.calcNewPosition(cal.currentPosition, cal.bearing, cal.newDistance);
        cal.calcSizeDist(cal.distance);
        let model = document.createElement('a-box');
        model.setAttribute('material', 'color: red');
        model.setAttribute('gps-entity-place', `latitude: ${cal.newPosition[0]}; longitude: ${cal.newPosition[1]};`);
        model.setAttribute('scale', `${cal.objectSize}`);

        model.addEventListener('loaded', () => {
            window.dispatchEvent(new CustomEvent('gps-entity-place-loaded'))
        });

        scene.appendChild(model);
    });
}
var options = {
    enableHighAccuracy: true,
    timeout: 50000,
    maximumAge: 0
  };

function success(pos) {
    let places = staticLoadPlaces();
    renderPlaces(places, pos);
}

function error(err) {
   console.warn(`ERROR(${err.code}): ${err.message}`);
   alert('Unable to capture current location.');
 }