グラスモーフィズムとは
グラスモーフィズム ってご存知ですか?これは2021年頃から流行している、磨りガラスを模した半透明の表現手法のことです。
↓実際の見た目はこんな感じ。

Image by starline on Freepik
この表現手法はApple製のUIに多く見られ、最近ではWindowsアプリのUIでも度々目にする気がします。試しにAppleの公式サイトを覗いてみると、グラスモーフィズムを発見できるかもしれません。
このグラスモーフィズムをFlutterアプリに実装してみようと思った所、意外にもAppBarをグラスモーフィズム化する記事が見つからなかったので、備忘録として本記事にまとめておきます。
ソースコードと解説
GlassAppBarファイルの作成
このソースコードをlibディレクトリ内の任意の場所においておきましょう。
import 'package:flutter/material.dart';
import 'dart:ui';

class GlassAppBar extends StatelessWidget implements PreferredSizeWidget {
  final String title;
  final double blur;
  final double opacity;
  final Color backgroundColor;

  const GlassAppBar({super.key,
    required this.title,
    this.blur = 25.0,
    this.opacity = 0.70,
    this.backgroundColor = Colors.black,
  });

  @override
  Size get preferredSize => const Size.fromHeight(kToolbarHeight);

  @override
  Widget build(BuildContext context) {
    return ClipRect(
      child: BackdropFilter(
        filter: ImageFilter.blur(sigmaX: blur, sigmaY: blur),
        child: AppBar(
          title: Text(title),
          backgroundColor: backgroundColor.withOpacity(opacity),
          elevation: 0,
        ),
      ),
    );
  }
}
backGroundColorをベースの色として、opacityとblurで不透明度とぼかし具合を決めています。この値は自由にいじって自分が納得行く数値にしてみましょう。
GlassAppBarの呼び出し
では、準備が整ったところでGlassAppBarを呼び出してみましょう。
まずは、以下のように先程作成したファイルをimportしておきます。
import 'package:flutter/material.dart';
import 'glass_appbar.dart';  //ファイルの場所に合わせて適時変更
そして、以下のようにScaffold内にAppBarを作れば完了です!
extendBodyBehindAppBar: true,
appBar: const GlassAppBar(
    title: 'Glassmorphic AppBar',
),
このとき、extenddBodyBehindAppBar:trueとしておかないと透過してくれないので、忘れずにtrueに設定しておきましょう。
main部分のソースコード例
今すぐ試したい人は以下のmain.dartをコピペして試してみてください。
import 'package:flutter/material.dart';
import 'glass_appbar.dart';

void main() {
  runApp(const MyApp());
}

class MyApp extends StatelessWidget {
  const MyApp({super.key});

  @override
  Widget build(BuildContext context) {
    return const MaterialApp(
      debugShowCheckedModeBanner: false,
      title: 'Flutter Demo',
      home: HomePage(),
    );
  }
}

class HomePage extends StatelessWidget {
  const HomePage({super.key});

  @override
  Widget build(BuildContext context) {
    return Scaffold(
      extendBodyBehindAppBar: true,
      appBar: const GlassAppBar(
        title: 'Glassmorphic AppBar',
      ),

      backgroundColor: Colors.grey.shade900,

      body: ListView(
        children: [
          Padding(
            padding: const EdgeInsets.only(top: 20.0, left: 20.0, right: 20.0),
            child: Container(
              decoration: BoxDecoration(
                borderRadius: BorderRadius.circular(12),
                color: Colors.greenAccent,
              ),
              width: 100,
              height: 300,
              child: const Center(child: Text("container")),
            ),
          ),

          Padding(
            padding: const EdgeInsets.only(top: 20.0, left: 20.0, right: 20.0),
            child: Container(
              decoration: BoxDecoration(
                borderRadius: BorderRadius.circular(12),
                color: Colors.lightBlueAccent,
              ),
              width: 100,
              height: 300,
              child: const Center(child: Text("container")),
            ),
          ),

          Padding(
            padding: const EdgeInsets.only(top: 20.0, left: 20.0, right: 20.0),
            child: Container(
              decoration: BoxDecoration(
                borderRadius: BorderRadius.circular(12),
                color: Colors.redAccent,
              ),
              width: 100,
              height: 300,
              child: const Center(child: Text("container")),
            ),
          ),
        ],
      ),
    );
  }
}
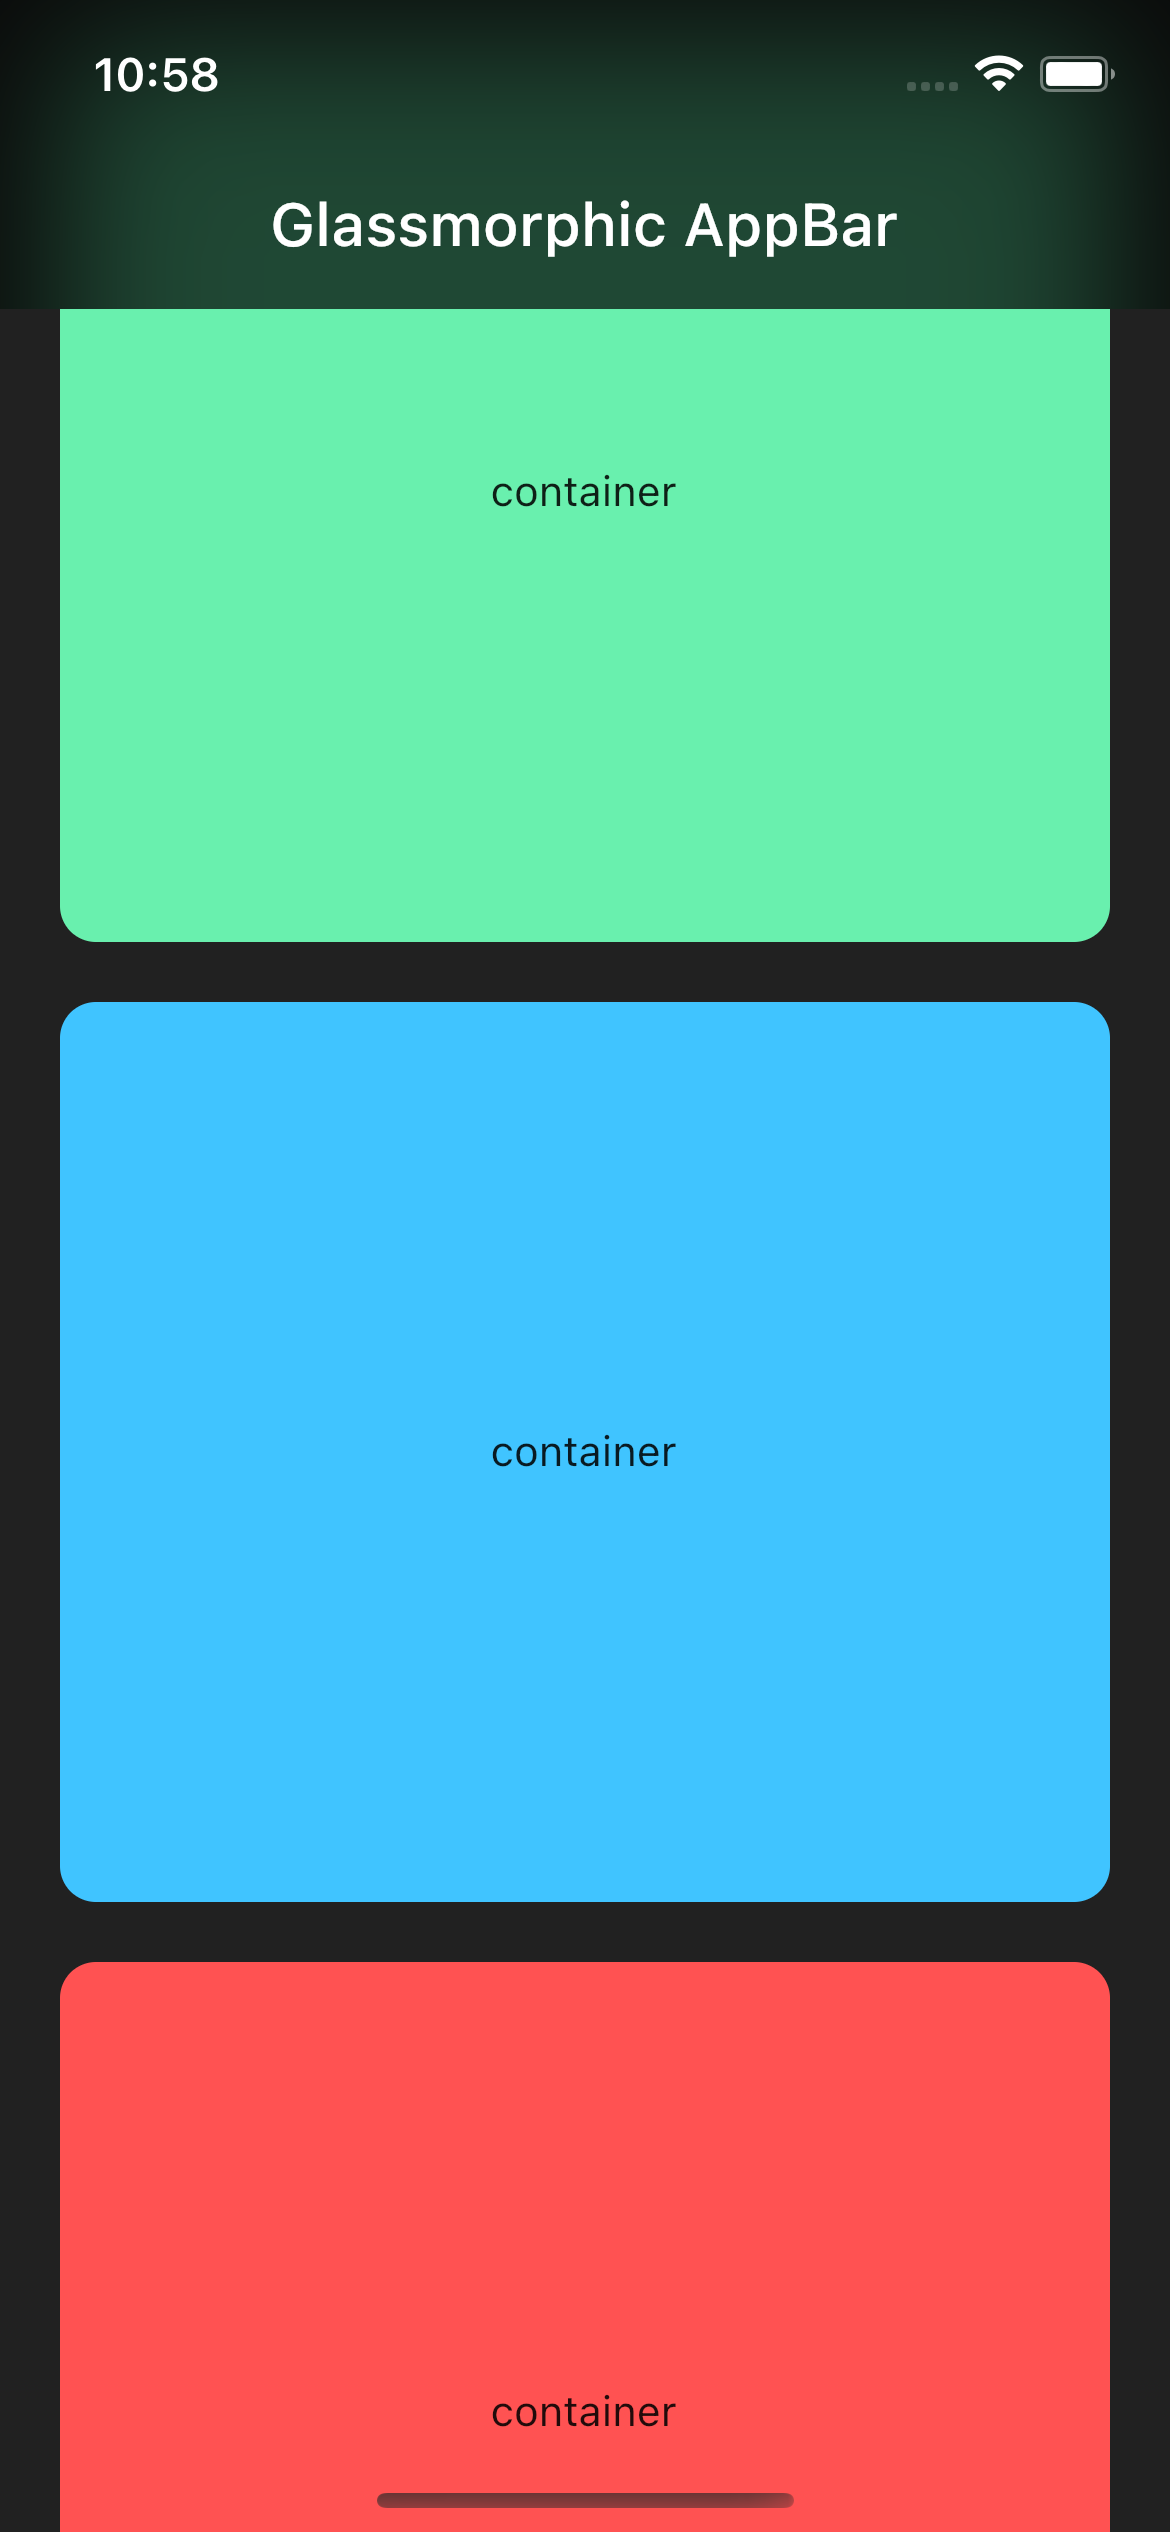
これを実行すると以下の様になるはずです。

今回は黒を基調としましたが、最初の例に挙げた画像のような白を基調とした実装も、AppBarの背景色を変えるだけで簡単にできます。
あとがき
今回はグラスモーフィズムなAppBarを実装してみました。同じような方法でDrawerやBottomNavigationBarもグラスモーフィズムにしてみると、アプリの見た目がぐっとスタイリッシュになるかもしれません。
もし不備やご質問があれば、コメントいただければ幸いです。
それでは良いFlutterライフを👋