はじめに
前回の記事 Spring Initializerを使ってHello World で作成したアプリケーションを公開します。
Herokuを利用したいので、公式サイト Git を使用したデプロイ に沿って進めます。
準備
Gitがインストールされていることを確認
git push でデプロイを行うため、Gitがインストールされている必要があります。
$ git --version
git version 2.20.1 (Apple Git-117)
Herokuアカウント作成
https://jp.heroku.com/home
「新規登録」 > 必要事項を入力 > メール認証
Heroku CLIのインストール
$ brew tap heroku/brew && brew install heroku

$ heroku --version
heroku/7.47.6 darwin-x64 node-v12.16.2
The Heroku CLI
https://devcenter.heroku.com/articles/heroku-cli
デプロイまでの手順
ローカルリポジトリの設定
まずはデプロイしたいプロジェクトをGit管理にします。
# 前回作成したプロジェクトのルートディレクトリに移動
$ cd demo
$ git init
Initialized empty Git repository in /Users/xxxx/workspace/demo/.git/
$ git add .
$ git commit -m "first commit"
リモートの設定
$ heroku create
Creating app... done, ⬢ stormy-headland-99999
https://stormy-headland-99999.herokuapp.com/ | https://git.heroku.com/stormy-headland-99999.git

$ git remote -v
heroku	https://git.heroku.com/stormy-headland-99999.git (fetch)
heroku	https://git.heroku.com/stormy-headland-99999.git (push)
新しい Heroku アプリの場合
https://devcenter.heroku.com/ja/articles/git#for-a-new-heroku-appheroku create CLI コマンドは、関連した空の Git リポジトリとともに新しい空のアプリケーションを Heroku 上に作成します。アプリのルートディレクトリからこのコマンドを実行した場合、空の Heroku Git リポジトリがローカルリポジトリのリモートとして自動的に設定されます。
デプロイ(push)
$ git push heroku master

remote:        [ERROR] Failed to execute goal org.apache.maven.plugins:maven-compiler-plugin:3.8.1:compile (default-compile) on project demo: Fatal error compiling: invalid target release: 11 -> [Help 1]
ERROR![]()
どうやらherokuのデフォルト環境がJDK1.8のため、それ以外のバージョンを使いたいときはsystem.propertiesに設定が必要とのこと。
Supported Java versions
https://devcenter.heroku.com/articles/java-support
ルートディレクトリ(pom.xmlと同じ階層)に以下を配置
java.runtime.version=11
$ git add system.properties
$ git commit -m 'add system.properties'
$ git push heroku master

remote:        [INFO] ------------------------------------------------------------------------
remote:        [INFO] BUILD SUCCESS
remote:        [INFO] ------------------------------------------------------------------------
remote:        [INFO] Total time:  16.410 s
remote:        [INFO] Finished at: 2020-12-31T09:06:48Z
remote:        [INFO] ------------------------------------------------------------------------
remote: -----> Discovering process types
remote:        Procfile declares types     -> (none)
remote:        Default types for buildpack -> web
remote:
remote: -----> Compressing...
remote:        Done: 75.3M
remote: -----> Launching...
remote:        Released v3
remote:        https://stormy-headland-99999.herokuapp.com/ deployed to Heroku
remote:
remote: Verifying deploy... done.
To https://git.heroku.com/stormy-headland-99999.git
SUCCESS![]()
ターミナルに出力されたhttps://git.heroku.com/stormy-headland-99999.gitにアクセス...しかし Method Not Allowedでアクセスできません![]()
理由は単純で、アクセスするURLが違っていました。
remote:        https://stormy-headland-99999.herokuapp.com ⇦ *こっちにアクセス
remote:
remote: Verifying deploy... done.
To https://git.heroku.com/stormy-headland-99999.git
あらためてhttps://stormy-headland-99999.herokuapp.comにアクセスすると、無事デプロイされた環境でHTMLの内容が表示されました。
ここでひとつ疑問 - リモートリポジトリってどうするの?
自分のGitHubにRepositoryを作ってプロジェクト管理をしようとしていたけど、今Herokuをリモートに設定してしまった…大丈夫なのか?
結果、大丈夫でした。今だとherokuだけが設定されていますが、ここに自分のGitHubのリモートリポジトリも追加すればよいのです。
$ git remote
heroku
- GitHub上で空のRepositoryを作成します。
- すると、初期化の方法がいくつか提示されます。すでにプロジェクトは作成しているので「…or push an existing repository from the command line」の手順に従います。
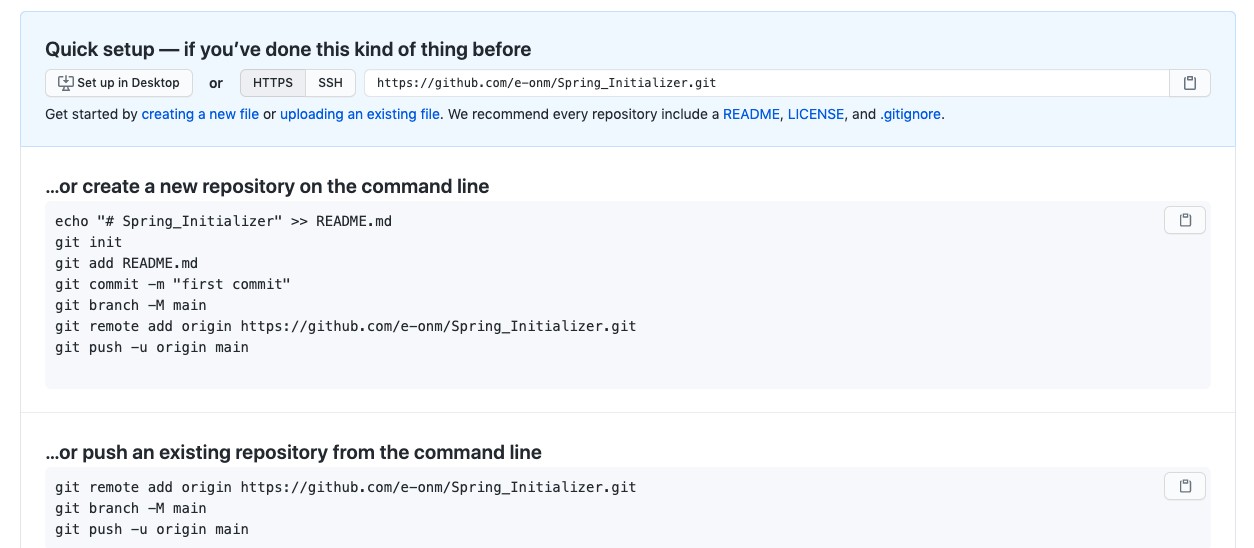
-
git remote add origin https://github.com/e-onm/Spring_Initializer.gitを実行。 - ブランチ名は今のmasterのままでよかったので以降はスキップ
- リモートの設定が追加されたことが確認できました。
$ git remote
heroku
origin
originを指定してpush。問題なくできました。
$ git push origin master
Username for 'https://github.com': e-onm
Password for 'https://e-onm@github.com':
Enumerating objects: 43, done.
Counting objects: 100% (43/43), done.
Delta compression using up to 4 threads
Compressing objects: 100% (30/30), done.
Writing objects: 100% (43/43), 53.89 KiB | 5.99 MiB/s, done.
Total 43 (delta 5), reused 0 (delta 0)
remote: Resolving deltas: 100% (5/5), done.
To https://github.com/e-onm/Spring_Initializer.git
 * [new branch]      master -> master
Herokuにデプロイしたいときはまた
$ git push heroku master
とすれば大丈夫そうですね。
もうひとつ疑問 - ログってどうやって見るの?
以下のコマンドで見れるようです。
$ heroku logs

$ heroku logs help
display recent log output

USAGE
  $ heroku logs

OPTIONS
  -a, --app=app        (required) [default: stormy-headland-70297] app to run command against
  -d, --dyno=dyno      only show output from this dyno type (such as "web" or "worker")
  -n, --num=num        number of lines to display
  -r, --remote=remote  git remote of app to use
  -s, --source=source  only show output from this source (such as "app" or "heroku")
  -t, --tail           continually stream logs
  --force-colors       force use of colors (even on non-tty output)

DESCRIPTION
  disable colors with --no-color, HEROKU_LOGS_COLOR=0, or HEROKU_COLOR=0

EXAMPLES
  $ heroku logs --app=my-app
  $ heroku logs --num=50
  $ heroku logs --dyno=web --app=my-app
  $ heroku logs --app=my-app --tail