1. はじめに
M5cameraはカメラとESP32 wroverが内蔵された製品です.これを使って,定期的にhttp postでサーバにカメラ画像をアップロードしてみます.開発は,Arduino-IDEで行います.ライブラリはHTTPClientとesp_cameraを使います.サーバ側はnode-redを使います.
1.1. 利用したバージョン
- Arduino-IDE : ver 1.8.13
- Arduino core for the ESP32 : ver 1.0.4 (2019.10月版)
(ESP32ライブラリ(ボードマネージャで設定)が古いと動かないことがあります) - Node-red : ver 1.1.2
2. m5cameraのコーディング
処理は次のような流れになります.
- Wi-Fi設定
- HTTPClient設定
- カメラ初期設定
- カメラ画像取得
- HTTP post実施
以前作成したHTTPClientでバイナリファイルを送信を利用します.
まずは,カメラ画像の取得について記載します.
2.1. カメラ画像取得
カメラからの画像取得は非常に簡単です.
esp_camera.hを使い,初期設定後,このたった1行で画像取得できます.
camera_fb_t * fb = esp_camera_fb_get();
fbは次のようになっています.(esp_camera.hより)
typedef struct {
    uint8_t * buf;              /*!< Pointer to the pixel data */
    size_t len;                 /*!< Length of the buffer in bytes */
    size_t width;               /*!< Width of the buffer in pixels */
    size_t height;              /*!< Height of the buffer in pixels */
    pixformat_t format;         /*!< Format of the pixel data */
    struct timeval timestamp;   /*!< Timestamp since boot of the first DMA buffer of the frame */
} camera_fb_t;
JPEGで取得すれば,必要なのはバッファの開始位置と長さとなります.例えば,バッファの最後の内容は下記のように記述できます.
fb->buf[fb->len-1]
あとは,バッファの中身をHTTP postするだけです.ここでは,以前作成したHTTPClientでバイナリファイルを送信の関数httppostを利用します.
httppost( fb->buf , fb->len);
2.2. httppostの修正
但し,関数httppost内で,バッファを複製しhttp.POSTに渡していますので,mallocではなく,ps_mallocで大きいPSDRAM内に複製しています.
その点だけ変更した関数httppostです.
関数httppost
int32_t httppost( uint8_t * ui8BufJpg, uint32_t iNumDat ){

  String stMyURL="";
  stMyURL+=URL1;
  stMyURL+=String(servC);
  stMyURL+=URL2;
  myHttp.begin(stMyURL);

  String stConType ="";
  stConType +="multipart/form-data; boundary=";
  stConType +=STRING_BOUNDARY;
  myHttp.addHeader("Content-Type", stConType);

  String stMHead="";
  stMHead += "--";
  stMHead += STRING_BOUNDARY;
  stMHead += "\r\n";
  stMHead += STRING_MULTIHEAD02;
  stMHead += "\r\n";
  stMHead += STRING_MULTIHEAD03;
  stMHead += "\r\n";
  stMHead += "\r\n";
  uint32_t iNumMHead = stMHead.length();

  String stMTail="";
  stMTail += "\r\n";
  stMTail += "--";
  stMTail += STRING_BOUNDARY;
  stMTail += "--";
  stMTail += "\r\n";
  stMTail += "\r\n";
  uint32_t iNumMTail = stMTail.length();

  uint32_t iNumTotalLen = iNumMHead + iNumMTail + iNumDat;

  uint8_t *uiB = (uint8_t *)ps_malloc(sizeof(uint8_t)*iNumTotalLen);

  for(int uilp=0;uilp<iNumMHead;uilp++){
    uiB[0+uilp]=stMHead[uilp];
  }
  for(int uilp=0;uilp<iNumDat;uilp++){
    uiB[iNumMHead+uilp]=ui8BufJpg[uilp];
  }
  for(int uilp=0;uilp<iNumMTail;uilp++){
    uiB[iNumMHead+iNumDat+uilp]=stMTail[uilp];
  }

  int32_t httpResponseCode = (int32_t)myHttp.POST(uiB,iNumTotalLen);
  myHttp.end();
  free(uiB);
  return (httpResponseCode);
}
2.3. カメラ初期設定
説明の流れが逆になりましたが,初期設定は次のように行います.
これはサンプルコードの CameraWebServerを利用します.m5 camera model Bは次のような設定です.
設定部分
# define PWDN_GPIO_NUM     -1
# define RESET_GPIO_NUM    15
# define XCLK_GPIO_NUM     27
# define SIOD_GPIO_NUM     22 //25
# define SIOC_GPIO_NUM     23

# define Y9_GPIO_NUM       19
# define Y8_GPIO_NUM       36
# define Y7_GPIO_NUM       18
# define Y6_GPIO_NUM       39
# define Y5_GPIO_NUM        5
# define Y4_GPIO_NUM       34
# define Y3_GPIO_NUM       35
# define Y2_GPIO_NUM       32
# define VSYNC_GPIO_NUM    25 //22
# define HREF_GPIO_NUM     26
# define PCLK_GPIO_NUM     21

  camera_config_t config;
  config.ledc_channel = LEDC_CHANNEL_0;
  config.ledc_timer = LEDC_TIMER_0;
  config.pin_d0 = Y2_GPIO_NUM;
  config.pin_d1 = Y3_GPIO_NUM;
  config.pin_d2 = Y4_GPIO_NUM;
  config.pin_d3 = Y5_GPIO_NUM;
  config.pin_d4 = Y6_GPIO_NUM;
  config.pin_d5 = Y7_GPIO_NUM;
  config.pin_d6 = Y8_GPIO_NUM;
  config.pin_d7 = Y9_GPIO_NUM;
  config.pin_xclk = XCLK_GPIO_NUM;
  config.pin_pclk = PCLK_GPIO_NUM;
  config.pin_vsync = VSYNC_GPIO_NUM;
  config.pin_href = HREF_GPIO_NUM;
  config.pin_sscb_sda = SIOD_GPIO_NUM;
  config.pin_sscb_scl = SIOC_GPIO_NUM;
  config.pin_pwdn = PWDN_GPIO_NUM;
  config.pin_reset = RESET_GPIO_NUM;
  config.xclk_freq_hz = 20000000;
  config.pixel_format = PIXFORMAT_JPEG;
  config.jpeg_quality = 10;
  config.frame_size = FRAMESIZE_UXGA;
  //FRAMESIZE_ + QVGA|CIF|VGA|SVGA|XGA|SXGA|UXGA
  config.fb_count = 1;
ポイントは,JPEGで取得する点です.JPEGのバイナリがフレームバッファに入るため,加工不要です.サイズは,好きなものを選択するのが良いと思います.ここでは最大のUXGAにしています.
2.4. Arduinoのボード側設定
- ボードは, ESP32 Wrover Module
- Partition Schemeは,Huge App(3MB No OTA/1MB SPIFFS)を選択します
3. サーバー側
Node-Redを使います.
次のようなノードを配置します.
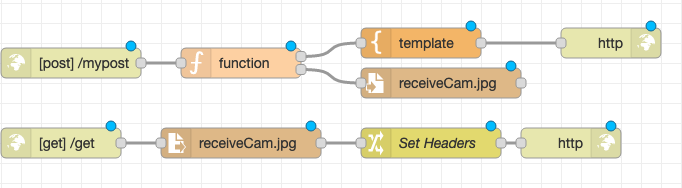
http inノードは,メソッドをpostにし,ファイルをアップロードにチェックを入れ,URLを決めます.
アップロードされたファイルは,fileノードを使い,サーバ側へ一旦保存します.
fileノードは,payloadに入っているものを保存します.
そこで,次のように関数を書いて,payloadに流し込みました.
let mymsgB={};
var myArray = [];
myArray=msg.req.files[0].buffer;
mymsgB.payload=myArray;
mymsgB.filename="test.jpg";

return [msg,mymsgB];
関数を二股にしている理由は特になく,http inから二つに分岐しても良いです.
画像の確認には,http getを利用しています.
postする側はESP32なのでその画像をESP32に見せる必要はなく,上げられた画像を別で見たいはずですので,getで見ます.
こちらのhttp inノードは,メソッドをgetにします.ファイルは,先ほど一次保存したものと整合をとるようにします.あとは,そのバイナリを応答として返します.その返信の前にchangeノードで次のようにヘッダを追加します.
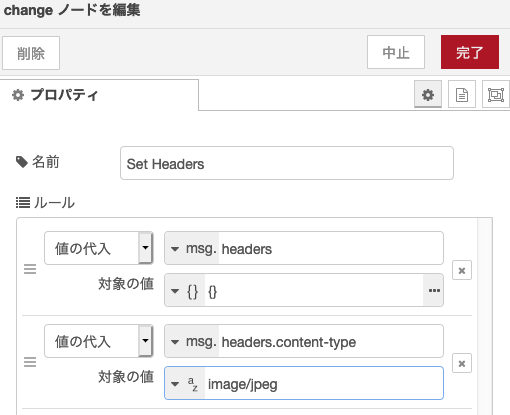
ESP32のHTTPClientでpostメソッドを使う際にヘッダを追加しましたがそれと同じですね.
4. サンプル
下記に置きました.
https://github.com/dzonesasaki/m5camera_httppost_sample
5. むすび
M5cameraはとても高機能で,たったこれだけの事にだけに使うのは勿体ない感じがします.画像をエッジ側(ここではM5camera)で解析する処理しても良いのでは?と感じます.しかし,一方,エッジ側は負荷を軽減したいというニーズもあるように思います.例えば,エッジ側の電源が十分に確保できず,省エネ化したい場合などです.そういう場合は,今回の手法は価値があるように思います.
なお,省エネ化のためには,ループ処理にあるものを全てsetup関数内に持って行き,deepやlightなスリープを行うという方法があると思います.これは撮影の間隔次第かもしれません.
あとは,電力消費の主役はWi-Fiです.残したい画像が来た時だけ,Wi-Fiを接続し,サーバにアップロードするという方法もあるかもしれません.例えば,人の顔を認識したらその画像をアップするなどです.Haar-Like程度であれば,ESP32で処理できるように思います.