こんばんは、 @dz_ こと大平かづみです。
Prologue - はじめに
Cogbot Advent Calendar 2016 25日目の記事です!トリです!ヽ(☆’v`)★’v`)ノ
Microsoft Cognitive Services の新しい仲間 Text Analytics API (Preview) は、キーとなる言葉や、感情を認識してくれる API です。
これを Azure Bot Service でチャットと連携して、発言のキーフレーズを探ってみようと思います。
Cognitive Services とは?
昨今では、膨大なデータの蓄積と解析リソースの調達が容易になったことにより、人間が得意とする認知行動を、コンピューターができるようになってきました。Cognitive Services は、視覚、音声、言語、知識、検索などの認知に特化した機能を、専門的な知識がなくても簡単に利用できるよう、 API や SDK として提供してくれるサービスです。
Text Analytics API とは?
Text Analytics API は、テキストから、感情、キーフレーズ、トピックや言語を検知してくれる機能を提供してくれます。現時点ではまだ Preview で、日本語で利用できるのはキーフレーズの検知、言語の検知です。
Bot Service とは?
チャットボットの仕組みを簡単に実装できる Microsoft Bot Framework に特化した、FaaS (Function as a Service) です。Azure Functions や Azure Web Apps をベースとしたUI・機能ですが、チャットウィンドウや、チャンネル連携のタブがあるのでとても便利です。
準備
前提条件
- Microsoft アカウントを持っている
- Cognitive Services のサブスクリプション登録のため
- Azure のアカウントを持っている
- Azure Bot Service 利用のため
大まかな流れ
- Cognitive Services で Text Analytics のサブスクリプションを登録する
- Azure で Bot Service を新規作成する
- Basic テンプレートを選択する
- Bot Service の環境変数にサブスクリプションキーを設定する
- Text Analytics API を用いてコーディング
参考資料
- Quick start guide: Machine Learning Text Analytics APIs | Microsoft Docs
- Dialogs | Documentation | Bot Framework
Bot Service と Text Analytics を使って発言のキーフレーズを知る
- Cognitive Services で Text Analytics のサブスクリプションを登録する
※ 無料枠を利用する前提で進めます。
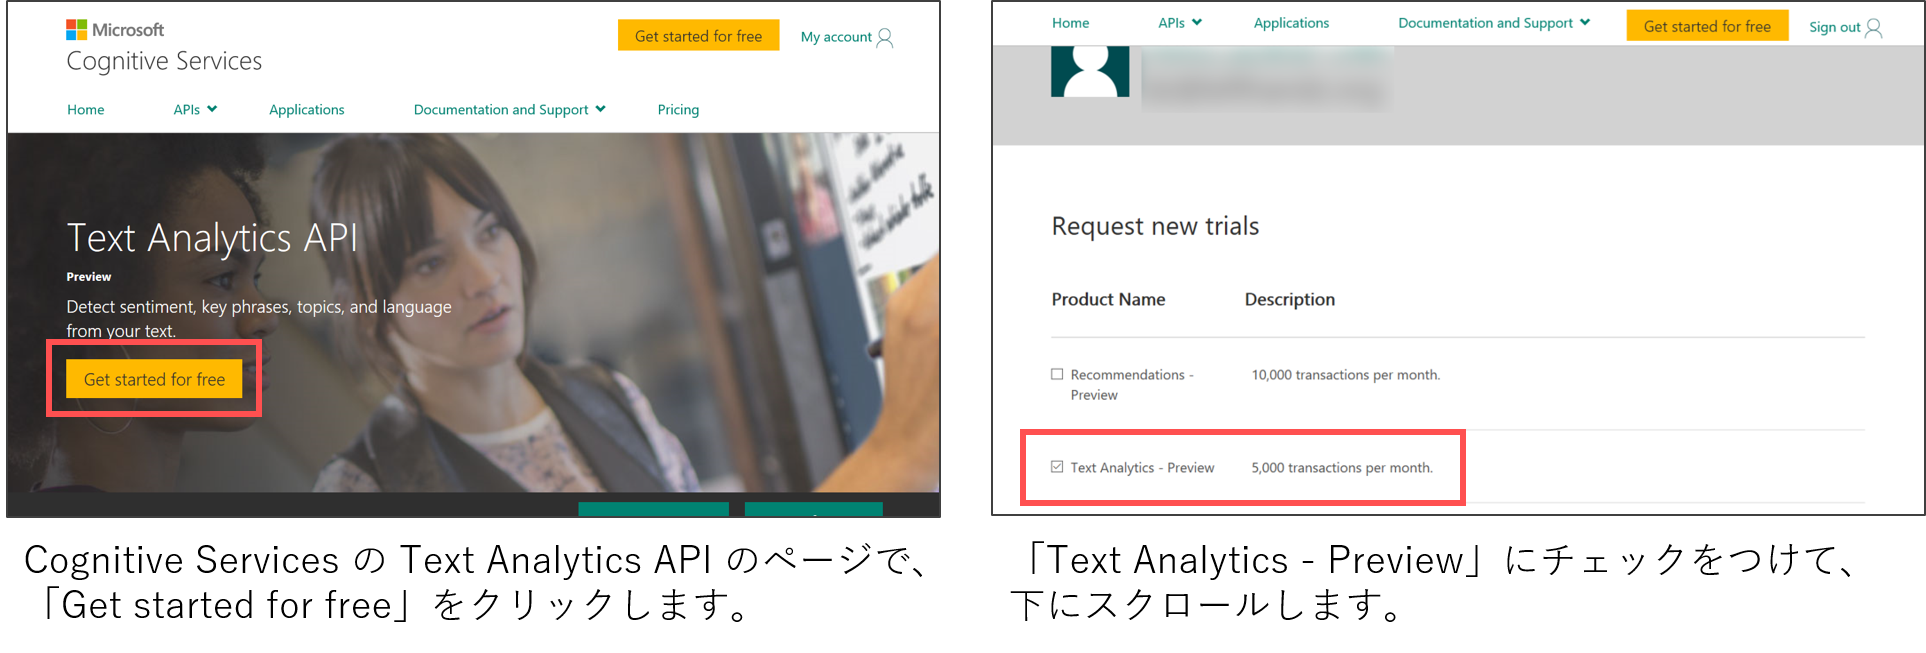
Text Analytics API のページ にアクセスし、「Get started for free」をクリックします。Text Analytics にチェックを付けます。

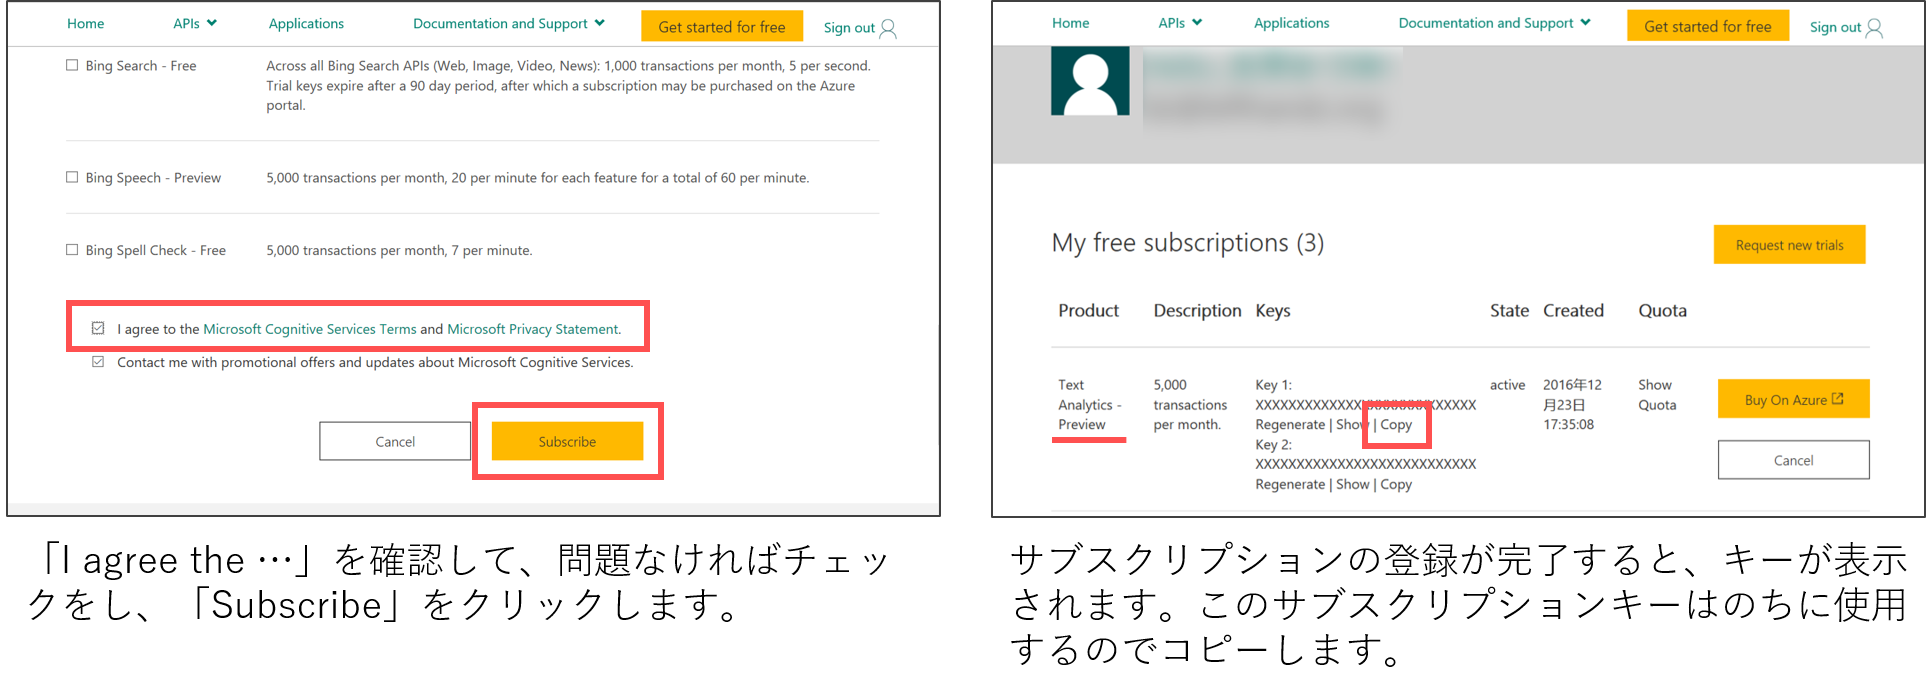
画面下部の利用規約を確認し、チェックを付け、「Subscribe」をクリックすることで、サブスクリプションの登録が完了します。表示されたサブスクリプションキーは、のちに使うのでコピーしておいてください。

- Azure で Bot Service を新規作成する
Azure Bot Service の作成手順については、こちらの 15 ~ 27ページをご参考ください。なお、利用するテンプレートは Basic を選択すると扱いやすいです。
- Bot Service の環境変数にサブスクリプションキーを設定する
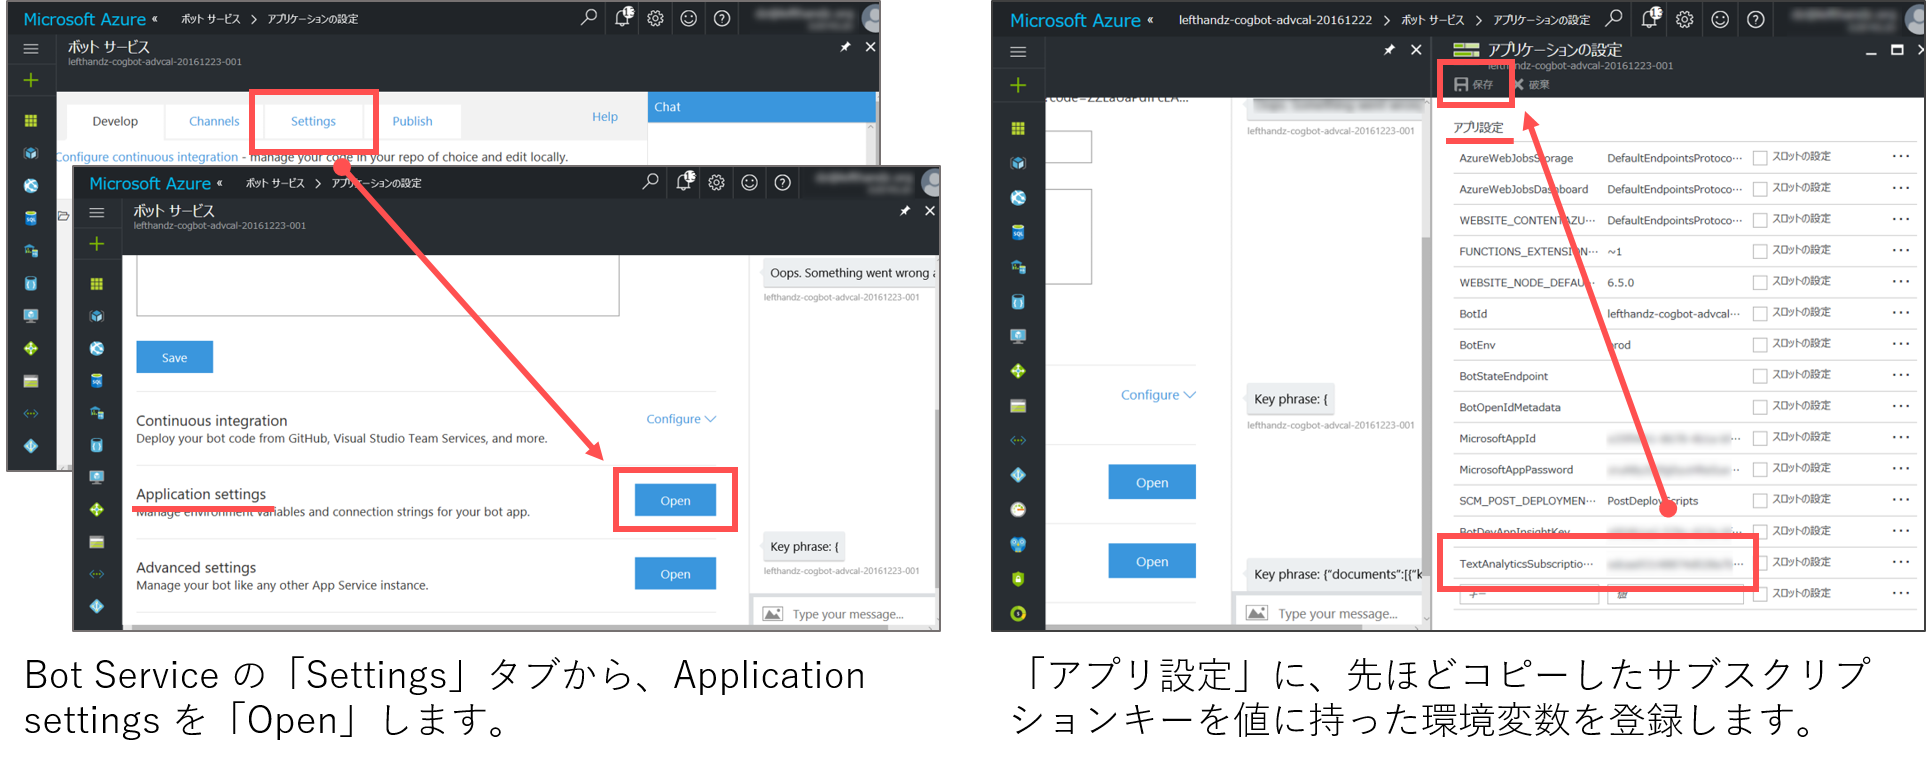
Bot Service の準備ができたら、 Text Analytics のサブスクリプションキーを環境変数に登録しておきましょう。登録した環境変数は、Node.js であれば process.env['<キー名>'] で取得できます。
今回は、 TextAnalyticsSubscriptionKey というキー名で登録しました。後述のサンプルでも、このキー名でサブスクリプションキーを取得しています。
- Text Analytics API を用いてコーディング
キーフレーズ検出の API について
コーディングの前に、 Postman などのAPIクライアントなどを利用して、API の使用感を確認しておくと作業を進めやすいです。
| エンドポイント |
|---|
https://westus.api.cognitive.microsoft.com |
| リクエストヘッダ | 値 |
|---|---|
Ocp-Apim-Subscription-Key |
Text Analytics のサブスクリプションキー(前手順でコピーしたもの) |
Content-Type |
application/json |
Accept |
application/json |
{
    "documents": [
        {
            "language": "ja",
            "id": "1",
            "text": "First document"
        },
        ...
        {
            "language": "ja",
            "id": "100",
            "text": "Final document"
        }
    ]
}
レスポンスデータやその他詳細については、こちら をご参考ください。
コーディング
それでは、 Bot Service の index.js に Text Analytics API を組み込んでみましょう!
以下は Node.js 版のサンプルコードです。(Node.js は独学なので、あくまで処理の参考としてご了承ください。 (´・ω・`;) )
概要説明
Bot Framework は、チャットからメッセージを受信すると、 UniversalBot.dialog() に登録されたコールバックを呼び出します。そのコールバック先で、 session.message.text に格納されたメッセージを、 Text Analytics API に渡してキーフレーズを検出、返信する処理を実装しました。
なお、 Text Analytics API は、一意のIDを付与することで、一度に複数個のテキストを処理にかけることができますので、それを見越した作りにしています。
サンプルコード
"use strict";
var builder = require("botbuilder");
var botbuilder_azure = require("botbuilder-azure");

...<略>...

// --- ★★ ここから ★★ ---
// Load https module
const https = require('https');

/**
 * Text Analytics class
 */
function TextAnalytics() {};

TextAnalytics.prototype.getKeyPhrase = function(messages, callback) {
    // Create send data
    var data = this._createSendData(messages);

    // Request Text Analytics API
    this._requestKeyPhrase(data, callback);

}

TextAnalytics.prototype._createSendData = function(messages) {
    var documents = [];
    var index = 1;
    messages.forEach(function(doc) {
       documents.push({
           "language": "ja",
           "id": index++,
           "text": doc
       });
    });
    var data = {
        "documents": documents
    };
    return JSON.stringify(data);
}

TextAnalytics.prototype._requestKeyPhrase = function(data, callback) {
    var that = this;
    // Create options
    var options = {
        hostname: 'westus.api.cognitive.microsoft.com',
        path: '/text/analytics/v2.0/keyPhrases',
        port: 443,
        method: 'POST',
        headers: {
            'Ocp-Apim-Subscription-Key': process.env['TextAnalyticsSubscriptionKey'],
            'Content-Type': 'application/json',
            'Accept': 'application/json'
        }
    }

    // Request Text Analytics API
    var req = https.request(options, function(res) {
        res.setEncoding('utf8');
        res.on('data', function(chunk) {
            var responses = that._adjustResponse(JSON.parse(chunk));
            callback(responses);
        });
        res.on('end', function() {
            console.log('No more data in response.');
        });
    });
    req.on('error', function(e) {
        console.log('problem with request: ' + ${e.message});
    });
    req.write(data);
    req.end();
}

TextAnalytics.prototype._adjustResponse = function(response) {
    // Adjust the response
    var res = [];
    response.documents.forEach(function(document) {
        res.push(document.keyPhrases);
    });

    return res;
}
var textAnalytics = new TextAnalytics();
// --- ★★ ここまで追加 ★★ ---

var bot = new builder.UniversalBot(connector);

bot.dialog('/', function (session) {
    // --- ★★ ここから ★★ ---
    // session.send('You said ' + session.message.text);

    // Analytics the message to detected key phrase
    textAnalytics.getKeyPhrase(
        [session.message.text],
        function(keyPhrases) {
           // Return detected key phrase
            session.send('Key phrase: ' + keyPhrases[0]);
        });
    // --- ★★ ここまで変更 ★★ ---

});

...<略>...
ここまで反映できたら、右のチャットウィンドウを使って動作確認をしてみましょう! Oops. ... と返信されたり、 Log でエラーの発生がみられたときは、適宜ご調整ください。
できたかなー? (〃ゝω’)b
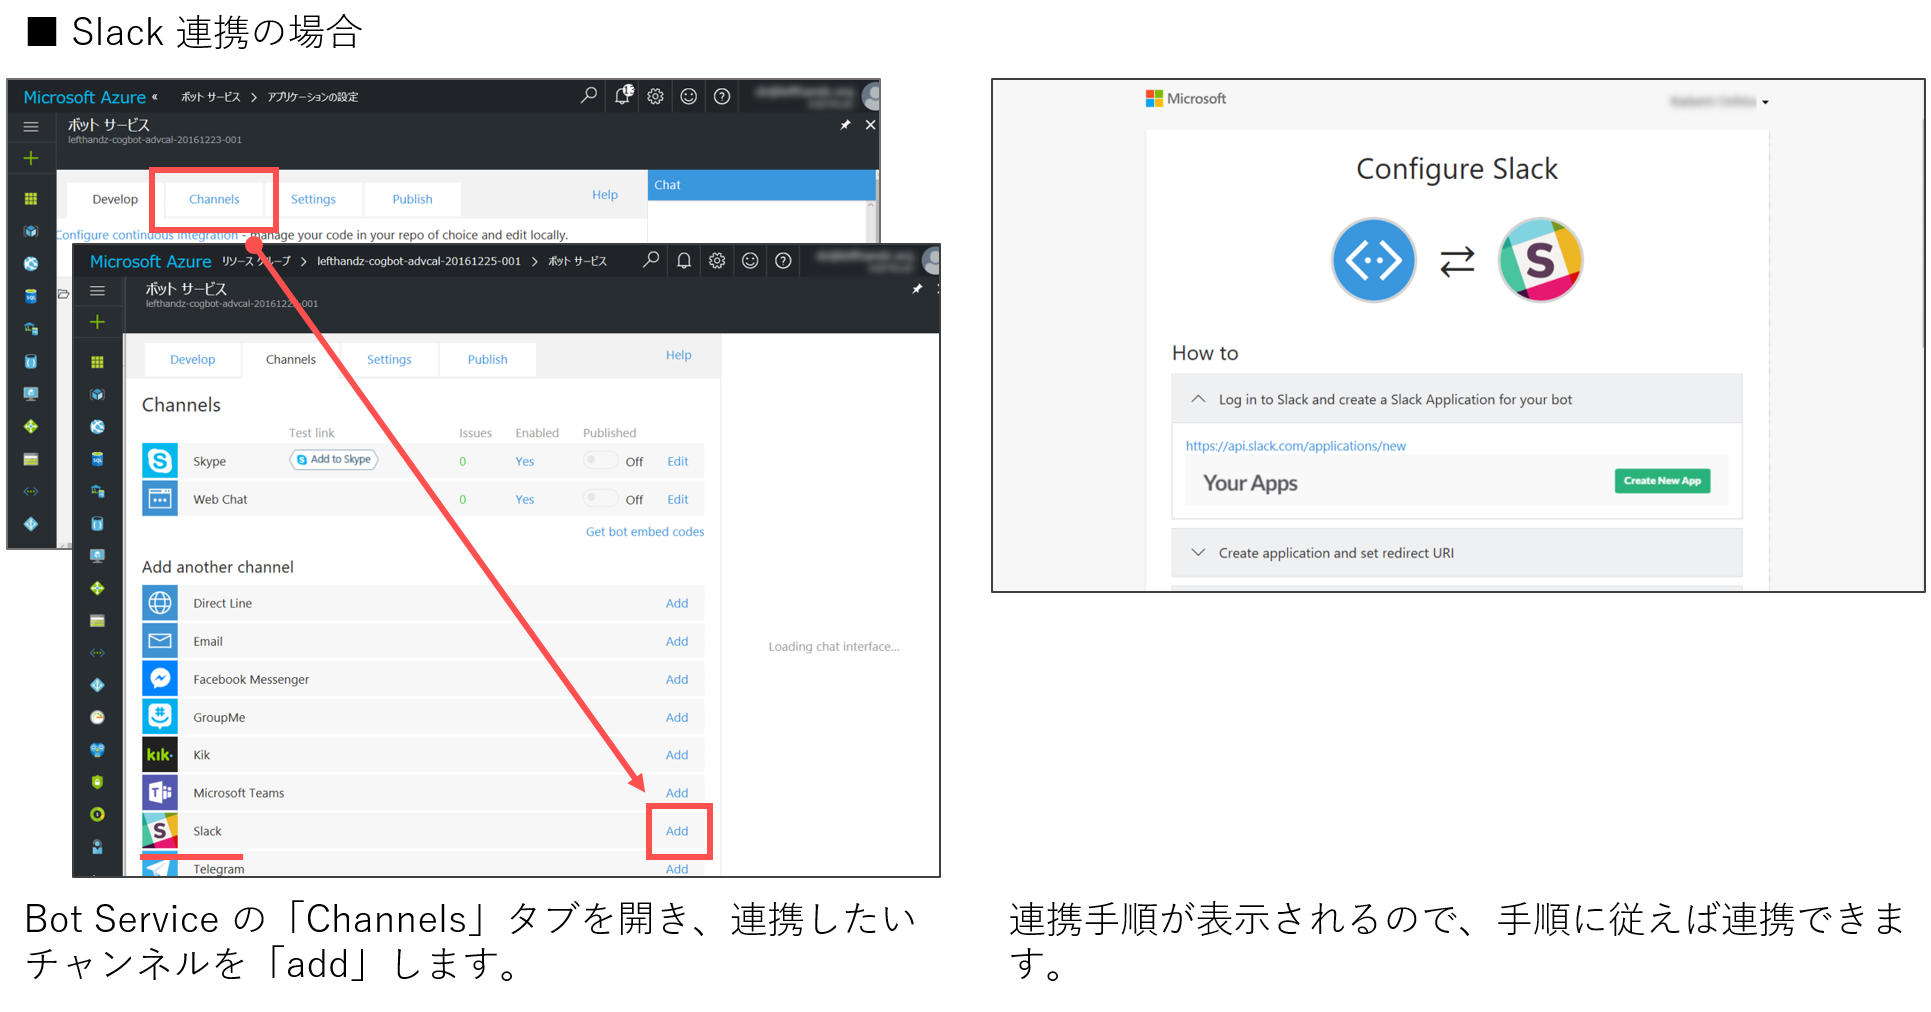
そして、Bot Service のチャットウィンドウでしっかり動けば、あとはどのチャットに連携しても動きます!
なお、今回は、 Slack 連携を検証していたのですが、Slack 側の UI が変わっていて説明が長くなるので、別途記事にまとめる予定です。
Epilogue - おわりに
こんなにあっさり実装できるので、さらに見せ方を工夫すると、ライフログ、作業ログに活かせるかもと思ってます。楽しくなってきましたー!(*ノωノ)

