こんばんは、 @dz_ こと大平かづみです。
Prologue - はじめに
Node-RED Advent Calendar 2016 の 5日目の投稿です。昨日は FlowEditorをカスタマイズ (settings.jsで指定) という記事で、複数運用のコツが紹介されていました!
さて、本記事では Node-RED から Azure IoT Hub にデータを送る方法をご紹介します。(すでにご存知の方も多いかとは思いますが…!)
Azure IoT Hub とは?
IoT デバイスのデータ送受信や、監視、管理ができる Azure のサービスです。
- デバイス → クラウド、クラウド → デバイスの双方向で通信ができる
- デバイス別に共有アクセスキーや接続文字列を発行することができ、それらを用いて接続する
- Azure Stream Analytics を介して、 Azure の各サービスにつなげることができる
余談
ちなみに、IoT でよく使われる似たサービスの Azure Event Hub は、デバイス → クラウドへの単方向の通信をサポートしています。
Node-RED から Azure IoT Hub を利用する方法
Node-RED から Azure IoT Hub を利用するには、ざっくり 2つの方法があります。
- デフォルトの MQTT ノードを利用する
- Azure IoT Hub 用ノードを利用する
デフォルトの MQTT ノードを利用する
Azure IoT Hub は、 MQTT プロトコルをサポートしているので、デフォルトの MQTT ノードでもデータを送受信することができそうです。
Azure IoT Hub 用ノードを利用する
MQTT 専用ノードの方がより簡単に Azure IoT Hub を利用できます。2016年12月の時点では 下記の 2つのノードが見つかりました。
- node-red-contrib-azureiothubnode ← Microsoft 公式?
- node-red-contrib-azure-iot-hub
node-red-contrib-azureiothubnode は、メンテナが azure-cli と同じ windowsazure なので、こちらがマイクロソフト公式のようですね?
ということで、今回は Azure IoT Hub 用ノードを使ってみましょう!
Azure IoT Hub 用ノードを使ってみよう
どちらの使い方も、他のノードと同様、さほど難しくないのですが、IoT Hub 特有のポイントを中心にご紹介します。
作業環境
- Node.js, npm インストール済み
- Node-RED 構築済み
- Azure IoT Hub 作成済み
以下はそれぞれのノードの大まかな流れです。「デバイスID」「接続文字列」「SASトークン」に関しては、後述の Azure IoT Hub デバイスID の新規作成、情報取得について をご参照ください。
なお、この二つは名前が同じノードがあるので、同時には利用できないようです (´・ω・`)
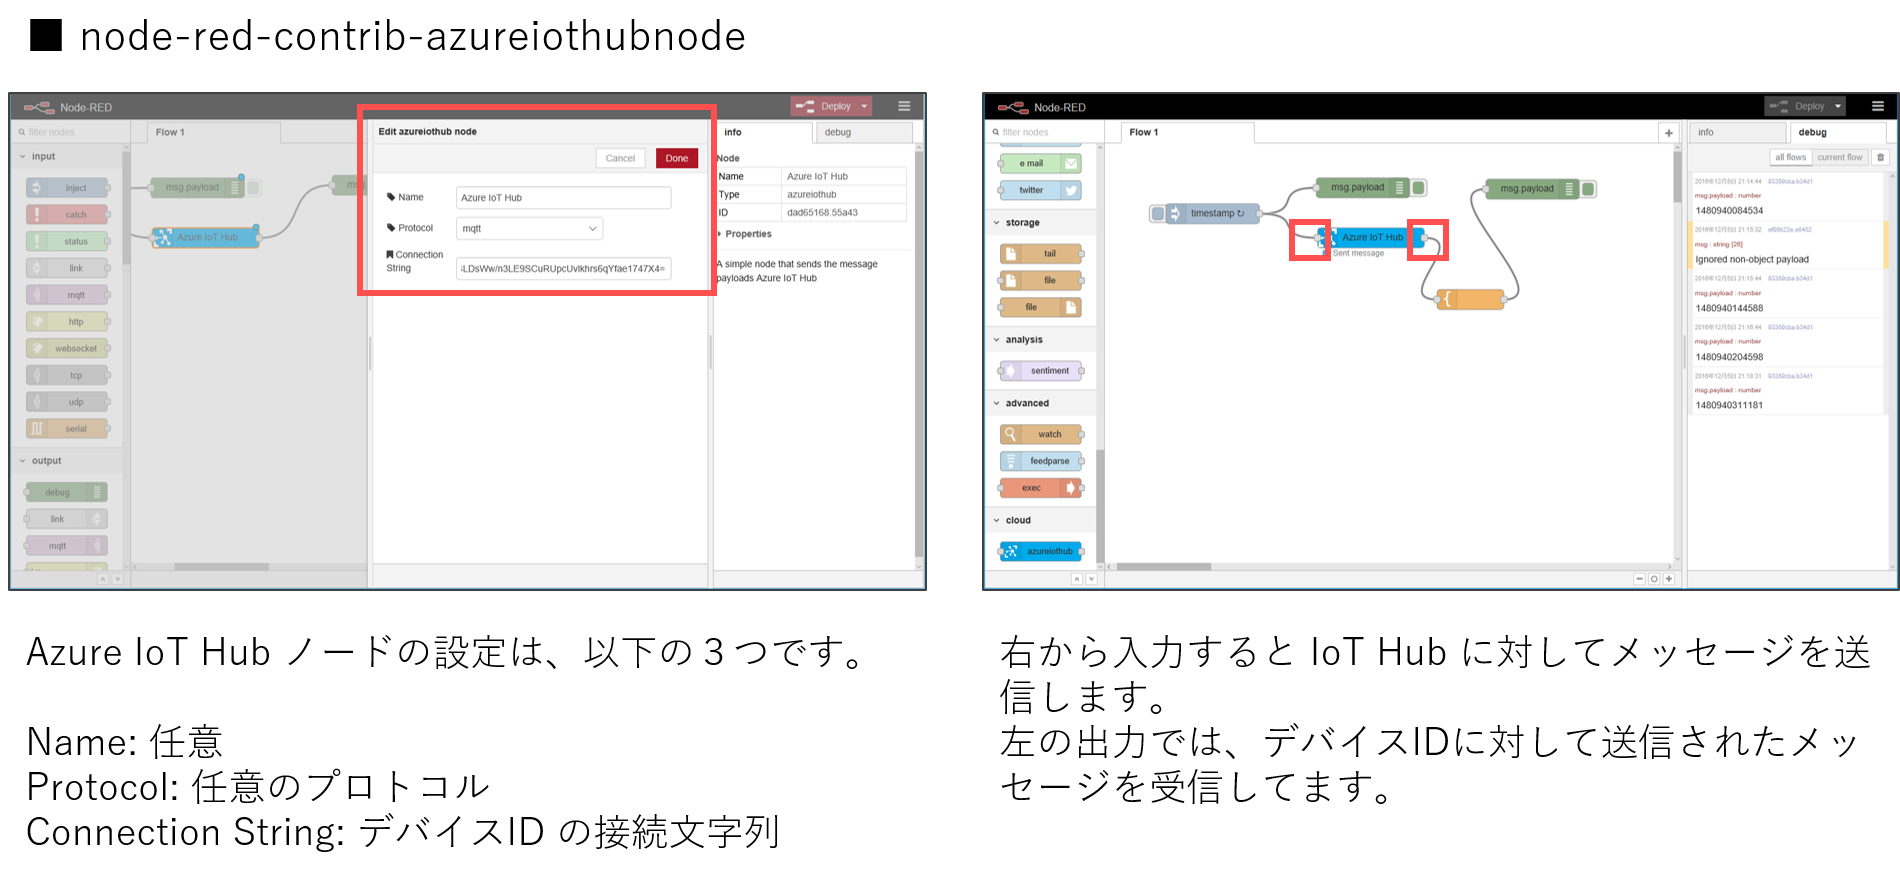
node-red-contrib-azureiothubnode を使ってみる
-
node-red-contrib-azureiothubnodeノードをインストールする - Azure IoT Hub に デバイスID を作成し、接続文字列を得る
-
azureiothubノードを配置し、ノードの設定を行う- 作成したデバイスID の
ConnectionStringに接続文字列を設定する
- 作成したデバイスID の
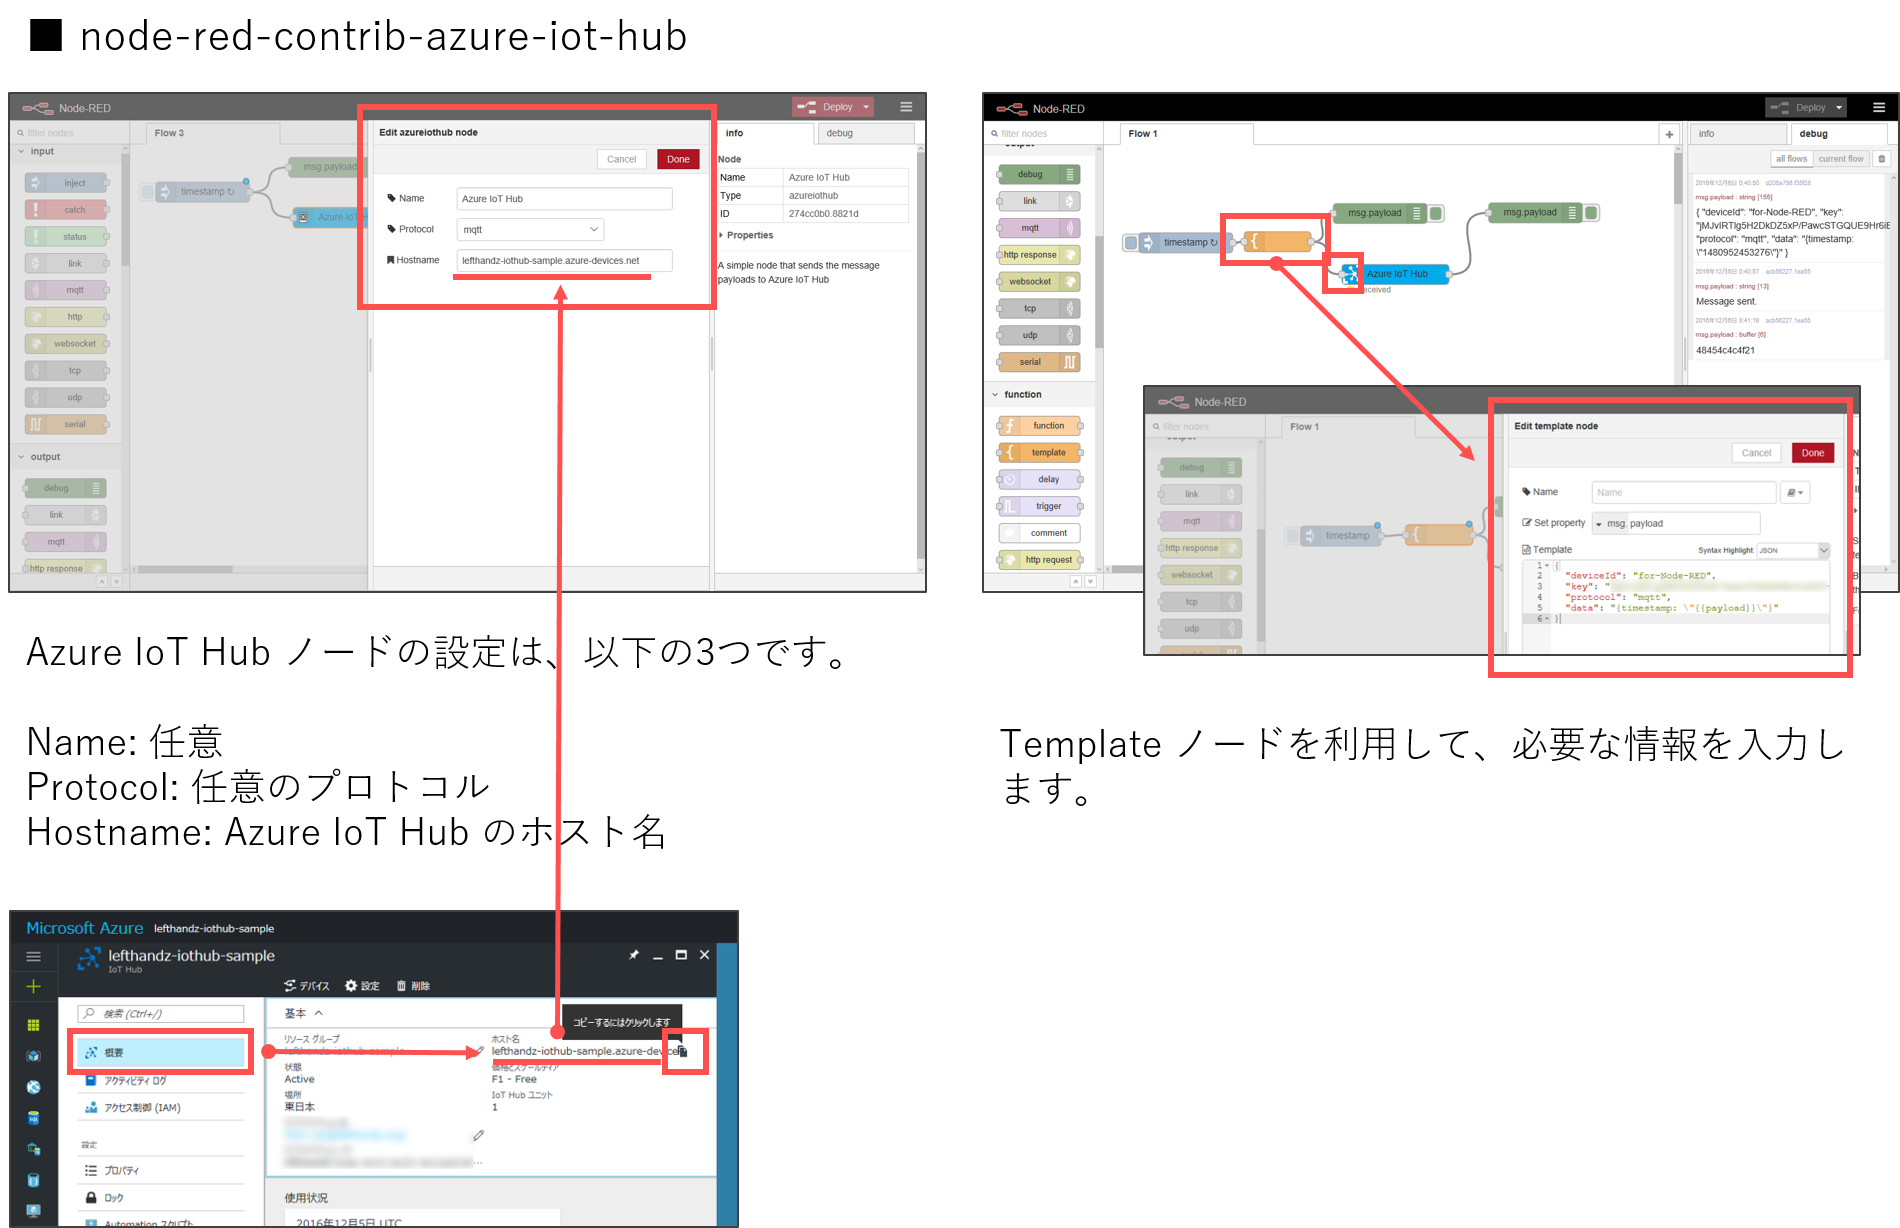
node-red-contrib-azure-iot-hub を使ってみる
こちらは 2つのノード ( azureiothub, azureiothubregistry ) がインストールされます。
-
node-red-contrib-azure-iot-hubノードをインストールする - ポータルなどから Azure IoT Hub の「ホスト名」を取得する
-
azureiothubノードを配置し、ノードの設定を行う-
Hostnameにホスト名を入力する
-
-
azureiothubノードの入力に対して、templateノードを接続し、設定する-
templateノードに、下記フォーマットに合わせた JSON を入力する
-
azureiothub ノードに入力する JSONフォーマットについて
こちら のフォーマットで、「デバイスID」「デバイスIDのキー」「プロトコル」そして「送信データ」を指定します。
{
  "deviceId": "xxx",
  "key": "xxxxxxxxxxxxxxxxxxxxxxxxxxxxxxxxxxxxxxxxxxx=",
  "protocol": "mqtt",
  "data": "{value1: 0, value2: \"test\"}"
}
| 設定項目 | 設定値 |
|---|---|
deviceId |
デバイスID |
key |
デバイスID のプライマリキー、またはセカンダリキー。取得方法は後述参照。 |
protocol |
amqp, amqpws, mqtt, http から選択可能 |
data |
送信データ |
Azure IoT Hub デバイスID の新規作成、情報取得について
Azure IoT Hub を利用するには、デバイスごとの「デバイスID」を作成する必要があります。Azure IoT Hub のデバイスIDの作成は、ポータルではなく、以下のようないくつかの方法で行います。
-
iothub-explorer
- Node.js 製CLIツール
- Windows, Mac OS, Linux で利用可能
- 参考: Use the iothub-explorer tool to provision a device
- Node.js azure-iothub モジュール
- Node.js でコーディング
- 参考: Node.js で Azure IoT Hub を使用する方法 | Microsoft Docs
- Device Explorer
- GUIツール
- Windows のみで利用可能
-
Azure IoT SDKs のリリースページ から
SetupDeviceExplorer.msiをダウンロード、インストールして利用する - 参考: Use the Device Explorer tool to provision a device
iothub-explorer を使ってみる
大まかな流れ
- ポータルから IoT Hub の接続文字列を取得する
- IoT Hub の接続文字列を用いて、ログインする
- デバイスIDを作成する
- デバイスIDの情報を取得する
解説
ポータルから IoT Hub の接続文字列を取得します。
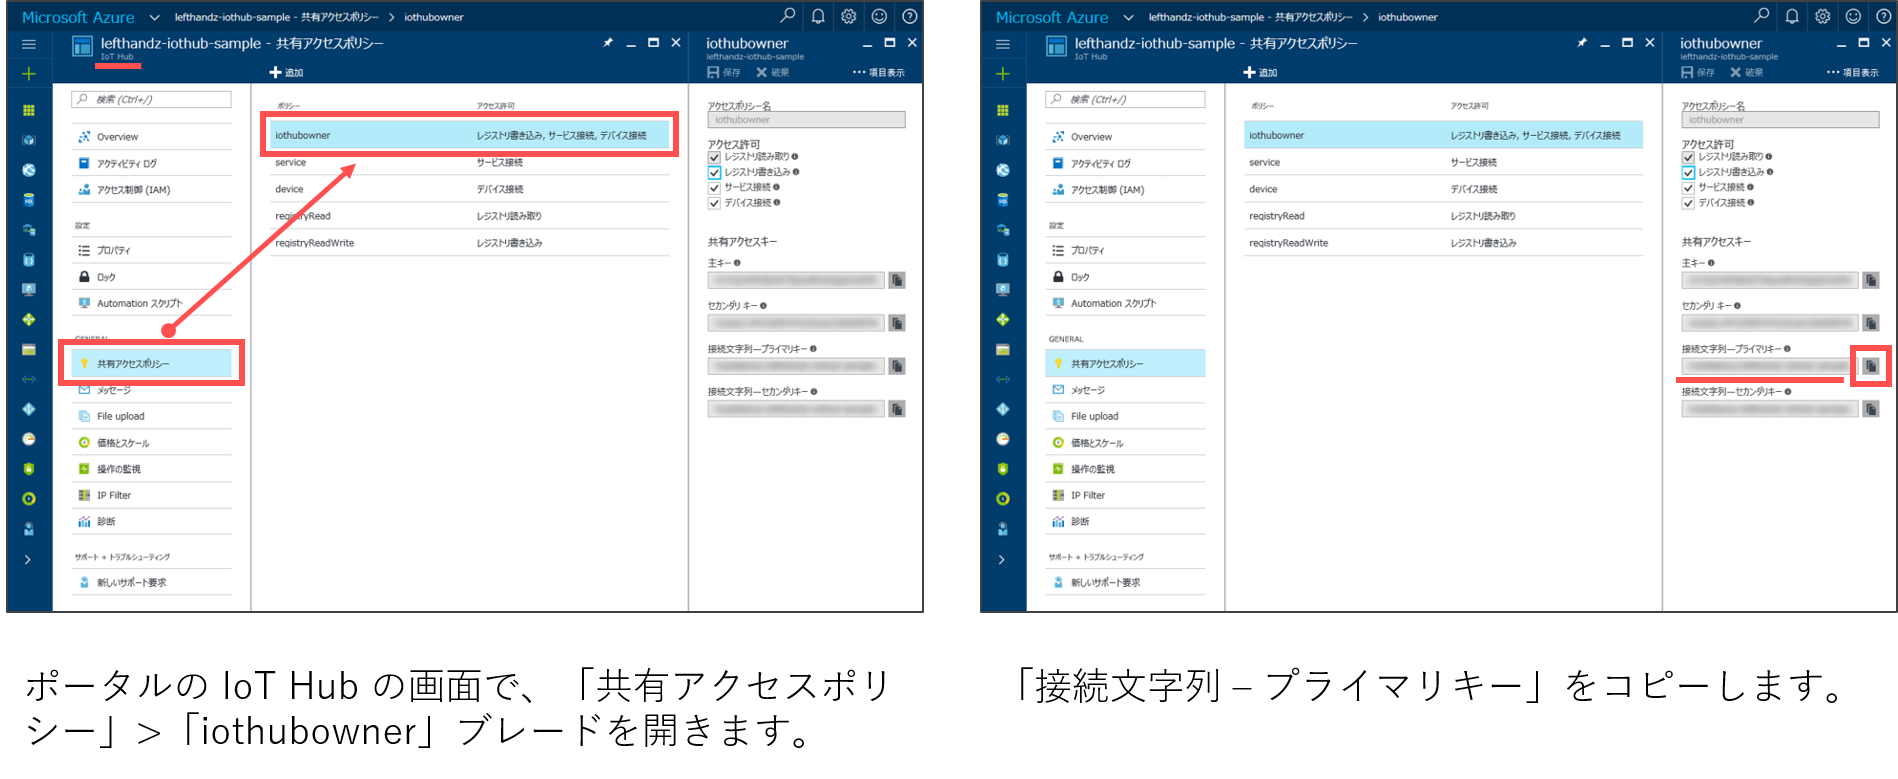
接続文字列 ( connectionString ) は、このような文字列です。
HostName=xxx.azure-devices.net;SharedAccessKeyName=iothubowner;SharedAccessKey=xxxxxxxxxxxxxxxxxxxxxxxxxxxxxxxxxxxxxxxxx=
そして、 そのの接続文字列を用いて、ログインします。
# ログインする
$ iothub-explorer login <iothub-connection-string>
デバイスIDを新規作成するには、 iothub-explorer create コマンドを使います。
デバイスIDのキーは symmetricKey として表示され、プライマリキー、セカンダリキーを持っています。このとき --connection-string または -c とオプションをつけると、このデバイスIDの接続文字列を表示してくれます。
# デバイスIDを作成する
$ iothub-explorer create <device-name> --connection-string

Created device xxx
deviceId:                   xxx
generationId:               012345678901234567

...<略>...

authentication:
  symmetricKey:
    primaryKey:   xxxx=
    secondaryKey: xxxx=

...<略>...

connectionString:           HostName=xxx.azure-devices.net;DeviceId=xxx;SharedAccessKey=xxxxx=
作成済みのデバイスID の場合は、 iothub-explorer get コマンドで、キーなどの各情報を得ることができます。 --connection-string または -c オプションを指定することで接続文字列も取得できます。
# 作成済みのデバイスIDの接続文字列を取得する
$ iothub-explorer get <device-name> --connection-string

deviceId:                   xxx
generationId:               012345678901234567

...<略>...

authentication:
  symmetricKey:
    primaryKey:   xxxx=
    secondaryKey: xxxx=

...<略>...

connectionString:           HostName=xxx.azure-devices.net;DeviceId=xxx;SharedAccessKey=xxxxx=
トラブルシューティング
最後に、私が陥ったトラブルについて共有しておきます。
前述のドキュメント ( Node.js で Azure IoT Hub を使用する方法) のデバイスIDを作成する Node.js のコードや、バージョン 1.1.0 時点の iothub-explorer では、以下のエラーが発生します。ご注意くださいませ。
primaryKey が定義されていないというエラー
概要
デバイスIDに紐づく情報の構造が deviceInfo.authentication.SymmetricKey.primaryKey から deviceInfo.authentication.symmetricKey.primaryKey (symmetricKey の頭文字が小文字になった) に変わったようで、これに対応していないと TypeError: Cannot read property 'primaryKey' of undefined というエラーが発生します。
対処
ドキュメント内のサンプルコードの場合
以下を読み替えて実行して下さい。
...<略>...

function printDeviceInfo(err, deviceInfo, res) {
  if (deviceInfo) {
    console.log('Device id: ' + deviceInfo.deviceId);
-   console.log('Device key: ' + deviceInfo.authentication.SymmetricKey.primaryKey);
+   console.log('Device key: ' + deviceInfo.authentication.symmetricKey.primaryKey);
  }
}
バージョン 1.1.0 時点の iothub-explorer の場合
1.1.0 までのバージョン iothub-explorer を利用すると、以下のエラーが発生するようです。当初は直接モジュール内のソースコードを書き換えて回避してましたが、今では 1.1.1 以上にバージョンアップすれば問題ありません。
$ iothub-explorer sas-token "myFirstDevice"

C:\Users\user\AppData\Roaming\npm\node_modules\iothub-explorer\iothub-explorer-sas-token.js:44
    var key = device.authentication.SymmetricKey.primaryKey || device.authentication.SymmetricKey.secondaryKey;
                                                ^

TypeError: Cannot read property 'primaryKey' of undefined
    at C:\Users\user\AppData\Roaming\npm\node_modules\iothub-explorer\iothub-explorer-sas-token.js:44:49
    at C:\Users\user\AppData\Roaming\npm\node_modules\iothub-explorer\node_modules\azure-iothub\lib\registry.js:223:7
    at C:\Users\user\AppData\Roaming\npm\node_modules\iothub-explorer\node_modules\azure-iothub\lib\rest_api_client.js:109:7
    at IncomingMessage.onResponseEnd (C:\Users\user\AppData\Roaming\npm\node_modules\iothub-explorer\node_modules\azure-iot-http-base\lib\http.js:73:7)
    at emitNone (events.js:91:20)
    at IncomingMessage.emit (events.js:185:7)
    at endReadableNT (_stream_readable.js:974:12)
    at _combinedTickCallback (internal/process/next_tick.js:74:11)
    at process._tickCallback (internal/process/next_tick.js:98:9)
Epilogue - おわりに
簡単ゆえにいろいろ情報を載せようとしたところ、てんこ盛りに…!
とはいえ、簡単につなげられるので、ぜひご利用くださいませ~!ヾ(*・ω・*)o