Amplify Gen2でプ譜エディターを動かす
Amplify Gen2とは
Amplify Gen2はコードファースト(TypeScript)でAWSのサービスを組み合わせたアプリケーション開発を提供します。
Amplify Gen1はCLIツールやCloudFormationのテンプレートを組み合わせて、アプリケーションのバックエンドを構築していましたが、Gen2ではAWS CDKによってコードでバックエンドを構築することができ、より統一感のある開発を実現します。
プ譜エディターとは
プ譜エディターは書籍『予定通り進まないプロジェクトの進め方』(著: 前田考歩、後藤洋平)で紹介されているプロジェクト譜(以下、プ譜)をWebブラウザで編集・表示するためのエディターです。
プ譜は下記のように紙1枚で表現できるフォーマットになり、プロジェクト全体を俯瞰することができます。

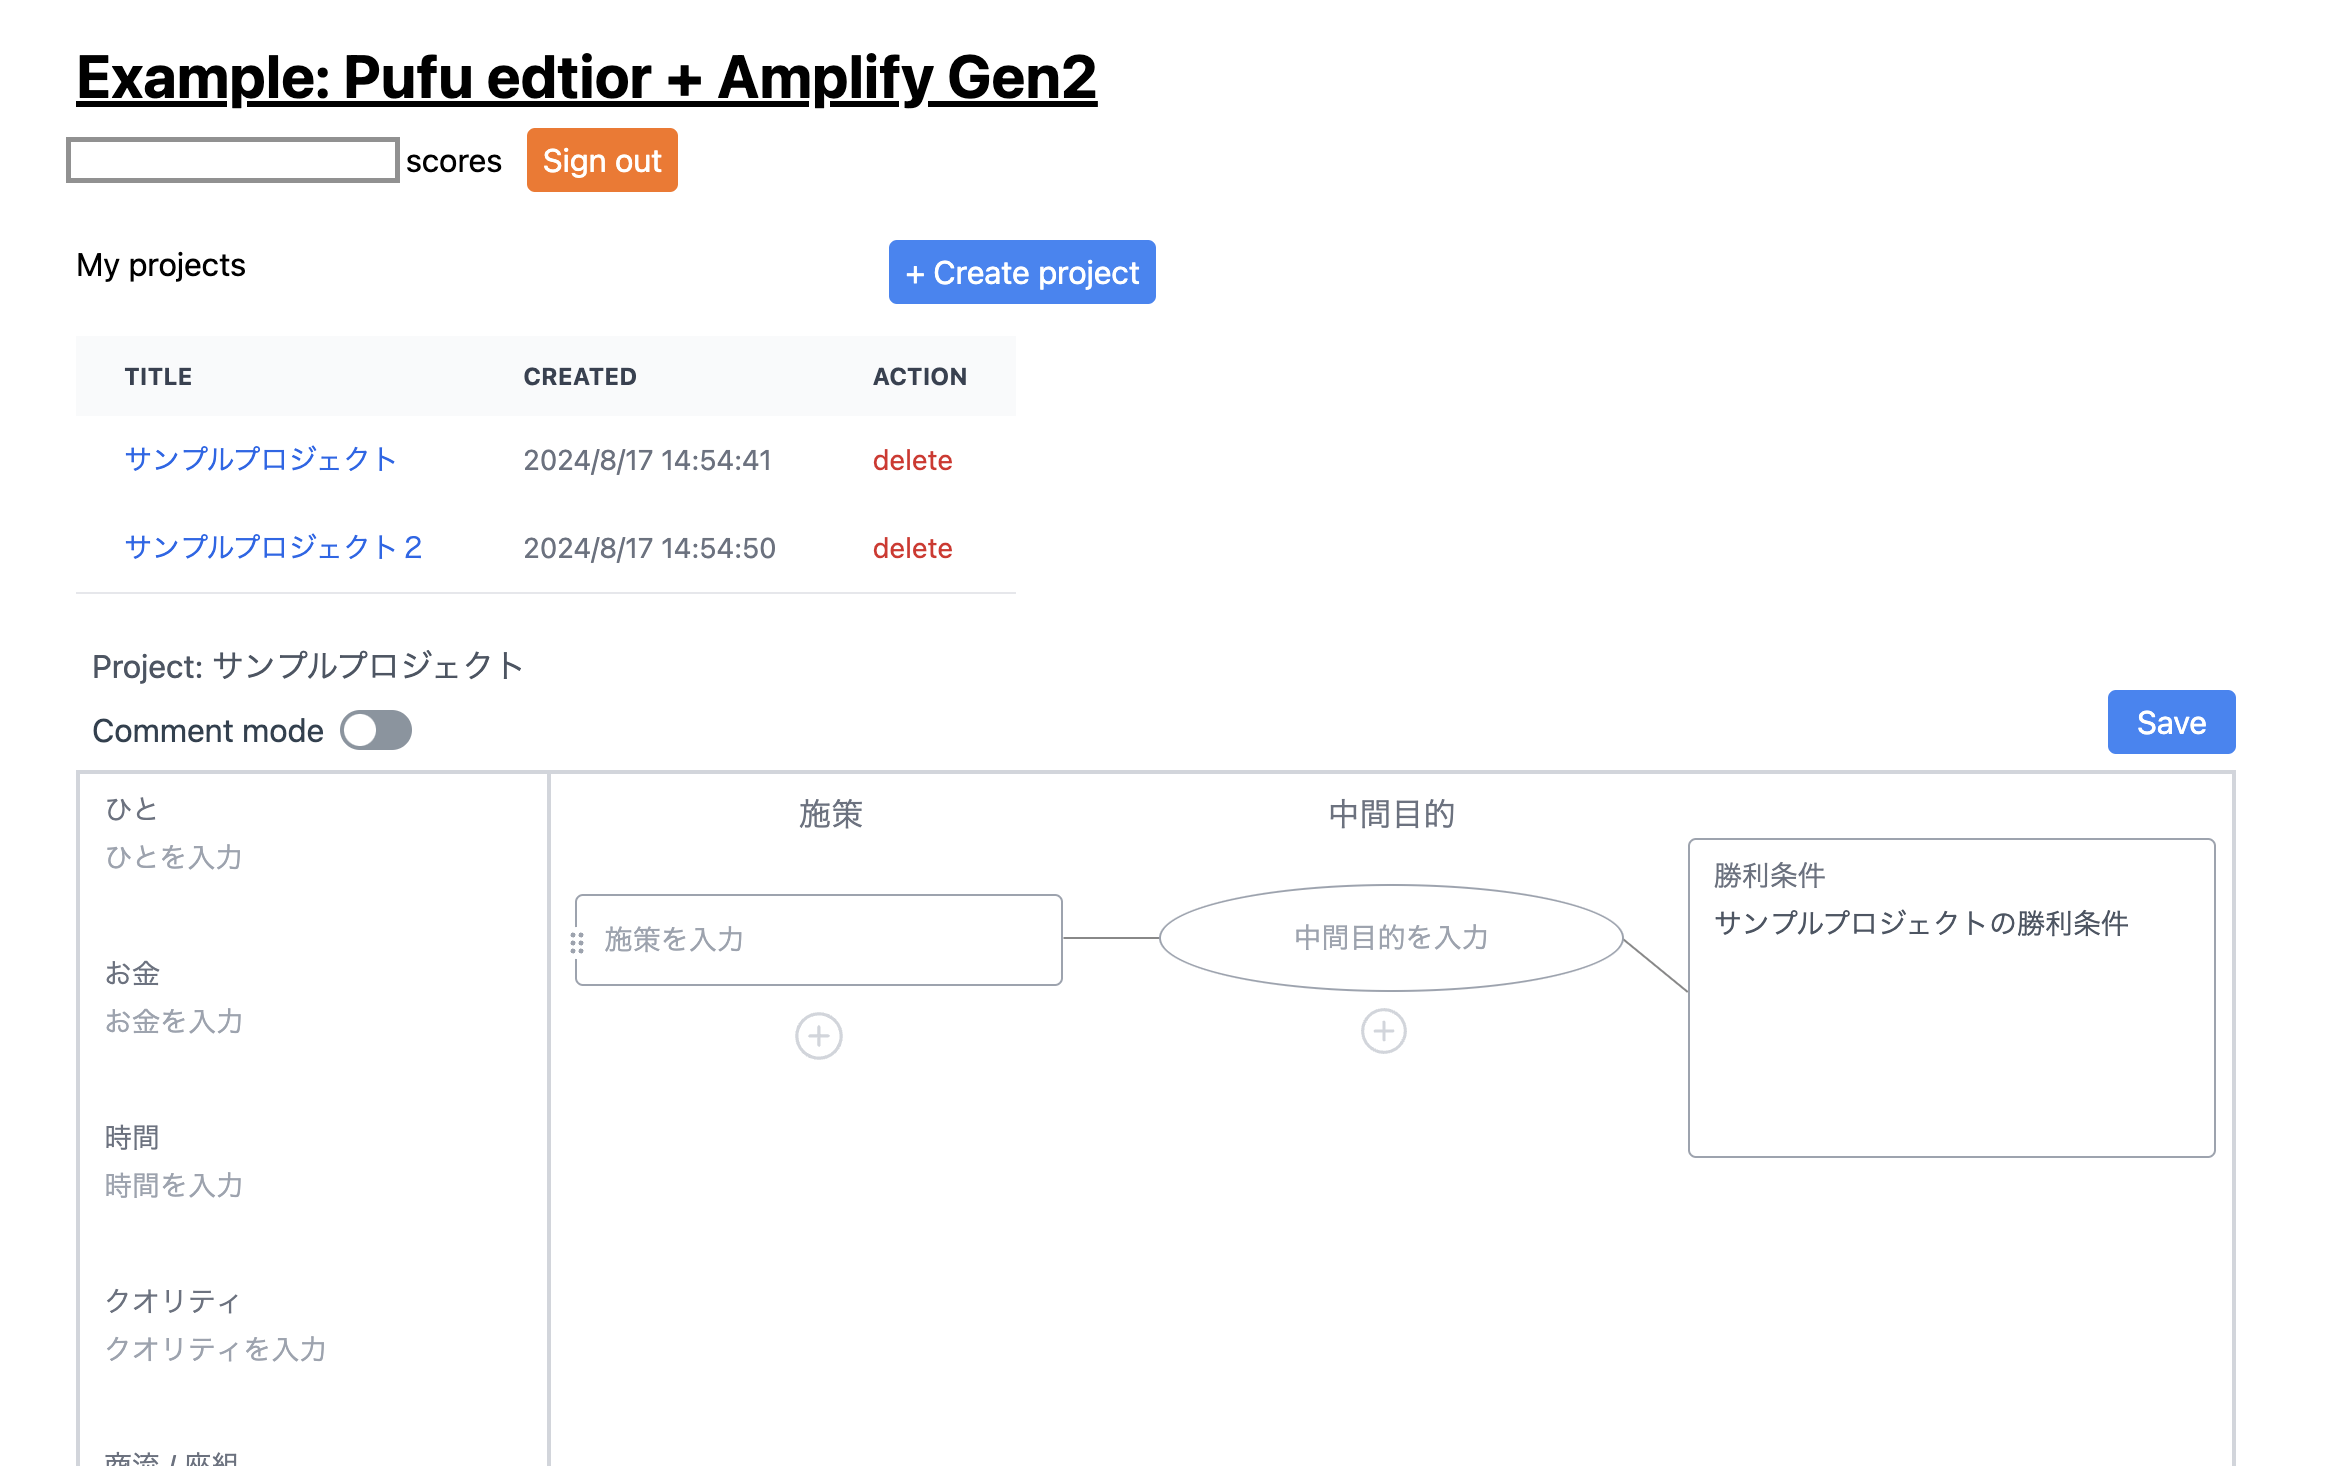
プ譜エディターは描画を担うもので保存機能はないので、Amplify Gen2と組み合わせてプ譜の管理機能をつくってみます。
完成イメージ
初期設定
React+Viteのインストール
npm create vite@latest first-intall -- --template react-ts
npm install
Amplify関連のインストール
npm create amplify@latest
npm install @aws-amplify/ui-react
その他パッケージインストール
npm install @goto-lab/pufu-editor
npm install short-uuid
npm install -D tailwindcss postcss autoprefixer
Tailwindの設定
Install Tailwind CSS with Vite に沿ってtailwind.config.jsやindex.cssの設定をおこないます。
tsconfig.app.jsonのincludeにamplifyを追加
- "include": ["src"]
+ "include": ["src", "amplity"]
Amplify Sandbox
Amplify Gen2ではサンドボックスという機能があり、開発検証用の環境をサンドボックス(砂場)として簡単に立ち上げることができます。
下記のコマンドでサンドボックスの作成や立ち上げを行います。
# デフォルトのプロファイルを使用する場合
npx ampx sandbox
# プロファイルや識別子を指定する場合
npx ampx sandbox --profile <profile> --identifier identifier>
プロファイルやサンドボックス名につくprefixを識別子として指定することができます。
Amplifyのリソースの編集
プ譜のデータを保存できるようにするため、データのフォーマットの設定をおこないます。
https://docs.amplify.aws/react/build-a-backend/data/
データのフォーマットはスキーマとして定義します。
amplify/data/resource.ts
Scoreにプ譜のデータを格納します。データの認証機能もつけるためuserPoolを指定します。
userPoolにするとAWSの認証サービスCognitoを利用するようになります。
const schema = a.schema({
  Project: ProjectModel,
  Score: ScoreModel,
  Comment: CommentType,
  Measure: MeasureType,
  Objective: ObjectiveType,
  Purpose: PurposeType,
  Element: ElementType,
  Elements: ElementsType,
});

export type Schema = ClientSchema<typeof schema>;
export const data = defineData({
  schema,
  authorizationModes: {
    defaultAuthorizationMode: "userPool",
  },
});
ScoreModelに廟算八要素(elements)や勝利条件(winCondition)などを定義していきます。
プ譜はデータが入れ子構造になっているので下位の構造は別途定義してrefで参照します。
プロジェクトIDで検索できるようにインデックスを定義して、listByProjectIdで検索できるようにしています。
const ScoreModel = a
  .model({
    projectId: a.id().required(),
    number: a.integer().required(),
    gainingGoal: a.ref("Objective").required(),
    winCondition: a.ref("Objective").required(),
    elements: a.ref("Elements").required(),
    purposes: a.ref("Purpose").array(),
    owner: a.id(), //現時点ではownerを指定しないとupdateでエラーが発生
  })
  .secondaryIndexes((index) => [
    index("projectId").sortKeys(["number"]).queryField("listByProjectId"),
  ])
  .authorization((allow) => [allow.owner()]);
下位の構造はcustomTypeで定義しています。さらに入れ子になっているのでElementも別途定義しています。
const ElementsType = a.customType({
  people: a.ref("Element"),
  money: a.ref("Element"),
  time: a.ref("Element"),
  quality: a.ref("Element"),
  businessScheme: a.ref("Element"),
  environment: a.ref("Element"),
  rival: a.ref("Element"),
  foreignEnemy: a.ref("Element"),
});
サンドボックスのコマンドを起動していると、スキーマを定義の変更を検知して自動的にサンドボックス環境に反映されます。従来は開発環境にデプロイしたり、モックを作ったりしていたので画期的ですね。
App.tsxの編集
メインのページを編集してきます。
下記がAmplifyの初期設定に関わる箇所です。
import type { Schema } from "../amplify/data/resource";
import outputs from "../amplify_outputs.json";
import { Amplify } from "aws-amplify";
import { generateClient } from "aws-amplify/data";
....
Amplify.configure(outputs);

const client = generateClient<Schema>();
下記でAmplifyの設定の読み込みとデータにアクセスするクライアントを設定します。
Amplify.configure(outputs);
const client = generateClient<Schema>();
プロジェクト→プ譜の構造にしており、下記がプロジェクトとプ譜の作成箇所です。
clientのスキーマ名のcreateメソッドでデータを作成します。
このメソッドでAppSyncのmutationが実行されます。
  const createProject = async () => {
    return await client.models.Project.create({
      title: window.prompt("Score title") ?? "no name",
    });
  };

  const createScore = (projectId: string) => {
  ...
    return client.models.Score.create({
      projectId,
      number: 1,
      winCondition: {
      uuid: short.generate(),
       text: "",
      comment: createComment(),
      } ,
      ...
  };
プ譜の局面(Score)のデータ取得はプロジェクトIDから引っ張るため、
インデックス定義したlistByProjectIdからprojectIdを指定して取得します。
  const getScore = async (projectId: string) => {
    return (
      await client.models.Score.listByProjectId({
        projectId,
      })
    ).data[0];
  };
ログインの判定は@aws-amplify/ui-reactのAuthenticatorを
使用します。未ログインの場合はログインページが表示されます。
import { Authenticator, Loader, SwitchField } from "@aws-amplify/ui-react";
...
  return (
    <Authenticator>
      {({ signOut, user }) => (
              <main className="px-16 py-8">
              </main>
      )}
    </Authenticator>
  )
UIなどを実装して
$ npm run dev

  VITE v5.3.5  ready in 371 ms

  ➜  Local:   http://localhost:5173/
  ➜  Network: use --host to expose
  ➜  press h + enter to show help
でhttp://localhost:5173/にアクセスして画面が表示されます。
Amplify Gen2を使用してプ譜のデータを保存する画面を実装しました。
データの入れ子などGen1とは異なるところもあるのでまだまだ学習が必要です。
ソースコードはプ譜エディターのGithubで公開しております。
https://github.com/goto-lab/pufu-editor/tree/main/examples/amplify-gen2-example
以上です。ありがとうございました。

