CSS animation day 59 もとい、
Three.js day2 となりました。
本日は、Three.js で3D object を表示させましょう。
1. 完成版

2. 参考文献
ICS MEDIA
初めてのThree.js
three.jsの基礎の基礎:概要から静止オブジェクトの表示方法まで
3. 分解してみる
❶.
前回までの復習です。
three.js のセットアップです。
<!DOCTYPE html>
<html lang="ja">
  <head>
    <meta charset="UTF-8" />
    <script src="https://cdnjs.cloudflare.com/ajax/libs/three.js/102/three.min.js"></script>
    <style>
      body {
        margin: 0;
        padding: 0;
        overflow: hidden;
      }
    </style>
  </head>
  <body>
    <canvas class="stage"></canvas>

    <script>
      function init() {

      }

      window.addEventListener("load", init);
    </script>
  </body>
</html>
では、init 関数の中身を書いていきましょう。
3D オブジェクトを表示するためには、
1. renderer
2. scene (3D空間)
3. camera
4. 3D オブジェクト (plane, sphere, cubeなど)
を作ることが必要になります。順番にやっていきましょう。
1. renderer を作る
renderer とは、 3D 空間の物質を、適切に2D 空間に描画するための装置です。
WebGL ベースの WebGLRenderer 以外にも、CSS/SVG/canvas ベースのレンダラーがあります。
ほとんどのブラウザでWebGL対応された現在、基本的にはWebGLRenderer を使いましょう。
コードは以下のようになります。
const renderer = new THREE.WebGLRenderer({
    canvas: document.querySelector('.stage')
});
THREE.WebGLRender クラスの引数に、HTMLで配置した canvas要素を指定します。
これで完成ですが、このままでは、レンダラーのサイズが小さいため、setSizeメソッドを使い、修正しましょう。
const renderer = new THREE.WebGLRenderer({
    canvas: document.querySelector('.stage')
});

renderer.setSize(window.innerWidth, window.innerHeight);
## 2. scene を作る sceneとは、3D 空間のことであり、これがないと、Three.js は何も描画しません。
オライリー本によると、
scene オブジェクトとは、表示したい全ての物質と利用したい全ての光源を保持して、
変更を監視するコンテナオブジェクトです。
シーンを作るには、以下のコードを書きます。
const scene = new THREE.Scene()
THREE.Scene オブジェクトは、物体、ライト、その他のレンダリングに必要なオブジェクトの全てを持ちます。
scene.add(camera);
scene.add(spotLight);
scene.add(planeMesh)
このように、scene.add(object) 関数を用いて、様々なオブジェクトを、シーンに追加することができます。
3. camera を作る
シーンを作っただけでは、何も見えません。
camera オブジェクトを作り、そこから撮影された映像が、実際に画面に映し出されます。
自然な見た目の透視投影(Perspective view; 遠くのものが小さく見えるview) を出すために、PerspectiveCamera を作りましょう。
const camera = new THREE.PerspectiveCamera()
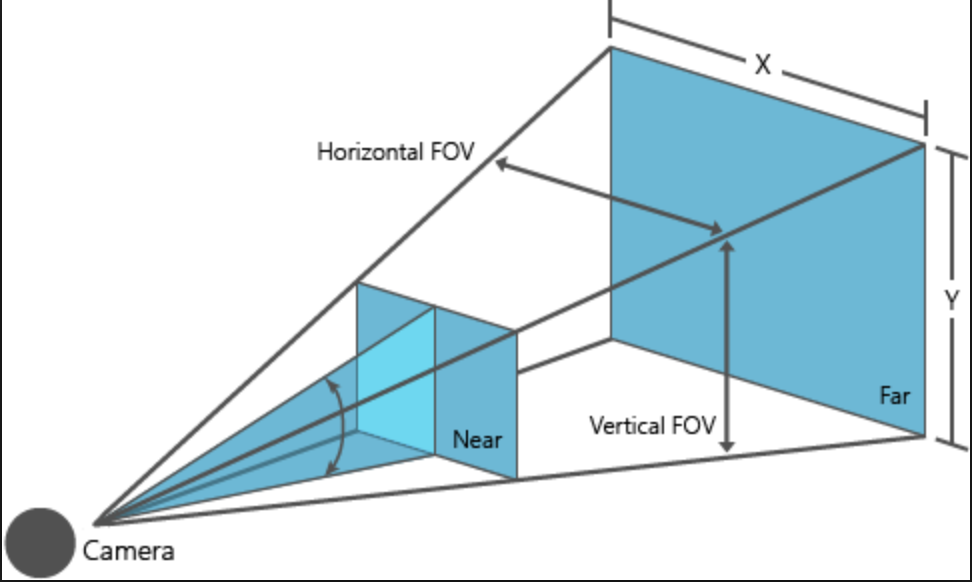
PerspectiveCamera() の引数 に、
・ fov (視野角)
・ aspect (縦横比: 垂直方向の視野と、水平方向の視野。下図の場合、X/Y)
・ near (カメラからどれくらい近くから描画するか)
・ far (カメラからどのくらい遠くまで見えるか)
を設定します。
オライリー本によると、以下がそれぞれの推奨デフォルト値となります。
const camera = new THREE.PerspectiveCamera(50, window.innerWidth/window.innerHeight, 0.1, 2000)
cameraができたら、設置しましょう。
camera.position.set(0, 0, 1000);
## 4. 3D オブジェクトを作る
球を設置しましょう。
まず、Mesh という表示オブジェクトを作成します。
const mesh = new THREE.Mesh();
THREE.Meshの引数に、形状(ジオメトリ)と、素材(マテリアル)を設定します。
const mesh = new THREE.Mesh(geometry, material)
ジオメトリは、今回は球体を設定します。
マテリアル は、meshBasicMaterial という、均一な色で表現されるマテリアル(影がつきません)を使います。
詳細は、公式DOC: SphereGeometry をご参照ください。
const geometry = new THREE.SphereGeometry(100,32,32)
const material = new THREE.MeshBasicMaterial({ color: 0xffff00 });
これらを、scene.add(mesh) で、シーンに加えます。
最終的に以下のコードになります。
const geometry = new THREE.SphereGeometry(100, 32, 32);
const material = new THREE.MeshBasicMaterial({ color: 0xffff00 });
const mesh = new THREE.Mesh(geometry, material);
scene.add(mesh);
5. 最終コード
最後に、シーンとカメラを、renderer.render() して完成です。
<!DOCTYPE html>
<html lang="ja">
  <head>
    <meta charset="UTF-8" />
    <script src="https://cdnjs.cloudflare.com/ajax/libs/three.js/102/three.min.js"></script>
    <style>
      body {
        margin: 0;
        padding: 0;
        overflow: hidden;
      }
    </style>
  </head>
  <body>
    <canvas class="stage"></canvas>

    <script>
      function init() {
        //レンダラーを作成
        const renderer = new THREE.WebGLRenderer({
          canvas: document.querySelector(".stage")
        });
        renderer.setSize(window.innerWidth, window.innerHeight);

        //シーンを作成
        const scene = new THREE.Scene();

        //カメラを作成
        const camera = new THREE.PerspectiveCamera(
          50,
          window.innerWidth / window.innerHeight,
          0.1,
          2000
        );
        camera.position.set(0, 0, 1000);

        //球を作成
        const geometry = new THREE.SphereGeometry(100, 32, 32);
        const material = new THREE.MeshBasicMaterial({ color: 0xffff00 });
        const mesh = new THREE.Mesh(geometry, material);
        scene.add(mesh);

    //レンダリング
        renderer.render(scene, camera);
      }

      window.addEventListener("load", init);
    </script>
  </body>
</html>

CSS使えば、1分で作れそうなのに、悔しいことこの上なしです。
ここから、どんどん広がっていくんですね。
それでは、また明日〜