どうも、SupabaseでDeveloper Advocateをしていますタイラーです!
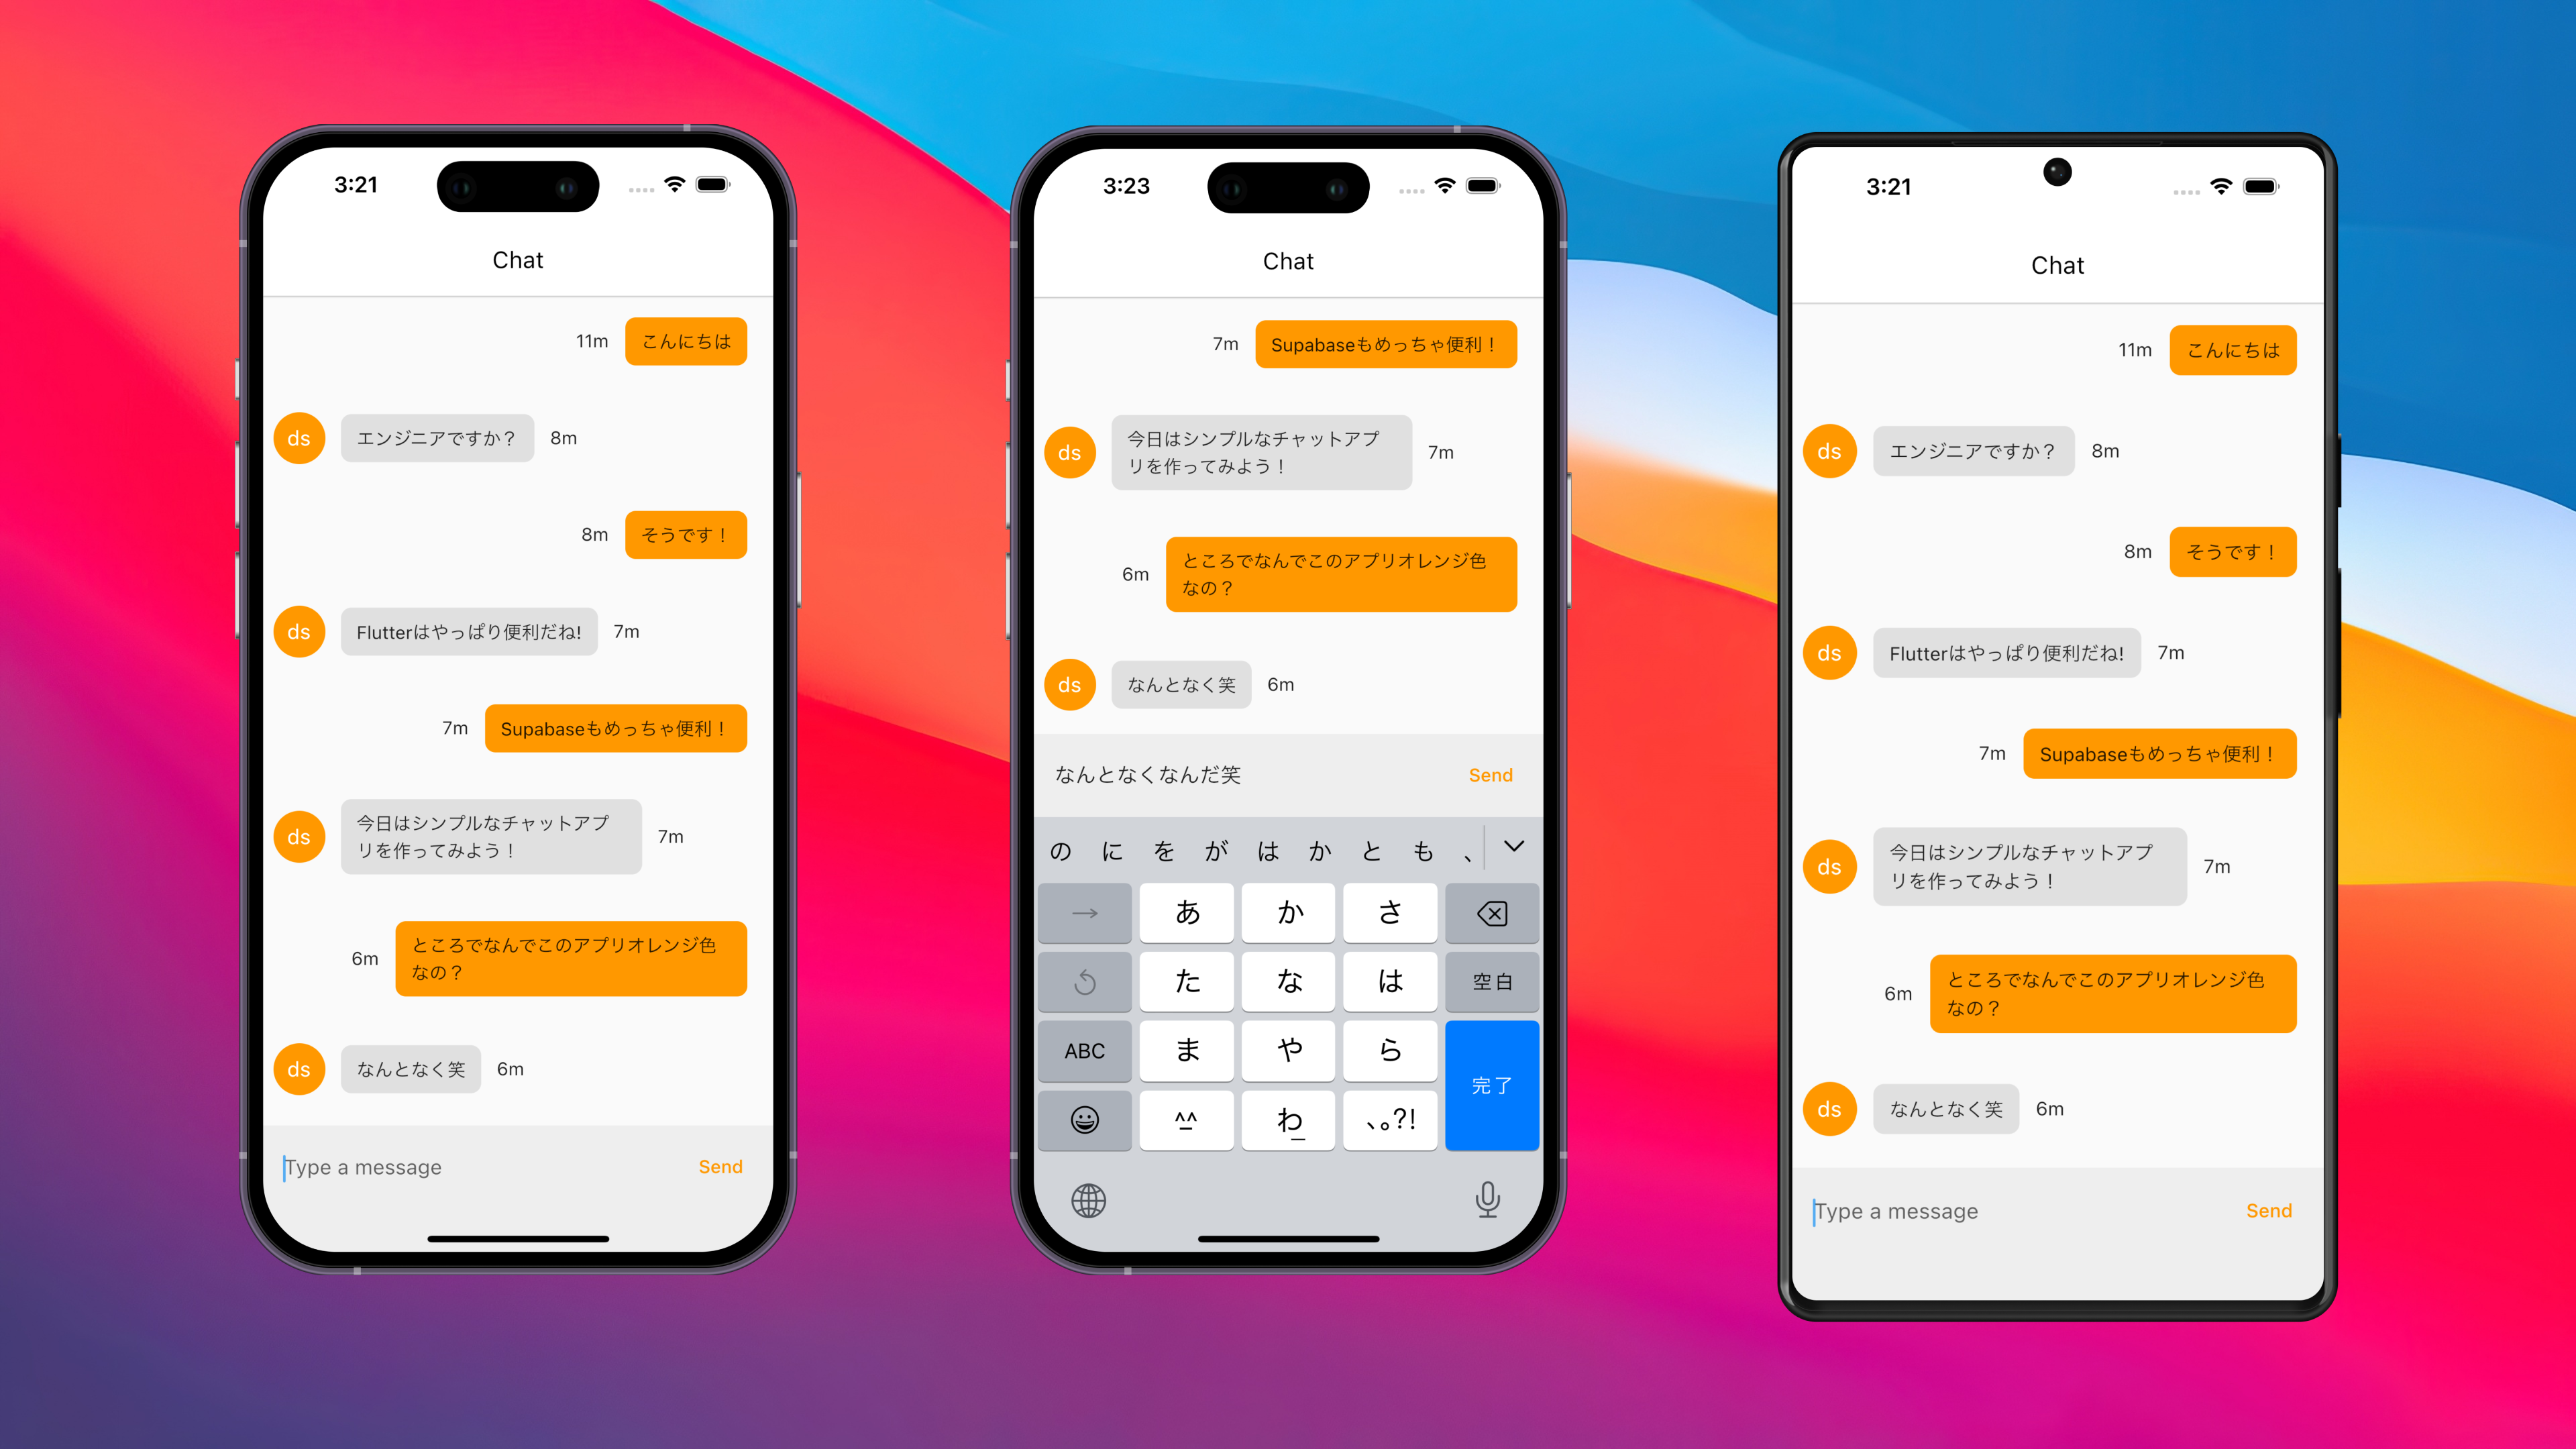
FlutterとSupabaseを使って実際にアプリを作ってみるシリーズの記事を書いていこうと思いまして、今回はその第一弾としてシンプルなリアルタイムチャットアプリを作ってみようと思います。具体的にはユーザーが登録・ログインするとチャットページに飛び、そこでユーザー間でポンポンメッセージのやり取りができるものを想定しています。
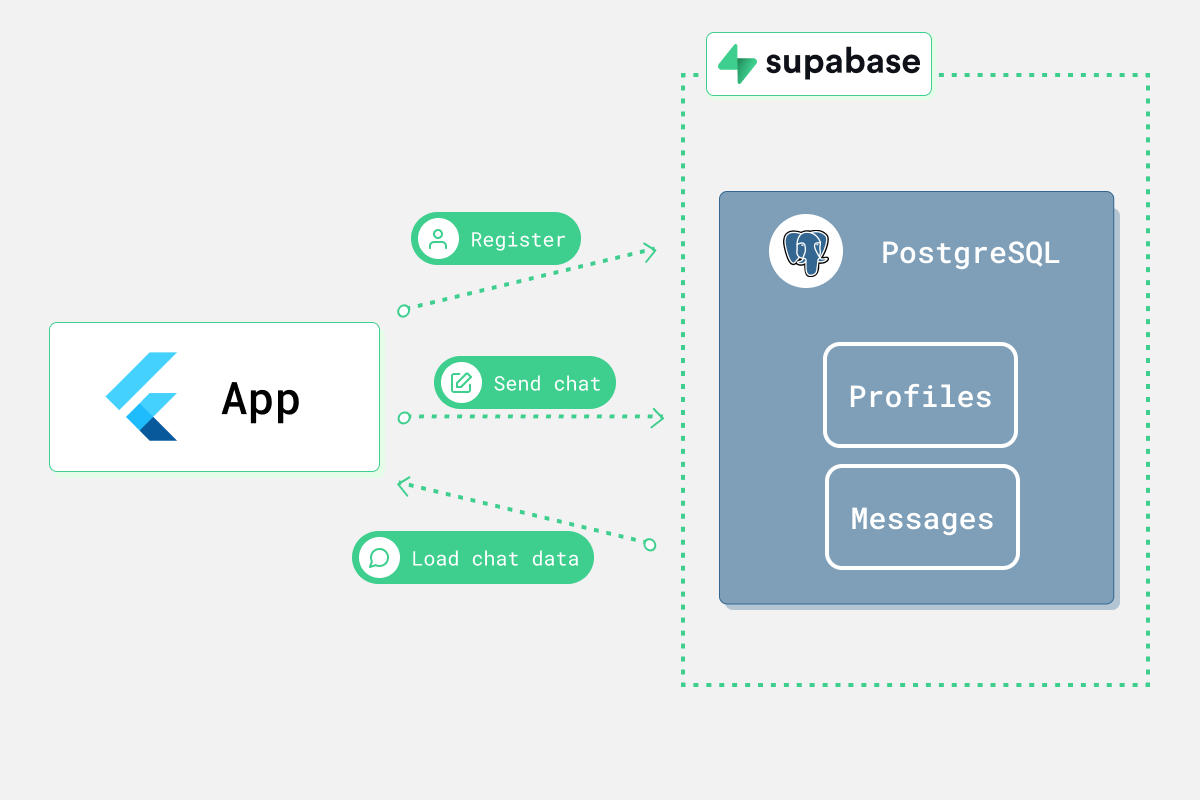
今回使うデータベースはもちろんSupabase!Supabaseを知らない方のために一応説明しておくと、Supabaseはオープンソースソフトウェアの組み合わせでできた裏側にPostgreSQLがついているFirebase的なツールで、要はサクッと簡単に認証・データの保存・ファイルの保存などができるサービスになっています。バックエンドなどを用意する必要もないし、無料で使えるのでめっちゃ楽。特に、今回重宝しそうなのがリアルタイム機能です!Supabaseではデータベースで起こったアップデートに対してリスナーを張ってリアルタイムにアップデート情報を受け取る機能があるので、今回はそれを中心にチャット機能を作っていきます!
一応今回作るアプリはこちらのレポジトリーに置いておきますね。
アプリの全体像
繰り返しになりますが、今回作るのはリアルタイムチャットアプリです。ユーザーは登録・ログインができて、それが済んだらチャット画面に飛びそこから他の人とメッセージのやり取りをピコンピコンできる形になります。Flutterを使って作っているので、もちろんiOS, Android, そしてWebにも対応!(デスクトップはSupabaseのSDKがまだ対応できていないので抜きましたが、もう時期対応予定!)
テックスタックはとてもシンプルです。フロントのアプリ側はFlutterで作り、バックエンドのSupabaseを使います、以上。Supabaseのプロジェクトを作ると自動的に楽且つセキュアにデータベースにアクセスするAPIを用意してくれるので特にこれ以上必要なものはありません。今回はそのSupabaseのAPIにアクセスするためにsupabase_flutterパッケージを使います。
もろもろの準備
空のFlutterアプリを作成
まず最初に空のFlutterアプリを作りましょう。
ターミナルから以下のコマンドを打ってください。
flutter create my_chat_app
それが終わったら下記コマンドで実行してみましょう。エミュレーターでもWeb上でも大丈夫です。
cd my_chat_app
flutter run
Flutterがデフォルトで用意しているカウンターアプリが立ち上がっているかと思います。一旦ここまで来たら、普段使っているコードエディターを開いてコーディングに入りましょう!
パッケージのインストール
pubspec.yamlを開いて以下のパッケージを追加しましょう!
supabase_flutter: ^1.5.0
timeago: ^3.1.0
supabase_flutterはSupabase上でログインしたり、データの読み書きをしたりする際に使います。timeagoはDateTime型の値を渡すと自動的に現在時刻と比較して「1d」みたいにどれくらい前に投稿されたかのテキストを出してくれます。これはチャットの送信時刻を表示するところで使います。
flutter pub getを実行してパッケージのインストールを完了させましょう。先ほどローカルでFlutterのアプリを実行していましたが、そちらも一度閉じて再実行する必要があります。
Supabaseプロジェクトの作成
今度はSupabase側の設定に入っていきましょう。「まだSupabaseプロジェクト作ったことがないよ」という方もご心配なく!Githubアカウントさえあれば誰でも無料で簡単にプロジェクトが作れます!まずはこちらにアクセス。
Githubアカウントでログインすることを促されるので緑のボタンを押してログインしてしまいましょう。あとはGithub側でもろもろ許可してしまえばログインできます!ログインが完了してSupabaseの画面に戻ってきたら左上の「New Project」ボタンを押しましょう!
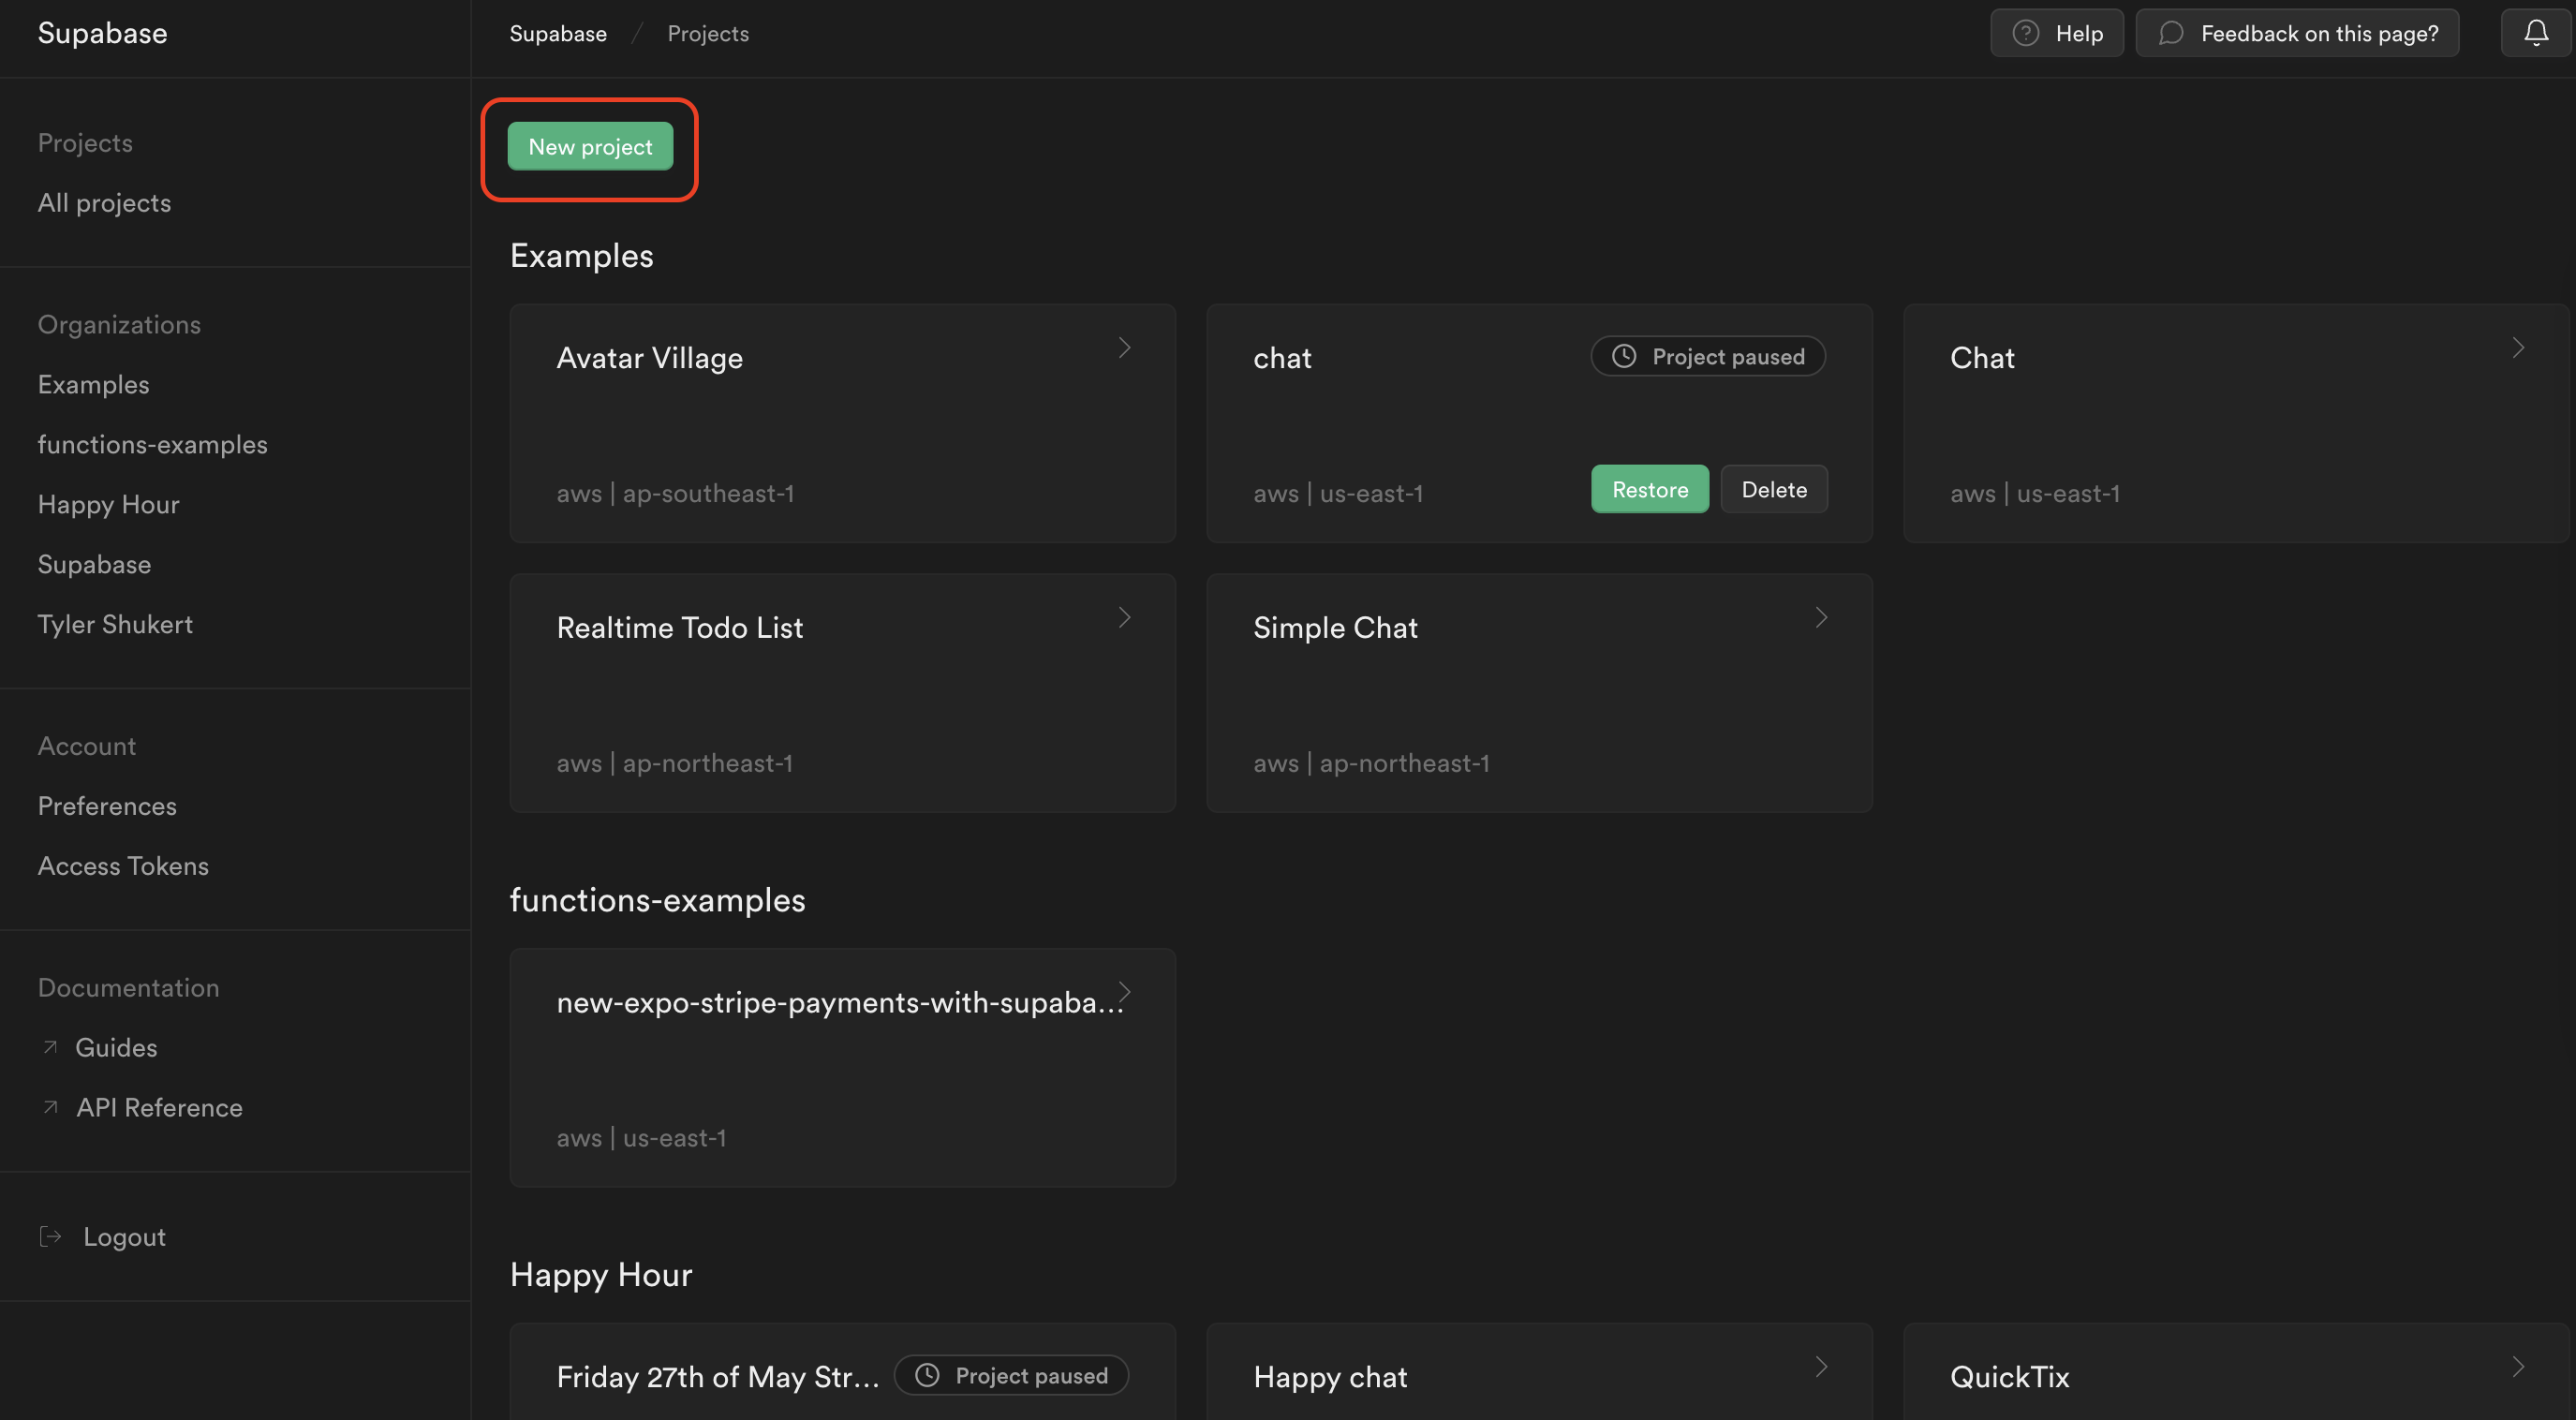
このボタンを押したあとプロジェクト名などを設定します。プロジェクト名はとりあえず「chat」とでも呼んでおきましょう。Detabaseのパスワードに関しては特に今回は使いませんし、後々何かで必要になっても上書きはできるのでGenerate a passwordボタンを押してランダムでセキュアなパスワードを自動生成しちゃいましょう。Pricing planはデフォルトの無料版でOKです。ここまで済んだら「Create new Project」ボタンを押しましょう。Supabaseが裏側で新しいプロジェクトを1、2分ほどでセットアップしてくれます。
プロジェクトのセットアップが完了したら実際に設定に入っていきましょう!
Supabase内でテーブルの作成
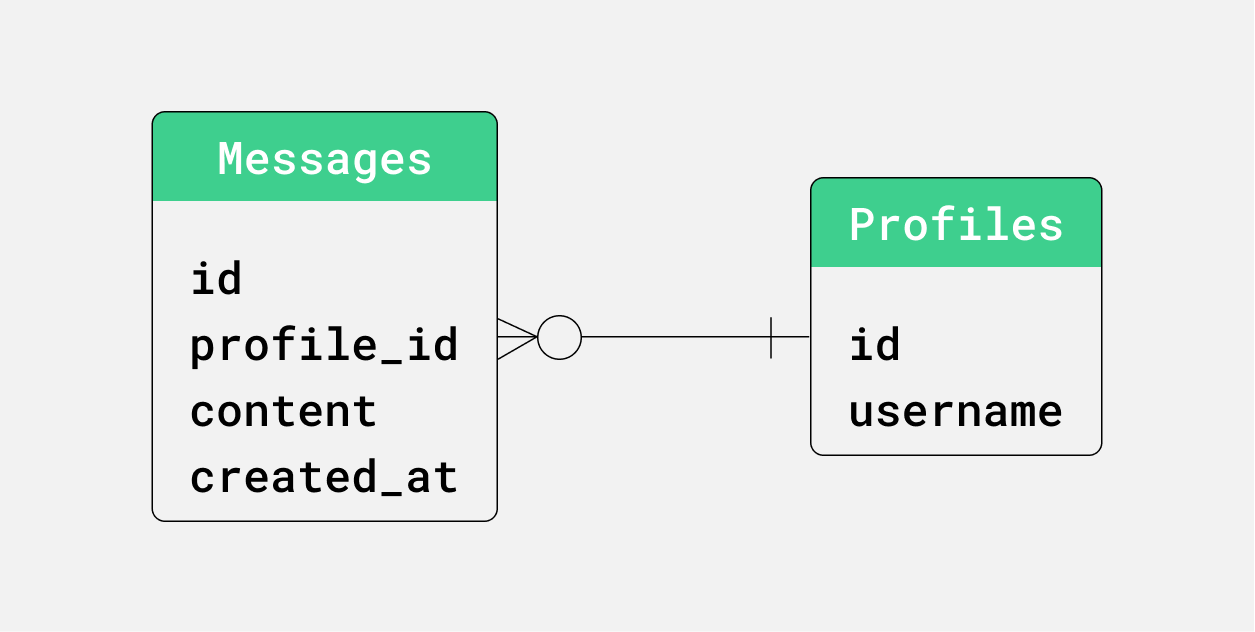
今回のアプリで使うテーブルは以下の二つです。
- profiles - ユーザーのプロフィールデータを保存する
- messages - 送信されたチャットデータを保存する
それぞれのメッセージは外部キーによってユーザーのプロフィールに紐づけられています。
こちらのSQLをSupabaseダッシュボード内のSQLエディターから実行しましょう。
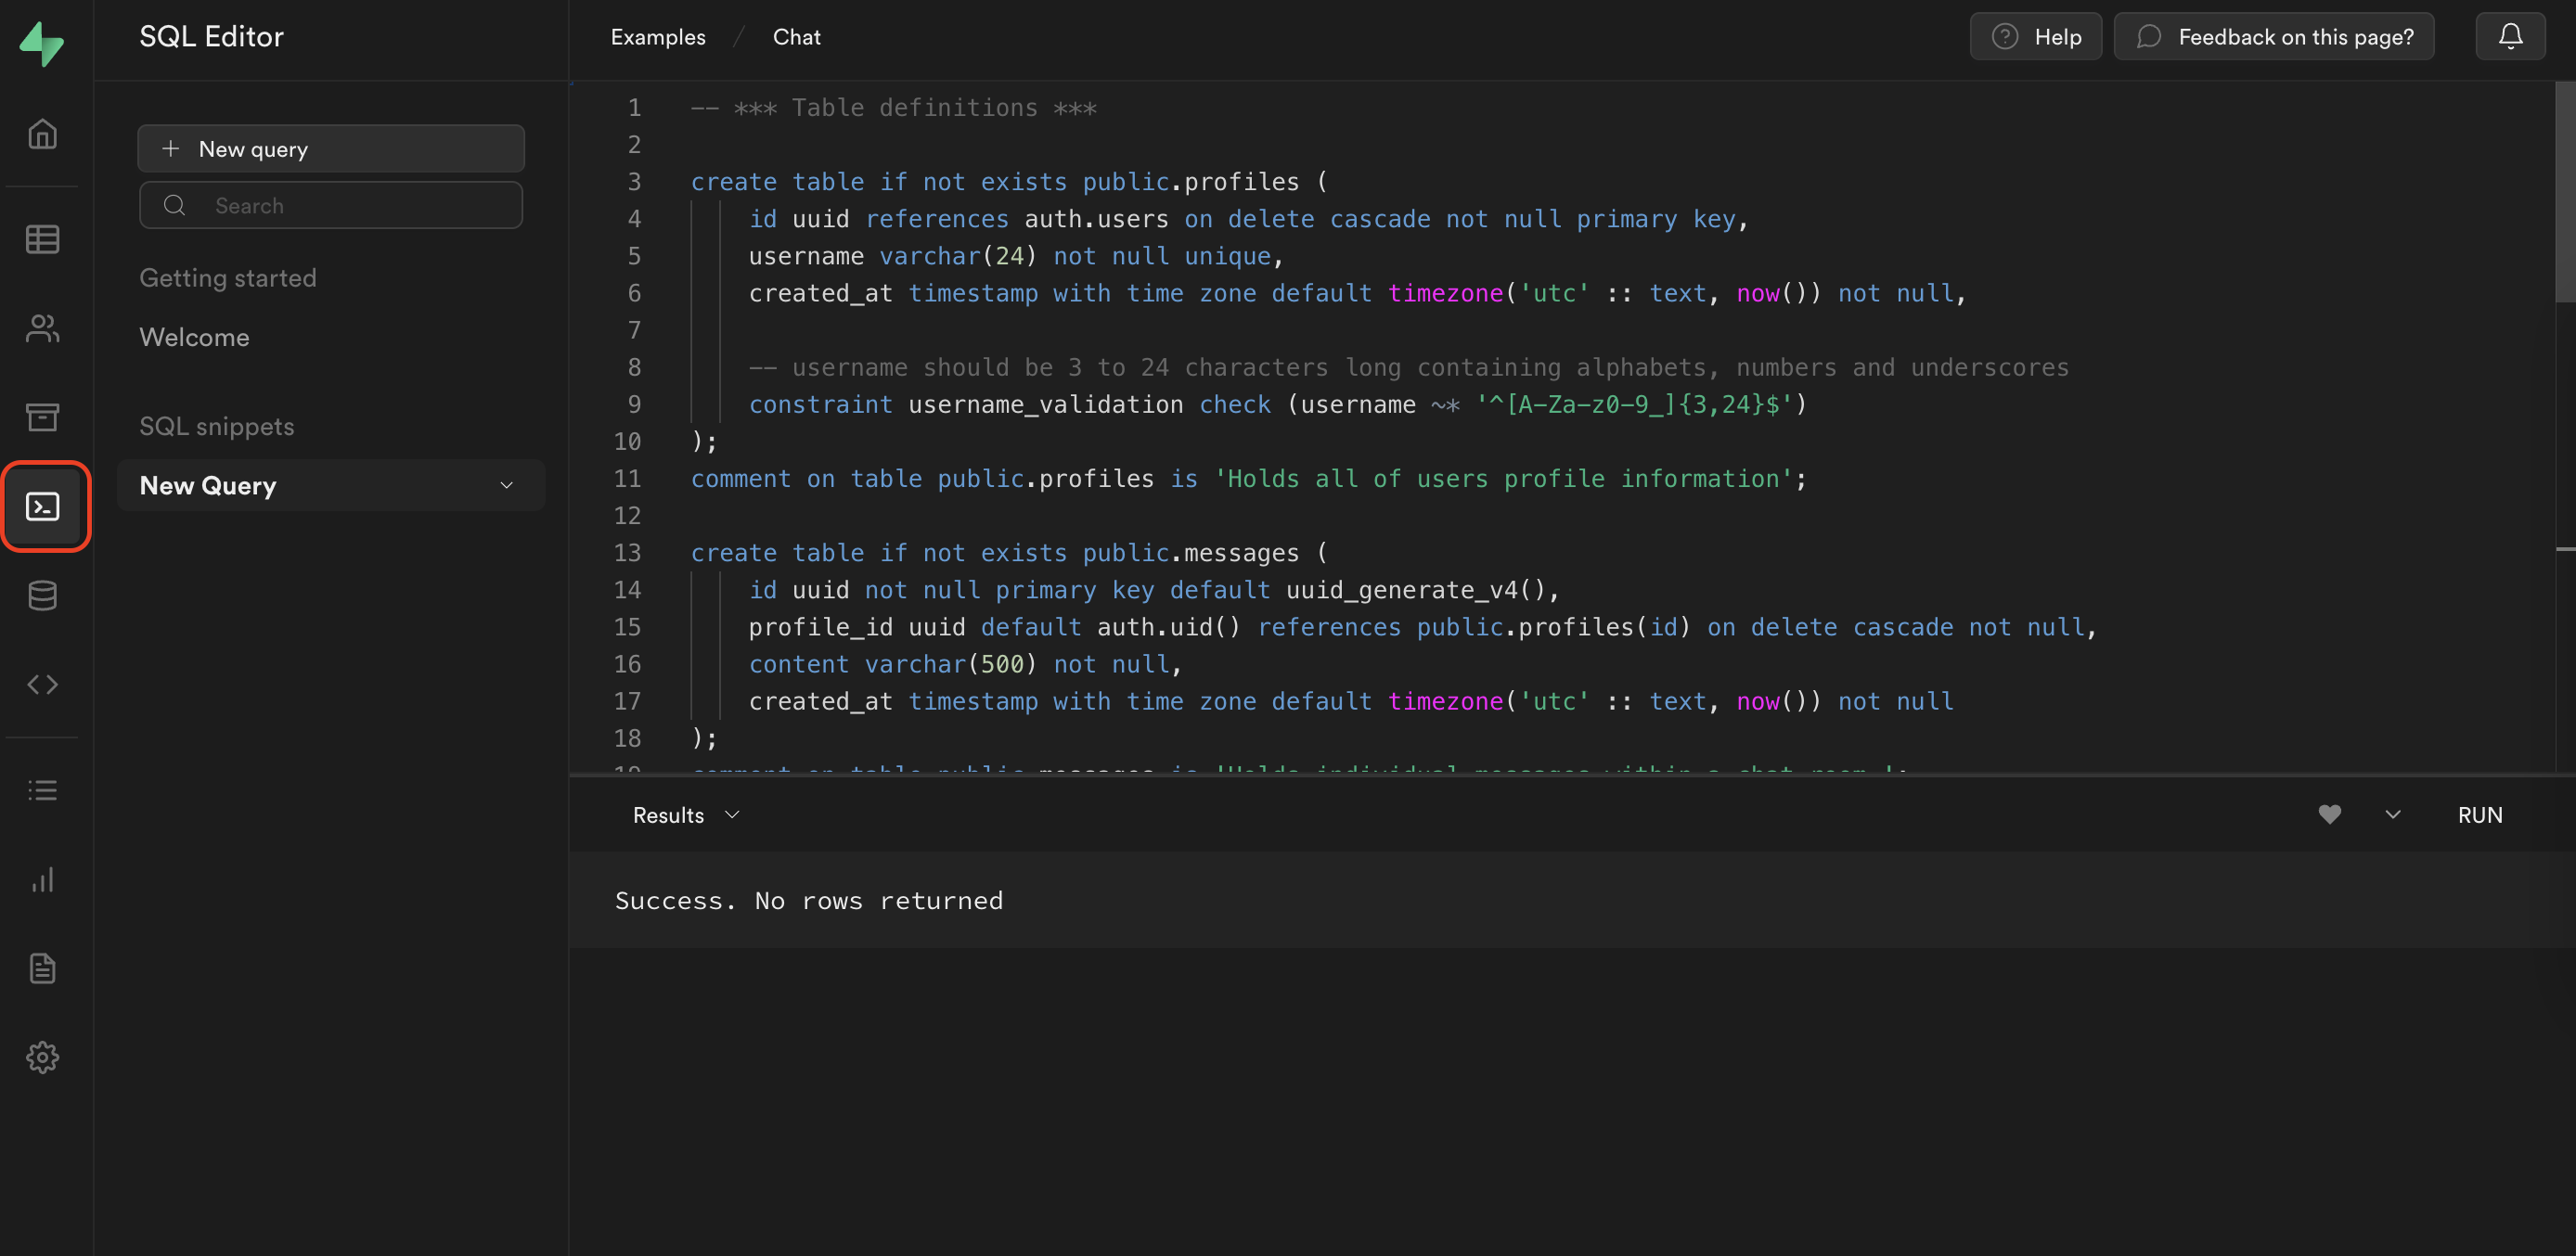
create table if not exists public.profiles (
    id uuid references auth.users on delete cascade not null primary key,
    username varchar(24) not null unique,
    created_at timestamp with time zone default timezone('utc' :: text, now()) not null,

    -- username should be 3 to 24 characters long containing alphabets, numbers and underscores
    constraint username_validation check (username ~* '^[A-Za-z0-9_]{3,24}$')
);
comment on table public.profiles is 'Holds all of users profile information';

create table if not exists public.messages (
    id uuid not null primary key default uuid_generate_v4(),
    profile_id uuid default auth.uid() references public.profiles(id) on delete cascade not null,
    content varchar(500) not null,
    created_at timestamp with time zone default timezone('utc' :: text, now()) not null
);
comment on table public.messages is 'Holds individual messages sent on the app.';
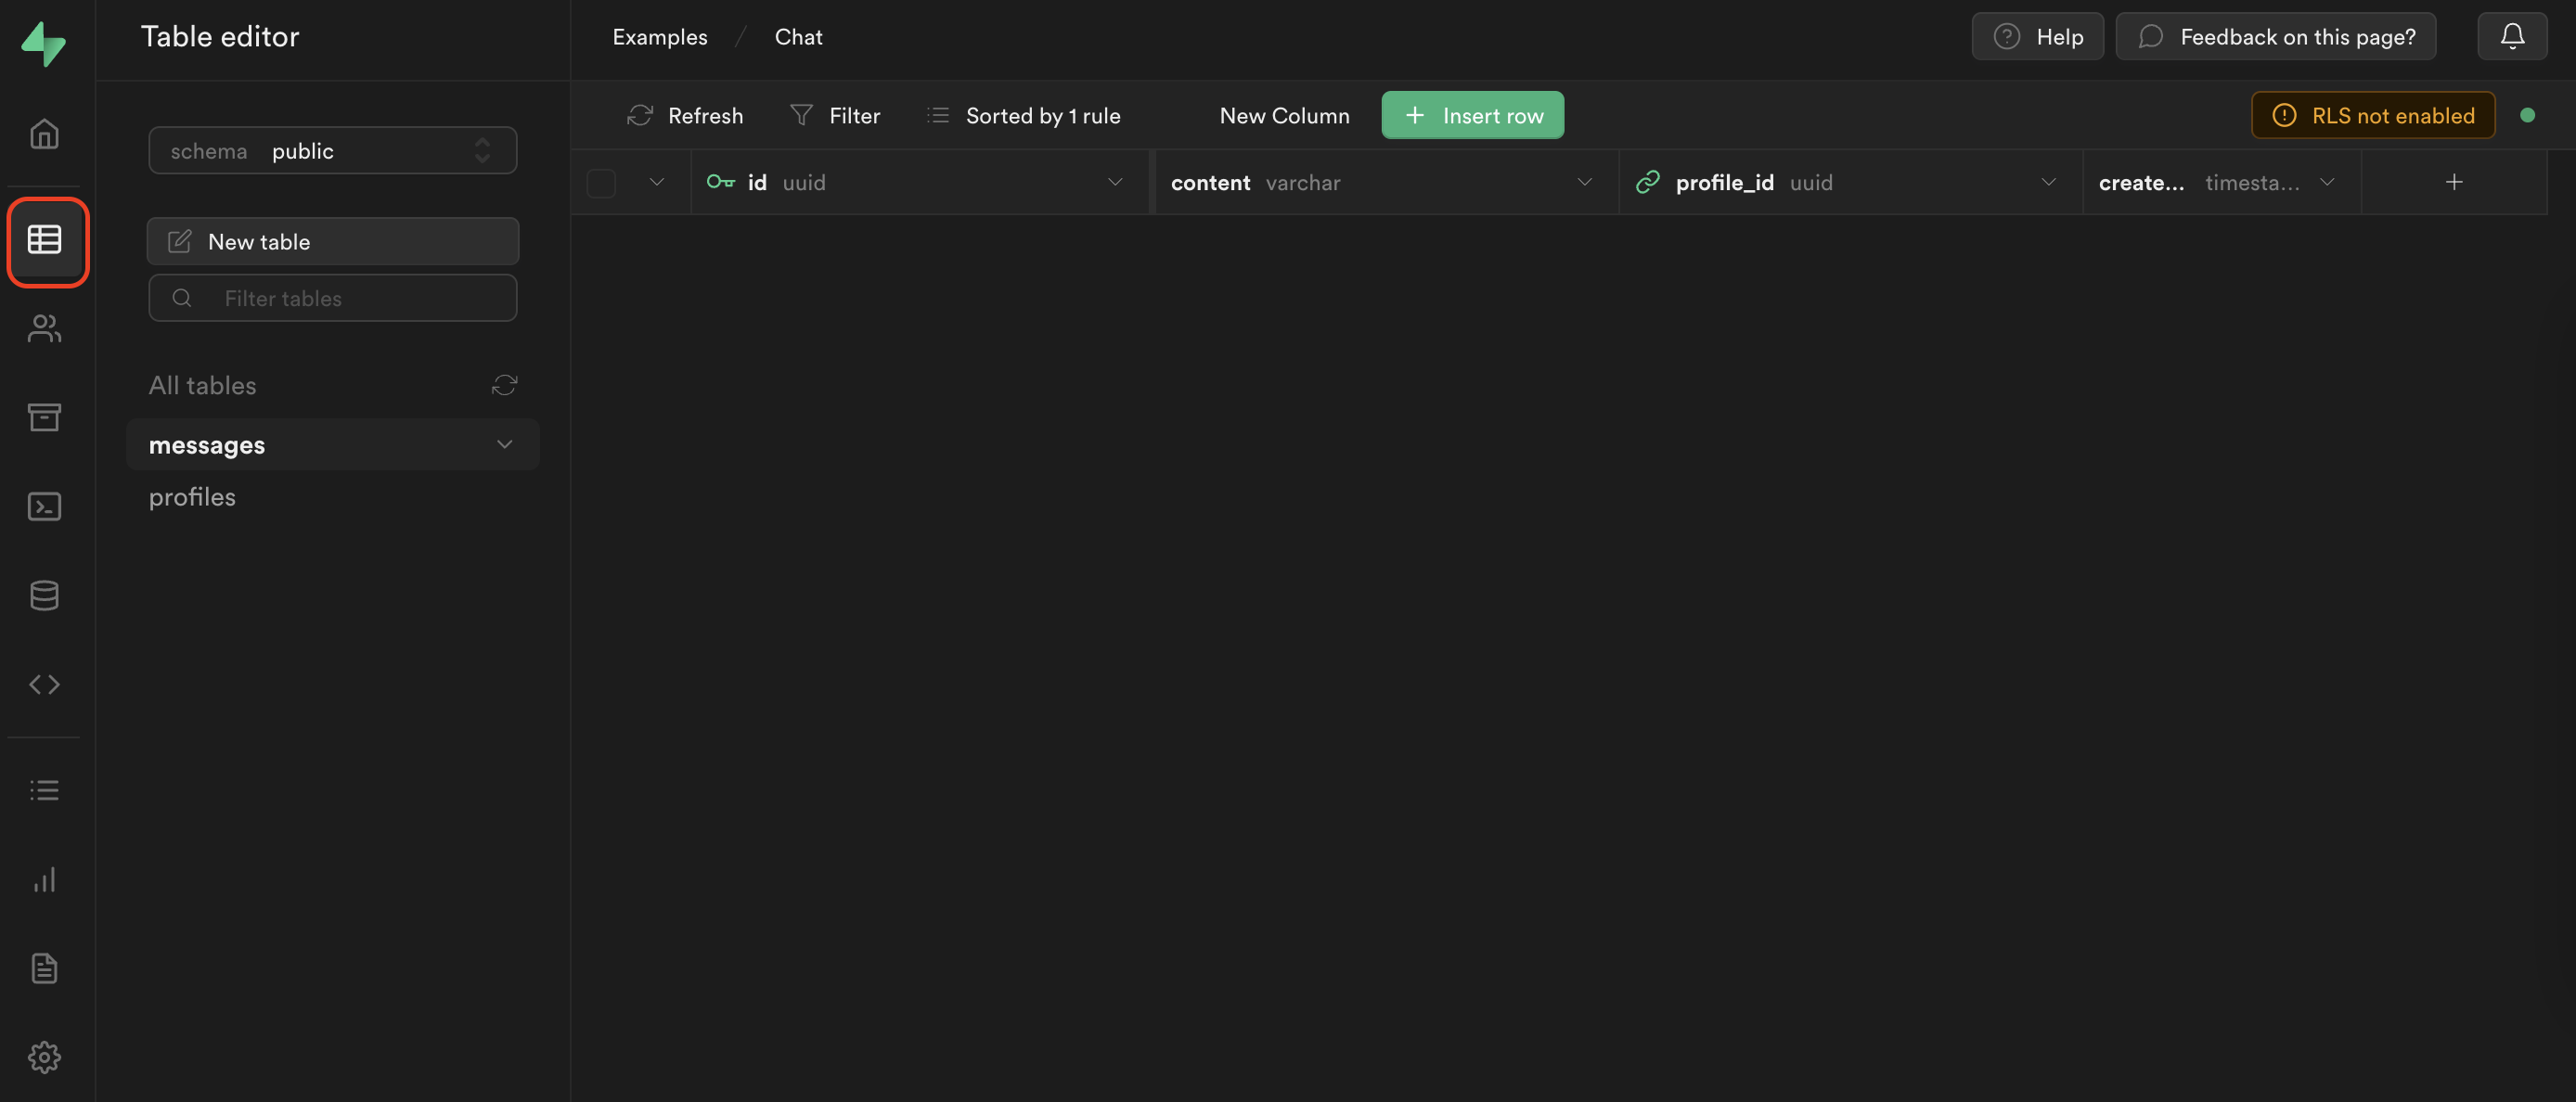
実行が完了したらテーブルエディターに行って実際に作成されたテーブルを確認してみましょう。空のテーブルが二つ作成されているはずです。
Supabaseにはリアルタイムにデータを引っ張ってくる機能があるのですが、デフォルトでこちらの機能はオフになっており、テーブル単位でオンにしてあげる必要があります。こちらのSQLを同じようにSQLエディターから実行して、messagesテーブルからリアルタイムにデータを引っ張って来れるようにしましょう。
-- *** Add tables to the publication to enable real time subscription ***
alter publication supabase_realtime add table public.messages;
ここまできたらあとは実際にFlutterのコードを書いていきましょう!
Flutterでのアプリ開発
Step 1: constantsファイルの作成
まずはライトにconstantsファイルを作成しましょう。このファイルではアプリのあちこちで使う便利な変数や関数を定義しています。
import 'package:flutter/material.dart';
import 'package:supabase_flutter/supabase_flutter.dart';

/// Supabase client
final supabase = Supabase.instance.client;

/// Simple preloader inside a Center widget
const preloader =
    Center(child: CircularProgressIndicator(color: Colors.orange));

/// Simple sized box to space out form elements
const formSpacer = SizedBox(width: 16, height: 16);

/// Some padding for all the forms to use
const formPadding = EdgeInsets.symmetric(vertical: 20, horizontal: 16);

/// Error message to display the user when unexpected error occurs.
const unexpectedErrorMessage = 'Unexpected error occured.';

/// Basic theme to change the look and feel of the app
final appTheme = ThemeData.light().copyWith(
  primaryColorDark: Colors.orange,
  appBarTheme: const AppBarTheme(
    elevation: 1,
    backgroundColor: Colors.white,
    iconTheme: IconThemeData(color: Colors.black),
    titleTextStyle: TextStyle(
      color: Colors.black,
      fontSize: 18,
    ),
  ),
  primaryColor: Colors.orange,
  textButtonTheme: TextButtonThemeData(
    style: TextButton.styleFrom(
      foregroundColor: Colors.orange,
    ),
  ),
  elevatedButtonTheme: ElevatedButtonThemeData(
    style: ElevatedButton.styleFrom(
      foregroundColor: Colors.white,
      backgroundColor: Colors.orange,
    ),
  ),
  inputDecorationTheme: InputDecorationTheme(
    floatingLabelStyle: const TextStyle(
      color: Colors.orange,
    ),
    border: OutlineInputBorder(
      borderRadius: BorderRadius.circular(12),
      borderSide: const BorderSide(
        color: Colors.grey,
        width: 2,
      ),
    ),
    focusColor: Colors.orange,
    focusedBorder: OutlineInputBorder(
      borderRadius: BorderRadius.circular(12),
      borderSide: const BorderSide(
        color: Colors.orange,
        width: 2,
      ),
    ),
  ),
);

/// Set of extension methods to easily display a snackbar
extension ShowSnackBar on BuildContext {
  /// Displays a basic snackbar
  void showSnackBar({
    required String message,
    Color backgroundColor = Colors.white,
  }) {
    ScaffoldMessenger.of(this).showSnackBar(SnackBar(
      content: Text(message),
      backgroundColor: backgroundColor,
    ));
  }

  /// Displays a red snackbar indicating error
  void showErrorSnackBar({required String message}) {
    showSnackBar(message: message, backgroundColor: Colors.red);
  }
}
Step 2: Supabaseをinitialize
Supabaseを使うにはmain関数でinitializeしてあげる必要があります。
main.dartを編集してSupabaseをinitializeしてあげましょう。ついでに、アプリのhomeをSplashPage()に設定してあげます。このページは後々作るので一旦今はエラーが出ていても気にせず進みましょう。
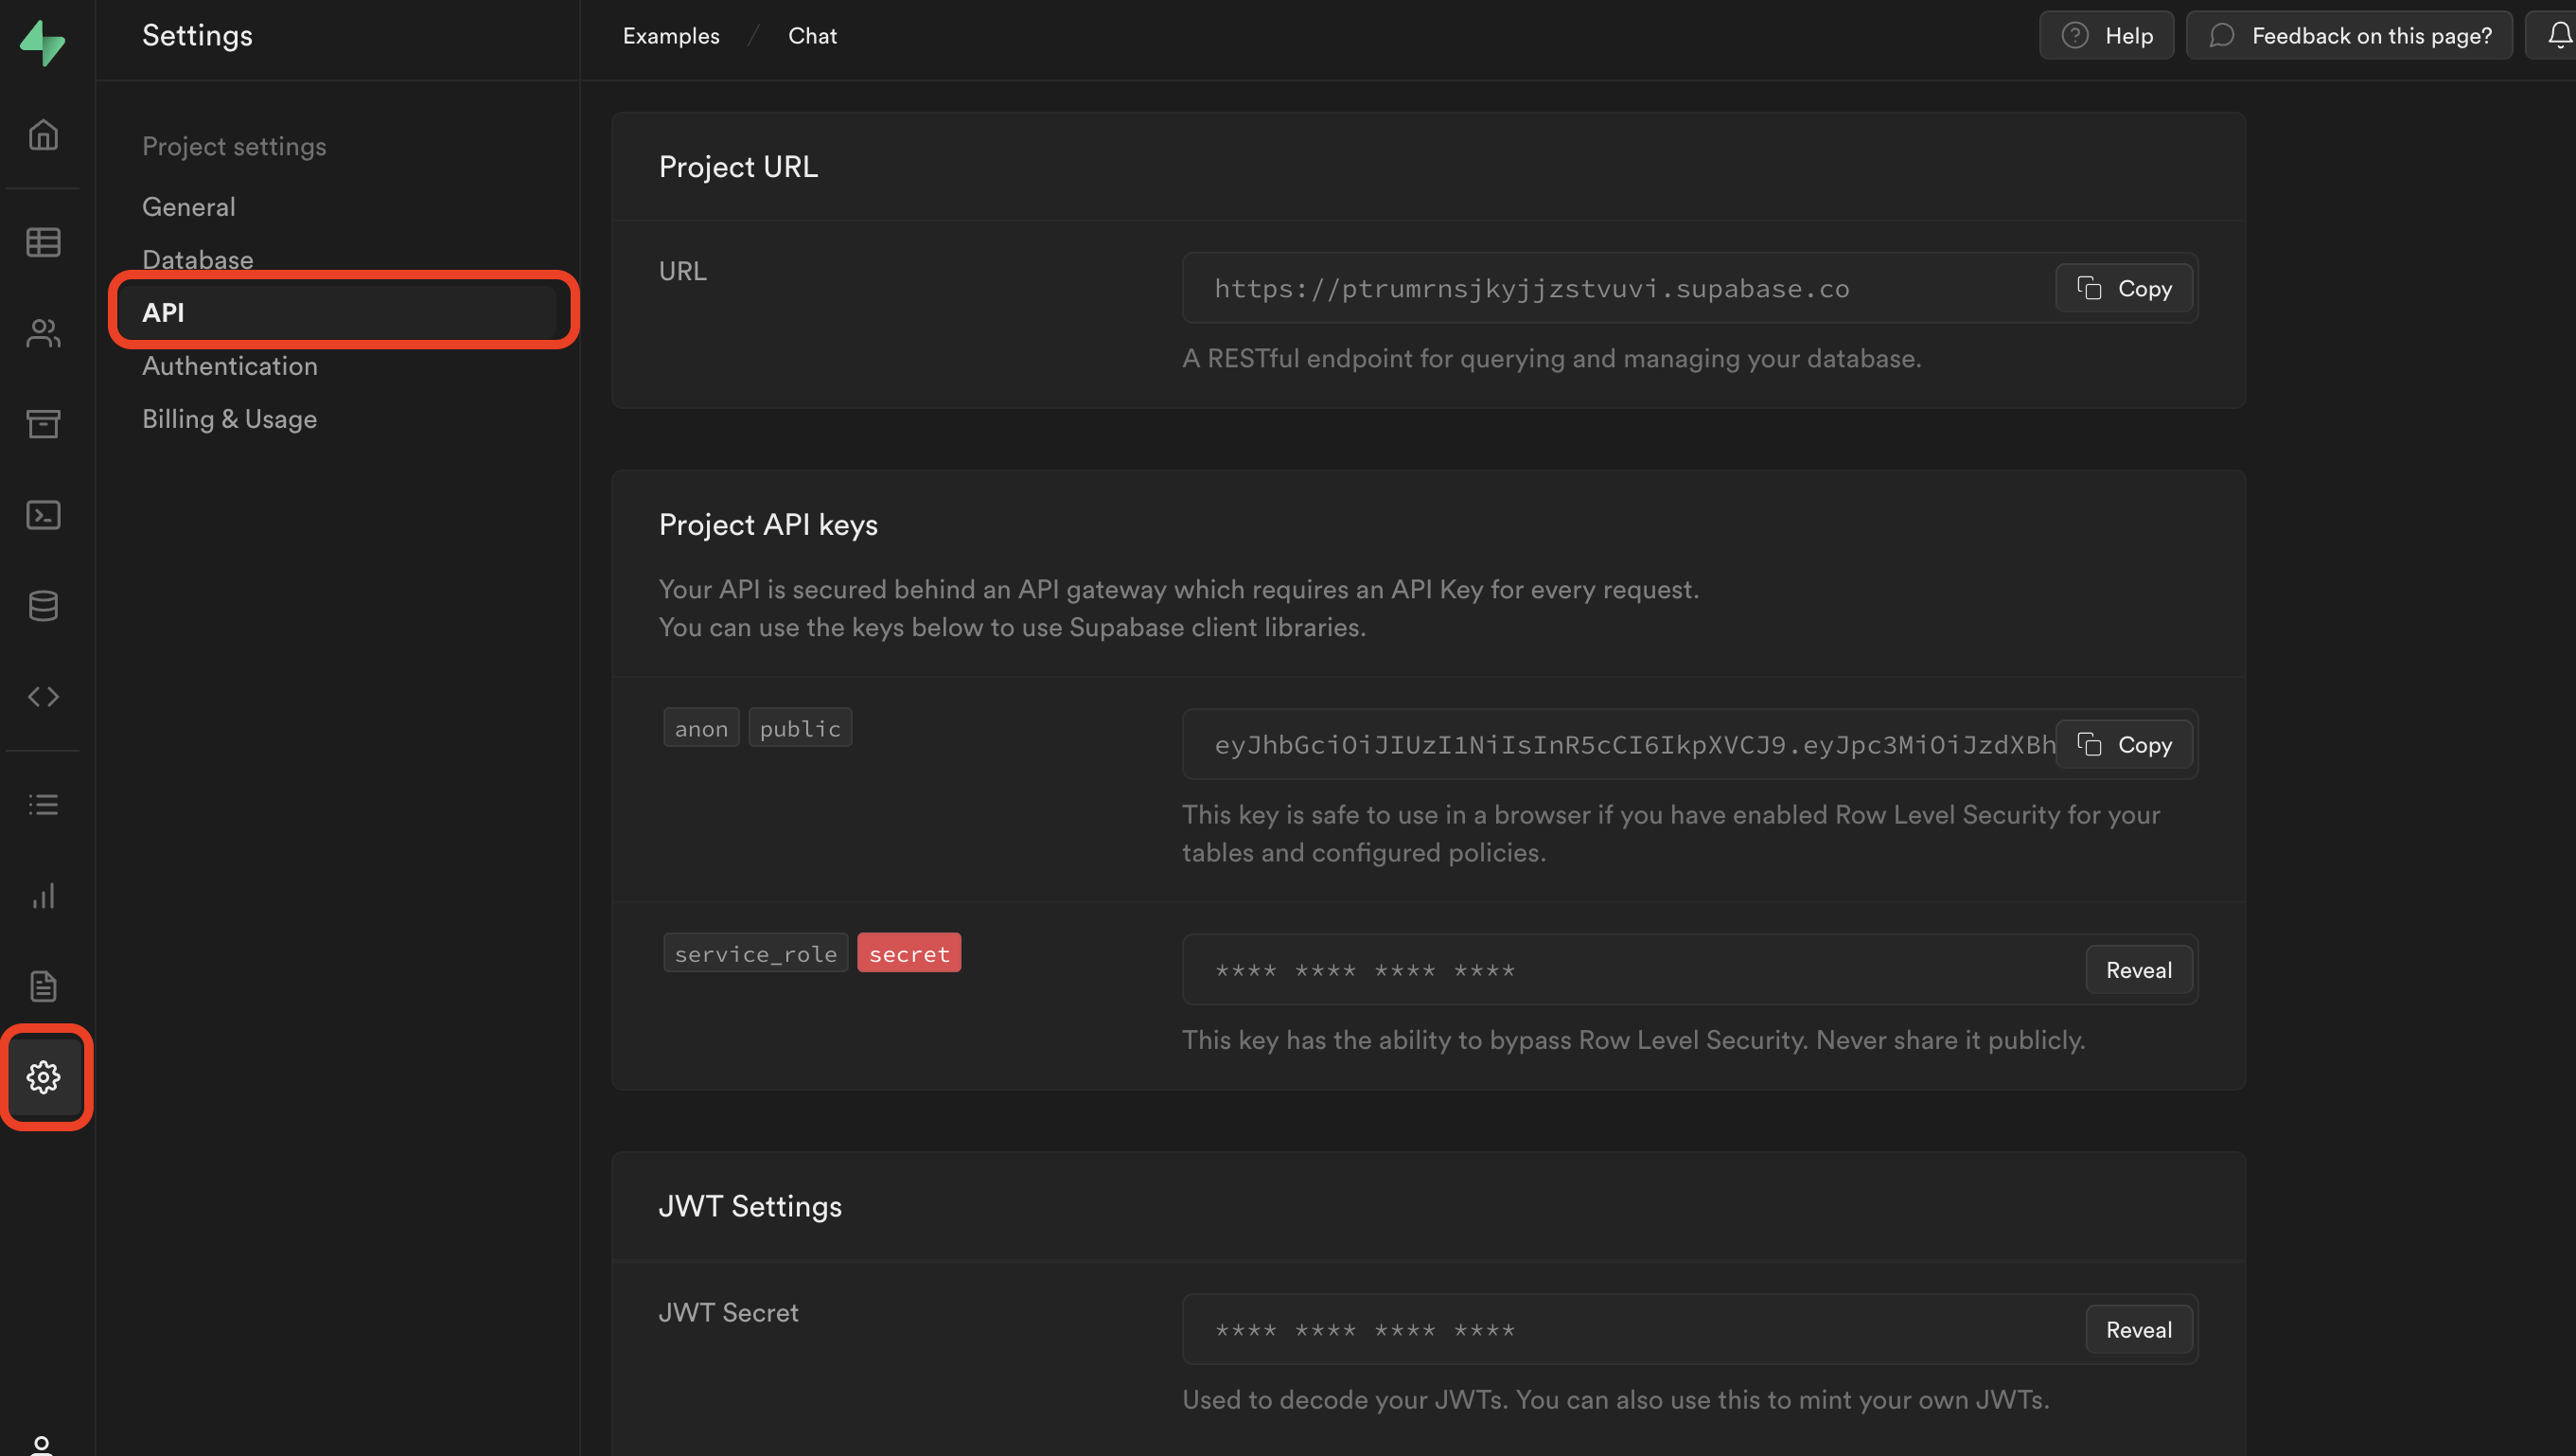
SupabaseをinitializeするときにSupabase URLとSupabase Anon Keyが必要になるのですが、これらはSupabaseダッシュボードのsettings -> APIから探すことができます。これらの情報は外部に漏れても全く問題ないものなのでそのままGitにコミットしてしまっても大丈夫です!
import 'package:flutter/material.dart';
import 'package:my_chat_app/utils/constants.dart';
import 'package:supabase_flutter/supabase_flutter.dart';
import 'package:my_chat_app/pages/splash_page.dart';

Future<void> main() async {
  WidgetsFlutterBinding.ensureInitialized();

  await Supabase.initialize(
    // TODO: Replace credentials with your own
    url: 'SUPABASE_URL',
    anonKey: 'SUPABASE_ANON_KEY',
  );
  runApp(const MyApp());
}

class MyApp extends StatelessWidget {
  const MyApp({Key? key}) : super(key: key);

  @override
  Widget build(BuildContext context) {
    return MaterialApp(
      debugShowCheckedModeBanner: false,
      title: 'My Chat App',
      theme: appTheme,
      home: const SplashPage(),
    );
  }
}
Step 3: ユーザーのログイン状態に応じてSplashPageからリダイレクトする
ユーザーがアプリを立ち上げたときにそのユーザーがログインしているかどうかに応じて適切なページにリダイレクトしてあげましょう。これをするにはSplashPageというページを作り、その中でログイン状態を判別し適切なページにリダイレクトしてあげます。UIはただ単に真ん中でローダーがくるくる回っているだけのものになります。
import 'package:flutter/material.dart';
import 'package:my_chat_app/pages/chat_page.dart';
import 'package:my_chat_app/pages/register_page.dart';
import 'package:my_chat_app/utils/constants.dart';

/// Page to redirect users to the appropriate page depending on the initial auth state
class SplashPage extends StatefulWidget {
  const SplashPage({Key? key}) : super(key: key);

  @override
  SplashPageState createState() => SplashPageState();
}

class SplashPageState extends State<SplashPage> {
  @override
  void initState() {
    super.initState();
    _redirect();
  }

  Future<void> _redirect() async {
    // await for for the widget to mount
    await Future.delayed(Duration.zero);

    final session = supabase.auth.currentSession;
    if (session == null) {
      Navigator.of(context)
          .pushAndRemoveUntil(RegisterPage.route(), (route) => false);
    } else {
      Navigator.of(context)
          .pushAndRemoveUntil(ChatPage.route(), (route) => false);
    }
  }

  @override
  Widget build(BuildContext context) {
    return const Scaffold(body: preloader);
  }
}
Step 4: モデルの定義
アプリ内でデータを扱う際に型を効かせられるようにモデルを定義しましょう。ここではprofilesとmessagesテーブル用のモデルを作ります。その際にfromMapコンストラクターを作って簡単にSupabaseから帰ってきたデータからインスタンスを作れるようにします。
class Profile {
  Profile({
    required this.id,
    required this.username,
    required this.createdAt,
  });

  /// User ID of the profile
  final String id;

  /// Username of the profile
  final String username;

  /// Date and time when the profile was created
  final DateTime createdAt;

  Profile.fromMap(Map<String, dynamic> map)
      : id = map['id'],
        username = map['username'],
        createdAt = DateTime.parse(map['created_at']);
}
class Message {
  Message({
    required this.id,
    required this.profileId,
    required this.content,
    required this.createdAt,
    required this.isMine,
  });

  /// ID of the message
  final String id;

  /// ID of the user who posted the message
  final String profileId;

  /// Text content of the message
  final String content;

  /// Date and time when the message was created
  final DateTime createdAt;

  /// Whether the message is sent by the user or not.
  final bool isMine;

  Message.fromMap({
    required Map<String, dynamic> map,
    required String myUserId,
  })  : id = map['id'],
        profileId = map['profile_id'],
        content = map['content'],
        createdAt = DateTime.parse(map['created_at']),
        isMine = myUserId == map['profile_id'];
}
Step 5: 登録ページの作成
一通り下準備が整ったのでページの作成に入っていきましょう!まずは登録ページに取り掛かります。今回はシンプルにメールアドレスとパスワード、そしてユーザーネームを設定して登録する形にしましょう。ユーザー名はアプリ内でそのユーザーのアイデンティティとして表示されます。こちらの登録ページから登録が完了するとユーザーは自動的にチャットページにナビゲーションされる形になります。
import 'package:flutter/material.dart';
import 'package:my_chat_app/pages/chat_page.dart';
import 'package:my_chat_app/pages/login_page.dart';
import 'package:my_chat_app/utils/constants.dart';
import 'package:supabase_flutter/supabase_flutter.dart';

class RegisterPage extends StatefulWidget {
  const RegisterPage({Key? key, required this.isRegistering}) : super(key: key);

  static Route<void> route({bool isRegistering = false}) {
    return MaterialPageRoute(
      builder: (context) => RegisterPage(isRegistering: isRegistering),
    );
  }

  final bool isRegistering;

  @override
  State<RegisterPage> createState() => _RegisterPageState();
}

class _RegisterPageState extends State<RegisterPage> {
  final bool _isLoading = false;

  final _formKey = GlobalKey<FormState>();

  final _emailController = TextEditingController();
  final _passwordController = TextEditingController();
  final _usernameController = TextEditingController();

  Future<void> _signUp() async {
    final isValid = _formKey.currentState!.validate();
    if (!isValid) {
      return;
    }
    final email = _emailController.text;
    final password = _passwordController.text;
    final username = _usernameController.text;
    try {
      await supabase.auth.signUp(
          email: email, password: password, data: {'username': username});
      Navigator.of(context)
          .pushAndRemoveUntil(ChatPage.route(), (route) => false);
    } on AuthException catch (error) {
      context.showErrorSnackBar(message: error.message);
    } catch (error) {
      context.showErrorSnackBar(message: unexpectedErrorMessage);
    }
  }

  @override
  Widget build(BuildContext context) {
    return Scaffold(
      appBar: AppBar(
        title: const Text('Register'),
      ),
      body: Form(
        key: _formKey,
        child: ListView(
          padding: formPadding,
          children: [
            TextFormField(
              controller: _emailController,
              decoration: const InputDecoration(
                label: Text('Email'),
              ),
              validator: (val) {
                if (val == null || val.isEmpty) {
                  return 'Required';
                }
                return null;
              },
              keyboardType: TextInputType.emailAddress,
            ),
            formSpacer,
            TextFormField(
              controller: _passwordController,
              obscureText: true,
              decoration: const InputDecoration(
                label: Text('Password'),
              ),
              validator: (val) {
                if (val == null || val.isEmpty) {
                  return 'Required';
                }
                if (val.length < 6) {
                  return '6 characters minimum';
                }
                return null;
              },
            ),
            formSpacer,
            TextFormField(
              controller: _usernameController,
              decoration: const InputDecoration(
                label: Text('Username'),
              ),
              validator: (val) {
                if (val == null || val.isEmpty) {
                  return 'Required';
                }
                final isValid = RegExp(r'^[A-Za-z0-9_]{3,24}$').hasMatch(val);
                if (!isValid) {
                  return '3-24 long with alphanumeric or underscore';
                }
                return null;
              },
            ),
            formSpacer,
            ElevatedButton(
              onPressed: _isLoading ? null : _signUp,
              child: const Text('Register'),
            ),
            formSpacer,
            TextButton(
              onPressed: () {
                Navigator.of(context).push(LoginPage.route());
              },
              child: const Text('I already have an account'),
            )
          ],
        ),
      ),
    );
  }
}
ユーザー名のTextFormFieldのvalidationの部分を見ていただくと、テーブル定義でユーザー名のフィールドに使っていたものと同じ正規表現を使ってユーザー名のフォーマットを制限していることがわかると思います。
さらに、_signup()メソッドを見てみると、ユーザー名をここではuserMetadataとしてSupabaseに保存していることがわかるかと思います。このuserMetadataとはSupabaseがデフォルトで用意してくれているauth.usersテーブル内に存在するjsonb型のカラムで、今回はこのユーザー名を他のユーザーもロードしてきて閲覧できるようにしたいのでprofilesテーブルにコピーしてあげる必要があります。ここで役立つのがPostgresトリガーとPostgres Functionです。Postgres Functionはデータベース内に定義できる関数のことで、任意で引数を渡してあげて特定のSQL、を実行させることができるものになっています。Postgresトリガーはデータベース内に任意の変更があった際に特定のPostgres Functionを実行する機能になっております。この二つを組み合わせて、auth.usersテーブルにユーザーが新しく追加された際にその中身をprofilesテーブルにコピーしてあげることができます。下記のSQLを実行してトリガーとFunctionを定義してあげましょう!その際便利なのが、profilesテーブルのusernameカラムにはuniqueな制限をかけてあげているので、Flutterのアプリ側でユーザーが選んだユーザー名が既に登録済みの場合はエラーが出て登録が失敗し、ユーザーに違うユーザー名を選ぶことを促すことができる点です。データベースレベルでユニークさが定義されているので、アプリを作る際はあまりそこらへんに神経を使うことなく簡単に裏側のデータをきれいに保つことができます。
-- Function to create a new row in profiles table upon signup
-- Also copies the username value from metadata
create or replace function public.handle_new_user() returns trigger as $$
    begin
        insert into public.profiles(id, username)
        values(new.id, new.raw_user_meta_data->>'username');

        return new;
    end;
$$ language plpgsql security definer;

-- Trigger to call `handle_new_user` when new user signs up
create trigger on_auth_user_created
    after insert on auth.users
    for each row
    execute function handle_new_user();
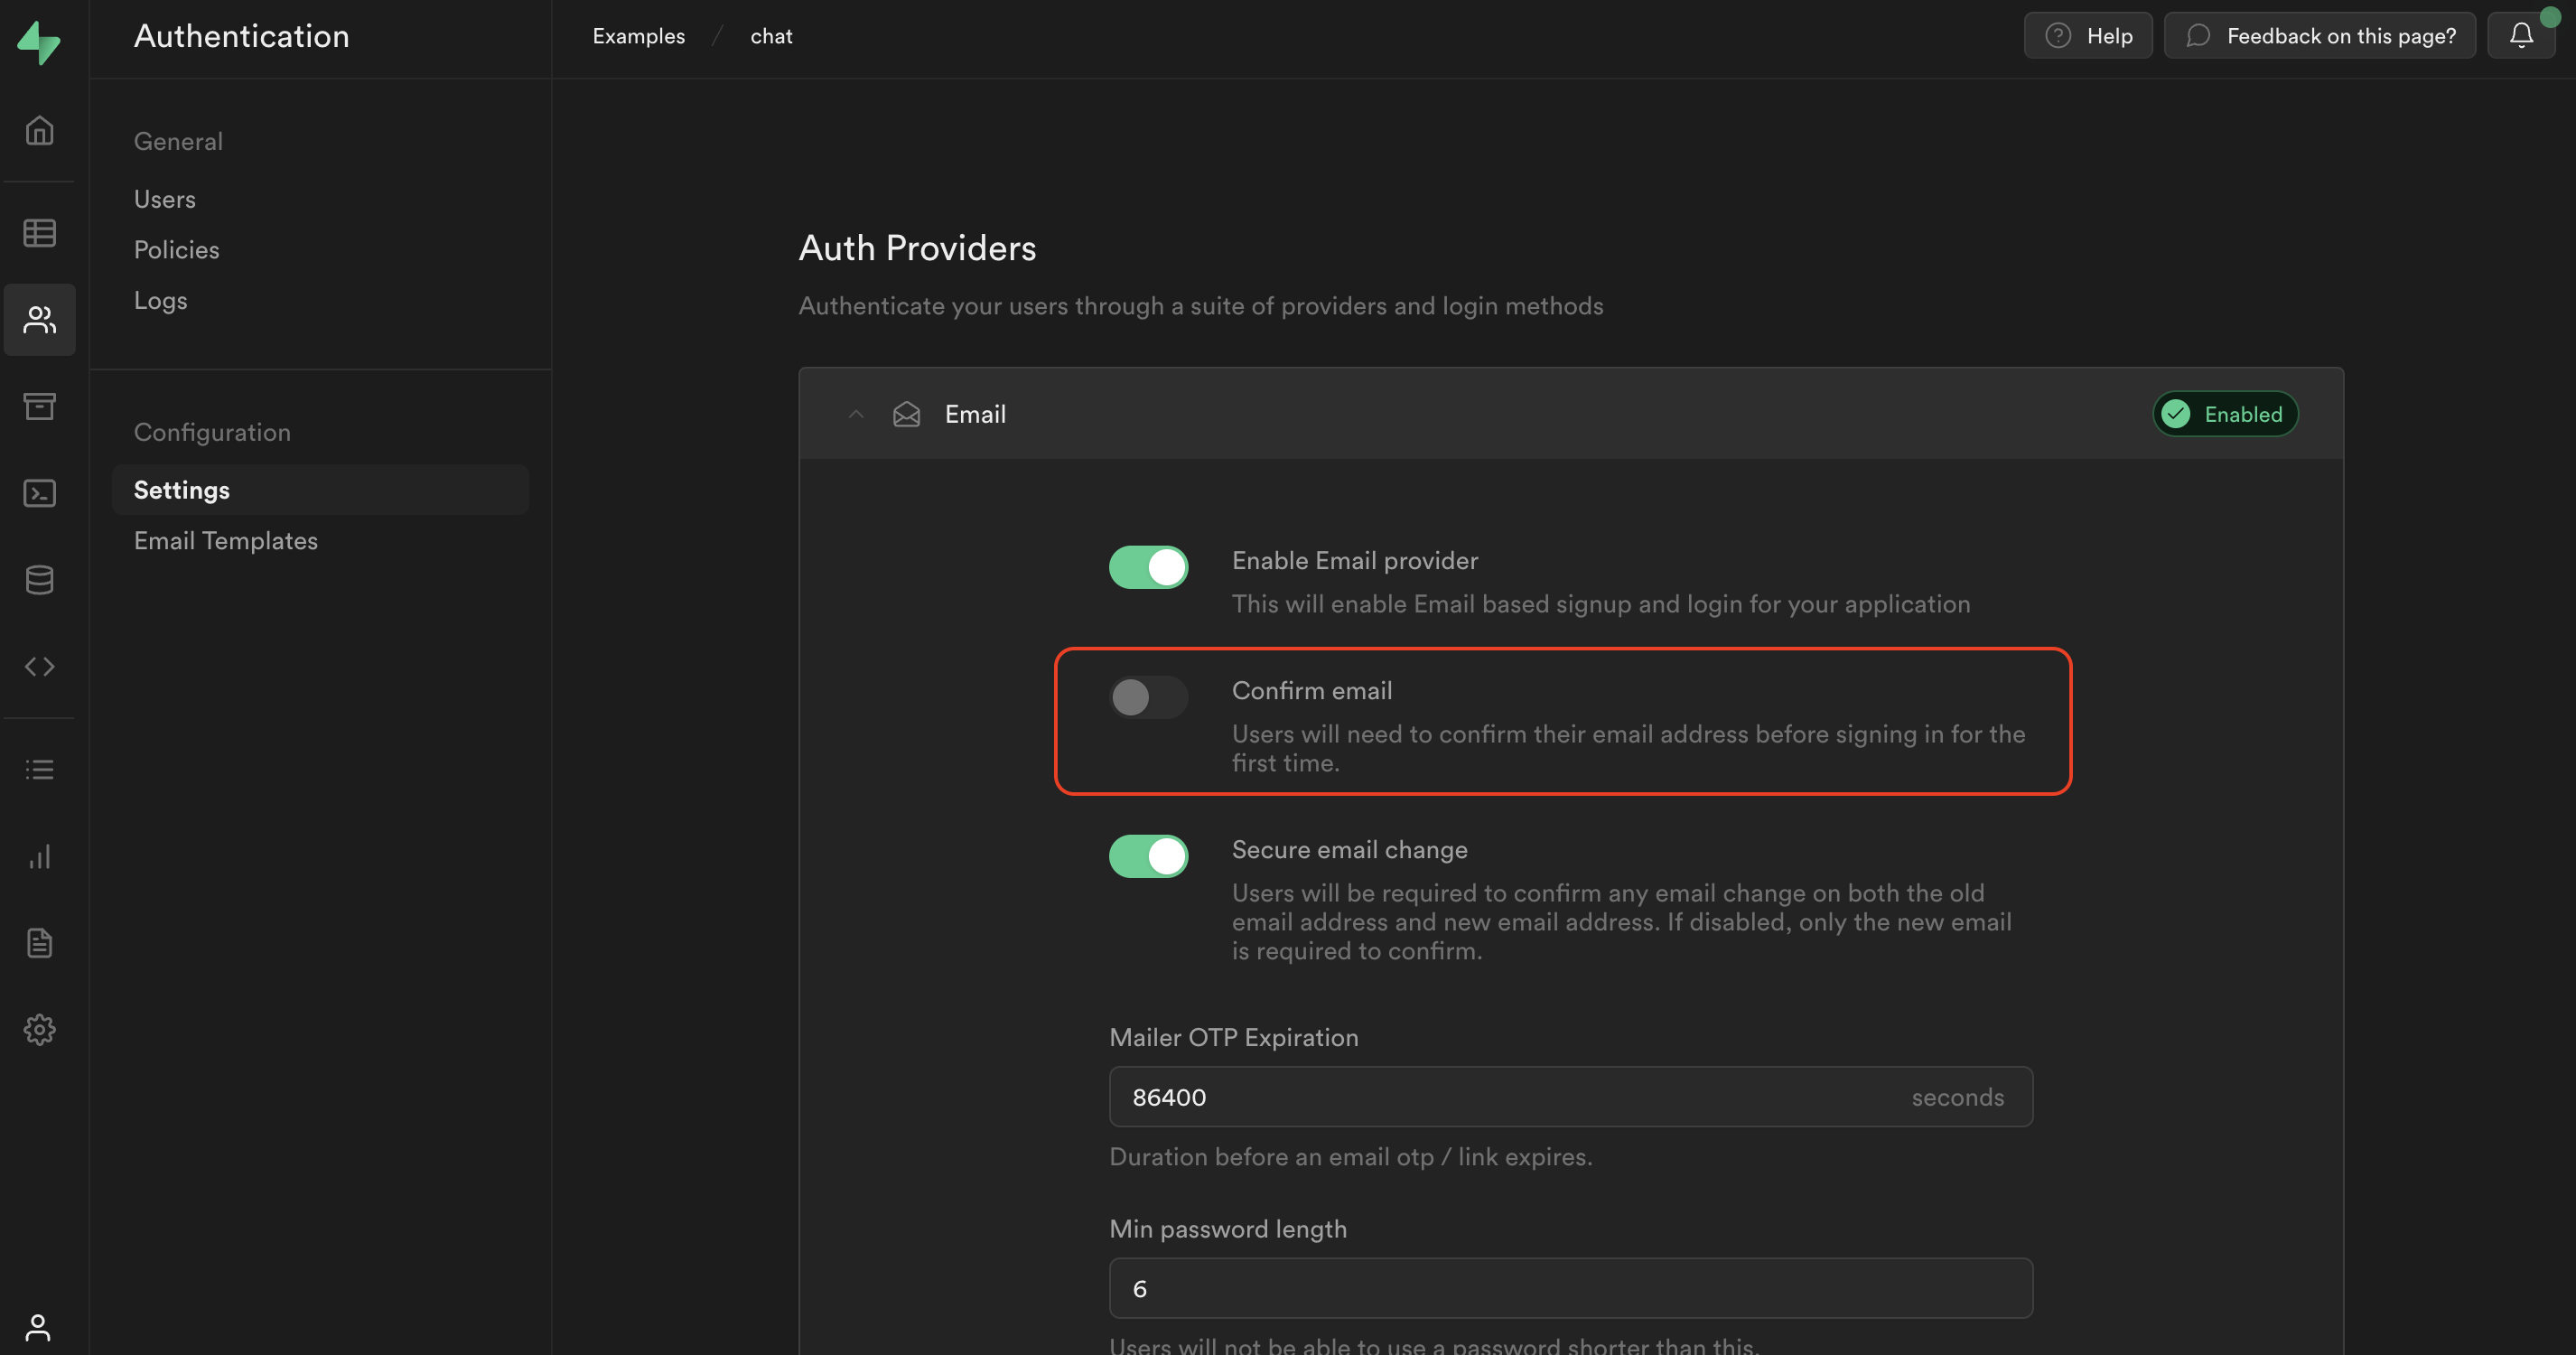
最後に、SupabaseはデフォルトでEmailで登録した際にそのメールアドレスに確認メールを送り、その確認が済まないときちんと登録完了したことにならない仕様になっているのですが、今回は簡単なサンプルアプリということで一旦こちらはオフにしてしまいましょう。後々続編の記事で認証認可についてはもう少し深堀するので、その際にここら辺はカバーさせてください。ということで、Supabase管理画面のauthentication -> settingsから'Enable email confirmations'のスイッチをオフにしてください。
Step 6: ログインページの作成
ログインページはシンプルにメールアドレスとパスワードを入力するTextFormFieldがあるくらいで、特に捻りはないです。登録ページと同じく、ログインが完了したらチャットページに飛ぶ形になっています。
import 'package:flutter/material.dart';
import 'package:my_chat_app/pages/chat_page.dart';
import 'package:my_chat_app/utils/constants.dart';
import 'package:supabase_flutter/supabase_flutter.dart';

class LoginPage extends StatefulWidget {
  const LoginPage({Key? key}) : super(key: key);

  static Route<void> route() {
    return MaterialPageRoute(builder: (context) => const LoginPage());
  }

  @override
  _LoginPageState createState() => _LoginPageState();
}

class _LoginPageState extends State<LoginPage> {
  bool _isLoading = false;
  final _emailController = TextEditingController();
  final _passwordController = TextEditingController();

  Future<void> _signIn() async {
    setState(() {
      _isLoading = true;
    });
    try {
      await supabase.auth.signInWithPassword(
        email: _emailController.text,
        password: _passwordController.text,
      );
      Navigator.of(context)
          .pushAndRemoveUntil(ChatPage.route(), (route) => false);
    } on AuthException catch (error) {
      context.showErrorSnackBar(message: error.message);
    } catch (_) {
      context.showErrorSnackBar(message: unexpectedErrorMessage);
    }
    if (mounted) {
      setState(() {
        _isLoading = true;
      });
    }
  }

  @override
  void dispose() {
    _emailController.dispose();
    _passwordController.dispose();
    super.dispose();
  }

  @override
  Widget build(BuildContext context) {
    return Scaffold(
      appBar: AppBar(title: const Text('Sign In')),
      body: ListView(
        padding: formPadding,
        children: [
          TextFormField(
            controller: _emailController,
            decoration: const InputDecoration(labelText: 'Email'),
            keyboardType: TextInputType.emailAddress,
          ),
          formSpacer,
          TextFormField(
            controller: _passwordController,
            decoration: const InputDecoration(labelText: 'Password'),
            obscureText: true,
          ),
          formSpacer,
          ElevatedButton(
            onPressed: _isLoading ? null : _signIn,
            child: const Text('Login'),
          ),
        ],
      ),
    );
  }
}
Step 7: メッセージのやり取りができるチャットページの作成
いよいよ最後のページ、メインのチャットページを作成しましょう。このページはリアルタイムにメッセージがロードされ、さらに誰でも他の人に向けてメッセージを送信することができるページになります。ここではsupabase-flutterのstream()メソッドを使ってメッセージテーブルからデータをロードしてきています。メッセージを読み込んだ際に、そのメッセージの送信者情報をprofilesテーブルから適宜ロードしてきています。その際、ロードされたメッセージはすぐにUI上に表示させ、後から遅れてロードされてくるプロフィール情報は、一旦くるくる回るローダーを表示させたのちにプロフィール情報がロードされ次第ユーザー名の最初の二文字を表示したプロフィール画像的なものを表示させている形になります。
import 'dart:async';

import 'package:flutter/material.dart';

import 'package:my_chat_app/models/message.dart';
import 'package:my_chat_app/models/profile.dart';
import 'package:my_chat_app/utils/constants.dart';
import 'package:supabase_flutter/supabase_flutter.dart';
import 'package:timeago/timeago.dart';

/// Page to chat with someone.
///
/// Displays chat bubbles as a ListView and TextField to enter new chat.
class ChatPage extends StatefulWidget {
  const ChatPage({Key? key}) : super(key: key);

  static Route<void> route() {
    return MaterialPageRoute(
      builder: (context) => const ChatPage(),
    );
  }

  @override
  State<ChatPage> createState() => _ChatPageState();
}

class _ChatPageState extends State<ChatPage> {
  late final Stream<List<Message>> _messagesStream;
  final Map<String, Profile> _profileCache = {};

  @override
  void initState() {
    final myUserId = supabase.auth.currentUser!.id;
    _messagesStream = supabase
        .from('messages')
        .stream(primaryKey: ['id'])
        .order('created_at')
        .map((maps) => maps
            .map((map) => Message.fromMap(map: map, myUserId: myUserId))
            .toList());
    super.initState();
  }

  Future<void> _loadProfileCache(String profileId) async {
    if (_profileCache[profileId] != null) {
      return;
    }
    final data =
        await supabase.from('profiles').select().eq('id', profileId).single();
    final profile = Profile.fromMap(data);
    setState(() {
      _profileCache[profileId] = profile;
    });
  }

  @override
  Widget build(BuildContext context) {
    return Scaffold(
      appBar: AppBar(title: const Text('Chat')),
      body: StreamBuilder<List<Message>>(
        stream: _messagesStream,
        builder: (context, snapshot) {
          if (snapshot.hasData) {
            final messages = snapshot.data!;
            return Column(
              children: [
                Expanded(
                  child: messages.isEmpty
                      ? const Center(
                          child: Text('Start your conversation now :)'),
                        )
                      : ListView.builder(
                          reverse: true,
                          itemCount: messages.length,
                          itemBuilder: (context, index) {
                            final message = messages[index];

                            /// I know it's not good to include code that is not related
                            /// to rendering the widget inside build method, but for
                            /// creating an app quick and dirty, it's fine 😂
                            _loadProfileCache(message.profileId);

                            return _ChatBubble(
                              message: message,
                              profile: _profileCache[message.profileId],
                            );
                          },
                        ),
                ),
                const _MessageBar(),
              ],
            );
          } else {
            return preloader;
          }
        },
      ),
    );
  }
}

/// Set of widget that contains TextField and Button to submit message
class _MessageBar extends StatefulWidget {
  const _MessageBar({
    Key? key,
  }) : super(key: key);

  @override
  State<_MessageBar> createState() => _MessageBarState();
}

class _MessageBarState extends State<_MessageBar> {
  late final TextEditingController _textController;

  @override
  Widget build(BuildContext context) {
    return Material(
      color: Colors.grey[200],
      child: SafeArea(
        child: Padding(
          padding: const EdgeInsets.all(8.0),
          child: Row(
            children: [
              Expanded(
                child: TextFormField(
                  keyboardType: TextInputType.text,
                  maxLines: null,
                  autofocus: true,
                  controller: _textController,
                  decoration: const InputDecoration(
                    hintText: 'Type a message',
                    border: InputBorder.none,
                    focusedBorder: InputBorder.none,
                    contentPadding: EdgeInsets.all(8),
                  ),
                ),
              ),
              TextButton(
                onPressed: () => _submitMessage(),
                child: const Text('Send'),
              ),
            ],
          ),
        ),
      ),
    );
  }

  @override
  void initState() {
    _textController = TextEditingController();
    super.initState();
  }

  @override
  void dispose() {
    _textController.dispose();
    super.dispose();
  }

  void _submitMessage() async {
    final text = _textController.text;
    final myUserId = supabase.auth.currentUser!.id;
    if (text.isEmpty) {
      return;
    }
    _textController.clear();
    try {
      await supabase.from('messages').insert({
        'profile_id': myUserId,
        'content': text,
      });
    } on PostgrestException catch (error) {
      context.showErrorSnackBar(message: error.message);
    } catch (_) {
      context.showErrorSnackBar(message: unexpectedErrorMessage);
    }
  }
}

class _ChatBubble extends StatelessWidget {
  const _ChatBubble({
    Key? key,
    required this.message,
    required this.profile,
  }) : super(key: key);

  final Message message;
  final Profile? profile;

  @override
  Widget build(BuildContext context) {
    List<Widget> chatContents = [
      if (!message.isMine)
        CircleAvatar(
          child: profile == null
              ? preloader
              : Text(profile!.username.substring(0, 2)),
        ),
      const SizedBox(width: 12),
      Flexible(
        child: Container(
          padding: const EdgeInsets.symmetric(
            vertical: 8,
            horizontal: 12,
          ),
          decoration: BoxDecoration(
            color: message.isMine
                ? Theme.of(context).primaryColor
                : Colors.grey[300],
            borderRadius: BorderRadius.circular(8),
          ),
          child: Text(message.content),
        ),
      ),
      const SizedBox(width: 12),
      Text(format(message.createdAt, locale: 'en_short')),
      const SizedBox(width: 60),
    ];
    if (message.isMine) {
      chatContents = chatContents.reversed.toList();
    }
    return Padding(
      padding: const EdgeInsets.symmetric(horizontal: 8, vertical: 18),
      child: Row(
        mainAxisAlignment:
            message.isMine ? MainAxisAlignment.end : MainAxisAlignment.start,
        children: chatContents,
      ),
    );
  }
}
以上でアプリの作成は完了です!実際にflutter runを実行してみてアプリを起動させましょう!ウェブ版とシミュレーター版を同時に起動させてみてぜひリアルタイムにチャットのやり取りをして楽しんでみてください!
まとめと今後の改善点について
今回はFlutterとSupabaseといったサクッと簡単にアプリが開発できる素晴らしいツールを使って実際にサクッとリアルタイムチャットアプリを作ってみました。このアプリのフォーカスはリアルタイムにデータのやり取りをすることだったので、あえて認可周りに関しては疎かになっていますが、そちらに関してはrow level securityを使っていくのですが、そこら辺は次の記事でカバーしたいと思います。その際、今回のアプリは全ユーザーが一箇所に集まる大きなチャット部屋があるだけでしたが、次回の認可周りを実装したあとは個別のユーザーとプライベートなチャットができる1対1のチャット部屋機能なんかも実装していきたいと思います。
もし何か質問がある方はぜひTwitterで聞いていただくか、SupabaseのDiscordに入って聞いてみてください!Discordの方は最近日本語専用チャンネルもできたので日本語での質問もお待ちしております!
また、この記事の続編になるFlutterとSupabaseでチャットアプリを作る - その2もあるのでぜひ覗いてみてください!