メールコーディングをする上で重要なポイント
-
<table>タグを組むときにcolspanやrowspanを使わないように組み立てる - 半角スペースは極力削る(Gmailは文字数やファイルサイズが大きいと制限で切られてしまうため、なるべく無駄な空白は削ったほうが良い)
- 画像のパス指定は 'http://' から記述
- スタイルはインラインに記述、レスポンシブ対応はヘッダのCSSに記述する
Outlook対策
- 画像のサイズは必ず
width="size" height="size"を指定する(これを書かないと、元の画像サイズで表示されてしまう。どちらかをautoにしたい時は、width="300" height="*"と書く。 pxは書かない 、 *はauto という意味になる。)
今回の記事で実機確認しているのは、以下の通り。
- Mac
- Gmail(Chrome/FF)
- Inbox(Chrome/FF)
- Thunderbird
- Windows
- Outlook
- iPhone
- Gmail
- Inbox
- MailBox
- Android
- Gmail
head設定
- ドキュメント宣言は 'HTML 4.01 Transitional' で設定
- 文字コードは 'iso-2022-jp' で設定
<!DOCTYPE html PUBLIC "-//W3C//DTD XHTML 1.0 Strict//EN" "http://www.w3.org/TR/xhtml1/DTD/xhtml1-strict.dtd" />
<html xmlns="http://www.w3.org/1999/xhtml" xmlns="http://www.w3.org/1999/xhtml">
  <head>
    <meta http-equiv="Content-Language" content="ja" />
    <meta http-equiv="Content-Type" content="text/html;charset=iso-2022-jp" />
    <meta name="viewport" content="initial-scale=1.0,width=device-width" />
    <title>[タイトル]</title>
  </head>
  <body>
    [本文]
  </body>
</html>
CSS
- CSSはメーラーによって影響範囲が変動するため、良く理解した上でコーディングしていく必要がある。
- 対応するデバイスは決めておく必要がある。
- 主要メーラーとして気にするべきなのはGmailとOutlook
- Browser/Gmail => 一部のCSSは効かない(リンクの色を指定しても勝手に抜かれるなど、頑張っても無理な場所があります。)
- Win/Outlook => CSSファイルを読み込まない為、基本的にレスポンシブは考えない。崩れないで表示するためにはどうするか?という程度に考える。
詳しいデバイス別の対応表はこちらから
The Ultimate Guide to CSS
body内のタグの書き方
- 基本的にタグにプロパティを足す+スタイルはインラインで書く。
- resetされたboxの書きかた(Outlookに対応)
<table width="100%" border="0" cellpadding="0" cellspacing="0" style="width:100%;border:none;margin:0;">
  <tr>
    <td width="100%" border="0" cellpadding="0" cellspacing="0" style="width:100%;border:none;margin:0;">
    </td>
  </tr>
</table>
- 背景色を付けたい場合は、一番外の
tableに指定すれば、内側のtableやtdに、書かなくてOK。 - 高さを取りたい時は必ず
tdで書くこと
<table width="100%" bgcolor="#fff" border="0" cellpadding="0" cellspacing="0" style="width:100%; background:#fff;border:none;margin:0;">
  <tr>
    <td width="100%" height="14" border="0" cellpadding="0" cellspacing="0" style="width:100%;height:14px;background:#fff;border:none;margin:0;">
      [白背景の height:14px のボックス]
    </td>
  </tr>
</table>
- 文字の色や文字の太さを変更する時は
fontやbタグで書く(もちろんインラインでスタイルも書く) -
font-sizeの1~5は大体以下くらいのサイズを目処にかけばOK(CSS非対応デバイス対策)- size="1" (12px)
- size="2" (14px)
- size="3" (16px)
- size="4" (18px)
- size="5" (20px)
<font color="#414141" size="3" style="font-size:16px;color:#414141;">
  <b style="font-weight:bold;">
    <img src="/images/new.png" width="26" height="20" border="0" style="width:26px;height:20px;border:none;" />
    新着のメッセージが有ります!
  </b>
</font>
tableの組み方
- 序盤で話したように
<table>タグを組むときにcolspanやrowspanを使わないように組み立てる
これが結構大事で、崩れないようにするにはここを徹底するべき。
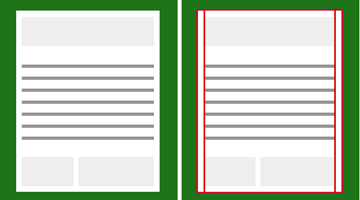
横幅に余白を取りたい場合はテーブルを二重にする等の工夫をする。
以下のようなメールを作りたい場合、まず、大枠となる tableを1つ作り、横の余白を設定します。
<table width="100%" border="0" cellpadding="0" cellspacing="0" style="width:100%;border:none;margin:0;">
  <tr>
    <td width="15" border="0" cellpadding="0" cellspacing="0" style="width:15px;border:none;margin:0;">
    </td>
    <td width="*" border="0" cellpadding="0" cellspacing="0" style="width:auto;border:none;margin:0;">
    </td>
    <td width="15" border="0" cellpadding="0" cellspacing="0" style="width:15px;border:none;margin:0;">
    </td>
  </tr>
</table>
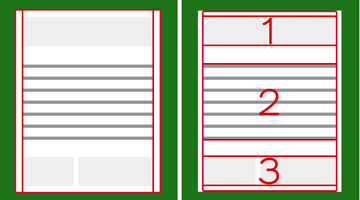
こんな感じで15pxの横幅を作ったtableを生成し、2つ目の tdの中にまたtableを書いていきます。
<table width="100%" border="0" cellpadding="0" cellspacing="0" style="width:100%;border:none;margin:0;">
  <tr>
    <td width="100%" height="15" border="0" cellpadding="0" cellspacing="0" style="width:100%;height:15px;border:none;margin:0;"><!-- 余白 --></td>
  </tr>
  <tr>
    <td width="100%" bgcolor="#ccc" border="0" cellpadding="0" cellspacing="0" style="width:100%;background:#ccc;border:none;margin:0;"><!-- ① -->
    </td>
  </tr>
  <tr>
    <td width="100%" height="45" border="0" cellpadding="0" cellspacing="0" style="width:100%;height:45px;border:none;margin:0;"><!-- 余白 --></td>
  </tr>
  <tr>
    <td width="100%" border="0" cellpadding="0" cellspacing="0" style="width:100%;border:none;margin:0;"><!-- ② -->
    </td>
  </tr>
  <tr>
    <td width="100%" height="45" border="0" cellpadding="0" cellspacing="0" style="width:100%;height:45px;border:none;margin:0;"><!-- 余白 --></td>
  </tr>
  <tr>
    <td width="100%" bgcolor="#ccc" border="0" cellpadding="0" cellspacing="0" style="width:100%;background:#ccc;border:none;margin:0;"><!-- ③ -->

      <table>
        <tr>
          <td>右カラム用td</td>
          <td>左カラム用td</td>
        </tr>
      </table>

    </td>
  </tr>
  <tr>
    <td width="100%" height="15" border="0" cellpadding="0" cellspacing="0" style="width:100%;height:15px;border:none;margin:0;"><!-- 余白 --></td>
  </tr>
</table>
結構細かく輪切りにしていくことを心がけると、大きくセルが崩れたりしません。
- 1つのtable内では
table > tr> tdの数を、基本的に同じ数で書いていけば間違いないです。

