前回の続き。
Kotlin製webフレームワークKtorのコードを読んで整理してみた話。
Ktor公式ドキュメント
Ktor日本語版ドキュメント
versionは1.1.3。
パッケージ構成の次は、主要な処理であるApplication.installの呼び出し内部を調べてみた。
そもそもApplication.installメソッドとは?
Ktorでは認証、ルーティング、ヘッダー付与、Cookie、テンプレートエンジン等の機能は全て、Featureと呼ばれるプラグインになっており、Application.installメソッドでそれらを利用可能にする。
例えば以下のようなコードで、Sessionを利用したり、HttpへのリクエストをHttpsへリダイレクトしたりできるようになる。
data class MySession(val username: String)
data class IndexData(val items: List<Int>)

fun Application.module() {
    //Application.installメソッド
    install(HttpsRedirect) {
        sslPort = 443
    }
    install(Sessions) {
        cookie<MySession>("SESSION")
    }
    routing {
        get("/") {
            val session = call.sessions.get<MySession>()
            if (session != null) {
                call.respondText("User is logged")
            } else {
                call.respond(FreeMarkerContent("index.ftl", mapOf("data" to IndexData(listOf(1, 2, 3))), ""))
            }
        }
    }
}
Applicationクラスとは
まずは役割について。公式には以下のように記載があった。
An Application instance is the main unit of a Ktor Application. When a request comes in (a request can be HTTP, HTTP/2 or WebSocket requests), it is converted to an ApplicationCall and goes through a pipeline which is owned by the Application. The pipeline consists of one or more interceptors that are previously installed, providing certain functionality such as routing, compression, etc. that ends handling the request.
Normally, a Ktor program configures the Application pipeline through modules that install and configure features.
つまりは以下のような存在になる。
- 起動しているWebアプリ本体そのものを指す
- Pipelineとみなせ、処理を予めApplicationに登録しておくことで、受け取ったリクエスト、レスポンスに対し処理を行える
継承ツリーをたどると下のクラス図のようにApplicationクラスはPipelineクラスを継承していることがわかります。
また、下図を見るとApplicationはPipelineであるという以外にも、以下のようなこともわかります。
- Pipelineには
addPhase,insertPhaseXXXメソッドなどでPipelinePhaseを登録可能(PipelinePhaseは振る舞いをほぼ持たない値オブジェクトに近いもの。定義はほぼclass PipelinePhase(val name: String)だけ。) - ApplicationはWebアプリのCoroutineのスコープを表すCoroutineContextを持つ(Coroutineに詳しくないのでちょっと自信なし)
- Applicationはそれ自体がPipelineである他にも、ApplicationCallPipelineの2つの変数(receivePipeline, sendPipeline)によって、受信したコンテンツ・送信するコンテンツへの処理(Pipeline)も持つ。
※ 矢印は継承関係を表す
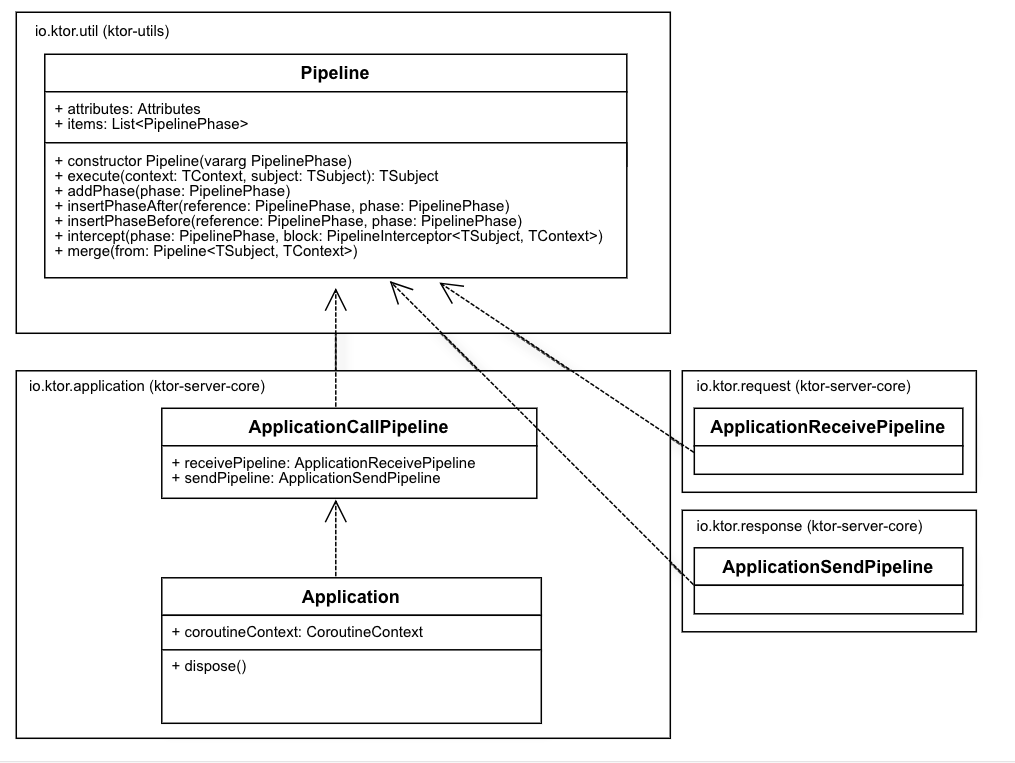
また、上図のようにPipelineクラスのコンストラクタはPipelinePhaseを複数受け取るようになっていますが、
ここには記載しませんがコードを読むと以下のこともわかります。
- ApplicationCallPipeline
-
PipelinePhase("Setup"),PipelinePhase("Monitoring"),PipelinePhase("Features"),PipelinePhase("Call"),PipelinePhase("Fallback")をPipelineコンストラクタに渡しインスタンス生成している
-
- ApplicationReceivePipeline
-
PipelinePhase("Before"),PipelinePhase("Transform"),PipelinePhase("After")をPipelineコンストラクタに渡しインスタンス生成している
-
- ApplicationSendPipeline
-
PipelinePhase("Before"),PipelinePhase("Transform"),PipelinePhase("Render")等7つをPipelineコンストラクタに渡しインスタンス生成している
-
Pipelineに関する具体的な制御処理は、基底クラスであるPipelineに集まっており子クラスにはほとんどないようです。
<話の重要な部分まとめ>
- 起動したWebアプリそのものを表すApplicationクラスはPipelineである
- ApplicationはPipelineでありつつも、他に2つPipelineを持つ(sendPipeline, receivePipeline)
- PipelineにはPipelinePhaseを複数設定できる。
- PipelinePhaseは実質ただの文字列値であり振る舞いは持たない
ここまでで説明していないPipelineクラスの変数attributes: Attributesの話は後述します。
Application.installメソッドの中身
本題に移ります。簡略化した形で持ってくると以下のようになります。
fun <P : Pipeline<*, ApplicationCall>, B : Any, F : Any> P.install(
    feature: ApplicationFeature<P, B, F>,
    configure: B.() -> Unit = {}
): F {
    //ここの`attributes`はApplicationクラスの変数(Attributes型)
    val registry: Attributes = attributes.computeIfAbsent(AttributeKey("ApplicationFeatureRegistry")) {
        Attributes(true)
    }
    val installedFeature: F? = registry.getOrNull(feature.key)
    when (installedFeature) {
        null -> {
            try {
                val installed: F = feature.install(this, configure)
                registry.put(feature.key, installed)
                return installed
            } catch (t: Throwable) {
                throw t
            }
        }
        feature -> { return installedFeature }
        else -> { throw DuplicateApplicationFeatureException("") }
    }
}
定義はP.install メソッド(拡張関数)であり、PはPipeline<*, ApplicationCall>型を指すので、
実際の定義はApplication.installではなくPipeline<*, ApplicationCall>.installメソッドであることがわかります。
なお、BとFについては、FがFeature(実際にInstallする機能)クラスであり、BがFeatureのConfigurationになります。
さて、attributes.computeIfAbsentでattributesという変数が出てきますが、これはApplicationクラスの変数です。
Attributes型であり、Attributesクラスの中身は、ただのMapのデータ構造です。
つまり最初の二行
val registry: Attributes = attributes.computeIfAbsent(AttributeKey("ApplicationFeatureRegistry")) {
        Attributes(true)
}
val installedFeature: F? = registry.getOrNull(feature.key)
はApplicationクラスの持つMap型変数にインストールしたいFeatureが登録されているかどうかを確認する処理になります。
そしてもし未登録だった場合は以下の2行でApplicationFeature.installメソッドを呼び出した後、そのFeatureをApplication.attributesに登録してます。
val installed: F = feature.install(this, configure)
registry.put(feature.key, installed)
<話の重要な部分まとめ>
- Applicationクラスの持つ変数attributesはFeatureを登録するのに使われていた
- Feature登録時にApplicationFeature.installメソッドを呼び、実際にPipelineにFeatureの処理登録を行う。
というわけでApplicationFeature.installについて見ていきます。
ApplicationFeature.installについて
ApplicationFeatureはinterfaceであり、installメソッドは以下のようなシグニチャになります。
//TConfiguration, TFeatureはAny型
fun install(pipeline: Pipeline<*, ApplicationCall>, configure: TConfiguration.() -> Unit): TFeature
具体的に何をしているのかは各具象クラスの実装を見ないとわからないので、io.ktor.features.HttpsRedirectの中身を見てみます。
HttpsRedirectクラスはktorがデフォルトで用意しているFeatureです。
HTTPリクエストをHTTPSリクエストにリダイレクトするという内容になります。
(HttpsRedirectをApplicationにinstallするコードは冒頭にて紹介しています。)
以下が簡略化したコードになります。
class HttpsRedirect(config: Configuration) {
    val redirectPort: Int = config.sslPort
    val permanent: Boolean = config.permanentRedirect

    class Configuration {
        var sslPort: Int = URLProtocol.HTTPS.defaultPort
        var permanentRedirect: Boolean = true
    }

    companion object Feature : ApplicationFeature<ApplicationCallPipeline, Configuration, HttpsRedirect> {
        override val key = AttributeKey<HttpsRedirect>("HttpsRedirect")
        //ApplicationFeature.installメソッド
        override fun install(pipeline: ApplicationCallPipeline, configure: Configuration.() -> Unit): HttpsRedirect {
            val feature = HttpsRedirect(Configuration().apply(configure))
            pipeline.intercept(ApplicationCallPipeline.Features) {
                if (call.request.origin.scheme == "http") {
                    val redirectUrl = call.url { protocol = URLProtocol.HTTPS; port = feature.redirectPort }
                    call.respondRedirect(redirectUrl, feature.permanent)
                    finish()
                }
            }
            return feature
        }
    }
}
ApplicationFeature.installメソッド内で何をしているのかを見ると、
- 1行目: ユーザがApplication.installメソッド呼び出し時に書いたconfigureを適用する
val feature = HttpsRedirect(Configuration().apply(configure))
- 2行目:
pipeline.interceptでPipelineの途中に処理を挟む。第一引数にPipelinePhase指定しどの時点での処理かを定義。第二引数に実際に挟む処理内容を記述する。
pipeline.intercept(ApplicationCallPipeline.Features) {
  //...
}
<話の重要な部分まとめ>
Pipeline.interceptメソッドを呼び、実際にPipelineに処理を登録するのは、ApplicationFeature.install内。- ユーザが
Application.installでFeatureをinstallする時に書いた設定コードはApplicationFeature.install内で実行される