EC2 + Tomcat + Javaの環境で、Selenium WebDriverを動かすため準備を
ご紹介します。
クローリングをする必要があり、Webサービスが動いているEC2にchrome等を
インストールしたのですが、めちゃくちゃ沼にハマっていきました。
諦めモードで新しくEC2インスタンスを用意したらあっさり動かすことができました。
EC2 + Tomcat + Java + WebDriverの環境が必要になった人のため
備忘録として記事を書きました。
(MySql,cronとかは記事に関係ないけど、私用の備忘録として書いてます。
不要な方は入れなくても問題ありません。)
コマンドの内容とか細かい説明は省略しましたが、1から順番に実行すれば必ず動くはず。。
今回の記事で用意した環境は下記です。
Amazon Linux 2023
Java 21
apache-tomcat 10
MySql 8
| No | 目次 |
|---|---|
| 0 | EC2インスタンスの用意 |
| 1 | 環境設定 |
| 2 | Java21インストール |
| 3 | Apacheインストール |
| 4 | Tomcatインストール |
| 5 | MySqlインストール |
| 6 | cronインストール |
| 7 | Chromeインストール |
| 8 | warファイルのアップロード |
| 9 | プログラムが動くか確認 |
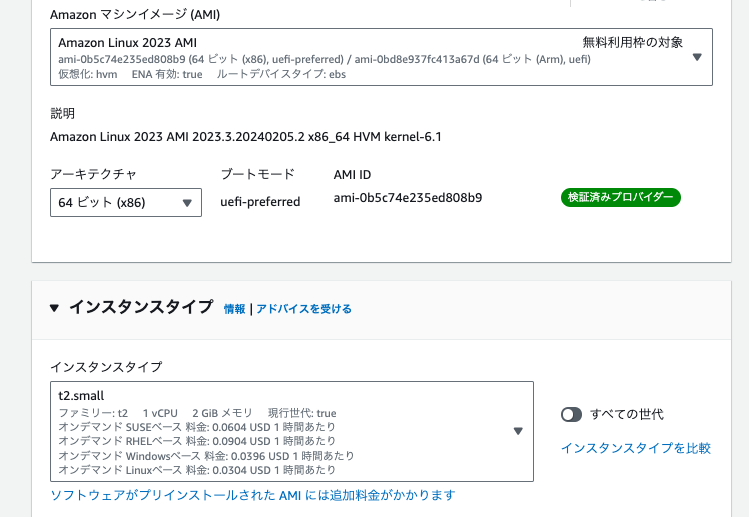
0. EC2インスタンスの用意
EC2でインスタンスを起動します。
AMIは、「Amazon Linux 2023 API」、
インスタンスタイプは、**「t2.small」**を選択します。
「t2.micro」でWevDriverを動かすとメモリが足りずクラッシュします。
最低でもsmall以上は必要なようです。
sshでログイン後、OSのバージョンを確認します。
cat /etc/os-release
下記が出力される。
PRETTY_NAME="Amazon Linux 2023"となっていればOK
NAME="Amazon Linux"
VERSION="2023"
ID="amzn"
ID_LIKE="fedora"
VERSION_ID="2023"
PLATFORM_ID="platform:al2023"
PRETTY_NAME="Amazon Linux 2023"
ANSI_COLOR="0;33"
CPE_NAME="cpe:2.3:o:amazon:amazon_linux:2023"
HOME_URL="https://aws.amazon.com/linux/"
BUG_REPORT_URL="https://github.com/amazonlinux/amazon-linux-2023"
SUPPORT_END="2028-03-15"
1. 環境設定
1.1.システムのアップグレード
sudo dnf -y update
1.2.タイムゾーンの変更
sudo timedatectl set-timezone Asia/Tokyo
1.3.ロケールの変更
sudo localectl set-locale LANG=ja_JP.UTF-8
source /etc/locale.conf
localectl status
下記が出力される。
System Locale: LANG=ja_JP.UTF-8
    VC Keymap: (unset)
   X11 Layout: (unset)
1.4.パッケージアップグレードの自動化
1.4.1. dnf-automatic パッケージをインストール
sudo dnf install -y dnf-automatic
sudo vi /etc/dnf/automatic.conf
apply_updates=noをyesに書き換える
apply_updates = yes
1.4.2. 自動アプグレードタイマーを有効にする
sudo systemctl enable --now dnf-automatic.timer
2. Java21インストール
2.1. インストール可能なパッケージの確認
sudo dnf list --available "java-*"
下記が出力される。
利用可能なパッケージ
java-1.8.0-amazon-corretto.x86_64                                                     1:1.8.0_402.b08-1.amzn2023                                                amazonlinux
java-1.8.0-amazon-corretto-devel.x86_64                                               1:1.8.0_402.b08-1.amzn2023                                                amazonlinux
java-11-amazon-corretto.x86_64                                                        1:11.0.22+7-1.amzn2023                                                    amazonlinux
java-11-amazon-corretto-devel.x86_64                                                  1:11.0.22+7-1.amzn2023                                                    amazonlinux
java-11-amazon-corretto-headless.x86_64                                               1:11.0.22+7-1.amzn2023                                                    amazonlinux
java-11-amazon-corretto-javadoc.x86_64                                                1:11.0.22+7-1.amzn2023                                                    amazonlinux
java-11-amazon-corretto-jmods.x86_64                                                  1:11.0.22+7-1.amzn2023                                                    amazonlinux
java-17-amazon-corretto.x86_64                                                        1:17.0.10+7-1.amzn2023.1                                                  amazonlinux
java-17-amazon-corretto-devel.x86_64                                                  1:17.0.10+7-1.amzn2023.1                                                  amazonlinux
java-17-amazon-corretto-headless.x86_64                                               1:17.0.10+7-1.amzn2023.1                                                  amazonlinux
java-17-amazon-corretto-javadoc.x86_64                                                1:17.0.10+7-1.amzn2023.1                                                  amazonlinux
java-17-amazon-corretto-jmods.x86_64                                                  1:17.0.10+7-1.amzn2023.1                                                  amazonlinux
java-21-amazon-corretto.x86_64                                                        1:21.0.2+13-1.amzn2023.1                                                  amazonlinux
java-21-amazon-corretto-devel.x86_64                                                  1:21.0.2+13-1.amzn2023.1                                                  amazonlinux
java-21-amazon-corretto-headless.x86_64                                               1:21.0.2+13-1.amzn2023.1                                                  amazonlinux
java-21-amazon-corretto-javadoc.x86_64                                                1:21.0.2+13-1.amzn2023.1                                                  amazonlinux
java-21-amazon-corretto-jmods.x86_64                                                  1:21.0.2+13-1.amzn2023.1                                                  amazonlinux
2.2. インストール
先程の一覧からjava21を選択します。
sudo dnf -y install java-21-amazon-corretto-devel
2.3. バージョン確認
java --version
下記が出力される。
openjdk 21.0.2 2024-01-16 LTS
OpenJDK Runtime Environment Corretto-21.0.2.13.1 (build 21.0.2+13-LTS)
OpenJDK 64-Bit Server VM Corretto-21.0.2.13.1 (build 21.0.2+13-LTS, mixed mode, sharing)
3. Apacheインストール
3.1. インストール可能なパッケージの一覧を表示
sudo dnf list --available httpd
下記が出力される。
利用可能なパッケージ
httpd.x86_64                                                                 2.4.58-1.amzn2023                                                                  amazonlinux
3.2. Apache をインストール
sudo dnf -y install httpd
3.3. インストールされている Apache のバージョン確認
httpd -v
下記が出力される。
Server version: Apache/2.4.58 (Amazon Linux)
Server built:   Oct 24 2023 00:00:00
3.4. Apache を起動する
sudo systemctl start httpd.service
3.5. Apache の状態確認
sudo systemctl status httpd.service
下記が出力される。
「active (running)」になっていればOK。
● httpd.service - The Apache HTTP Server
     Loaded: loaded (/usr/lib/systemd/system/httpd.service; disabled; preset: disabled)
     Active: active (running) since Sat 2024-02-10 13:47:02 JST; 4s ago
       Docs: man:httpd.service(8)
   Main PID: 26444 (httpd)
     Status: "Started, listening on: port 80"
      Tasks: 177 (limit: 2322)
     Memory: 13.1M
        CPU: 69ms
     CGroup: /system.slice/httpd.service
             ├─26444 /usr/sbin/httpd -DFOREGROUND
             ├─26463 /usr/sbin/httpd -DFOREGROUND
             ├─26464 /usr/sbin/httpd -DFOREGROUND
             ├─26465 /usr/sbin/httpd -DFOREGROUND
             └─26466 /usr/sbin/httpd -DFOREGROUND

 2月 10 13:47:02 ip-172-31-23-161.ap-northeast-1.compute.internal systemd[1]: Starting httpd.service - The Apache HTTP Server...
 2月 10 13:47:02 ip-172-31-23-161.ap-northeast-1.compute.internal systemd[1]: Started httpd.service - The Apache HTTP Server.
 2月 10 13:47:02 ip-172-31-23-161.ap-northeast-1.compute.internal httpd[26444]: Server configured, listening on: port 80
3.6. Apache 自動起動の有効化
sudo systemctl enable httpd.service
3.7. 自動起動有効化の確認
sudo systemctl is-enabled httpd.service
3.8. 動作確認
curl -s http://localhost
下記が出力される
<html><body><h1>It works!</h1></body></html>
4. Tomcatインストール
4.1. システムアカウントの作成
sudo useradd -r -s /sbin/nologin tomcat
4.2. アカウントの確認
id tomcat
下記が出力される
uid=992(tomcat) gid=992(tomcat) groups=992(tomcat)
grep tomcat /etc/passwd
下記が出力される
tomcat:x:992:992::/home/tomcat:/sbin/nologin
4.3. Tomcat10 最新パッケージの確認
下記リンク先でverを確認
https://dlcdn.apache.org/tomcat/tomcat-10
執筆時の最新は、「v10.1.18」。
以下のコマンドのバージョンが書いてあるところを「10.1.18」にします。適時に変えてください。
4.4. Tomcat パッケージのダウンロード
wget https://dlcdn.apache.org/tomcat/tomcat-10/v10.1.18/bin/apache-tomcat-10.1.18.tar.gz
4.5. ダウンロードファイルの解凍して配置
tar -zxvf apache-tomcat-10.1.18.tar.gz
sudo mv ~/apache-tomcat-10.1.18 /opt
sudo chown -R tomcat:tomcat /opt/apache-tomcat-10.1.18
4.6. シンボリックリンクの作成
sudo ln -s /opt/apache-tomcat-10.1.18 /opt/apache-tomcat
sudo chown -h tomcat:tomcat /opt/apache-tomcat
4.7. ログシンボリックリンク作成
sudo ln -s /opt/apache-tomcat/logs /var/log/tomcat
sudo chown -h tomcat:tomcat /var/log/tomcat
4.8. ユニットファイル (tomcat.service) の作成
sudo vi /usr/lib/systemd/system/tomcat.service
下記を記載する。
# Systemd unit file for default tomcat
#
# To create clones of this service:
# DO NOTHING, use tomcat@.service instead.

[Unit]
Description=Apache Tomcat Web Application Container
After=syslog.target network.target

[Service]
Type=oneshot
PIDFile=/opt/apache-tomcat/tomcat.pid
RemainAfterExit=yes
#EnvironmentFile=/etc/tomcat/tomcat.conf
#Environment="NAME="
#EnvironmentFile=-/etc/sysconfig/tomcat
ExecStart=/opt/apache-tomcat/bin/startup.sh
ExecStop=/opt/apache-tomcat/bin/shutdown.sh
ExecReStart=/opt/apache-tomcat/bin/shutdown.sh;/opt/apache-tomcat/bin/startup.sh
SuccessExitStatus=143
User=tomcat
Group=tomcat

[Install]
WantedBy=multi-user.target
4.9. 自動起動の設定
sudo systemctl enable tomcat.service
4.10. Tomcat の起動
sudo systemctl start tomcat.service
4.11. 動作確認
curl -s http://localhost:8080 | grep title
下記が出力される
<title>Apache Tomcat/10.1.10</title>
5. MySqlインストール
MySql 8.0をインストールします。
MySQLを使用したい方以外はスキップしてください。
5.1. GPGキーをインストール(最新のキーにする2023年)
sudo rpm --import https://repo.mysql.com/RPM-GPG-KEY-mysql-2023
5.2. MySQLのリポジトリを追加
sudo yum localinstall https://dev.mysql.com/get/mysql80-community-release-el9-1.noarch.rpm
5.3. MySqlサーバーをインストール
sudo yum install mysql-community-server
5.4. MySqlクライアントをインストール
sudo yum -y install mysql mysql-community-client
5.5. MySql起動
sudo systemctl start mysqld.service
sudo systemctl enable mysqld.service
5.6. rootパスワードの設定
5.6.1. 初期パスワードの確認
sudo less /var/log/mysqld.log
下記のXXXXXXXXXXXXの箇所にパスワードが記載されています。
YYYY-MM-DDTHH:MM:SS.260490Z 6 [Note] [MY-010454] [Server] A temporary password is generated for root@localhost: XXXXXXXXXXXX
5.6.2. rootでログイン
mysql -u root -p
先程取得したパスワードを入力してください。
Enter password:
5.6.3. rootのパスワード変更
mysql> ALTER USER 'root'@'localhost' identified BY '新しいrootユーザのパスワード';
6. cronインストール
cronで何かしら動かす必要がない方はスキップしてください。
6.1. cronieインストール
sudo dnf -y install cronie
6.2. cron起動
sudo systemctl start crond.service
6.3. 自動起動の設定
sudo systemctl enable crond.service
6.4. 動作確認
6.4.1. crontabファイルの編集
sudo vi /etc/crontab
下記を入力して動作確認をしてみます。
SHELL=/bin/bash
PATH=/sbin:/bin:/usr/sbin:/usr/bin
MAILTO=root

# For details see man 4 crontabs

# Example of job definition:
# .---------------- minute (0 - 59)
# |  .------------- hour (0 - 23)
# |  |  .---------- day of month (1 - 31)
# |  |  |  .------- month (1 - 12) OR jan,feb,mar,apr ...
# |  |  |  |  .---- day of week (0 - 6) (Sunday=0 or 7) OR sun,mon,tue,wed,thu,fri,sat
# |  |  |  |  |
# *  *  *  *  * user-name  command to be executed

*/1 * * * * root date > /var/log/test.log 2>&1
6.4.2. 実行内容の確認
少し待つと、「/var/log」以下に「test.log」が出力されます。
Wed Feb 14 08:55:01 UTC 2024
6.4.3. 実行ログの確認
これだけだと、「/var/log/cron」のログは出力されないので、
下記のコマンドでcronの実行ログを確認します。
sudo journalctl -u crond
下記が出力されていれば動いています。
(1分周期で動いています。)
Feb 14 08:37:01 ip-xxx-xxx-xxx-xxx.ap-northeast-1.compute.internal CROND[25758]: (root) CMD (date > /var/log/test.log 2>&1)
Feb 14 08:37:01 ip-xxx-xxx-xxx-xxx.ap-northeast-1.compute.internal CROND[25757]: (root) CMDEND (date > /var/log/test.log 2>&1)
Feb 14 08:38:01 ip-xxx-xxx-xxx-xxx.ap-northeast-1.compute.internal CROND[25765]: (root) CMD (date > /var/log/test.log 2>&1)
Feb 14 08:38:01 ip-xxx-xxx-xxx-xxx.ap-northeast-1.compute.internal CROND[25764]: (root) CMDEND (date > /var/log/test.log 2>&1)
Feb 14 08:39:01 ip-xxx-xxx-xxx-xxx.ap-northeast-1.compute.internal CROND[25817]: (root) CMD (date > /var/log/test.log 2>&1)
Feb 14 08:39:01 ip-xxx-xxx-xxx-xxx.ap-northeast-1.compute.internal CROND[25816]: (root) CMDEND (date > /var/log/test.log 2>&1)
7. Chromeインストール
7.1. Chrome用のリポジトリファイルを作成
sudo vi /etc/yum.repos.d/google-chrome.repo
下記を記載する
[google-chrome]
name=google-chrome
baseurl=http://dl.google.com/linux/chrome/rpm/stable/$basearch
enabled=1
gpgcheck=1
gpgkey=https://dl-ssl.google.com/linux/linux_signing_key.pub
7.2. Chrome インストール
sudo yum install --enablerepo=google-chrome google-chrome-stable
7.3. バージョン確認
google-chrome --version
下記が出力される。
Google Chrome 121.0.6167.160
7.4. 動作確認
chromeでスクリーンショットを撮ってちゃんと動くか確認します。
google-chrome --headless --disable-gpu --no-sandbox --window-size=1024,768 --hide-scrollbars --screenshot='yahoo.png' https://www.yahoo.co.jp
色々ワーニングがでますが、最後の行に下記が出てればOK。
218360 bytes written to file yahoo.png
実行したパスに以下のファイルが生成される。
-rw-r--r--. 1 ec2-user ec2-user 218360 2月 10 13:58 yahoo.png
8. warファイルのアップロード
各々で作ったwarファイルをアップロードします。
アップロード前にwebappsのパーミッションを変更します。
sudo chmod 777 /opt/apache-tomcat/webapps
scpでwarファイルをアップロードします。
scp -i "pemファイルのパス" warファイルのパス ec2-user@ec2-xxx-xxx-xxx-xxx.ap-northeast-1.compute.amazonaws.com:/opt/apache-tomcat/webapps
warファイルアップロード後はパーミッションを元に戻します。
sudo chmod 775 /opt/apache-tomcat/webapps
9. プログラムが動くか確認
9.1. SeleniumとWebDriverManagerライブラリのダウンロード
pom.xmlで下記を設定しています。
<!-- https://mvnrepository.com/artifact/org.seleniumhq.selenium/selenium-java -->
<dependency>
    <groupId>org.seleniumhq.selenium</groupId>
    <artifactId>selenium-java</artifactId>
    <version>4.15.0</version>
</dependency>
<!-- https://mvnrepository.com/artifact/io.github.bonigarcia/webdrivermanager -->
<dependency>
    <groupId>io.github.bonigarcia</groupId>
    <artifactId>webdrivermanager</artifactId>
    <version>5.6.1</version>
</dependency>
9.2. 動作確認用プログラム
ちゃんと動くか下記のプログラムを実行します。
public static void main(String[] args) throws Exception{
    WebDriverManager.chromedriver().setup();

    ChromeOptions chromeOptions = new ChromeOptions();
    chromeOptions.setBinary("/usr/bin/google-chrome");
    chromeOptions.addArguments("--headless");
    chromeOptions.addArguments("--disable-gpu");
    chromeOptions.addArguments("--disable-software-rasterizer");
    chromeOptions.addArguments("--no-sandbox");

    ChromeDriver driver = null;
    try {
        driver = new ChromeDriver(chromeOptions);

        driver.get("https://www.yahoo.co.jp");
        System.out.println(driver.getPageSource());
    }finally {
        if(driver!=null) {
            driver.close();
            driver.quit();
        }
    }
}
9.2.1. WebDriverManager
WebDriverManagerでchromedriverを初期化します。
環境にあった最新のDriverをダウンロードしてくれます。
WebDriverManager.chromedriver().setup();
9.2.2. ChromeOptions
オプションをいろいろと指定します。
極力消費メモリを抑えるためにいろいろとオプションを追加していますが、
必要に応じて変えてください。
まずは、chromeのバイナリの場所を指定します。
記事の流れ通りに実行すると下記のパスにgoogle-chormeが存在するはず。
chromeOptions.setBinary("/usr/bin/google-chrome");
ヘッドレスモードを指定
chromeOptions.addArguments("--headless");
GPUハードウェアアクセラレーションを無効化する
chromeOptions.addArguments("--disable-gpu");
WebGLを無効化する
chromeOptions.addArguments("--disable-software-rasterizer");
SandBoxモードを解除する
chromeOptions.addArguments("--no-sandbox");
9.3. 結果
yahooページが出力されていれば成功です。
<html lang="ja"><head><meta charset="utf-8"><meta http-equiv="X-UA-Compatible" content="IE=edge,chrome=1"><title>Yahoo! JAPAN</title>
...略
おしまい。。