前提条件
Zabbixサーバがインストールされていること。
環境
CentOS 6.5:Zabbixサーバ
Windows7:クライアント端末
インストール済みパッケージ:
mod_ssl-2.2.15-47.el6.centos.x86_64
openssl-1.0.1e-42.el6.x86_64
openssl-devel-1.0.1e-42.el6.x86_64
入っていない場合は、yumでインストールしておこう。
サーバ証明書の作成
まずは、サーバ証明書を作成して、httpsでZabbixサーバへアクセスできるようにします。この時点ではクライアント認証はしません。
秘密鍵を作成。パスフレーズは任意でOKです。

# openssl genrsa -des3 -out server.key.secure 2048
Generating RSA private key, 2048 bit long modulus
........................+++

# openssl rsa -in server.key.secure -out server.key
Enter pass phrase for server.key.secure:
writing RSA key

作成されていることを確認。

# ls -ltr
total 8
-rw-r--r-- 1 root root 1751 Nov  8 22:25 server.key.secure
-rw-r--r-- 1 root root 1679 Nov  8 22:26 server.key

セキュリティ上の理由から、秘密鍵のパーミッションは「400」としておこう。

# chmod 400 server.key

CSR作成

# openssl req -new -key server.key -out server.csr
You are about to be asked to enter information that will be incorporated
into your certificate request.
What you are about to enter is what is called a Distinguished Name or a DN.
There are quite a few fields but you can leave some blank
For some fields there will be a default value,
If you enter '.', the field will be left blank.
-----
Country Name (2 letter code) [XX]:JP
State or Province Name (full name) []:Tokyo
Locality Name (eg, city) [Default City]:Shinagawaku
Organization Name (eg, company) [Default Company Ltd]:Test.co.jp
Organizational Unit Name (eg, section) []:Test.col.jp
Common Name (eg, your name or your server's hostname) []:Test.co.jp
Email Address []:

Please enter the following 'extra' attributes
to be sent with your certificate request
A challenge password []:
An optional company name []:

サーバ証明書を作成

# openssl x509 -in server.csr -out server.pem -req -sig nkey server.key -days 365
Signature ok
subject=/C=JP/ST=Tokyo/L=Shinagawaku\x08\x08/O=Test.co.jp/OU=Test.col\x08.jp/CN=Test.co.jp
Getting Private key

Apacheの設定ファイルを修正。
※ssl.confがhttpd.conf内でIncludeされていることが前提です。デフォルトでは、Includeされています。

vi /etc/httpd/conf.d/ssl.conf

以下の箇所を、作成したサーバ証明書(CertificateFile)と秘密鍵(CertificateKeyFile)を指定します。

SSLCertificateFile /root/work/server.pem
SSLCertificateKeyFile /root/work/server.key

Apacheを再起動。

# service httpd restart
Stopping httpd: [  OK  ]
Starting httpd: [  OK  ]
Zabbixへアクセスしてください。以下の画面が表示されますが、「このサイトの閲覧を続行する(推奨されません)。」を選択して進んでください。

ログイン画面が表示されます。正規の証明書ではないので、証明書エラーが出ていますが、SSL通信はできています。

「証明書をエラー」-「証明書を表示」をクリックすると、証明書が表示されます。

作成したサーバ証明書の情報と間違いがないか、確認してください。これでサーバ証明書のインストールは完了です。
クライアント証明書の作成
クライアント証明書を作成します。秘密鍵の作成。

# openssl genrsa -out client.key 2048
Generating RSA private key, 2048 bit long modulus
......+++
..........................+

CSRを作成。

[root@v157-7-131-58 client]# openssl req -new -key client.key -cliout client.csr
You are about to be asked to enter information that will be incorporated
into your certificate request.
What you are about to enter is what is called a Distinguished Name or a DN.
There are quite a few fields but you can leave some blank
For some fields there will be a default value,
If you enter '.', the field will be left blank.
-----
Country Name (2 letter code) [XX]:JP
State or Province Name (full name) []:Tokyo
Locality Name (eg, city) [Default City]:Shinagawaku
Organization Name (eg, company) [Default Company Ltd]:Test2
Organizational Unit Name (eg, section) []:Test2
Common Name (eg, your name or your server's hostname) []:Test2
Email Address []:

Please enter the following 'extra' attributes
to be sent with your certificate req

サーバ証明書を作成。

# openssl x509 -in client.scsr -out client-ca.crt -req  -signkey client.key -days 360
Signature ok
subject=/C=JP/ST=Tokyo/L=Shinagawaku/O=T\x08\x1B[C\x08\x1B[Cest2/OU=Test2/CN=Test2
Getting Private key

証明書と秘密鍵のペアをexport。パスワードは任意(インストールするときに入力を求められる)。

# openssl pkcs12 -export -inkey client.key -in client -ca.crt  -out client.p12 -name "test2"
Enter Export Password:
Verifying - Enter Export Password:

作成されていることを確認。

# ls -ltr
total 16
-rw-r--r-- 1 root root 1679 Nov  9 06:25 client.key
-rw-r--r-- 1 root root 1009 Nov  9 06:26 client.csr
-rw-r--r-- 1 root root 1212 Nov  9 06:26 client-ca.crt
-rw-r--r-- 1 root root 2512 Nov  9 06:27 client.p12

Apacheの設定ファイル(ssl.conf)を修正して、再起動します。
クライアント認証を必須(VerifyClient)とするのと、クライアント証明書を指定(SSLCACertificateFile)します。

SSLVerifyClient require
SSLCACertificateFile /root/work/client/client-ca.crt

# service httpd restart

これで、サーバ側の設定は完了です。
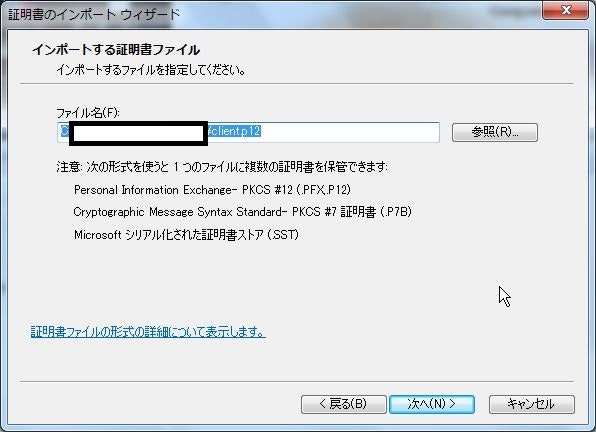
証明書のインポート
ここからは、端末側(Windows7)での設定となります。
IEで証明書のインポートの実施方法を説明します。基本的には流れにそっていくだけで大丈夫です。
まずは、作成したクライアント証明書(client.p12)をダウンロードし、デスクトップにおいて証明書をダブルクリック。

案内に沿ってインストール。

設定したパスワードを入力。

証明書ストアは、「個人」に置くのがいいでしょう。


完了。IEで「インターネットオプション」-「コンテンツ」-「証明書」を選択すると、証明書がインストールされていることが確認できます。

Zabbixサーバへのアクセス。
Zabbixサーバへアクセスすると、クライアント証明書の利用が表示されます。
「OK」を押せば次に進み、ログインができるようになります。

なお、クライアント証明書が入っていないと、以下のような画面が表示されます。

スマホへクライアント証明書を導入(が、うまくいかず)。
スマホにクライアント証明書をインストールします。これはスマホに依存するので、あくまで参考程度にしてください。私のスマホはXperiaです。
「設定」-「セキュリティ」-「内部ストレージかSDカードからインストール」を選択します。

ダウンロードした証明書ファイルを選択します。

パスワードを入力します。

証明書名を入力します。

が、「信頼できる認証情報」を確認しても、証明書が確認できない。アプリ(AndZabbixLite)でアクセスしても、当然エラーが表示される。

今後の課題
スマホへのクライアント証明書の導入し、アプリ(AndZabbixLite)でアクセス。