はじめに
iOS基本アプリ「写真」は写真を選択すると拡大しpresentできます。このようにしたい、もしくはこれを応用すればいろんなアニメーション作りたいときに参考にしてください。ネット上では様々なサンプルがたくさんありますが、自分なりに理解している部分をメモしました。
今回の説明
- CollectionViewからCellを選択する、選択イメージが拡大されながら遷移する。
- イメージ表示画面から閉じるボタンをタップし、CollectionViewへ縮小しながら閉じる。
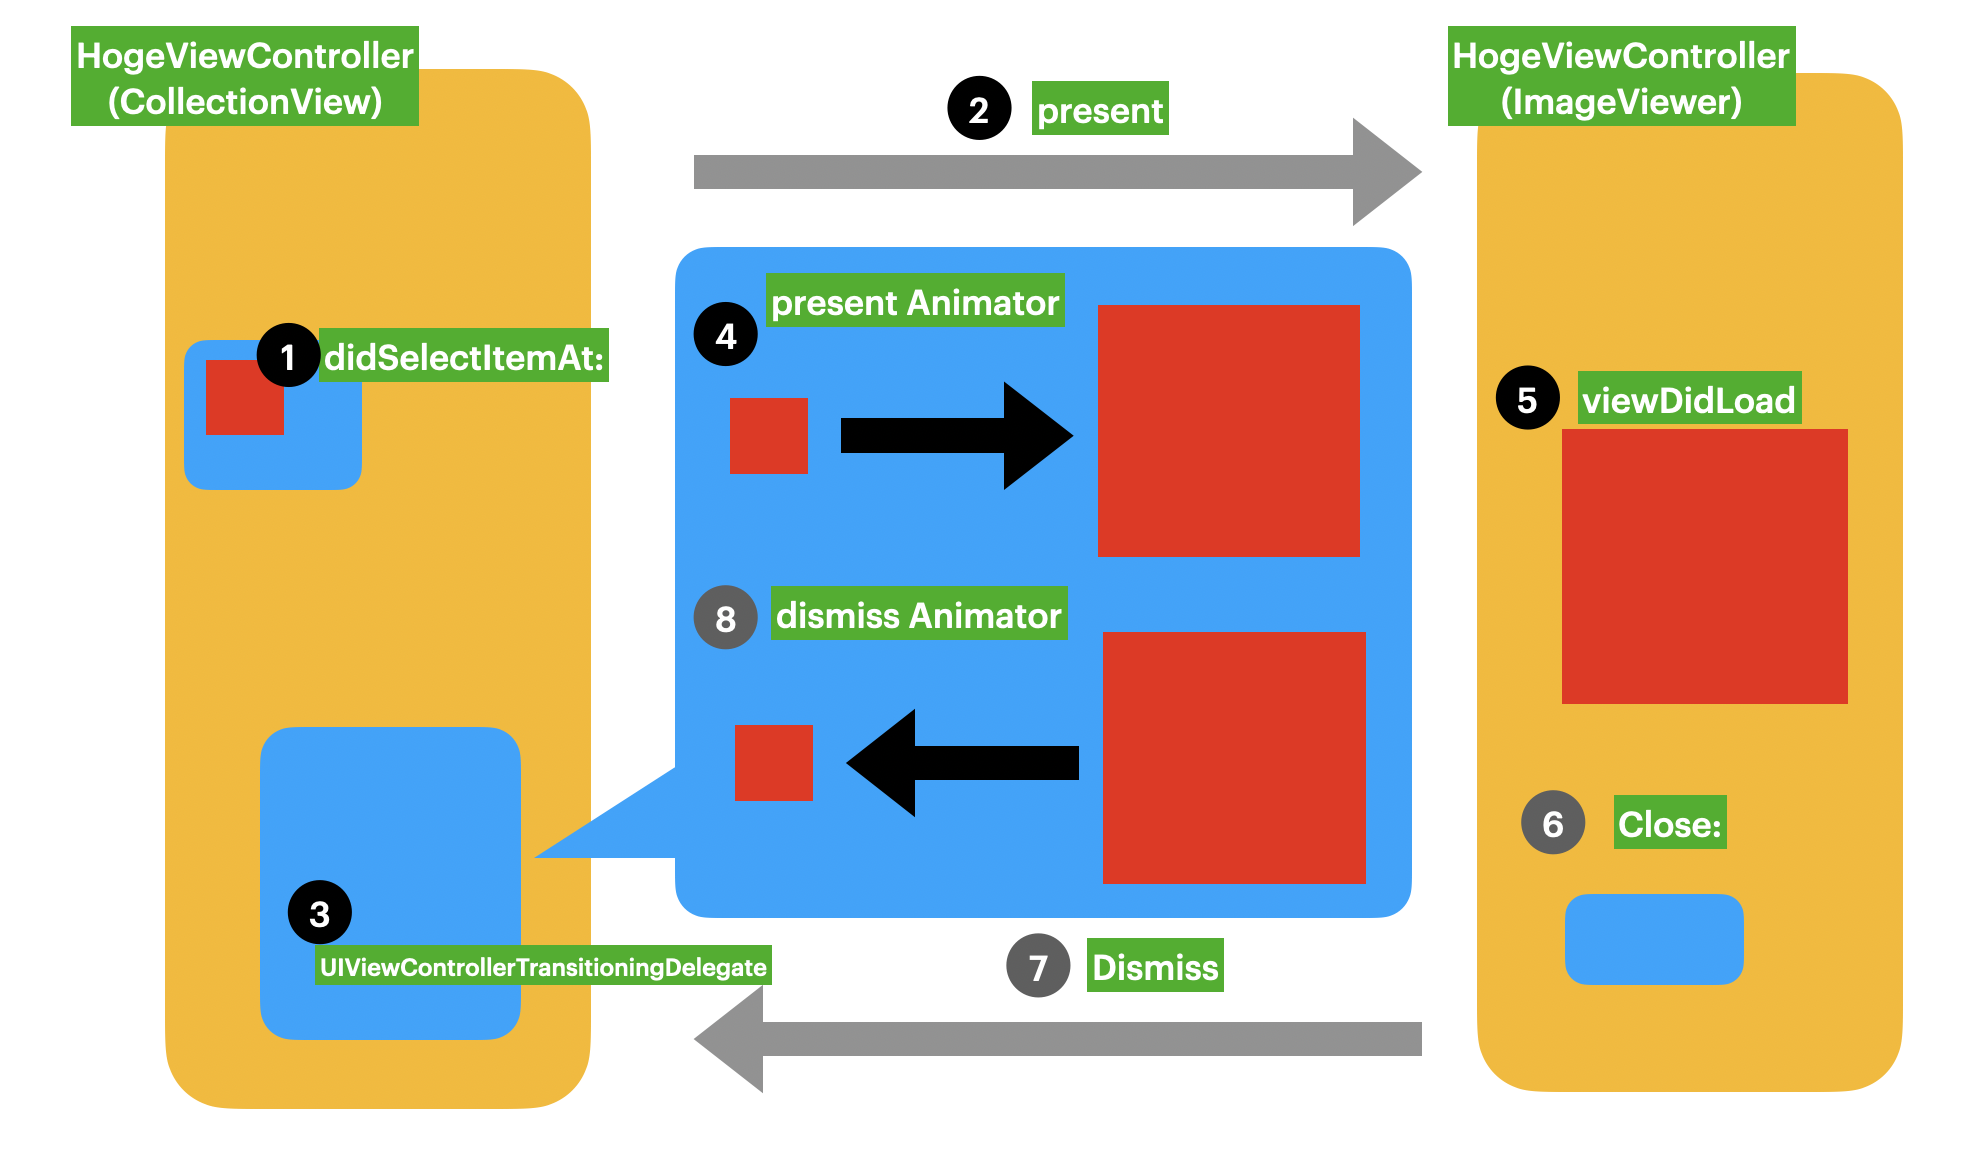
処理するイメージはこんな感じ。
登場人物(クラス、デリゲート) *図の説明
HogeViewController
CollectionViewをもつViewController。以下を用意します。
- 選択したセルの変数
- 選択したイメージのスナップショット変数
- 遷移処理
HogeViewController : TransitioningDelegate
遷移する際に必要なAnimatorインスタンス生成処理定義します。
- presentの時のAnimator生成ファクトリメソッド
- dismissの時のAnimator生成ファクトリメソッド
Animator: NSObject, UIViewControllerAnimatedTransitioning
実際にアニメーション処理が定義されている。主にアニメーションするイメージを取得し、アニメーション処理を行う。
アニメーションをカスタマイズしたいならこのクラスを修正することになる。
- 遷移元、遷移先のViewControllerのインスタンスを持っている
- 遷移元のスナップショットをもっている
FugaViewController
閉じる処理、特に何もすることはない。
コードから説明
func collectionView(_ collectionView: UICollectionView, didSelectItemAt indexPath: IndexPath) {
        // 選択されているセル情報をインスタンス変数に保存
        selectedCell = collectionView.cellForItem(at: indexPath) as? CollectionViewCell
        // 選択されているイメージ(アニメーション対象)情報をインスタンス変数に保存
        selectedCellImageViewSnapshot = selectedCell?.locationImageView.snapshotView(afterScreenUpdates: false)

        // 遷移処理
        let fugaViewController = UIStoryboard(name: "Main", bundle: nil).instantiateViewController(withIdentifier: "FugaViewController") as! FugaViewController

        // 遷移アニメーションプロトコールを委任
        fugaViewController.transitioningDelegate = self

        fugaViewController.modalPresentationStyle = .fullScreen
        fugaViewController.data = data
        present(fugaViewController, animated: true)
    }
// プロトコールメソッドの処理を定義
extension HogeViewController: UIViewControllerTransitioningDelegate {

    // presentをする時のAnimatorのインスタンスを生成
    func animationController(forPresented presented: UIViewController, presenting: UIViewController, source: UIViewController) -> UIViewControllerAnimatedTransitioning? {

     // 要確認: プロジェクトの構造により、ターゲットのViewControllerが違う場合があるため、デバックで確認しターゲットViewControllerを確認する必要がある。
       // もし、取得できなかったら修正が必要。(ターゲットが違う場合、エラーは発生しないが、アニメーションはしない。)
        guard let hogeViewController = presenting as? HogetViewController,
            let fugaViewController = presented as? FugaViewController,
            let selectedCellImageViewSnapshot = selectedCellImageViewSnapshot
            else { return nil }

        animator = Animator(type: .present, hogeViewController: hogeViewController, fugaViewController: fugaViewController, selectedCellImageViewSnapshot: selectedCellImageViewSnapshot)
        return animator
    }

    // dismissをする時のAnimatorのインスタンスを生成
    func animationController(forDismissed dismissed: UIViewController) -> UIViewControllerAnimatedTransitioning? {
        // // 要確認: プロジェクトの構造により、ターゲットのViewControllerが違う場合があるため、デバックで確認しターゲットViewControllerを確認する必要がある。presentと同様な対応が必要。
        guard let fugaViewController = dismissed as? FugaViewController,
            let selectedCellImageViewSnapshot = selectedCellImageViewSnapshot
            else { return nil }

        animator = Animator(type: .dismiss,  hogeViewController: self, fugaViewController: fugaViewController, selectedCellImageViewSnapshot: selectedCellImageViewSnapshot)
        return animator
    }
}
enum PresentationType {

    case present
    case dismiss

    var isPresenting: Bool {
        return self == .present
    }
}
// 実際のアニメーション処理を定義する。
final class Animator: NSObject, UIViewControllerAnimatedTransitioning {

    // アニメーションインターバル
    static let duration: TimeInterval = 1.25

    // 遷移元、遷移先の両方のインスタンス変数、また遷移元のスナップショット変数
    private let type: PresentationType
    private let hogeViewController: HogeViewController
    private let hugaViewController: FugaViewController
    private var selectedCellImageViewSnapshot: UIView

    // 遷移元の座標情報
    private let cellImageViewRect: CGRect
    private let cellLabelRect: CGRect

    // インスタンス生成
    init?(type: PresentationType, hogeViewController: HogeViewController, fugaViewController: FugaViewController, selectedCellImageViewSnapshot: UIView) {
        self.type = type
        self.hogeViewController = hogeViewController
        self.fugaViewController = fugaViewController
        self.selectedCellImageViewSnapshot = selectedCellImageViewSnapshot

        guard let window = hogeViewController.view.window ?? fugaViewController.view.window,
            let selectedCell = hogeViewController.selectedCell
            else { return nil }

        // 遷移元の座標情報を取得
        self.cellImageViewRect = selectedCell.locationImageView.convert(selectedCell.locationImageView.bounds, to: window)

        // これも遷移元の座標情報
        self.cellLabelRect = selectedCell.locationLabel.convert(selectedCell.locationLabel.bounds, to: window)
    }

    // インターバル
    func transitionDuration(using transitionContext: UIViewControllerContextTransitioning?) -> TimeInterval {
        return Self.duration
    }

    // 遷移の際にアニメーションする内容を定義
    func animateTransition(using transitionContext: UIViewControllerContextTransitioning) {

// アニメーションするビュー
        let containerView = transitionContext.containerView

        // 遷移先のビューを貼り付ける
        guard let toView = fugaViewController.view
            else {
                transitionContext.completeTransition(false)
                return
        }

        containerView.addSubview(toView)

        // 遷移元、遷移先のアニメーションするターゲットのスナップショットを取得する。
        guard
            let selectedCell = hogeViewController.selectedCell,
            let window = hogeViewController.view.window ?? fugaViewController.view.window,
            let cellImageSnapshot = selectedCell.locationImageView.snapshotView(afterScreenUpdates: true),
            let controllerImageSnapshot = fugaViewController.locationImageView.snapshotView(afterScreenUpdates: true),
            let cellLabelSnapshot = selectedCell.locationLabel.snapshotView(afterScreenUpdates: true),
            let closeButtonSnapshot = fugaViewController.closeButton.snapshotView(afterScreenUpdates: true)
            else {
                transitionContext.completeTransition(true)
                return
        }

        let isPresenting = type.isPresenting

        // アニメーション終了後処理
        let backgroundView: UIView
        let fadeView = UIView(frame: containerView.bounds)
        fadeView.backgroundColor =  fugaViewController.view.backgroundColor

        // presentアニメーション
        if isPresenting {
            selectedCellImageViewSnapshot = cellImageSnapshot

            backgroundView = UIView(frame: containerView.bounds)
            backgroundView.addSubview(fadeView)
            fadeView.alpha = 0
        } else {
           // dismissアニメーション
            backgroundView = hogeViewController.view.snapshotView(afterScreenUpdates: true) ?? fadeView
            backgroundView.addSubview(fadeView)
        }

        // アニメーション処理
        toView.alpha = 0
        [backgroundView, selectedCellImageViewSnapshot, controllerImageSnapshot, cellLabelSnapshot, closeButtonSnapshot].forEach { containerView.addSubview($0) }

        let controllerImageViewRect = fugaViewController.locationImageView.convert(fugaViewController.locationImageView.bounds, to: window)
        let controllerLabelRect = fugaViewController.locationLabel.convert(fugaViewController.locationLabel.bounds, to: window)
        let closeButtonRect = fugaViewController.closeButton.convert(fugaViewController.closeButton.bounds, to: window)

        [selectedCellImageViewSnapshot, controllerImageSnapshot].forEach {
            $0.frame = isPresenting ? cellImageViewRect : controllerImageViewRect
            $0.layer.cornerRadius = isPresenting ? 12 : 0
            $0.layer.masksToBounds = true
        }

        controllerImageSnapshot.alpha = isPresenting ? 0 : 1
        selectedCellImageViewSnapshot.alpha = isPresenting ? 1 : 0
        cellLabelSnapshot.frame = isPresenting ? cellLabelRect : controllerLabelRect
        closeButtonSnapshot.frame = closeButtonRect
        closeButtonSnapshot.alpha = isPresenting ? 0 : 1

        UIView.animateKeyframes(withDuration: Self.duration, delay: 0, options: .calculationModeCubic, animations: {

            UIView.addKeyframe(withRelativeStartTime: 0, relativeDuration: 1) {
                self.selectedCellImageViewSnapshot.frame = isPresenting ? controllerImageViewRect : self.cellImageViewRect
                controllerImageSnapshot.frame = isPresenting ? controllerImageViewRect : self.cellImageViewRect
                fadeView.alpha = isPresenting ? 1 : 0
                cellLabelSnapshot.frame = isPresenting ? controllerLabelRect : self.cellLabelRect
                [controllerImageSnapshot, self.selectedCellImageViewSnapshot].forEach {
                    $0.layer.cornerRadius = isPresenting ? 0 : 12
                }
            }
            UIView.addKeyframe(withRelativeStartTime: 0, relativeDuration: 0.6) {
                self.selectedCellImageViewSnapshot.alpha = isPresenting ? 0 : 1
                controllerImageSnapshot.alpha = isPresenting ? 1 : 0
            }
            UIView.addKeyframe(withRelativeStartTime: isPresenting ? 0.7 : 0, relativeDuration: 0.3) {
                closeButtonSnapshot.alpha = isPresenting ? 1 : 0
            }
        }, completion: { _ in
            // アニメーション終了後、削除
            self.selectedCellImageViewSnapshot.removeFromSuperview()
            controllerImageSnapshot.removeFromSuperview()

            backgroundView.removeFromSuperview()
            cellLabelSnapshot.removeFromSuperview()
            closeButtonSnapshot.removeFromSuperview()
            toView.alpha = 1

            transitionContext.completeTransition(true)
        })
    }
}
参考URL
下記のURLのソースみながら練習したため、クラス名を変えた説明になっています。
(FirstViewControllerをHogeViewController、SecondViewControllerをFugaViewControllerにしています。)
英語が得意な方は下記のリンクをご参考ください。
https://github.com/tungfam/CustomTransitionTutorial
