概要
耳鼻咽喉科の開業医をしています。
花粉症の患者さんに使ってもらえるような花粉飛散情報が分かるカレンダーアプリを作りたいと思っています。
前回カレンダーを表示して予定を入れるところまで挑戦してみました。
Vue.js×FullCallendarでカレンダー作成(花粉カレンダー作成①)
今回はユーザー個別のカレンダーを表示するために、ユーザー認証機能の実装に挑戦しました。
完成動画
作成
こちらの記事を参考にさせていただきました。ありがとうございました。
Auth0 + GitHub Pagesでミニマムなログインサンプルを作る
ファイル一つコピペで試すAuth0+Vue.jsのログインサンプル
1. Auth0のアカウント作成・サインイン
こちらから行ってください。
Auth0ホームページ
2.アプリケーションの作成
[Applications]>[Settings]のタブに移動し、
Allowed Callback URLs、Allowed Logout URLsを以下に設定します。
http://localhost:8080/#/calendar
Allowed Web Origins、Allowed Origins (CORS)を以下に設定します。
http://localhost:8080
DomainとClient IDは後で使うのでひかえておきます。

3.ユーザー認証の実装
以前作成したCalendar.vueに書き込んでいきます。
Vue.js×FullCallendarでWEBカレンダー作成(花粉カレンダー作成①)
templateタグの中に以下を追加していきます。
<button id="btn-login" v-on:click="auth0login()">Log in</button>
        <button id="btn-logout" v-on:click="auth0logout()">Log out</button>

        <div v-if="login" id="gated-content">
          <p>
            You're seeing this content because you're currently
          </p>
          <label>
              User profile Image:
              <img :src="userData.picture" id="ipt-user-profile-image" width="200px">
              <br />
          </label>
          <label>
            User profile:
            <pre id="ipt-user-profile">{{userData}}</pre>
          </label>

          <label>
            Access token:
            <pre id="ipt-access-token">{{userData.token}}</pre>
          </label>
        </div>
ログイン後にカレンダーが表示されるようにします。
 <div v-if="login">
        <FullCalendar
    default-view="dayGridMonth"
    :locale="locale"
    :header="calendarHeader"
    :weekends="calendarWeekends"
    :plugins="calendarPlugins"
    :events="calendarEvents"
    @dateClick="handleDateClick"
  />
  </div>
scriptタグの内に以下を書き込んでいきます。
import createAuth0Client from '@auth0/auth0-spa-js';
data(){ }の中に以下を追記します。
data() {
    return {
      auth0:{},
      APP_PATH:'/#/calendar',
      userData:{},
      login:false,
    }
}
methods: { }の中に以下を追記します。
async updateUI(){
        const isAuthenticated = await this.auth0.isAuthenticated();
        if (isAuthenticated) {
            this.login = true; //ログイン後の情報が表示
            this.userData = await this.auth0.getUser();
            this.userData.token = await this.auth0.getTokenSilently();
        }
    },
    async auth0login(){
        await this.auth0.loginWithRedirect({
            redirect_uri: window.location.origin + this.APP_PATH
        });
    },
    auth0logout(){
        this.auth0.logout({
            returnTo: window.location.origin + this.APP_PATH
        });
    },
最後にこちらを追記して完了です。
async created() {
    this.auth0 = await createAuth0Client({
      domain: 'domain名を記載',
      client_id: 'client_idを記載',
      // redirect_uri: '<MY_CALLBACK_URL>'
    });
    this.updateUI();
    const isAuthenticated = await this.auth0.isAuthenticated();
    if (isAuthenticated) {
        return;
    }
    const query = window.location.search;
    if (query.includes("code=") && query.includes("state=")) {

        // Process the login state
        await this.auth0.handleRedirectCallback();

        this.updateUI();

        // Use replaceState to redirect the user away and remove the querystring parameters
        window.history.replaceState({}, document.title, this.APP_PATH);
    }
}
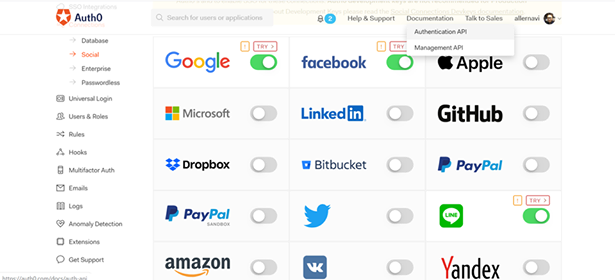
Auth0でユーザー認証を入れたいところをONにします。
考察
最初は参考記事のコピペで出来るかな?と軽く考えていました。しかし、vue.jsを全く勉強していなかったのですこし時間がかかってしまいました。追記する場所が分かればこれだけで面倒なユーザー認証が実装できるので便利ですね。